Manage inputs and outputs for components and pipelines
Azure Machine Learning pipelines support inputs and outputs at both the component and pipeline levels. This article describes pipeline and component inputs and outputs and how to manage them.
At the component level, the inputs and outputs define the component interface. You can use the output from one component as an input for another component in the same parent pipeline, allowing for data or models to be passed between components. This interconnectivity represents the data flow within the pipeline.
At the pipeline level, you can use inputs and outputs to submit pipeline jobs with varying data inputs or parameters, such as learning_rate. Inputs and outputs are especially useful when you invoke a pipeline via a REST endpoint. You can assign different values to the pipeline input or access the output of different pipeline jobs. For more information, see Create jobs and input data for batch endpoints.
Input and output types
The following types are supported as both inputs and outputs of components or pipelines:
Data types. For more information, see Data types.
uri_fileuri_foldermltable
Model types.
mlflow_modelcustom_model
The following primitive types are also supported for inputs only:
- Primitive types
stringnumberintegerboolean
Primitive type output isn't supported.
Example inputs and outputs
These examples are from the NYC Taxi Data Regression pipeline in the Azure Machine Learning examples GitHub repository.
- The train component has a
numberinput namedtest_split_ratio. - The prep component has a
uri_foldertype output. The component source code reads the CSV files from the input folder, processes the files, and writes the processed CSV files to the output folder. - The train component has a
mlflow_modeltype output. The component source code saves the trained model using themlflow.sklearn.save_modelmethod.
Output serialization
Using data or model outputs serializes the outputs and saves them as files in a storage location. Later steps can access the files during job execution by mounting this storage location or by downloading or uploading the files to the compute file system.
The component source code must serialize the output object, which is usually stored in memory, into files. For example, you could serialize a pandas dataframe into a CSV file. Azure Machine Learning doesn't define any standardized methods for object serialization. You have the flexibility to choose your preferred methods to serialize objects into files. In the downstream component, you can choose how to deserialize and read these files.
Data type input and output paths
For data asset inputs and outputs, you must specify a path parameter that points to the data location. The following table shows the supported data locations for Azure Machine Learning pipeline inputs and outputs, with path parameter examples.
| Location | Input | Output | Example |
|---|---|---|---|
| A path on your local computer | ✓ | ./home/<username>/data/my_data |
|
| A path on a public http/s server | ✓ | https://raw.githubusercontent.com/pandas-dev/pandas/main/doc/data/titanic.csv |
|
| A path on Azure Storage | * | wasbs://<container_name>@<account_name>.blob.core.windows.net/<path>or abfss://<file_system>@<account_name>.dfs.core.windows.net/<path> |
|
| A path on an Azure Machine Learning datastore | ✓ | ✓ | azureml://datastores/<data_store_name>/paths/<path> |
| A path to a data asset | ✓ | ✓ | azureml:my_data:<version> |
* Using Azure Storage directly isn't recommended for input, because it might need extra identity configuration to read the data. It's better to use Azure Machine Learning datastore paths, which are supported across various pipeline job types.
Data type input and output modes
For data type inputs and outputs, you can choose from several download, upload, and mount modes to define how the compute target accesses data. The following table shows the supported modes for different types of inputs and outputs.
| Type | upload |
download |
ro_mount |
rw_mount |
direct |
eval_download |
eval_mount |
|---|---|---|---|---|---|---|---|
uri_folder input |
✓ | ✓ | ✓ | ||||
uri_file input |
✓ | ✓ | ✓ | ||||
mltable input |
✓ | ✓ | ✓ | ✓ | ✓ | ||
uri_folder output |
✓ | ✓ | |||||
uri_file output |
✓ | ✓ | |||||
mltable output |
✓ | ✓ | ✓ |
The ro_mount or rw_mount modes are recommended for most cases. For more information, see Modes.
Inputs and outputs in pipeline graphs
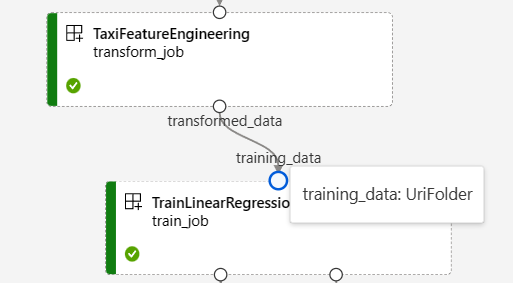
On the pipeline job page in Azure Machine Learning studio, component inputs and outputs appear as small circles called input/output ports. These ports represent the data flow in the pipeline. Pipeline level output is displayed in purple boxes for easy identification.
The following screenshot from the NYC Taxi Data Regression pipeline graph shows many component and pipeline inputs and outputs.

When you hover over an input/output port, the type is displayed.
The pipeline graph doesn't display primitive type inputs. These inputs appear on the Settings tab of the pipeline Job overview panel for pipeline level inputs, or the component panel for component level inputs. To open the component panel, double-click the component in the graph.

When you edit a pipeline in the studio Designer, pipeline inputs and outputs are in the Pipeline interface panel, and component inputs and outputs are in the component panel.

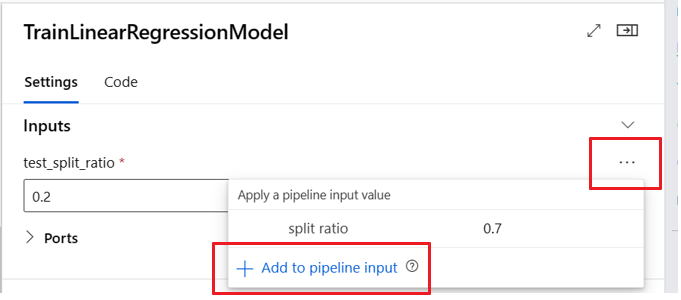
Promote component inputs/outputs to pipeline level
Promoting a component's input/output to the pipeline level lets you overwrite the component's input/output when you submit a pipeline job. This ability is especially useful for triggering pipelines by using REST endpoints.
The following examples show how to promote component level inputs/outputs to pipeline level inputs/outputs.
The following pipeline promotes three inputs and three outputs to the pipeline level. For example, pipeline_job_training_max_epocs is pipeline level input because it's declared under the inputs section on the root level.
Under train_job in the jobs section, the input named max_epocs is referenced as ${{parent.inputs.pipeline_job_training_max_epocs}}, meaning that the train_job's max_epocs input references the pipeline level pipeline_job_training_max_epocs input. Pipeline output is promoted by using the same schema.
$schema: https://azuremlschemas.azureedge.net/latest/pipelineJob.schema.json
type: pipeline
display_name: 1b_e2e_registered_components
description: E2E dummy train-score-eval pipeline with registered components

inputs:
  pipeline_job_training_max_epocs: 20
  pipeline_job_training_learning_rate: 1.8
  pipeline_job_learning_rate_schedule: 'time-based'

outputs:
  pipeline_job_trained_model:
    mode: upload
  pipeline_job_scored_data:
    mode: upload
  pipeline_job_evaluation_report:
    mode: upload

settings:
 default_compute: azureml:cpu-cluster

jobs:
  train_job:
    type: command
    component: azureml:my_train@latest
    inputs:
      training_data:
        type: uri_folder
        path: ./data
      max_epocs: ${{parent.inputs.pipeline_job_training_max_epocs}}
      learning_rate: ${{parent.inputs.pipeline_job_training_learning_rate}}
      learning_rate_schedule: ${{parent.inputs.pipeline_job_learning_rate_schedule}}
    outputs:
      model_output: ${{parent.outputs.pipeline_job_trained_model}}
    services:
      my_vscode:
        type: vs_code
      my_jupyter_lab:
        type: jupyter_lab
      my_tensorboard:
        type: tensor_board
        log_dir: "outputs/tblogs"
    #  my_ssh:
    #    type: tensor_board
    #    ssh_public_keys: <paste the entire pub key content>
    #    nodes: all # Use the `nodes` property to pick which node you want to enable interactive services on. If `nodes` are not selected, by default, interactive applications are only enabled on the head node.

  score_job:
    type: command
    component: azureml:my_score@latest
    inputs:
      model_input: ${{parent.jobs.train_job.outputs.model_output}}
      test_data:
        type: uri_folder
        path: ./data
    outputs:
      score_output: ${{parent.outputs.pipeline_job_scored_data}}

  evaluate_job:
    type: command
    component: azureml:my_eval@latest
    inputs:
      scoring_result: ${{parent.jobs.score_job.outputs.score_output}}
    outputs:
      eval_output: ${{parent.outputs.pipeline_job_evaluation_report}}
You can find the full example at train-score-eval pipeline with registered components in the Azure Machine Learning examples repository.
Define optional inputs
By default, all inputs are required and must either have a default value or be assigned a value each time you submit a pipeline job. However, you can define an optional input.
Note
Optional outputs aren't supported.
Setting optional inputs can be useful in two scenarios:
If you define an optional data/model type input and don't assign a value to it when you submit the pipeline job, the pipeline component lacks that data dependency. If the component's input port isn't linked to any component or data/model node, the pipeline invokes the component directly instead of waiting for a preceding dependency.
If you set
continue_on_step_failure = Truefor the pipeline butnode2uses required input fromnode1,node2doesn't execute ifnode1fails. Ifnode1input is optional,node2executes even ifnode1fails. The following graph demonstrates this scenario.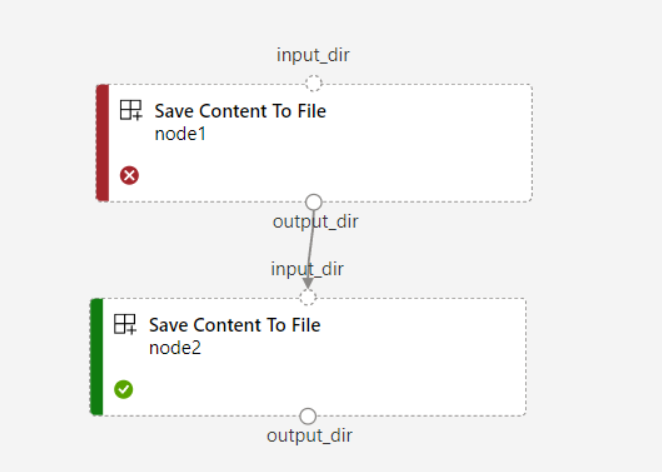
The following code example shows how to define optional input. When the input is set as optional = true, you must use $[[]] to embrace the command line inputs, as in the highlighted lines of the example.
$schema: https://azuremlschemas.azureedge.net/latest/commandComponent.schema.json
name: train_data_component_cli
display_name: train_data
description: A example train component
tags:
  author: azureml-sdk-team
type: command
inputs:
  training_data:
    type: uri_folder
  max_epocs:
    type: integer
    optional: true
  learning_rate:
    type: number
    default: 0.01
    optional: true
  learning_rate_schedule:
    type: string
    default: time-based
    optional: true
outputs:
  model_output:
    type: uri_folder
code: ./train_src
environment: azureml://registries/azureml/environments/sklearn-1.5/labels/latest
command: >-
  python train.py
  --training_data ${{inputs.training_data}}
  $[[--max_epocs ${{inputs.max_epocs}}]]
  $[[--learning_rate ${{inputs.learning_rate}}]]
  $[[--learning_rate_schedule ${{inputs.learning_rate_schedule}}]]
  --model_output ${{outputs.model_output}}

Customize output paths
By default, component output is stored in the {default_datastore} you set for the pipeline, azureml://datastores/${{default_datastore}}/paths/${{name}}/${{output_name}}. If not set, the default is the workspace blob storage.
Job {name} is resolved at job execution time, and {output_name} is the name you defined in the component YAML. You can customize where to store the output by defining an output path.
The pipeline.yml file at train-score-eval pipeline with registered components example defines a pipeline that has three pipeline level outputs. You can use the following command to set custom output paths for the pipeline_job_trained_model output.
# define the custom output path using datastore uri
# add relative path to your blob container after "azureml://datastores/<datastore_name>/paths"
output_path="azureml://datastores/{datastore_name}/paths/{relative_path_of_container}"

# create job and define path using --outputs.<outputname>
az ml job create -f ./pipeline.yml --set outputs.pipeline_job_trained_model.path=$output_path

Download outputs
You can download outputs at the pipeline or component level.
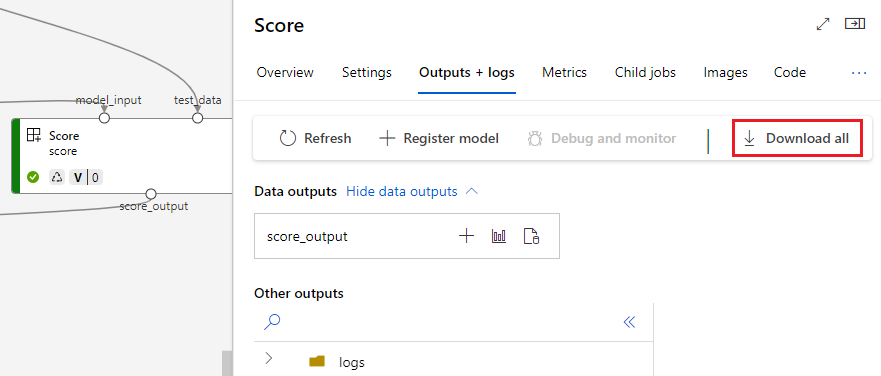
Download pipeline level outputs
You can download all the outputs of a job or download a specific output.
# Download all the outputs of the job
az ml job download --all -n <JOB_NAME> -g <RESOURCE_GROUP_NAME> -w <WORKSPACE_NAME> --subscription <SUBSCRIPTION_ID>

# Download a specific output
az ml job download --output-name <OUTPUT_PORT_NAME> -n <JOB_NAME> -g <RESOURCE_GROUP_NAME> -w <WORKSPACE_NAME> --subscription <SUBSCRIPTION_ID>

Download component outputs
To download the outputs of a child component, first list all child jobs of a pipeline job and then use similar code to download the outputs.
# List all child jobs in the job and print job details in table format
az ml job list --parent-job-name <JOB_NAME> -g <RESOURCE_GROUP_NAME> -w <WORKSPACE_NAME> --subscription <SUBSCRIPTION_ID> -o table

# Select the desired child job name to download output
az ml job download --all -n <JOB_NAME> -g <RESOURCE_GROUP_NAME> -w <WORKSPACE_NAME> --subscription <SUBSCRIPTION_ID>
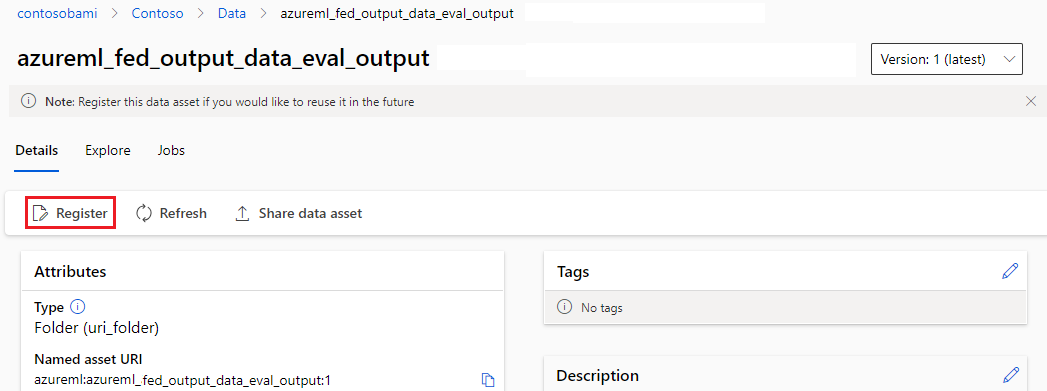
Register output as a named asset
You can register output of a component or pipeline as a named asset by assigning a name and version to the output. The registered asset can be listed in your workspace through the studio UI, CLI, or SDK and can be referenced in future workspace jobs.
Register pipeline level output
display_name: register_pipeline_output
type: pipeline
jobs:
  node:
    type: command
    inputs:
      component_in_path:
        type: uri_file
        path: https://dprepdata.blob.core.windows.net/demo/Titanic.csv
    component: ../components/helloworld_component.yml
    outputs:
      component_out_path: ${{parent.outputs.component_out_path}}
outputs:
  component_out_path:
    type: mltable
    name: pipeline_output  # Define name and version to register pipeline output
    version: '1'
settings:
  default_compute: azureml:cpu-cluster
Register component output
display_name: register_node_output
type: pipeline
jobs:
  node:
    type: command
    component: ../components/helloworld_component.yml
    inputs:
      component_in_path:
        type: uri_file
        path: 'https://dprepdata.blob.core.windows.net/demo/Titanic.csv'
    outputs:
      component_out_path:
        type: uri_folder
        name: 'node_output'  # Define name and version to register a child job's output
        version: '1'
settings:
  default_compute: azureml:cpu-cluster