Create a Standard logic app workflow from a prebuilt template
Applies to: Azure Logic Apps (Standard)
Azure Logic Apps gives you a faster way to start creating integration applications by providing prebuilt templates to use when you build Standard workflows in the Azure portal. These workflow templates follow commonly used patterns and help you streamline development because they offer a starting point or baseline with predefined business logic and configurations.
The following screenshot shows the templates gallery from which you can create a Standard workflow:

This how-to guide shows how to use a template to kickstart your workflow.
Limitations
Workflow templates are currently available only for Standard logic apps and single workflows.
Prerequisites
An Azure account and subscription. If you don't have a subscription, sign up for a free Azure account.
A Standard logic app resource. For more information, see Create an example Standard logic app workflow.
Access or sign-in credentials for each connection that the template creates for the workflow.
To authenticate access for connections that support using a managed identity, you need to set up your logic app resource and the managed identity with the necessary permissions.
A managed identity provides the best option for keeping your data secure because you don't need to provide account or user credentials to sign in. Azure manages this identity and removes the burden on you to rotate credentials, secrets, access tokens, and so on. The managed identity option also reduces security risks because unauthorized users don't have access to your sign-in details.
Before you can use a managed identity for authentication, you need to set up your logic app resource and the managed identity with the necessary permissions. For more information, see the following documentation:
Select a template from the gallery
In the Azure portal, open your Standard logic app resource.
On the logic app menu, under Workflows, select Workflows.
On the Workflows page toolbar, select Add > Add from Template, which opens the Templates gallery.
Browse the gallery or find the template you want by using the search box or filters.
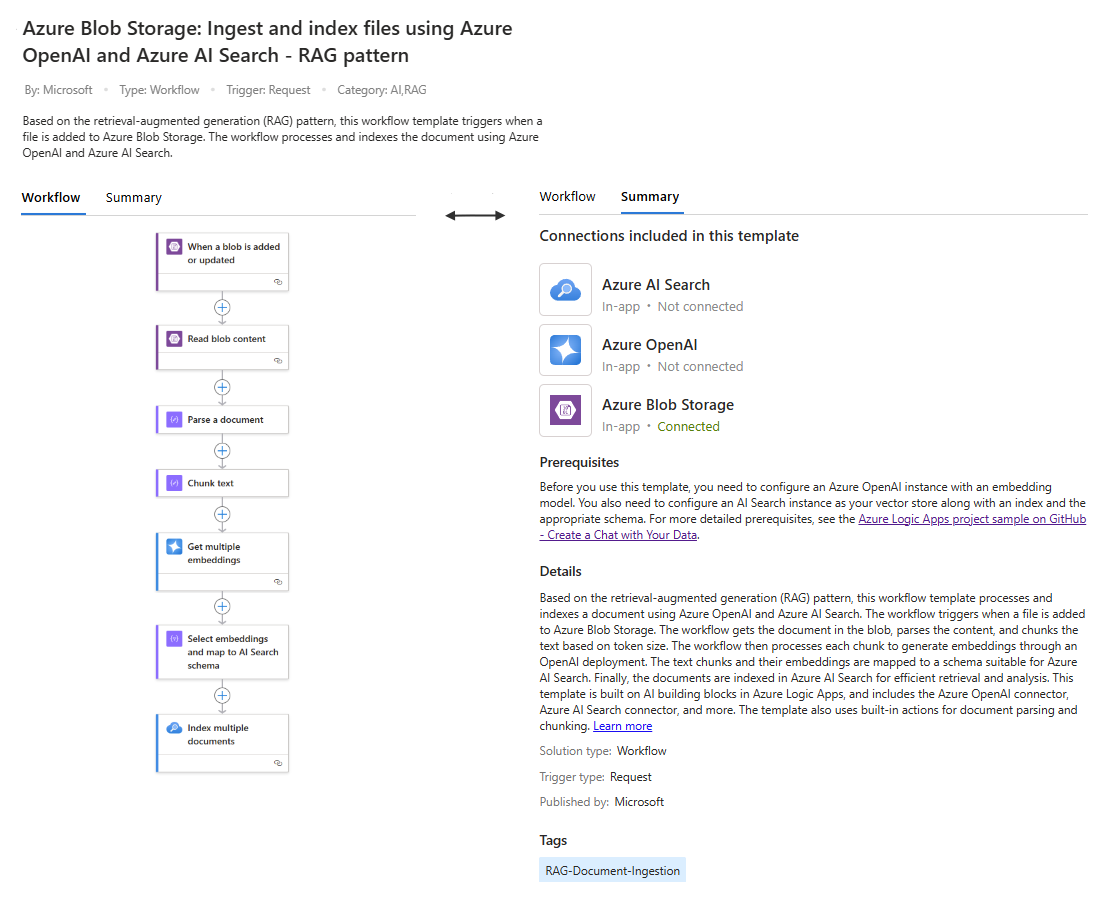
Select your template, which opens the templates overview pane, which summarizes the workflow's purpose.
The Workflow tab shows a preview for the workflow that the template creates.
The Summary tab shows more detailed information, such as any connections, prerequisites, and more information about the workflow.
The following example shows the Workflow tab and Summary tab for a template information pane:
Select Use this template.

Create connections for the workflow
After the Create a new workflow pane appears, the Connections tab lists any connections that the template needs to create.
To create each listed connection, in the Connection column, select Connect.
For each connection type, follow the prompts to provide the necessary connection information.
If a connection type supports using a managed identity to authenticate access, choose this option.
When you finish, select Next or the Parameters tab.
Enter values for action parameters
On the Parameters tab, provide the necessary values for various action parameters in the workflow.
The parameters on this tab vary, based on the actions that appear in the workflow template.
When you finish, select Next or the Name + state tab.
Provide other workflow information
On the Name + state tab, under Workflow name, provide the name to use for your workflow.
Under State type, select either Stateful or Stateless, which determines whether to record the run history, inputs, outputs, and other data for the workflow.
For more information, see Stateful and stateless workflows.
When you finish, select Next or the Review + create tab.
Review details and create workflow
On the Review + create tab, review all the provided information for your workflow.
When you're ready, select Create.
When Azure finishes creating your workflow, select Go to my workflow.
View the workflow in the designer
On the workflow menu, under Developer, select Designer to view the workflow.
Continue working on the workflow by adding or removing the operations that you want.
Make sure to provide the information necessary for each operation.