Test private endpoints by deploying Azure Load Testing in an Azure virtual network
In this article, learn how to test private application endpoints with Azure Load Testing. You create an Azure Load Testing resource and enable it to generate load from within your virtual network (virtual network injection).
This functionality enables the following usage scenarios:
- Generate load to an endpoint that is deployed in an Azure virtual network.
- Generate load to a public endpoint with access restrictions, such as restricting client IP addresses.
- Generate load to an on-premises service, not publicly accessible, that is connected to Azure via ExpressRoute.
Learn more about the scenarios for deploying Azure Load Testing in your virtual network.
The following diagram provides a technical overview:

When you start the load test, Azure Load Testing service injects the following Azure resources in the virtual network that contains the application endpoint:
- The test engine virtual machines. These VMs invoke your application endpoint during the load test.
- A public IP address.
- A network security group (NSG).
- An Azure Load Balancer.
These resources are ephemeral and exist only while the load test is running. If you have restrictions on the deployment of a public IP address, Azure load balancer, or network security group in your subnet, you can disable the deployment of these resources. For more information, see Configure your load test.
If you restrict access to your virtual network, you need to configure your virtual network to enable communication between these Azure Load Testing and the injected VMs.
Prerequisites
- Your Azure account has the Network Contributor role, or a parent of this role, on the virtual network. See Check access for a user to Azure resources to verify your permissions.
- The subnet you use for Azure Load Testing must have enough unassigned IP addresses to accommodate the number of load test engines for your test. Learn more about configuring your test for high-scale load.
- The subnet shouldn't be delegated to any other Azure service. For example, it shouldn't be delegated to Azure Container Instances (ACI). Learn more about subnet delegation.
- The subnet shouldn't have IPv6 enabled. Azure Load Testing doesn't support IPv6 enabled subnets. Learn more about IPv6 for Azure Virtual Network
- Azure CLI version 2.2.0 or later (if you're using CI/CD). Run
az --versionto find the version that's installed on your computer. If you need to install or upgrade the Azure CLI, see How to install the Azure CLI.
Configure virtual network
To test private endpoints, you connect Azure Load Testing to an Azure virtual network. The virtual network should have at least one subnet, and allow outbound traffic to the Azure Load Testing service.
If you don't have a virtual network yet, follow these steps to create an Azure virtual network in the Azure portal.
Important
The virtual network must be in the same subscription and the same region as the load testing resource.
Create a subnet
When you deploy Azure Load Testing in your virtual network, it's recommended to use separate subnets for Azure Load Testing and for the application endpoint. This approach enables you to configure network traffic access policies specifically for each purpose. Learn more about how to add a subnet to a virtual network.
(Optional) Configure traffic rules
Azure Load Testing requires that the injected VMs in your virtual network are allowed outbound access to the Azure Load Testing service. By default, when you create a virtual network, outbound access is already permitted.
If you plan to further restrict access to your virtual network with a network security group, or if you already have a network security group, you need to configure an outbound security rule to allow traffic from the test engine VMs to the Azure Load Testing service.
To configure outbound access for Azure Load Testing:
Sign in to the Azure portal.
Go to your network security group.
If you don't have an NSG yet, follow these steps to create a network security group.
Create the NSG in the same region as your virtual network, and then associate it with your subnet.
Select Outbound security rules in the left navigation.
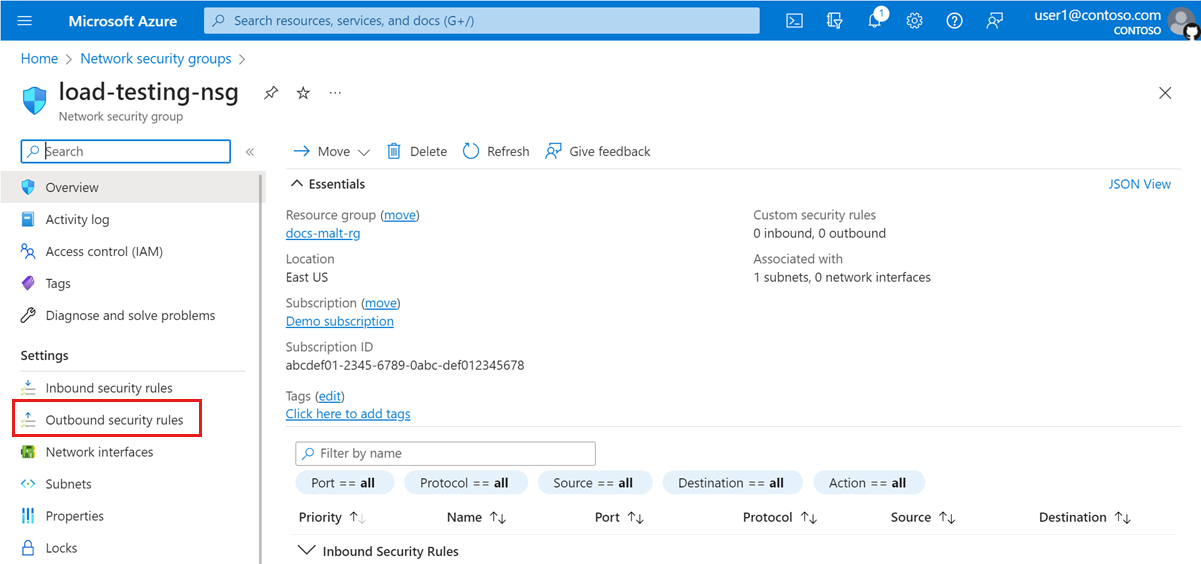
Select + Add, to add a new outbound security rule. Enter the following information to create a new rule.
Field Value Source Any Source port ranges * Destination Any Destination port ranges * Name azure-load-testing-outbound Description Used for various operations involved in orchestrating a load tests. Select Add to add the outbound security rule to the network security group.
Configure your load test script
The test engine VMs, which run the JMeter script, are injected in the virtual network that contains the application endpoint. You can now refer directly to the endpoint in the JMX file by using the private IP address or use name resolution in your network.
For example, for an endpoint with IP address 10.179.0.7, in a virtual network with subnet range 10.179.0.0/18, the JMX file could have this information:
<HTTPSamplerProxy guiclass="HttpTestSampleGui" testclass="HTTPSamplerProxy" testname="Internal service homepage" enabled="true">
  <elementProp name="HTTPsampler.Arguments" elementType="Arguments" guiclass="HTTPArgumentsPanel" testclass="Arguments" testname="Service homepage" enabled="true">
    <collectionProp name="Arguments.arguments"/>
  </elementProp>
  <stringProp name="HTTPSampler.domain">10.179.0.7</stringProp>
  <stringProp name="HTTPSampler.port">8081</stringProp>
  <stringProp name="HTTPSampler.protocol"></stringProp>
  <stringProp name="HTTPSampler.contentEncoding"></stringProp>
  <stringProp name="HTTPSampler.path"></stringProp>
  <stringProp name="HTTPSampler.method">GET</stringProp>
</HTTPSamplerProxy>
Configure your load test
To include privately hosted endpoints in your load test, you need to configure the virtual network settings for the load test. You can configure the virtual network settings in the Azure portal, or specify them in the YAML test configuration file for CI/CD pipelines.
Important
When you deploy Azure Load Testing in a virtual network, you'll incur additional charges. Azure Load Testing deploys an Azure Load Balancer and a Public IP address in your subscription and there might be a cost for generated traffic. For more information, see the Virtual Network pricing information.
Configure the virtual network in the Azure portal
You can specify the virtual network configuration settings in the load test creation/update wizard.
Sign in to the Azure portal by using the credentials for your Azure subscription.
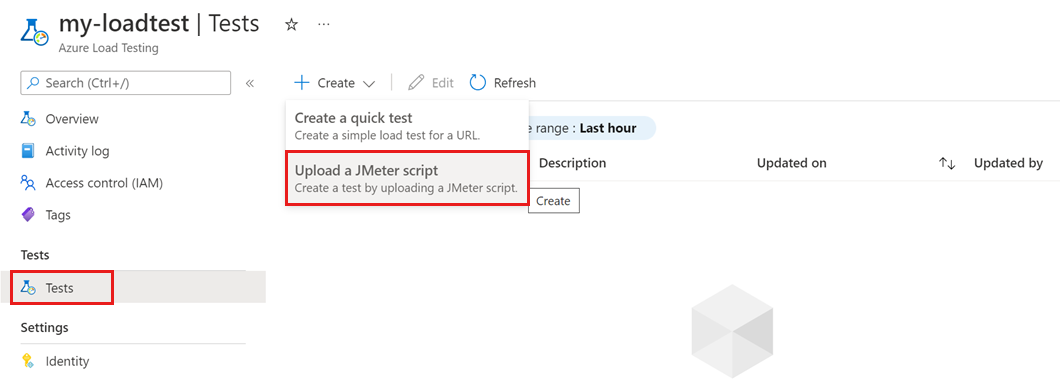
Go to your Azure Load Testing resource, and select Tests from the left pane.
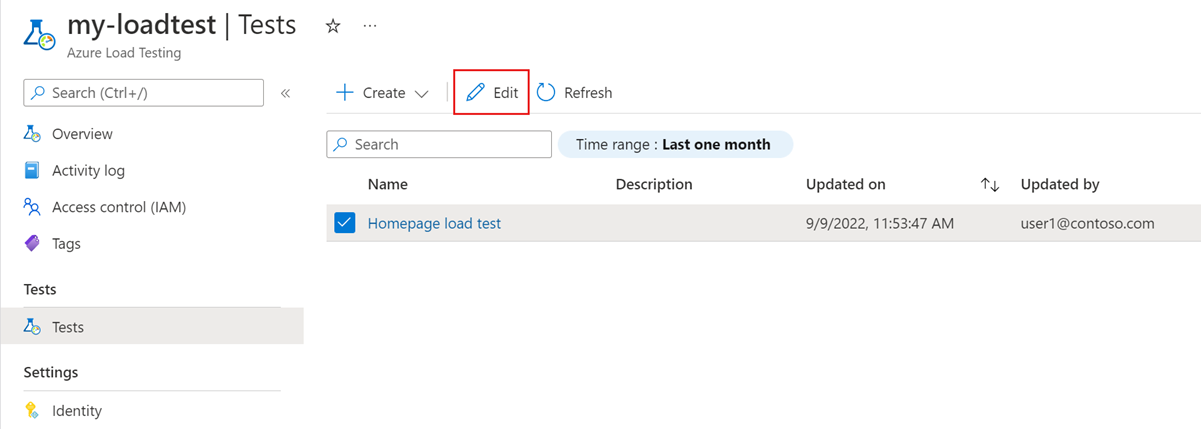
Open the load test creation/update wizard in either of two ways:
Select + Create > Upload a JMeter script, if you want to create a new test.
Select an existing test from the list, and then select Edit.
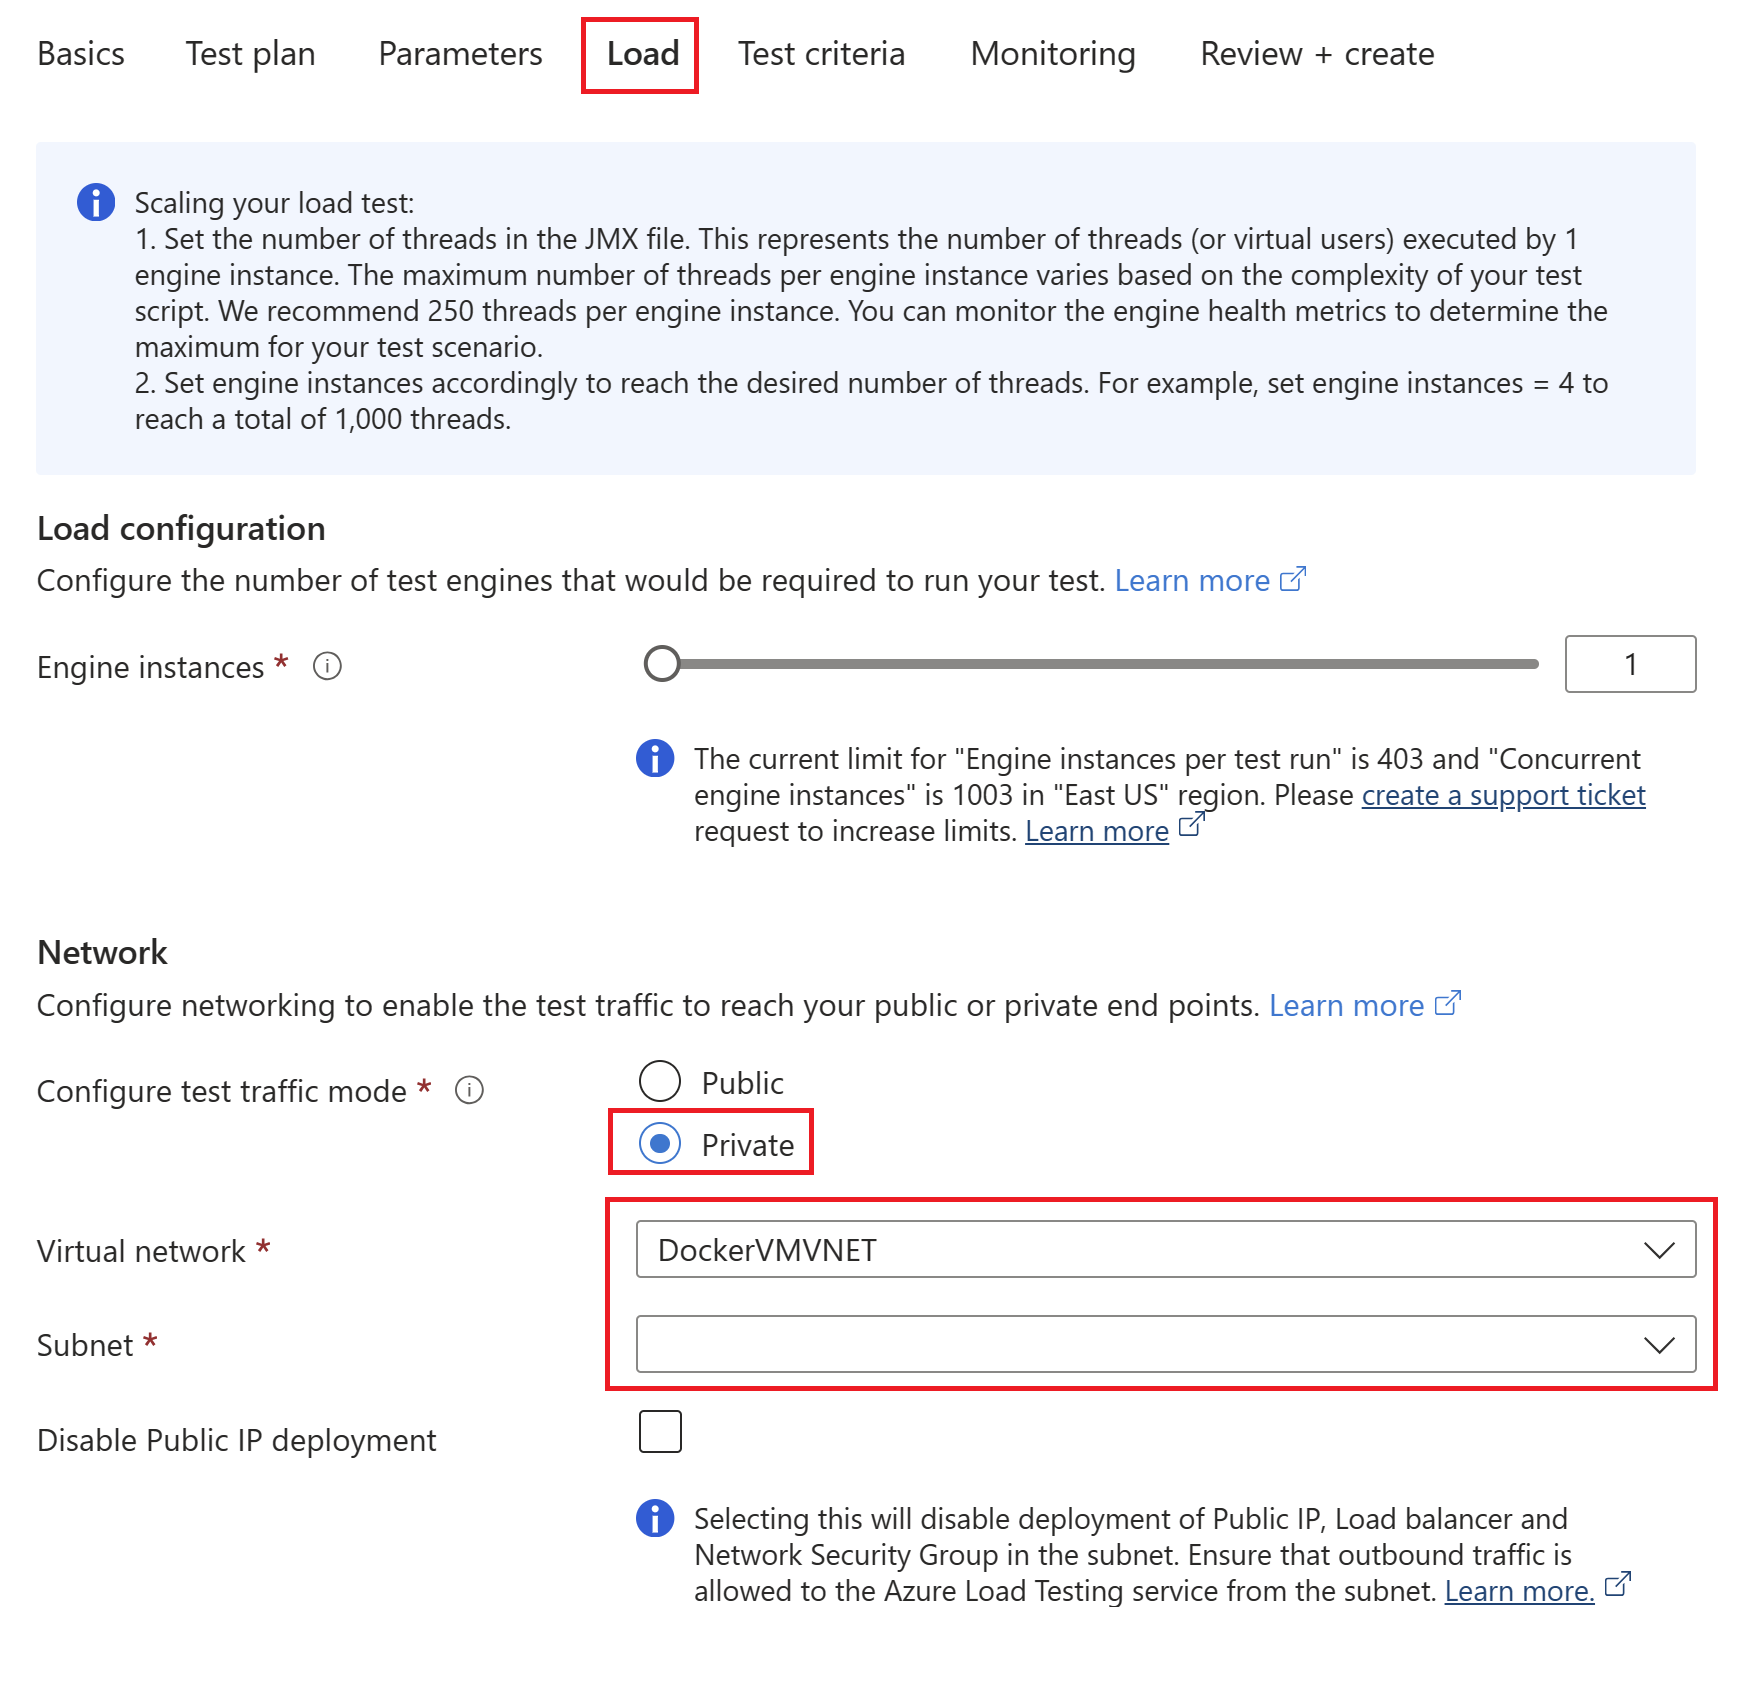
On the Load tab, select Private traffic mode, and then select your virtual network and subnet.
If you have multiple subnets in your virtual network, make sure to select the subnet that will host the injected test engine VMs.
Important
Make sure you have sufficient permissions for managing virtual networks. You require the Network Contributor role.
(Optional) Check Disable Public IP deployment if you don't want to deploy a public IP address, load balancer, and network security group in your subnet.
When you select this option, ensure that there is an alternative mechanism like Azure NAT Gateway, Azure Firewall, or a network virtual appliance (NVA) to enable outbound traffic routing from the subnet.
Review or fill the load test information. Follow these steps to create or manage a test.
Select Review + create and then Create (or Apply, when updating an existing test).
When the load test starts, Azure Load Testing injects the test engine VMs in your virtual network and subnet. The test script can now access the privately hosted application endpoint in your virtual network.
Configure the virtual network for CI/CD pipelines
To configure the load test with your virtual network settings, update the YAML test configuration file.
Open a terminal, and use the Azure CLI to sign in to your Azure subscription:
az login
az account set --subscription <your-Azure-Subscription-ID>
Retrieve the subnet ID and copy the resulting value:
az network vnet subnet show -g <your-resource-group> --vnet-name <your-vnet-name> --name <your-subnet-name> --query idOpen your YAML test configuration file in your favorite editor.
Add the
subnetIdproperty to the configuration file and provide the subnet ID you copied earlier:version: v0.1 testName: SampleTest testPlan: SampleTest.jmx description: 'Load test the website home page' engineInstances: 1 subnetId: <your-subnet-id> publicIPDisabled: FalseOptionally, you can set the
publicIPDisabledproperty toTrue. For more information about the YAML configuration, see test configuration YAML reference.Important
Make sure you have sufficient permissions for managing virtual networks. You require the Network Contributor role.
Save the YAML configuration file, and commit your changes to the source code repository.
After the CI/CD workflow triggers, your load test starts, and can now access the privately hosted application endpoint in your virtual network.
Troubleshooting
To troubleshoot issues in creating and running load tests against private endpoints, see how to troubleshoot private endpoint tests.
Next steps
- Learn more about the scenarios for deploying Azure Load Testing in a virtual network.
- Learn how to troubleshoot private endpoint tests.