Quickstart: Create an Azure Front Door (classic) using the Azure portal
Important
Azure Front Door (classic) will be retired on March 31, 2027. To avoid any service disruption, it is important that you migrate your Azure Front Door (classic) profiles to Azure Front Door Standard or Premium tier by March 2027. For more information, see Azure Front Door (classic) retirement.
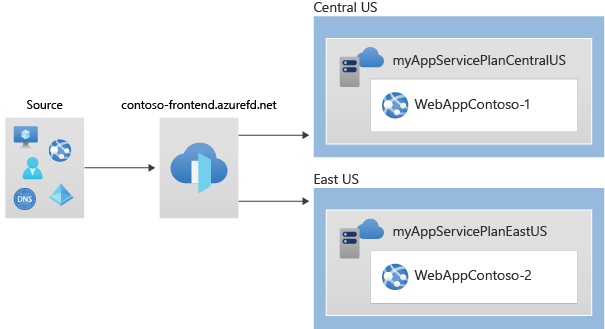
This quickstart guides you through setting up high availability for a web application using Azure Front Door (classic) via the Azure portal. You configure Azure Front Door to distribute traffic across two web application instances in different Azure regions. The setup uses equal weighted and same priority backends, directing traffic to the nearest available site. Azure Front Door also monitors the health of the web applications and automatically fails over to the next nearest site if the closest one is down.

Prerequisites
- An Azure account with an active subscription. Create an account for free.
Create two instances of a web app
To complete this quickstart, you need two instances of a web application running in different Azure regions. These instances operate in Active/Active mode, meaning they can handle traffic simultaneously. This setup differs from Active/Stand-By mode, where one instance serves as a backup.
If you don't have the web apps already, follow these steps to create them:
Sign in to the Azure portal.
Select + Create a resource from the top left corner and search for Web App.
On the Basics tab of the Create Web App page, provide, or select the following details:
Setting Value Subscription Choose your subscription. Resource group Select Create new and type FrontDoorQS_rg1. Name Type a unique name for your web app, for example, WebAppContoso-1. Publish Select Code. Runtime stack Select .NET Core 3.1 (LTS). Operating System Select Windows. Region Select Central US. Windows Plan Select Create new and type myAppServicePlanCentralUS. Sku and size Select Standard S1 100 total ACU, 1.75 GB memory. Select Review + create, verify the summary details, and then select Create to initiate the deployment. The deployment may take several minutes.
After deploying the first web app, create another one with the same steps but with the following changes:
Setting Value Resource group Select Create new and type FrontDoorQS_rg2. Name Type a unique name for your web app, for example, WebAppContoso-2. Region Select a different region, for example, East US. App Service plan > Windows Plan Select New and type myAppServicePlanEastUS, then select OK.
Create a Front Door for your application
Set up Azure Front Door to route user traffic based on the lowest latency between the two web app servers. Start by adding a frontend host for Azure Front Door.
From the home page or the Azure menu, select + Create a resource. Select Networking > Front Door and CDN profiles.
On the Compare offerings page, select Explore other offerings. Then select Azure Front Door (classic). Then select Continue.
In the Basics tab of Create a Front Door page, provide or select the following information, and then select Next: Configuration.
Setting Value Subscription Select your subscription. Resource group Select Create new and type FrontDoorQS_rg0 in the text box. Resource group location Select Central US. In Frontends/domains, select + to open Add a frontend host page.
For Host name, type a globally unique hostname. For example, contoso-frontend. Select Add.
Next, set up a backend pool that includes your two web apps.
Still in Create a Front Door, in Backend pools, select + to open the Add a backend pool page.
For Name, type myBackendPool, then select Add a backend.
Provide or select the following information in the Add a backend pane and select Add.
Setting Value Backend host type Select App service. Subscription Select your subscription. Backend host name Select the first web app you created. For example, WebAppContoso-1. Keep all other fields default.
“Select Add a backend again. Provide or select the following information and select Add.
Setting Value Backend host type Select App service. Subscription Select your subscription. Backend host name Select the second web app you created. For example, WebAppContoso-2. Keep all other fields default.
Select Add on the Add a backend pool page to finish the configuration of the backend pool.
Lastly, create a routing rule. A routing rule links your frontend host to the backend pool. The rule routes a request for contoso-frontend.azurefd.net to myBackendPool.
Still in Create a Front Door, in Routing rules, select + to set up a routing rule.
In Add a rule, for Name, type LocationRule. Keep all the default values, then select Add to create the routing rule.”
Warning
It's essential that you associate each of the frontend hosts in your Azure Front Door with a routing rule that has a default path
/*. This means that you need to have at least one routing rule for each of your frontend hosts at the default path/*among all of your routing rules. Otherwise, your end-user traffic may not be routed properly.Select Review + create and verify the details. Then, select Create to start the deployment.
View Azure Front Door in action
Once you create a Front Door, it takes a few minutes for the configuration to be deployed globally. After deployment, access the frontend host you created by navigating to its address in your browser. Your requests automatically get routed to the nearest server from the specified servers in the backend pool.
If you followed this quickstart to create the web apps, you should see an information page.
To test the instant global failover feature, follow these steps:
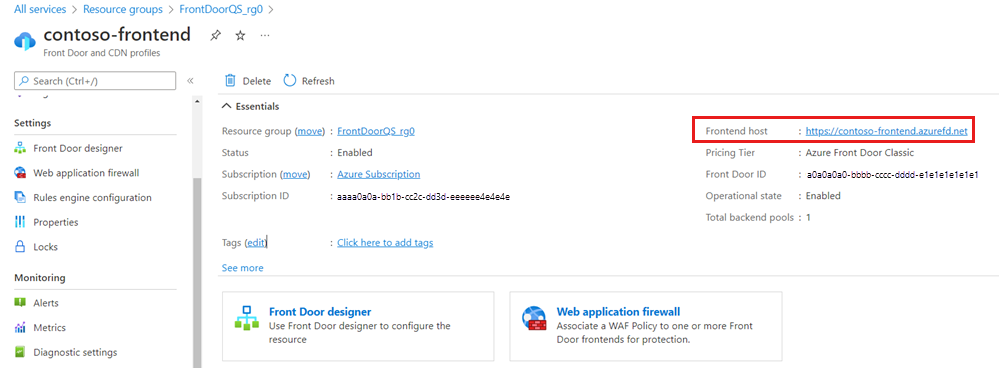
Navigate to the resource group FrontDoorQS_rg0 and select the Front Door service.
From the Overview page, copy the Frontend host address.
Open your browser and go to the frontend address.
In the Azure portal, search for and select App services. Scroll down to find one of your web apps, for example, WebAppContoso-1.
Select your web app, then select Stop, and confirm by selecting Yes.
Refresh your browser. You should still see the information page.
Tip
These actions may take some time to take effect. You may need to refresh the browser again.
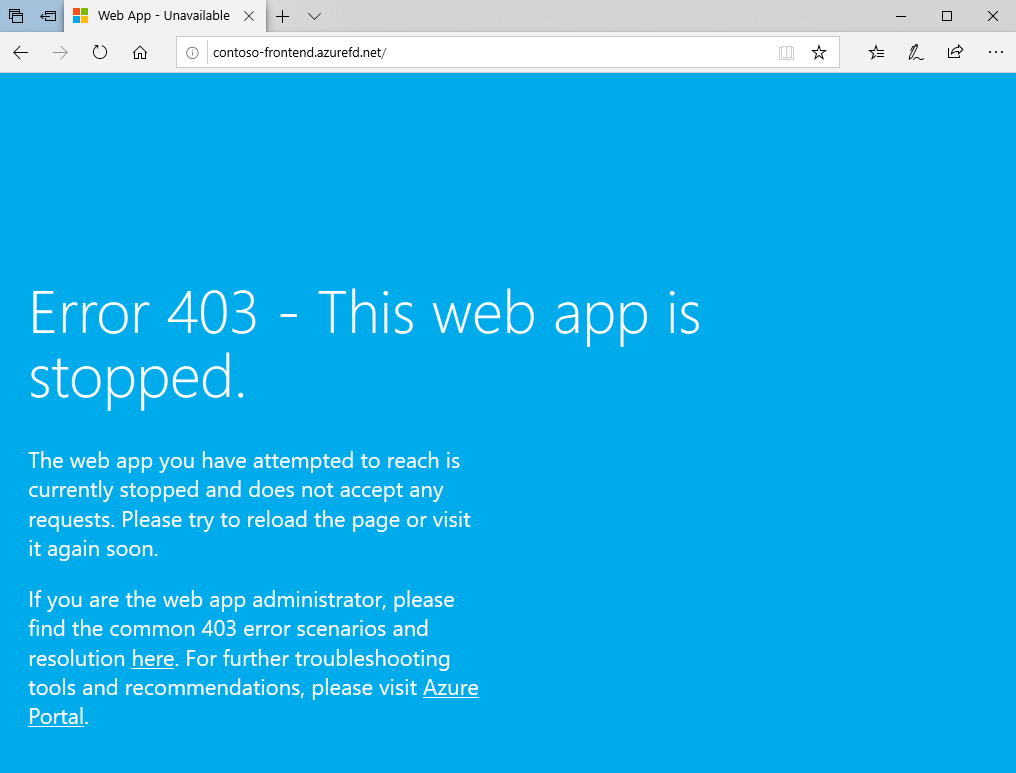
Locate the other web app and stop it as well.
Refresh your browser. This time, you should see an error message.
Clean up resources
After completing the quickstart, you can delete the resources, you created to avoid unnecessary charges. Deleting a resource group also deletes all its contents.
In the Azure portal, search for and select Resource groups from the menu.
Locate the resource group you want to delete, such as FrontDoorQS_rg0.
Select the resource group, then select Delete resource group.
Warning
This action is irreversible.
Enter the name of the resource group to confirm deletion, then select Delete.
Repeat these steps for the other resource groups.
Next steps
Proceed to the next article to learn how to configure a custom domain for your Front Door.


