Tutorial: Deploy to Linux virtual machine using Jenkins and Azure DevOps Services
Continuous integration (CI) and continuous deployment (CD) form a pipeline by which you can build, release, and deploy your code. Azure DevOps Services provides a complete, fully featured set of CI/CD automation tools for deployment to Azure. Jenkins is a popular third-party CI/CD server-based tool that also provides CI/CD automation. You can use Azure DevOps Services and Jenkins together to customize how you deliver your cloud app or service.
In this tutorial, you use Jenkins to build a Node.js web app. You then use Azure DevOps to deploy it
to a deployment group that contains Linux virtual machines (VMs). You learn how to:
- Get the sample app.
- Configure Jenkins plug-ins.
- Configure a Jenkins Freestyle project for Node.js.
- Configure Jenkins for Azure DevOps Services integration.
- Create a Jenkins service endpoint.
- Create a deployment group for the Azure virtual machines.
- Create an Azure Pipelines release pipeline.
- Execute manual and CI-triggered deployments.
Prerequisites
Azure subscription: If you don't have an Azure subscription, create a free Azure account before you begin.
Jenkins server: If you don't have a Jenkins server installed, create a Jenkins server on Azure.
Note
For more information, see Connect to Azure DevOps Services.
You need a Linux virtual machine for a deployment target. For more information, see Create and manage Linux VMs with the Azure CLI.
Open inbound port 80 for your virtual machine. For more information, see Create network security groups using the Azure portal.
Get the sample app
You need an app to deploy, stored in a Git repository. For this tutorial, we recommend that you use this sample app available from GitHub. This tutorial contains a sample script that's used for installing Node.js and an application. If you want to work with your own repository, you should configure a similar sample.
Create a fork of this app and take note of the location (URL) for use in later steps of this tutorial. For more information, see Fork a repo.
Note
The app was built through Yeoman. It uses Express, bower, and grunt. And it has some npm packages as dependencies. The sample also contains a script that sets up Nginx and deploys the app. It is executed on the virtual machines. Specifically, the script:
- Installs Node, Nginx, and PM2.
- Configures Nginx and PM2.
- Starts the Node app.
Configure Jenkins plug-ins
First, you must configure two Jenkins plug-ins: NodeJS and VS Team Services Continuous Deployment.
- Open your Jenkins account and select Manage Jenkins.
- On the Manage Jenkins page, select Manage Plugins.
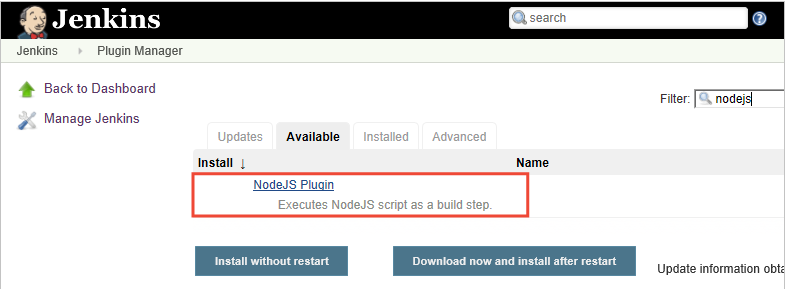
- Filter the list to locate the NodeJS plug-in, and select the Install without restart option.

- Filter the list to find the VS Team Services Continuous Deployment plug-in and select the Install without restart option.
- Go back to the Jenkins dashboard and select Manage Jenkins.
- Select Global Tool Configuration. Find NodeJS and select NodeJS installations.
- Select the Install automatically option, and then enter a Name value.
- Select Save.
Configure a Jenkins Freestyle project for Node.js
- Select New Item. Enter an item name.
- Select Freestyle project. Select OK.
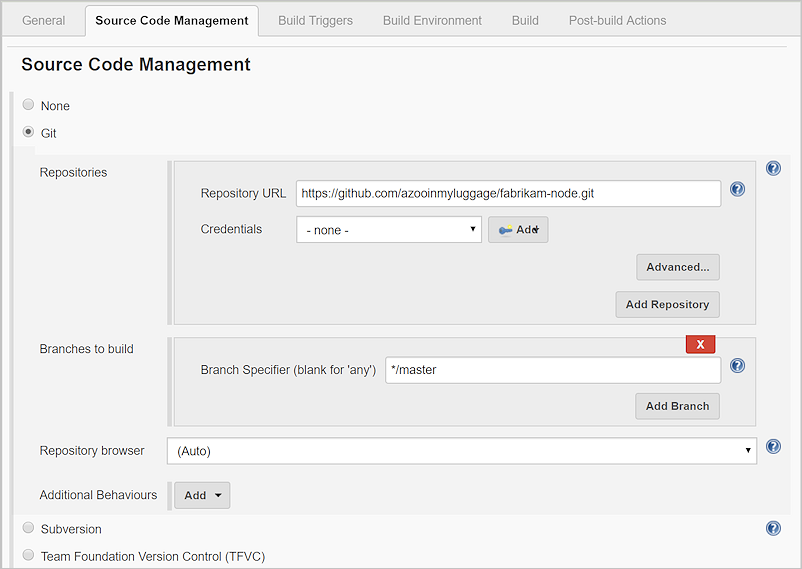
- On the Source Code Management tab, select Git and enter the details of the repository and the branch that contain your app code.

- On the Build Triggers tab, select Poll SCM and enter the schedule
H/03 * * * *to poll the Git repository for changes every three minutes. - On the Build Environment tab, select Provide Node & npm bin/ folder PATH and select the NodeJS Installation value. Leave npmrc file set to use system default.
- On the Build tab, select Execute shell and enter the command
npm installto ensure that all dependencies are updated.
Configure Jenkins for Azure DevOps Services integration
Note
Ensure that the personal access token (PAT) you use for the following steps contains the Release (read, write, execute and manage) permission in Azure DevOps Services.
Create a PAT in your Azure DevOps Services organization if you don't already have one. Jenkins requires this information to access your Azure DevOps Services organization. Be sure to store the token information for upcoming steps in this section.
To learn how to generate a token, read How do I create a personal access token for Azure DevOps Services?.
In the Post-build Actions tab, select Add post-build action. Select Archive the artifacts.
For Files to archive, enter
**/*to include all files.To create another action, select Add post-build action.
Select Trigger release in TFS/Team Services. Enter the URI for your Azure DevOps Services organization, such as https://{your-organization-name}.visualstudio.com.
Enter the Project name.
Choose a name for the release pipeline. (You create this release pipeline later in Azure DevOps Services.)
Choose credentials to connect to your Azure DevOps Services or Azure DevOps Server environment:
- Leave Username blank if you are using Azure DevOps Services.
- Enter a username and password if you are using an on-premises version of Azure DevOps Server.

Save the Jenkins project.
Create a Jenkins service endpoint
A service endpoint allows Azure DevOps Services to connect to Jenkins.
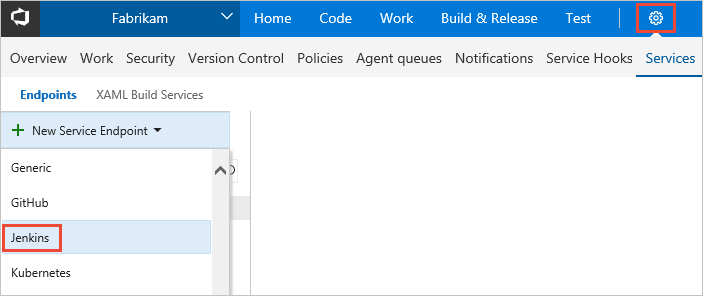
- Open the Services page in Azure DevOps Services, open the New Service Endpoint list, and select Jenkins.

- Enter a name for the connection.
- Enter the URL of your Jenkins server, and select the Accept untrusted SSL certificates option. An example URL is http://{YourJenkinsURL}.westcentralus.cloudapp.azure.com.
- Enter the username and password for your Jenkins account.
- Select Verify connection to check that the information is correct.
- Select OK to create the service endpoint.
Create a deployment group for Azure virtual machines
You need a deployment group to register the Azure DevOps Services agent so the release pipeline can be deployed to your virtual machine. Deployment groups make it easy to define logical groups of target machines for deployment, and to install the required agent on each machine.
Note
In the following procedure, be sure to install the prerequisites and don't run the script with sudo privileges.
- Open the Releases tab of the Build & Release hub, open Deployment groups, and select + New.
- Enter a name for the deployment group, and an optional description. Then select Create.
- Choose the operating system for your deployment target virtual machine. For example, select Ubuntu 16.04+.
- Select Use a personal access token in the script for authentication.
- Select the System prerequisites link. Install the prerequisites for your operating system.
- Select Copy script to clipboard to copy the script.
- Log in to your deployment target virtual machine and run the script. Don't run the script with sudo privileges.
- After the installation, you are prompted for deployment group tags. Accept the defaults.
- In Azure DevOps Services, check for your newly registered virtual machine in Targets under Deployment Groups.
Create an Azure Pipelines release pipeline
A release pipeline specifies the process that Azure Pipelines uses to deploy the app. In this example, you execute a shell script.
To create the release pipeline in Azure Pipelines:
- Open the Releases tab of the Build & Release hub, and select Create release pipeline.
- Select the Empty template by choosing to start with an Empty process.
- In the Artifacts section, select + Add Artifact and choose Jenkins for Source type. Select your Jenkins service endpoint connection. Then select the Jenkins source job and select Add.
- Select the ellipsis next to Environment 1. Select Add deployment group phase.
- Choose your deployment group.
- Select + to add a task to Deployment group phase.
- Select the Shell Script task and select Add. The Shell Script task provides the configuration for a script to run on each server in order to install Node.js and start the app.
- For Script Path, enter $(System.DefaultWorkingDirectory)/Fabrikam-Node/deployscript.sh.
- Select Advanced, and then enable Specify Working Directory.
- For Working Directory, enter $(System.DefaultWorkingDirectory)/Fabrikam-Node.
- Edit the name of the release pipeline to the name that you specified on the Post-build Actions tab of the build in Jenkins. Jenkins requires this name to be able to trigger a new release when the source artifacts are updated.
- Select Save and select OK to save the release pipeline.
Execute manual and CI-triggered deployments
- Select + Release and select Create Release.
- Select the build that you completed in the highlighted drop-down list, and select Queue.
- Choose the release link in the pop-up message. For example: "Release Release-1 has been created."
- Open the Logs tab to watch the release console output.
- In your browser, open the URL of one of the servers that you added to your deployment group. For example, enter http://{your-server-ip-address}.
- Go to the source Git repository and modify the contents of the h1 heading in the file app/views/index.jade with some changed text.
- Commit your change.
- After a few minutes, you will see a new release created on the Releases page of Azure DevOps. Open the release to see the deployment taking place. Congratulations!
Troubleshooting the Jenkins plug-in
If you encounter any bugs with the Jenkins plug-ins, file an issue in the Jenkins JIRA for the specific component.
Next steps
In this tutorial, you automated the deployment of an app to Azure by using Jenkins for build and Azure DevOps Services for release. You learned how to:
- Build your app in Jenkins.
- Configure Jenkins for Azure DevOps Services integration.
- Create a deployment group for the Azure virtual machines.
- Create an Azure Pipeline that configures the VMs and deploys the app.
To learn about how to use Azure Pipelines for both Build and Release steps, refer to this.
To learn about how to author a YAML based CI/CD pipeline to deploy to VMs, advance to the next tutorial.