Upload an image to an Azure Storage blob with JavaScript
Use a static web app to upload files directly to an Azure Storage blob using the @azure/storage-blob package. The API generates a SAS token following the Valet Key pattern, which lets you securely delegate limited access without exposing full credentials.
Caution
This tutorial shows you how to host your function app in a Consumption Plan. When you plan to secure your connections by using Microsoft Entra ID with managed identities, you should instead consider hosting your app in the Flex Consumption plan. The Flex Consumption plan has been designed to optimize security by supporting the use of managed identities without any of the tradeoffs required when running in a Consumption or Premium plan. Flex Consumption also fully supports virtual network integration.
Prerequisites
- An Azure subscription; if you don't already have an Azure subscription, you can sign up for a free Azure account.
- GitHub account to fork and push to a repo.
Application architecture
This application architecture includes two Azure resources:
- Azure Static Web Apps host both the static client and the linked Azure Functions API, with the service managing the API resource automatically.
- Azure Storage for the blob storage.
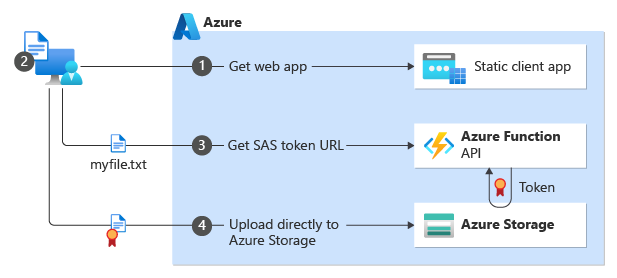
| Step | Description |
|---|---|
| 1 | The customer connects to the statically generated website. The website is hosted in Azure Static Web Apps. |
| 2 | The customer uses that website, to select a file to upload. For this tutorial, the front-end framework is Vite React and the file uploaded is an image file. |
| 3 | The website calls the Azure Functions API sas to get a SAS token based on the exact filename of the file to upload. The serverless API uses the Azure Blob Storage SDK to create the SAS token. The API returns the full URL to use to upload the file, which includes the SAS token as the query string.https://YOUR-STORAGE-NAME.blob.core.windows.net/YOUR-CONTAINER/YOUR-FILE-NAME?YOUR-SAS-TOKEN |
| 4 | The front-end website uses the SAS token URL to upload the file directly to Azure Blob Storage. |
Local and build environments
This tutorial uses the following environments:
- Local development with GitHub Codespaces or Visual Studio Code.
- Build and deploy with GitHub Actions.
Fork sample application repository with GitHub
This tutorial uses GitHub actions to deploy the sample application to Azure. You need a GitHub account and a fork of the sample application repository to complete that deployment.
- In a web browser, use the following link to begin the fork for your own account of the sample repository: Azure-Samples/azure-typescript-e2e-apps.
- Complete the steps to fork the sample with the main branch only.
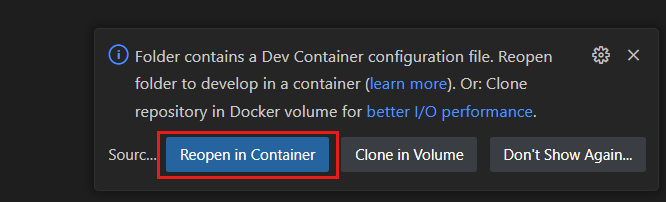
Configure dev environment
A development container environment is available with all dependencies required to complete every exercise in this project. You can run the development container in GitHub Codespaces or locally using Visual Studio Code.
GitHub Codespaces runs a development container managed by GitHub with Visual Studio Code for the Web as the user interface. For the most straightforward development environment, use GitHub Codespaces so that you have the correct developer tools and dependencies preinstalled to complete this training module.
Important
All GitHub accounts can use Codespaces for up to 60 hours free each month with 2 core instances. For more information, see GitHub Codespaces monthly included storage and core hours.
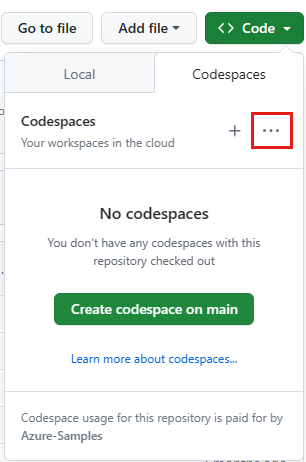
In a web browser, on your GitHub fork of the sample repository, start the process to create a new GitHub Codespace on the
mainbranch of your fork by selecting the CODE button.
On the Codespaces tab, select the ellipsis,
....
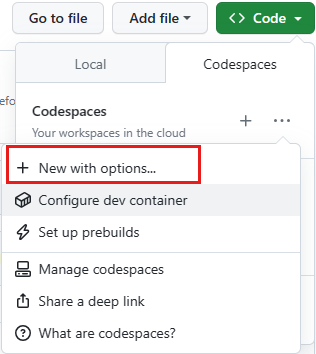
Select + New with options to select a specific Codespaces dev container.
Select the following options then select Create codespace.
- Branch:
main - Dev container configuration:
Tutorial: Upload file to storage with SAS Token - Region: accept default
- Machine type: accept default
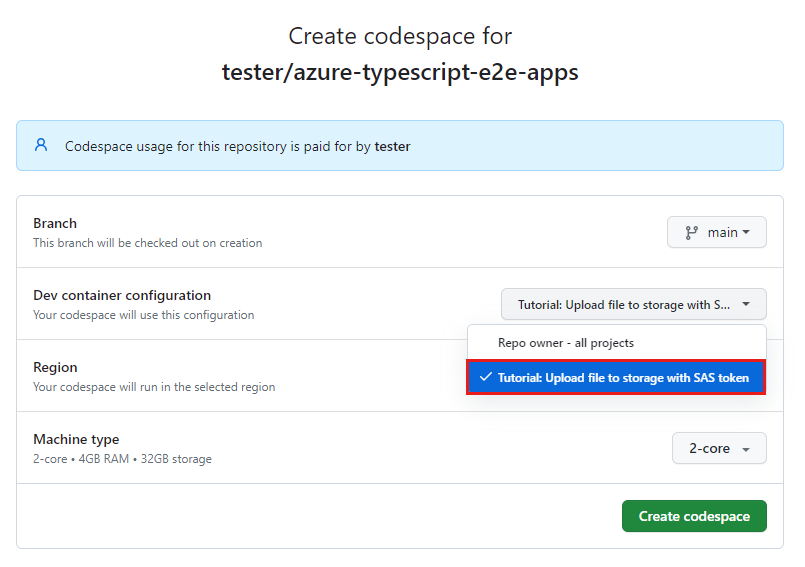
- Branch:
Wait for the codespace to start. This startup process can take a few minutes.
Open a new terminal in the codespace.
Tip
You can use the main menu to navigate to the Terminal menu option and then select the New Terminal option.

Check the versions of the tools you use in this tutorial.
node --version
npm --version
func --version
This tutorial requires the following versions of each tool, which are preinstalled in your environment:
Tool Version Node.js ≥ 18 npm ≥ 9.5 Azure Functions core tools ≥ 4.5098 Close the terminal.
The remaining steps in this tutorial take place in the context of this development container.

Install dependencies
The sample app for this tutorial is in the azure-upload-file-to-storage folder. You won't need to use any other folders in the project.
In Visual Studio Code, open a terminal, and move to the project folder.
cd azure-upload-file-to-storageSplit the terminal so you have two terminals, one for the client app and one for the API app.
In one of the terminals, run the following command to install the API app's dependencies and run the app.
cd api && npm installIn the other terminal, run the command to install the client app.
cd app && npm install
Create Storage resource with Visual Studio extension
Create the Storage resource to use with the sample app. Storage is used for:
- Triggers in the Azure Functions app
- Blob (file) storage
Navigate to the Azure Storage extension.
Sign in to Azure if necessary.
Right-click on the subscription then select
Create Resource....
Select Create Storage Account from list.
Follow the prompts using the following table to understand how to create your Storage resource.
Property Value Enter a globally unique name for the new web app. Enter a unique value such as fileuploadstor, for your Storage resource name.
This unique name is your resource name used in the next section. Use only characters and numbers, up to 24 in length. You need this account name to use later.Select a location for new resources. Use the recommended location. When the app creation process is complete, a notification appears with information about the new resource.


Configure Storage CORS
Because the browser is used to upload the file, the Azure Storage account needs to configure CORS to allow cross-origin requests. These CORS settings are used for this tutorial to simplify the steps and aren't meant to indicate best practices or security. Learn more about CORS for Azure Storage.
Navigate to the Azure Storage extension. Right-click on your storage resource and select Open in Portal.
In the Azure portal storage account Settings section, select Resource sharing (CORS).
Use the following properties to set CORS for this tutorial.
- Allowed origins:
* - Allowed methods: All except patch
- Allowed headers:
* - Exposed headers:
* - Max age: 86400
- Allowed origins:
Select Save.
Grant anonymous access to storage
After file upload, the tutorial scenario requires public access to the blob for viewing. For simplicity, this guide enables anonymous access for the uploaded files.
- To enable public access in the Azure portal, select the Overview page for your storage account, in the Properties section, select Blob anonymous access then select Disabled.
- On the Configuration page, enable Allow Blob anonymous access.
Create upload container
Create a private container which has publicly readable blobs.
While still in the Azure portal storage account, in the Data storage section, select Containers.
Select + Container to create your
uploadcontainer with the following settings:- Name:
upload - Public access Level:
Blob
- Name:
Select Create.
Grant yourself Blob Data access
While you created the resource, you don't have permission to view the contents of the container. That is reserved for specific IAM roles. Add your account so you can view the blobs in the containers.
- Still in the Azure portal storage account, select Access Control (IAM).
- Select Add role assignments.
- Search and select Storage Blob Data Contributor. Select Next.
- Select + Select members.
- Search and select your account.
- Select Review + assign.
- Select Containers then the upload container. You should be able to see there are no blobs in the container without authorization errors.
Get Storage resource credentials
The Storage resource credentials are used in the Azure Functions API app to connect to the Storage resource.
While still in the Azure portal, in the Security + networking section, select Access keys.
Copy the
Keykey.In Visual Studio Code, in the
./workspaces/azure-typescript-e2e-apps/azure-upload-file-to-storage/apifolder, rename the file fromlocal.settings.json.sampletolocal.settings.json. The file is ignored by Git so it won't be checked into source control.Update the settings for
local.settings.jsonusing the following table.Property Value Description Azure_Storage_AccountName Azure Storage account name, for example: fileuploadstor.Used in source code to connect to Storage resource. Azure_Storage_AccountKey Azure Storage account key Used in source code to connect to Storage resource. AzureWebJobsStorage Azure Storage account connection string Use by Azure Functions runtime to store state and logs.
It may seem like you entered the same account credentials twice, once as a key and once as a connection string. You did, but specifically for this simple tutorial. Generally speaking, Azure Functions apps should have a separate Storage resource that isn't reused for another purpose. When you create the Azure Function resource later in the tutorial, you won't need to set the AzureWebJobsStorage value for the cloud resource. You'll only need to set the Azure_Storage_AccountName and Azure_Storage_AccountKey values which are used in source code.
Run the API app
Run the Functions App to make sure it works correctly before deploying it to Azure.
In the API app's terminal, run the following command to start the API app.
npm run startWait until the Azure Functions app is started. You'll get a notice that the Azure Functions app's port, 7071 is now available. You should also see the APIs listed in the terminal for the API app.
Functions:

        list: [POST,GET] http://localhost:7071/api/list

        sas: [POST,GET] http://localhost:7071/api/sas

        status: [GET] http://localhost:7071/api/status
Select the Ports tab in the bottom pane then right-click the 7071 port and select Port Visibility then select Public.
If you don't expose this app as public, you'll get an error when you use the API from the client app.
To test that the API works and connects to storage, in the Ports tab in the bottom pane, select the globe icon in the Local Address area for port 7071. This opens a web browser to the functions app.
Add the API route to the URL address bar:
/api/sas?container=upload&file=test.png. It's ok that the file isn't in the container yet. The API creates the SAS token based on where you want it to be uploaded to.The JSON response should look something like the following:
{
    "url":"https://YOUR-STORAGE-RESOURCE.blob.core.windows.net/upload/test.png?sv=2023-01-03&spr=https&st=2023-07-26T22%3A15%3A59Z&se=2023-07-26T22%3A25%3A59Z&sr=b&sp=w&sig=j3Yc..."
}
Copy the base of the API URL in the browser address bar (not the SAS token URL in the JSON object) to use in the next step. The base URL is everything before
/api/sas. You will paste this into the client app environment variable file in the next section.
Configure and run the client app
Rename the
./azure-upload-file-to-storage/app/.env.samplefile to.env.Open the
.envfile and paste the base URL from the previous section as the value for theVITE_API_SERVER.An example for a Codespaces environment may look something like
VITE_API_SERVER=https://improved-space-fishstick-pgvxvxjpqgrh6qxp-7071.app.github.devIn the other split terminal, start the client app with the following command:
npm run devWait until the terminal returns the following notice that the app is available on port 5173.
  VITE v4.4.4  ready in 410 ms

  ➜  Local:   https://localhost:5173/
  ➜  Network: use --host to expose
  ➜  press h to show help
Select the Ports tab in the bottom pane then right-click the 5173 port and select the globe icon.
You should see the simple web app.
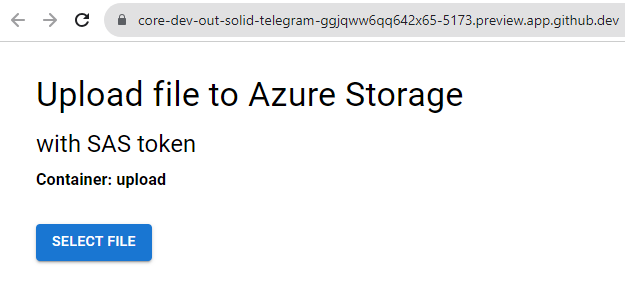
Interact with the web app:
- Select an image file (*.jpg or *.png) from your local computer to upload.
- Select the Get a SAS button to request a SAS token from the API app. The response shows the full URL to use to upload the file to Storage.
- Select the Upload button to send the image file directly to Storage.
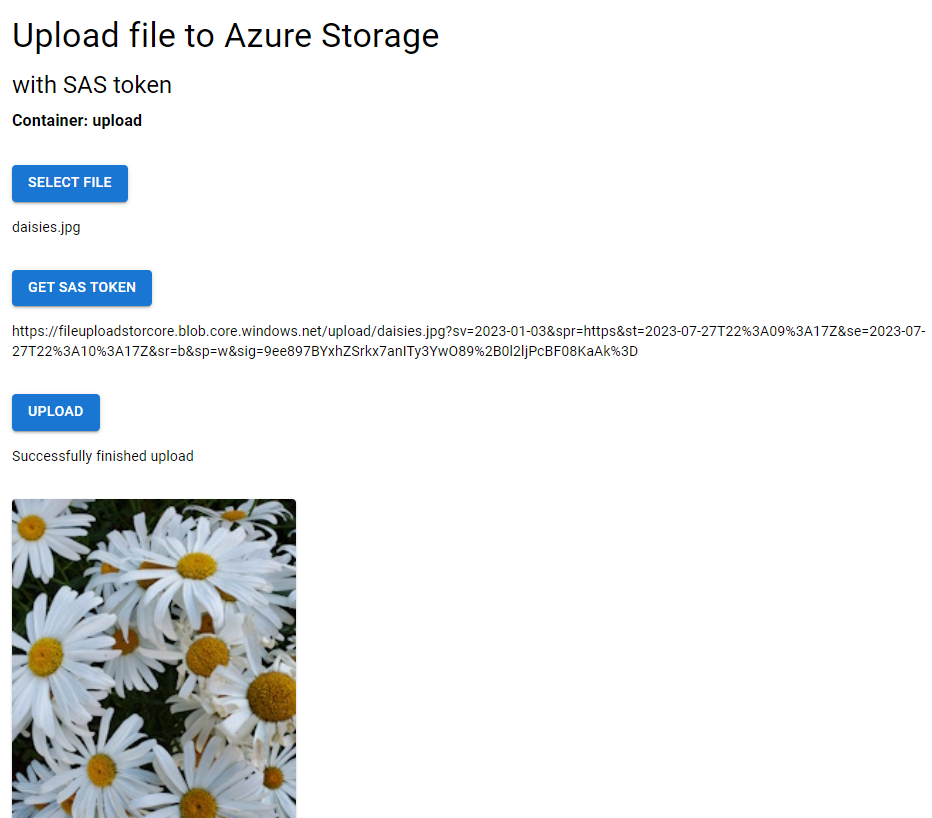
The client app and the API app successfully worked together in a containerized developer environment.

Commit code changes
- In Visual Studio Code, open the Source Control tab.
- Select the + icon to stage all changes. These changes should only include new package-lock.json files for the
appandapifolders for this tutorial.
Deploy static web app to Azure
The Azure Functions app is using a preview feature, it must be deployed to West US 2 to function properly.
In Visual Studio Code, select the Azure explorer.
In the Azure Explorer, right-click on the subscription name then select
Create Resource....Select Create Static Web App from list.
Follow the prompts using the following table to understand how to create your Static Web App resource.
Property Value Enter a globally unique name for the new web app. Enter a unique value such as fileuploadstor, for your Storage resource name.
This unique name is your resource name used in the next section. Use only characters and numbers, up to 24 in length. You need this account name to use later.Select a location for new resources. Use the recommended location. Follow the prompts to provide the following information:
Prompt Enter Select a resource group for new resources. Use the resource group that you created for your storage resource. Enter the name for the new static web app. Accept the default name. Select a SKU Select the free SKU for this tutorial. If you already have a free Static Web App resource in your subscription, select the next pricing tier. Choose build preset to configure default project structure. Select Custom. Select the location of your application code azure-upload-file-to-storage/appSelect the location of your Azure Functions code azure-upload-file-to-storage/apiEnter the path of your build output... dist
This is the path from your app to your static (generated) files.Select a location for new resources. Select a region close to you. When the process is complete, a notification pop-up displays. Select View/Edit Workflow.
Your remote fork has a new workflow file for deploying to Static Web Apps. Pull that file down to your environment with the following command in the terminal:
git pull origin mainOpen the workflow file located at
/.github/workflows/.Verify the section of the workflow specific to this tutorial's Static Web app should look like:
###### Repository/Build Configurations - These values can be configured to match your app requirements. ######
# For more information regarding Static Web App workflow configurations, please visit: https://aka.ms/swaworkflowconfig
app_location: "/azure-upload-file-to-storage/app" # App source code path
api_location: "/azure-upload-file-to-storage/api" # Api source code path - optional
output_location: "dist" # Built app content directory - optional
###### End of Repository/Build Configurations ######
Go to your GitHub fork of the sample,
https://github.com/YOUR-ACCOUNT/azure-typescript-e2e-apps/actionsto verify the build and deploy action, namedAzure Static Web Apps CI/CD, completed successfully. This may take a few minutes to complete.Go to your Azure portal for your app and view the APIs section of Settings. The Backend Resource Name in the production environment is
(managed)indicating your APIs are successfully deployed.Select (managed) to see the list of APIs loaded in the app:
- list
- sas
- status
Go to the Overview page to find the URL for your deployed app.
The deployment of the app is complete.
Configure API with Storage resource name and key
The app needs the Azure Storage resource name and key before the API works correctly.
Still in the Azure Explorer, right-click on the Static Web App resource and select Open in Portal.
Select Configuration in the Settings section.
Add application settings using the following table.
Property Value Description Azure_Storage_AccountName Azure Storage account name, for example: fileuploadstor.Used in source code to connect to Storage resource. Azure_Storage_AccountKey Azure Storage account key Used in source code to connect to Storage resource. Select Save on the Configuration page to save both settings.
Note
You don't need to set the client app's env variable VITE_API_SERVER because the client app and the API are hosted from the same domain.
Use the Azure-deployed static web app
Verify the deploy and configuration succeeded by using the web site.
- In Visual Studio Code, right-click your Static web app from the Azure explorer and select Browse site.
- In the new web browser window, select Choose File then select an image file (*.png or *.jpg) to upload.
- Select Get sas token. This action passes the file name to the API and receives the SAS token URL necessary to upload the file.
- Select Upload file to use the SAS token URL to upload the file. The browser displays the thumbnail and URL of the uploaded file.
Clean up resources
In Visual Studio Code, use the Azure explorer for Resource Groups, right-click on your resource group then select Delete.
This deletes all resources in the group, including your Storage and Static Web app resources.
Troubleshooting
Report issues with this sample in the GitHub repo noted below. Include the following with the issue:
- The URL of the article
- The step or context within the article that was problematic
- Your development environment
Sample code
- GitHub repository: azure-upload-file-to-storage
Related content
If you would like to continue with this app, learn how to deploy the app to Azure for hosting with one of the following choices:
- Azure Blob Storage documentation
- @azure/storage-blob
- Azure Static Web app