Connect to Azure Resource Manager on your Azure Stack Edge device
APPLIES TO:  Azure Stack Edge Pro - GPU
 Azure Stack Edge Pro 2
 Azure Stack Edge Pro R
 Azure Stack Edge Mini R
Azure Resource Manager provides a management layer that enables you to create, update, and delete resources in your Azure subscription. The Azure Stack Edge device supports the same Azure Resource Manager APIs to create, update, and delete VMs in a local subscription. This support lets you manage the device in a manner consistent with the cloud.
This article describes how to connect to the local APIs on your Azure Stack Edge device via Azure Resource Manager using Azure PowerShell.
Endpoints on Azure Stack Edge device
The following table summarizes the various endpoints exposed on your device, the supported protocols, and the ports to access those endpoints. Throughout the article, you'll find references to these endpoints.
| # | Endpoint | Supported protocols | Port used | Used for |
|---|---|---|---|---|
| 1. | Azure Resource Manager | https | 443 | To connect to Azure Resource Manager for automation |
| 2. | Security token service | https | 443 | To authenticate via access and refresh tokens |
| 3. | Blob* | https | 443 | To connect to Blob storage via REST |
* Connection to blob storage endpoint isn't required to connect to Azure Resource Manager.
Connecting to Azure Resource Manager workflow
The process of connecting to local APIs of the device using Azure Resource Manager requires the following steps:
| Step # | Do this step ... | .. on this location. |
|---|---|---|
| 1. | Configure your Azure Stack Edge device | Local web UI |
| 2. | Create and install certificates | Windows client/local web UI |
| 3. | Review and configure the prerequisites | Windows client |
| 4. | Set up Azure PowerShell on the client | Windows client |
| 5. | Modify host file for endpoint name resolution | Windows client or DNS server |
| 6. | Check that the endpoint name is resolved | Windows client |
| 7. | Use Azure PowerShell cmdlets to verify connection to Azure Resource Manager | Windows client |
The following sections detail each of the above steps in connecting to Azure Resource Manager.
Prerequisites
Before you begin, make sure that the client used for connecting to device via Azure Resource Manager is using TLS 1.2. For more information, go to Configure TLS 1.2 on Windows client accessing Azure Stack Edge device.
Step 1: Configure Azure Stack Edge device
Take the following steps in the local web UI of your Azure Stack Edge device.
Complete the network settings for your Azure Stack Edge device.
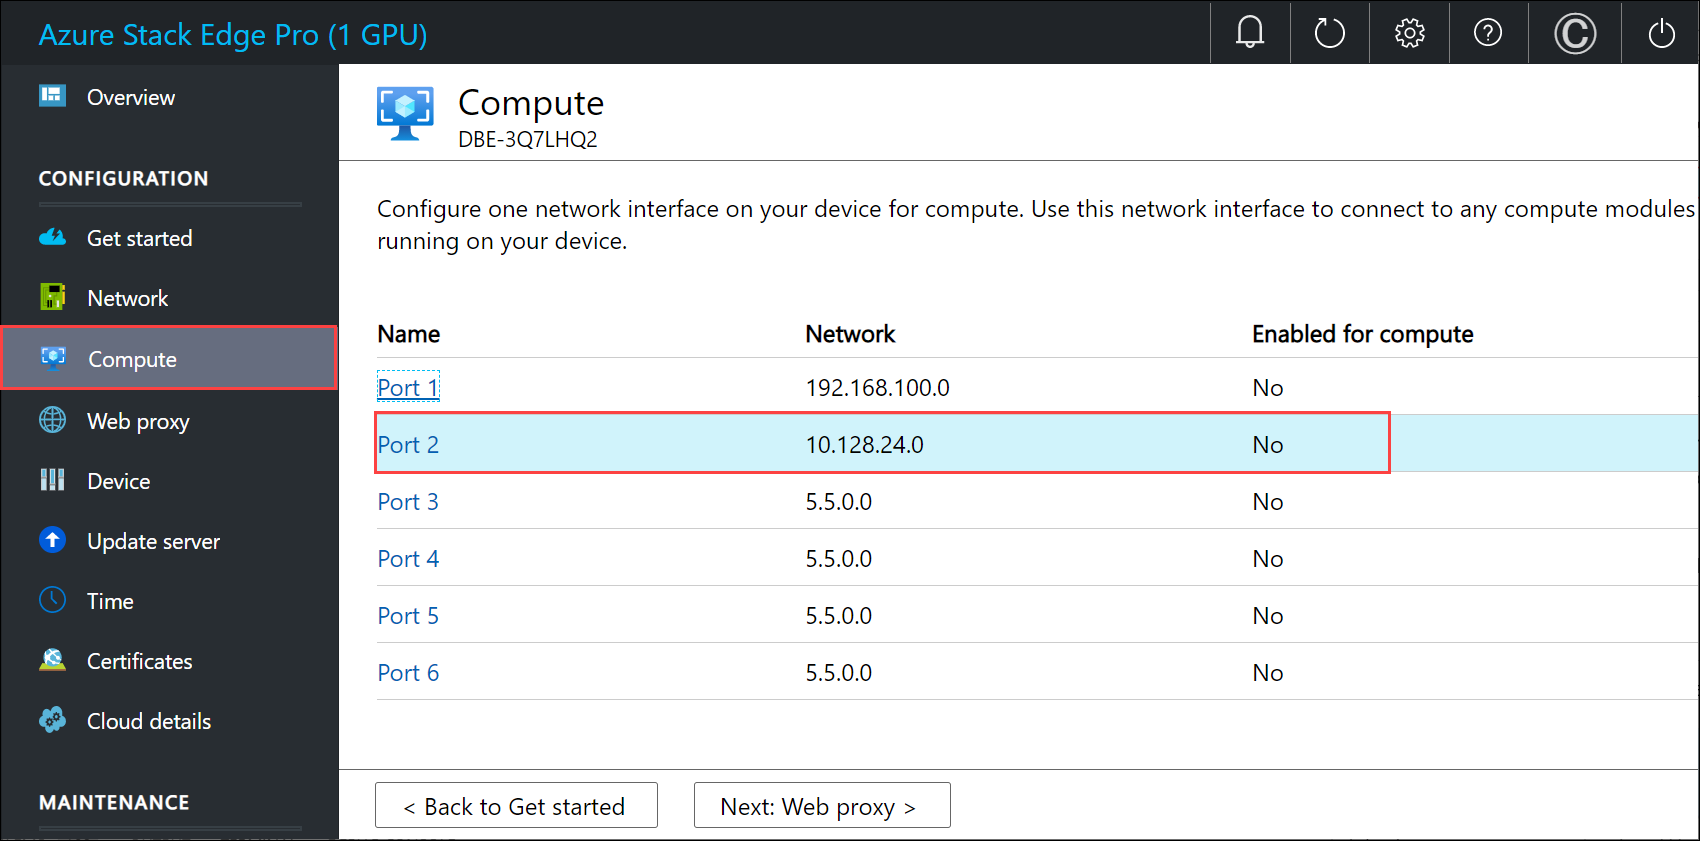
Make a note of the device IP address. You'll use this IP later.
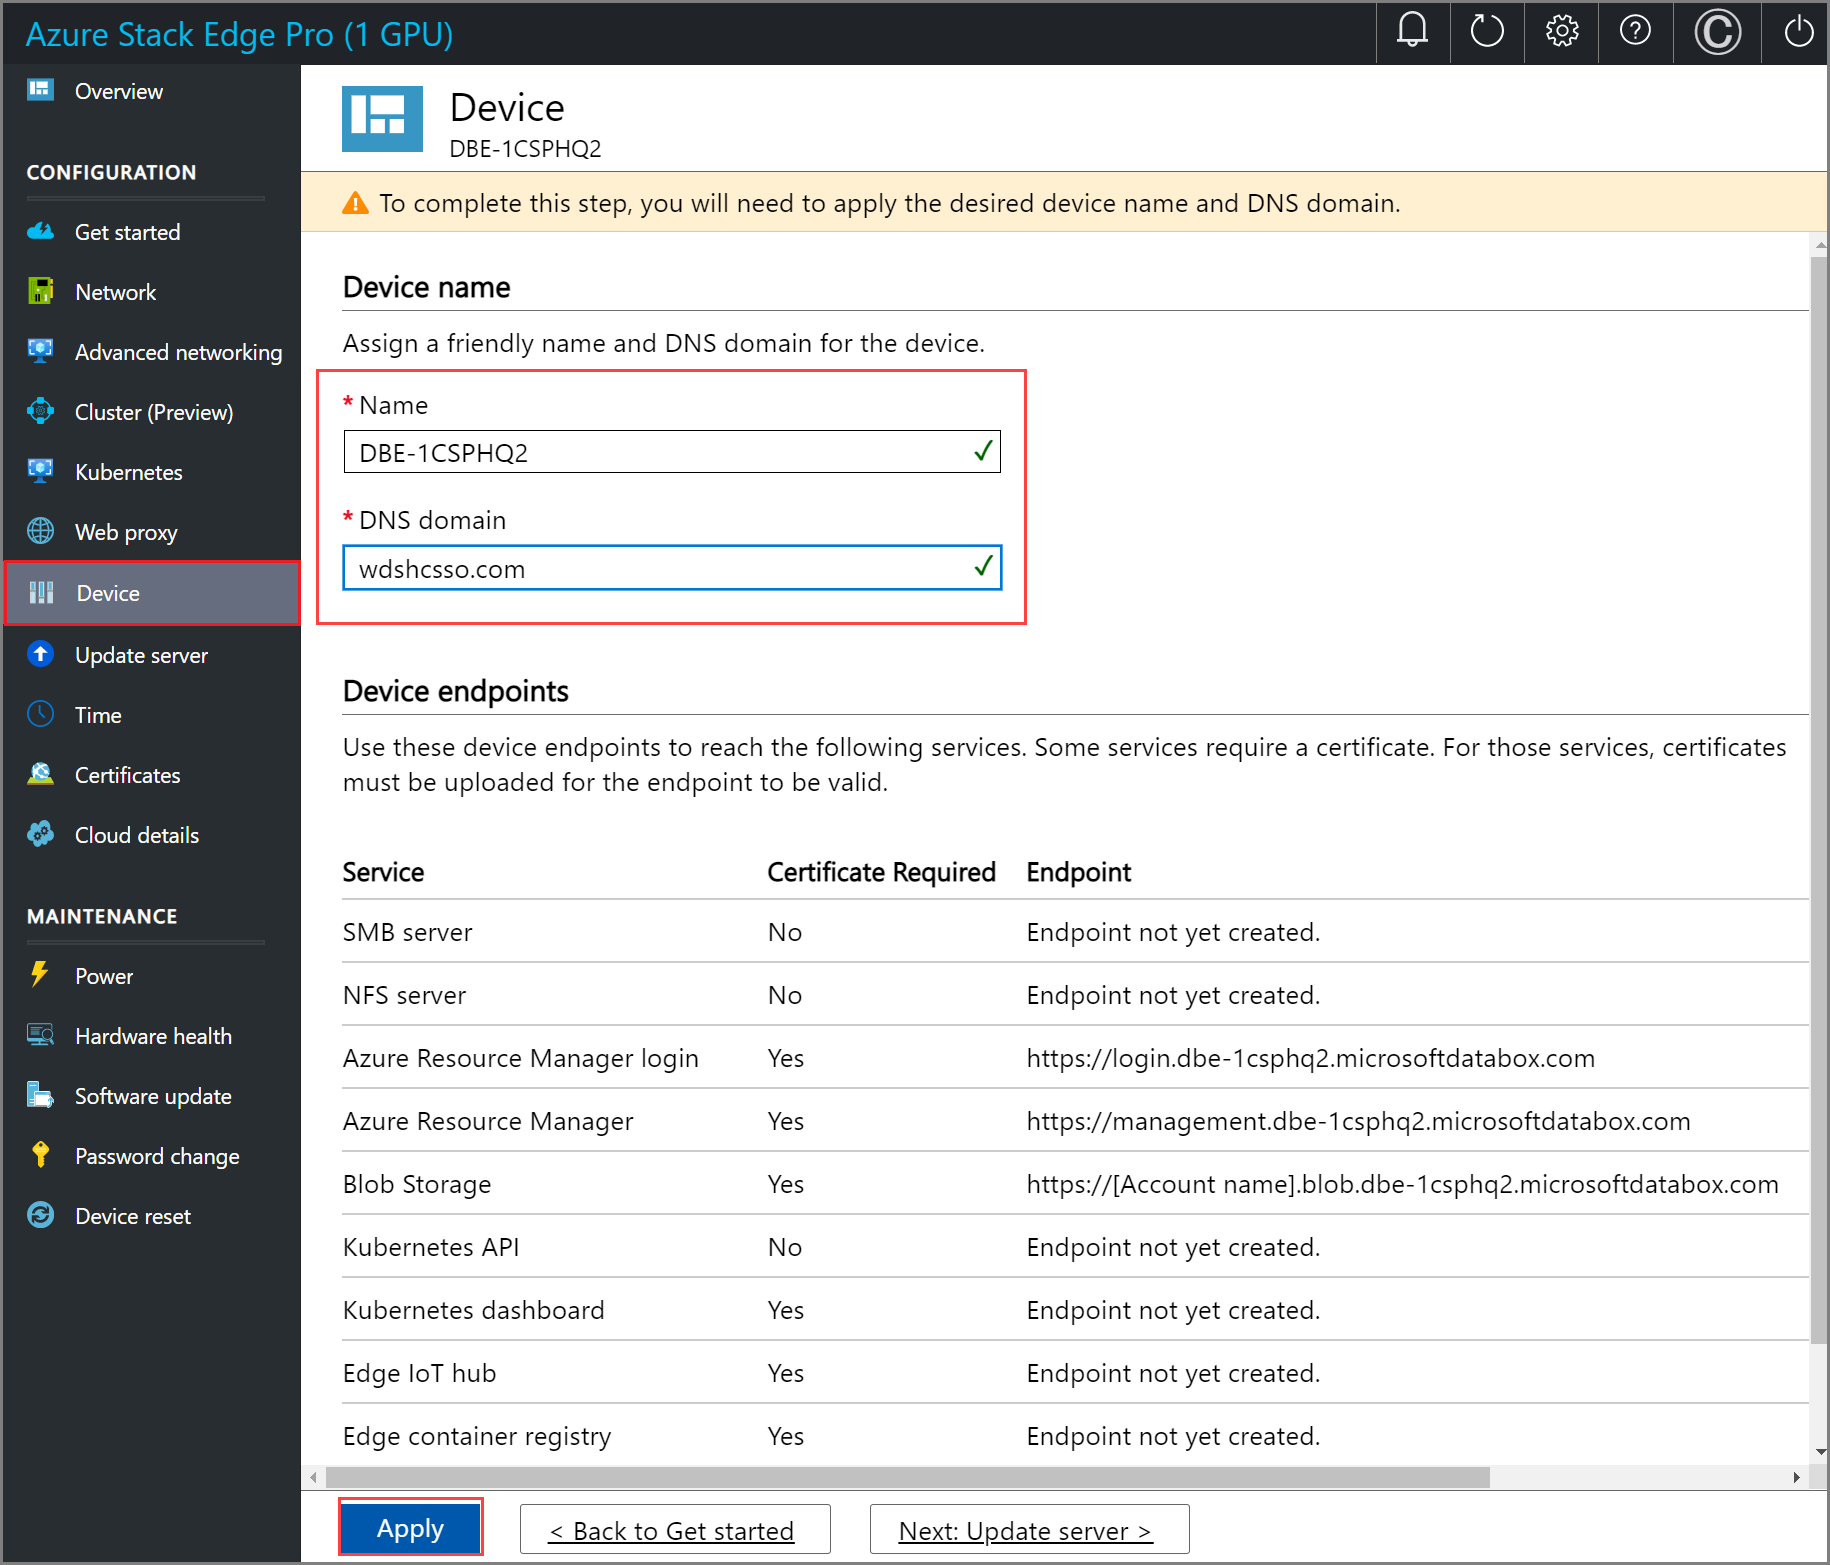
Configure the device name and the DNS domain from the Device page. Make a note of the device name and the DNS domain as you'll use these later.
Important
The device name, DNS domain will be used to form the endpoints that are exposed. Use the Azure Resource Manager and Blob endpoints from the Device page in the local web UI.
Step 2: Create and install certificates
Certificates ensure that your communication is trusted. On your Azure Stack Edge device, self-signed appliance, blob, and Azure Resource Manager certificates are automatically generated. Optionally, you can bring in your own signed blob and Azure Resource Manager certificates as well.
When you bring in a signed certificate of your own, you also need the corresponding signing chain of the certificate. For the signing chain, Azure Resource Manager, and the blob certificates on the device, you need the corresponding certificates on the client machine also to authenticate and communicate with the device.
To connect to Azure Resource Manager, you must create or get signing chain and endpoint certificates, import these certificates on your Windows client, and finally upload these certificates on the device.
Create certificates
For test and development use only, you can use Windows PowerShell to create certificates on your local system. While creating the certificates for the client, follow these guidelines:
You first need to create a root certificate for the signing chain. For more information, see steps to Create signing chain certificates.
You can next create the endpoint certificates for Azure Resource Manager and blob (optional). You can get these endpoints from the Device page in the local web UI. See the steps to Create endpoint certificates.
For all these certificates, make sure that the subject name and subject alternate name conform to the following guidelines:
Type Subject name (SN) Subject alternative name (SAN) Subject name example Azure Resource Manager management.<Device name>.<Dns Domain>login.<Device name>.<Dns Domain>management.<Device name>.<Dns Domain>management.mydevice1.microsoftdatabox.comBlob storage* *.blob.<Device name>.<Dns Domain>*.blob.< Device name>.<Dns Domain>*.blob.mydevice1.microsoftdatabox.comMulti-SAN single certificate for both endpoints <Device name>.<dnsdomain>login.<Device name>.<Dns Domain>management.<Device name>.<Dns Domain>*.blob.<Device name>.<Dns Domain>mydevice1.microsoftdatabox.com
* Blob storage isn't required to connect to Azure Resource Manager. It's listed here in case you're creating local storage accounts on your device.
For more information on certificates, go to how to Upload certificates on your device and import certificates on the clients accessing your device.
Upload certificates on the device
The certificates that you created in the previous step is in the Personal store on your client. These certificates need to be exported on your client into appropriate format files that can then be uploaded to your device.
The root certificate must be exported as a DER format file with .cer file extension. For detailed steps, see Export certificates as a .cer format file.
The endpoint certificates must be exported as .pfx files with private keys. For detailed steps, see Export certificates as .pfx file with private keys.
The root and endpoint certificates are then uploaded on the device using the +Add certificate option on the Certificates page in the local web UI. To upload the certificates, follow the steps in Upload certificates.
Import certificates on the client running Azure PowerShell
The Windows client where you invoke the Azure Resource Manager APIs needs to establish trust with the device. To this end, the certificates that you created in the previous step must be imported on your Windows client into the appropriate certificate store.
The root certificate that you exported as the DER format with .cer extension should now be imported in the Trusted Root Certificate Authorities on your client system. For detailed steps, see Import certificates into the Trusted Root Certificate Authorities store.
The endpoint certificates that you exported as the .pfx must be exported as .cer. This .cer is then imported in the Personal certificate store on your system. For detailed steps, see Import certificates into personal store.
Step 3: Install PowerShell on the client
Your Windows client must meet the following prerequisites:
Run Windows PowerShell 5.1. You must have Windows PowerShell 5.1. To check the version of PowerShell on your system, run the following cmdlet:
$PSVersionTable.PSVersionCompare the Major version and ensure that it's 5.1 or later.
If you have an outdated version, see Upgrading existing Windows PowerShell.
If you don't have PowerShell 5.1, follow Installing Windows PowerShell.
An example output is shown below.
Windows PowerShell
Copyright (C) Microsoft Corporation. All rights reserved.
Try the new cross-platform PowerShell https://aka.ms/pscore6
PS C:\windows\system32> $PSVersionTable.PSVersion
Major  Minor  Build  Revision
-----  -----  -----  --------
5      1      19041  906
You can access the PowerShell Gallery.
Run PowerShell as administrator. Verify that PowerShellGet version is older than 2.2.3. Additionally, verify if the
PSGalleryis registered as a repository.Install-Module PowerShellGet -MinimumVersion 2.2.3 Import-Module -Name PackageManagement -ErrorAction Stop Get-PSRepository -Name "PSGallery"An example output is shown below.
PS C:\windows\system32> Install-Module PowerShellGet -MinimumVersion 2.2.3
PS C:\windows\system32> Import-Module -Name PackageManagement -ErrorAction Stop
PS C:\windows\system32> Get-PSRepository -Name "PSGallery"
Name                      InstallationPolicy   SourceLocation
----                      ------------------   --------------
PSGallery                 Trusted              https://www.powershellgallery.com/api/v2
If your repository isn't trusted or you need more information, see Validate the PowerShell Gallery accessibility.
Step 4: Set up Azure PowerShell on the client
Install Azure PowerShell modules on your client that work with your device.
Run PowerShell as an administrator. You must have access to PowerShell gallery.
First verify that there are no existing versions of
AzureRMandAzmodules on your client. To check, run the following commands:# Check existing versions of AzureRM modules Get-InstalledModule -Name AzureRM -AllVersions # Check existing versions of Az modules Get-InstalledModule -Name Az -AllVersionsIf there are existing versions, use the
Uninstall-Modulecmdlet to uninstall. For more information, seeTo install the required Azure PowerShell modules from the PowerShell Gallery, run the following command:
If your client is using PowerShell Core version 7.0 or later:
# Install the Az.BootStrapper module. Select Yes when prompted to install NuGet.

Install-Module -Name Az.BootStrapper

# Install and import the API Version Profile into the current PowerShell session.

Use-AzProfile -Profile 2020-09-01-hybrid -Force

# Confirm the installation of PowerShell
Get-Module -Name "Az*" -ListAvailable
If your client is using PowerShell 5.1 or later:
#Install the Az module version 1.10.0

Install-Module -Name Az -RequiredVersion 1.10.0
Make sure that you have the correct Az module version running at the end of the installation.
If you used PowerShell 7 or later, the following example output indicates that the Az version 2.0.1 (or later) modules were installed successfully.
PS C:\windows\system32> Install-Module -Name Az.BootStrapper
PS C:\windows\system32> Use-AzProfile -Profile 2020-09-01-hybrid -Force
Loading Profile 2020-09-01-hybrid
PS C:\windows\system32> Get-Module -Name "Az*" -ListAvailable
If you used PowerShell 5.1 or later, the following example output indicates that the Az version 1.10.0 modules were installed successfully.
PS C:\WINDOWS\system32> Get-InstalledModule -Name Az -AllVersions
Version     Name     Repository     Description
-------     ----     ----------     -----------
1.10.0      Az       PSGallery      Mic...

PS C:\WINDOWS\system32>
Step 5: Modify host file for endpoint name resolution
You'll now add the device IP address to:
- The host file on the client, OR,
- The DNS server configuration
Important
We recommend that you modify the DNS server configuration for endpoint name resolution.
On your Windows client that you're using to connect to the device, take the following steps:
Start Notepad as an administrator, and then open the hosts file located at C:\Windows\System32\Drivers\etc.
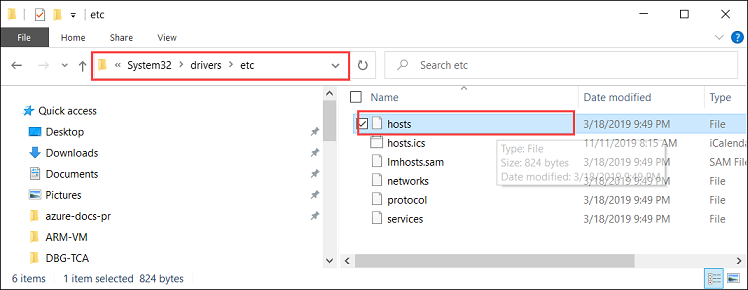
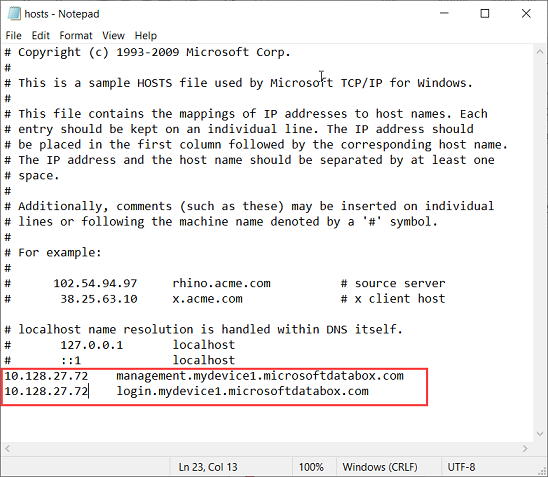
Add the following entries to your hosts file replacing with appropriate values for your device:
<Device IP> login.<appliance name>.<DNS domain>
<Device IP> management.<appliance name>.<DNS domain>
<Device IP> <storage name>.blob.<appliance name>.<DNS domain>
Important
The entry in the hosts file should match exactly that provided to connect to Azure Resource Manager at a later step. Make sure that the DNS Domain entry here is all in the lowercase. To get the values for the
<appliance name>and<DNS domain>, go to the Device page in the local UI of your device.You saved the device IP from the local web UI in an earlier step.
The
login.<appliance name>.<DNS domain>entry is the endpoint for Security Token Service (STS). STS is responsible for creation, validation, renewal, and cancellation of security tokens. The security token service is used to create the access token and refresh token used for continuous communication between the device and the client.The endpoint for blob storage is optional when connecting to Azure Resource Manager. This endpoint is needed when transferring data to Azure via storage accounts.
For reference, use the following image. Save the hosts file.
Step 6: Verify endpoint name resolution on the client
Check if the endpoint name is resolved on the client that you're using to connect to the device.
You can use the
ping.execommand-line utility to check that the endpoint name is resolved. Given an IP address, thepingcommand returns the TCP/IP host name of the computer you're tracing.Add the
-aswitch to the command line as shown in the example below. If the host name is returnable, it will also return this potentially valuable information in the reply.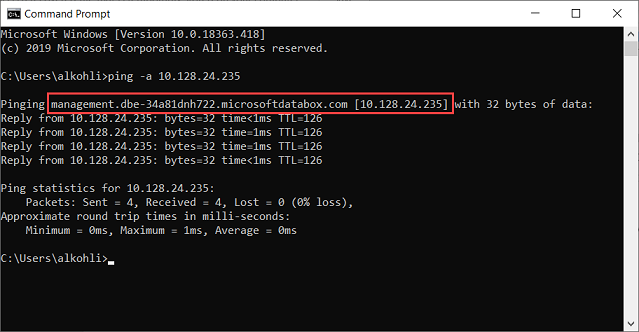
Step 7: Set Azure Resource Manager environment
Set the Azure Resource Manager environment and verify that your device to client communication via Azure Resource Manager is working fine. Take the following steps for this verification:
Use the
Add-AzEnvironmentcmdlet to further ensure that the communication via Azure Resource Manager is working properly and the API calls are going through the port dedicated for Azure Resource Manager - 443.The
Add-AzEnvironmentcmdlet adds endpoints and metadata to enable Azure Resource Manager cmdlets to connect with a new instance of Azure Resource Manager.Important
The Azure Resource Manager endpoint URL that you provide in the following cmdlet is case-sensitive. Make sure the endpoint URL is all in lowercase and matches what you provided in the hosts file. If the case doesn't match, then you will see an error.
Add-AzEnvironment -Name <Environment Name> -ARMEndpoint "https://management.<appliance name>.<DNSDomain>/"A sample output is shown below:
PS C:\WINDOWS\system32> Add-AzEnvironment -Name AzASE -ARMEndpoint "https://management.myasegpu.wdshcsso.com/"

Name  Resource Manager Url                      ActiveDirectory Authority
----  --------------------                      -------------------------
AzASE https://management.myasegpu.wdshcsso.com/ https://login.myasegpu.wdshcsso.c...
Set the environment as Azure Stack Edge and the port to be used for Azure Resource Manager calls as 443. You define the environment in two ways:
Set the environment. Type the following command:
Set-AzEnvironment -Name <Environment Name>Here's an example output.
PS C:\WINDOWS\system32> Set-AzEnvironment -Name AzASE

Name  Resource Manager Url                      ActiveDirectory Authority
----  --------------------                      -------------------------
AzASE https://management.myasegpu.wdshcsso.com/ https://login.myasegpu.wdshcsso.c...
For more information, go to Set-AzEnvironment.
Define the environment inline for every cmdlet that you execute. This ensures that all the API calls are going through the correct environment. By default, the calls would go through the Azure public but you want these to go through the environment that you set for Azure Stack Edge device.
See more information on how to Switch Az environments.
Call local device APIs to authenticate the connections to Azure Resource Manager.
These credentials are for a local machine account and are solely used for API access.
You can connect via
login-AzAccountor viaConnect-AzAccountcommand.To sign in, type the following command.
$pass = ConvertTo-SecureString "<Your password>" -AsPlainText -Force;
$cred = New-Object System.Management.Automation.PSCredential("EdgeArmUser", $pass)
Connect-AzAccount -EnvironmentName AzASE -TenantId aaaabbbb-0000-cccc-1111-dddd2222eeee -credential $cred
Use the tenant ID aaaabbbb-0000-cccc-1111-dddd2222eeee as in this instance it's hard coded. Use the following username and password.
Username - EdgeArmUser
Password - Set the password for Azure Resource Manager and use this password to sign in.
Here's an example output for the
Connect-AzAccount:PS C:\windows\system32> $pass = ConvertTo-SecureString "<Your password>" -AsPlainText -Force; PS C:\windows\system32> $cred = New-Object System.Management.Automation.PSCredential("EdgeArmUser", $pass) PS C:\windows\system32> Connect-AzAccount -EnvironmentName AzASE -TenantId aaaabbbb-0000-cccc-1111-dddd2222eeee -credential $cred Account SubscriptionName TenantId Environment ------- ---------------- -------- ----------- EdgeArmUser@localhost Default Provider Subscription aaaabbbb-0000-cccc-1111-dddd2222eeee AzASE PS C:\windows\system32>An alternative way to sign in is to use the
login-AzAccountcmdlet.login-AzAccount -EnvironmentName <Environment Name> -TenantId aaaabbbb-0000-cccc-1111-dddd2222eeeeHere's an example output.
PS C:\WINDOWS\system32> login-AzAccount -EnvironmentName AzASE -TenantId aaaabbbb-0000-cccc-1111-dddd2222eeee

Account               SubscriptionName              TenantId
-------               ----------------              --------
EdgeArmUser@localhost Default Provider Subscription c0257de7-538f-415c-993a-1b87a...

PS C:\WINDOWS\system32>
To verify that the connection to the device is working, use the
Get-AzResourcecommand. This command should return all the resources that exist locally on the device.Here's an example output.
PS C:\WINDOWS\system32> Get-AzResource

Name              : aseimagestorageaccount
ResourceGroupName : ase-image-resourcegroup
ResourceType      : Microsoft.Storage/storageaccounts
Location          : dbelocal
ResourceId        : /subscriptions/.../resourceGroups/ase-image-resourcegroup/providers/Microsoft.Storage/storageac
                    counts/aseimagestorageaccount
Tags              :

Name              : myaselinuxvmimage1
ResourceGroupName : ASERG
ResourceType      : Microsoft.Compute/images
Location          : dbelocal
ResourceId        : /subscriptions/.../resourceGroups/ASERG/providers/Microsoft.Compute/images/myaselinuxvmimage1
Tags              :

Name              : ASEVNET
ResourceGroupName : ASERG
ResourceType      : Microsoft.Network/virtualNetworks
Location          : dbelocal
ResourceId        : /subscriptions/.../resourceGroups/ASERG/providers/Microsoft.Network/virtualNetworks/ASEVNET
Tags              :

PS C:\WINDOWS\system32>
If you run into issues with your Azure Resource Manager connections, see Troubleshoot Azure Resource Manager issues for guidance.
Important
The connection to Azure Resource Manager expires every 1.5 hours or if your Azure Stack Edge device restarts. If this happens, any cmdlets that you execute, will return error messages to the effect that you are not connected to Azure anymore. You will need to sign in again.
Switch environments
You may need to switch between two environments.
Run Disconnect-AzAccount command to switch to a different AzEnvironment. If you use Set-AzEnvironment and Login-AzAccount without using Disconnect-AzAccount, the environment isn't switched.
The following examples show how to switch between two environments, AzASE1 and AzASE2.
First, list all the existing environments on your client.
PS C:\WINDOWS\system32> Get-AzEnvironment
Name Resource Manager Url ActiveDirectory Authority
---- -------------------- -------------------------
AzureChinaCloud https://management.chinacloudapi.cn/ https://login.chinacloudapi.cn/
AzureCloud https://management.azure.com/ https://login.microsoftonline.com/
AzureGermanCloud https://management.microsoftazure.de/ https://login.microsoftonline.de/
AzDBE1 https://management.HVTG1T2-Test.microsoftdatabox.com https://login.hvtg1t2-test.microsoftdatabox.com/adfs/
AzureUSGovernment https://management.usgovcloudapi.net/ https://login.microsoftonline.us/
AzDBE2 https://management.CVV4PX2-Test.microsoftdatabox.com https://login.cvv4px2-test.microsoftdatabox.com/adfs/
Next, get which environment you're currently connected to via your Azure Resource Manager.
PS C:\WINDOWS\system32> Get-AzContext |fl *
Name : Default Provider Subscription (...) - EdgeArmUser@localhost
Account : EdgeArmUser@localhost
Environment : AzDBE2
Subscription : ...
Tenant : aaaabbbb-0000-cccc-1111-dddd2222eeee
TokenCache : Microsoft.Azure.Commands.Common.Authentication.ProtectedFileTokenCache
VersionProfile :
ExtendedProperties : {}
You should now disconnect from the current environment before you switch to the other environment.
PS C:\WINDOWS\system32> Disconnect-AzAccount
Id : EdgeArmUser@localhost
Type : User
Tenants : {aaaabbbb-0000-cccc-1111-dddd2222eeee}
AccessToken :
Credential :
TenantMap : {}
CertificateThumbprint :
ExtendedProperties : {[Subscriptions, ...], [Tenants, aaaa0a0a-bb1b-cc2c-dd3d-eeeeee4e4e4e]}
Sign into the other environment. The sample output is shown below.
PS C:\WINDOWS\system32> Login-AzAccount -Environment "AzDBE1" -TenantId $ArmTenantId
Account SubscriptionName TenantId Environment
------- ---------------- -------- -----------
EdgeArmUser@localhost Default Provider Subscription aaaabbbb-0000-cccc-1111-dddd2222eeee AzDBE1
Run this cmdlet to confirm which environment you're connected to.
PS C:\WINDOWS\system32> Get-AzContext |fl *
Name : Default Provider Subscription (...) - EdgeArmUser@localhost
Account : EdgeArmUser@localhost
Environment : AzDBE1
Subscription : ...
Tenant : aaaabbbb-0000-cccc-1111-dddd2222eeee
TokenCache : Microsoft.Azure.Commands.Common.Authentication.ProtectedFileTokenCache
VersionProfile :
ExtendedProperties : {}
You have now switched to the intended environment.