Deploy Data API builder to Azure Container Instances

Diagram of the sequence of the deployment guide including these locations, in order: Overview, Plan, Prepare, Publish, Monitor, and Optimization. The 'Publish' location is currently highlighted.
Deploy the Data API builder quickly to Azure using just a configuration file and no custom code. This guide includes steps to host the Data API builder container image from Docker as a container in Azure Container Instances.
In this guide, walk through the steps to build a Data API builder configuration file, host the file in Azure Files, and then mount the file to a container in Azure Container Instances.
Prerequisites
An Azure account with an active subscription. Create an account for free.
Data API builder CLI. Install the CLI.
Azure CLI. Install the Azure CLI.
Existing supported database addressable from Azure.
Build the configuration file
To start, build a Data API builder (DAB) configuration file to connect to your existing database. This file is used later with the final container.
Create an empty directory on your local machine to store the configuration file.
Initialize a new base configuration file using
dab init. Use the following settings at a minimum on initialization.Setting Value Database type Select a supported database type. Connection string Use the @env()function to reference theDATABASE_CONNECTION_STRINGenvironment variable.dab init --database-type "<database-type>" --connection-string "@env('DATABASE_CONNECTION_STRING')"Important
Some database types will require additional configuration settings on initialization.
Add at least one database entity to the configuration. Use the
dab addcommand to configure an entity. Configure each entity to allow all permissions for anonymous users. Repeatdab addas many times as you like for your entities.dab add "<entity-name>" --source "<schema>.<table>" --permissions "anonymous:*"Open and review the contents of the dab-config.json file. You use this file later in this guide.
Host configuration in Azure Files
Next, upload the configuration file to a file share created within Azure Files. This file share is eventually mounted to the final container as a volume.
Sign into the Azure portal (https://portal.azure.com).
Create a new resource group. You will use this resource group to for all new resources in this guide.

Tip
We recommend naming the resource group msdocs-dab-aci. All screenshots in this guide use this name.
Create an Azure Storage account. Use these settings to configure the account.
Setting Value Resource group Select the resource group you created earlier Storage account name Enter a globally unique name Region Select an Azure region Performance Select Standard Redundancy Select Locally-redundant storage (LRS) Enable storage account key access Select Enabled 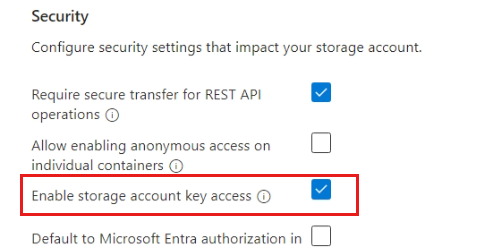
Navigate to the new storage account in the Azure portal.
Select File shares in the Data storage section of the resource menu. Then, select File share from the command bar to create a new share in the storage account. Use the following settings to configure the new file share.
Setting Value Name Enter configAccess tier Select Hot Enable backup Do not select 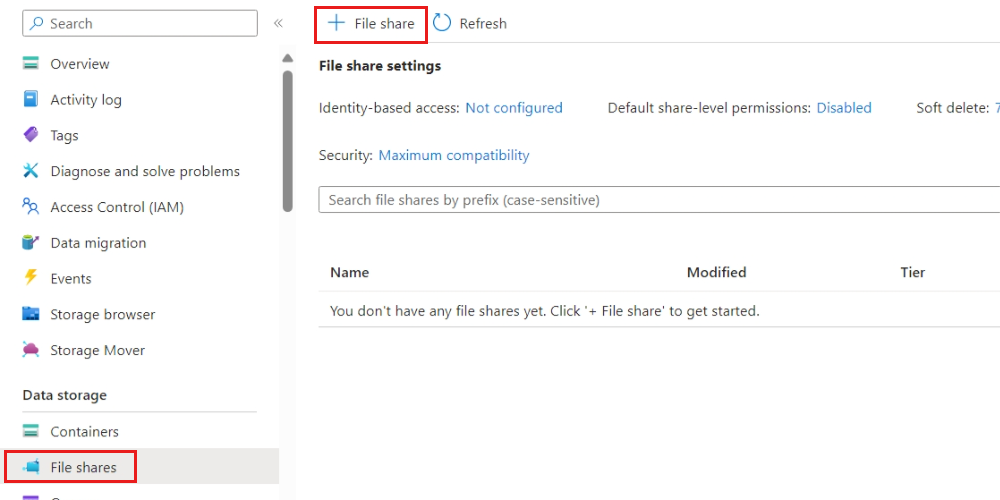
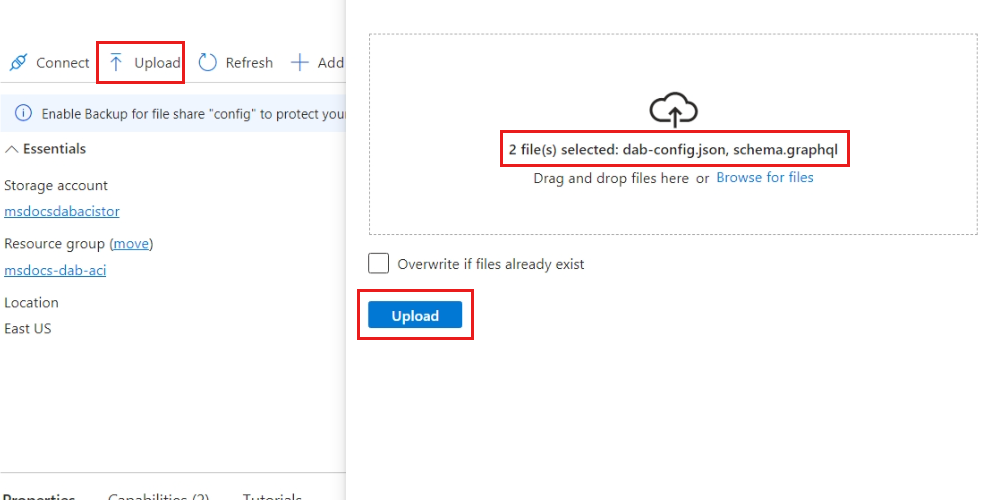
Upload the dab-config.json and any other required files to the share. Use the Upload option in the command bar to open the Upload files dialog. Select both files and then select Upload.
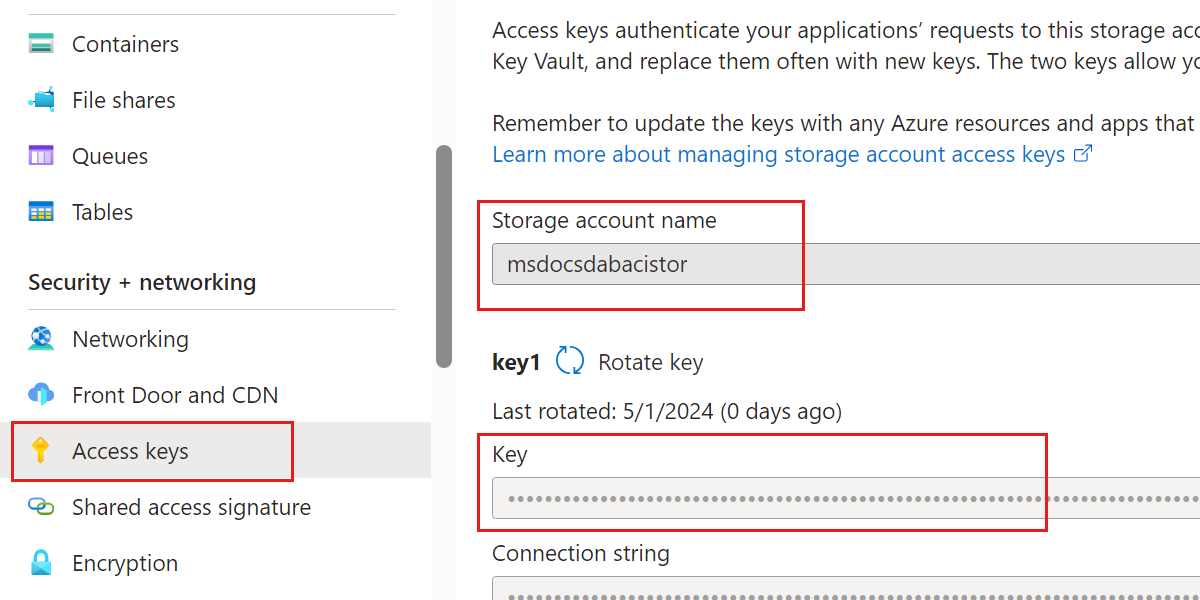
Select Access keys in the Security + networking section of the resource menu. Then, record the Storage account name and Key values from this page. You will use these values later in this guide.

Create the base container instance
Finally, create the container in Azure using Azure Container Instances. This container hosts the Data API builder image with a configuration file to connect to your database.
Important
Today, the only way to create a container instance with a mounted volume is with the Azure CLI.
Create an Azure Container Instances resource using
az container create. Use these settings to configure the resource.Setting Value Resource group Use the resource group you created earlier Container name Enter a globally unique name Region Use the same region as the storage account SKU Use Standard Image type Use Public Image Enter mcr.microsoft.com/azure-databases/data-api-builder:latestOS Type Use Linux Networking type Use Public Networking ports Enter 5000DNS name label Enter a globally unique label Environment variables Enter DATABASE_CONNECTION_STRINGand the connection string for your database.az container create \ --resource-group "<resource-group-name>" \ --name "<unique-container-instance-name>" \ --image "mcr.microsoft.com/azure-databases/data-api-builder:latest" \ --location "<region>" \ --sku "Standard" \ --os-type "Linux" \ --ip-address "public" \ --ports "5000" \ --dns-name-label "<unique-dns-label>" \ --environment-variables "DATABASE_CONNECTION_STRING=<database-connection-string>" \ --azure-file-volume-mount-path "/cfg" \ --azure-file-volume-account-name "<storage-account-name>" \ --azure-file-volume-account-key "<storage-account-key>" \ --azure-file-volume-share-name "config" \ --command-line "dotnet Azure.DataApiBuilder.Service.dll --ConfigFileName /cfg/dab-config.json" --Tip
We recommend using a connection string that does not include authorization keys. Instead, use managed identities and role-based access control to manage access between your database and host. For more information, see Azure services that use managed identities.
Use
az container showto query the fully-qualified domain name (FQDN) for your new container instance. Then, browse to the container instance's website.az container show \ --resource-group "<resource-group-name>" \ --name "<unique-container-instance-name>" \ --query "join('://', ['https', ipAddress.fqdn])" \ --output "tsv"Observe the response indicating that the DAB container is running and the status is healthy.
{
    "status": "healthy",
    "version": "1.1.7",
    "app-name": "dab_oss_1.1.7"
}
Note
The version number and name will vary based on your current version of Data API builder. At this point, you cannot navigate to any API endpoints. These endpoints will be available once you mount a DAB configuration file.
Navigate to the
/api/swaggerpath for the current running application. Use the Swagger UI to issue a HTTP GET request for one of your entities.
Clean up resources
When you no longer need the sample application or resources, remove the corresponding deployment and all resources.
Navigate to the resource group using the Azure portal.
In the command bar, select Delete.