Tutorial: Create a highly available Eureka server component cluster in Azure Container Apps
In this tutorial, you learn to create a Eureka service designed to remain operational in the face of failures and high demand. Building a highly available Eureka service ensures the service registry is always available to clients regardless of demand.
Achieving high availability status for Eureka includes linking multiple Eureka server instances together forming a cluster. The cluster provides resources so that if one Eureka server fails, the other services remain available for requests.
In this tutorial, you:
- Create a Eureka server for Spring components.
- Bind two Eureka servers for Spring components together into a cluster.
- Bind applications to both Eureka servers for highly available service discovery.
Prerequisites
- An Azure account with an active subscription. If you don't already have one, you can can create one for free.
- Azure CLI.
Considerations
When running managed Java components in Azure Container Apps, be aware of the following details:
| Item | Explanation |
|---|---|
| Scope | Components run in the same environment as the connected container app. |
| Scaling | Component can’t scale. The scaling properties minReplicas and maxReplicas are both set to 1. |
| Resources | The container resource allocation for components is fixed. The number of the CPU cores is 0.5, and the memory size is 1 Gi. |
| Pricing | Component billing falls under consumption-based pricing. Resources consumed by managed components are billed at the active/idle rates. You can delete components that are no longer in use to stop billing. |
| Binding | Container apps connect to a component via a binding. The bindings inject configurations into container app environment variables. After a binding is established, the container app can read the configuration values from environment variables and connect to the component. |
Setup
Use the following steps to create your Eureka service cluster.
Create variables that hold application configuration values.
export LOCATION=eastus
export RESOURCE_GROUP=my-services-resource-group
export ENVIRONMENT=my-environment
export EUREKA_COMPONENT_FIRST=eureka01
export EUREKA_COMPONENT_SECOND=eureka02
export APP_NAME=sample-service-eureka-client
export IMAGE="mcr.microsoft.com/javacomponents/samples/sample-service-eureka-client:latest"
Sign in to Azure with the Azure CLI.
az loginCreate a resource group.
az group create --name $RESOURCE_GROUP --location $LOCATIONCreate your Container Apps environment.
az containerapp env create \
    --name $ENVIRONMENT \
    --resource-group $RESOURCE_GROUP \
    --location $LOCATION
Create a cluster
Next, create two Eureka server instances and link them together as a cluster.
Create two Eureka Server for Spring components.
az containerapp env java-component eureka-server-for-spring create \
    --environment $ENVIRONMENT \
    --resource-group $RESOURCE_GROUP \
    --name $EUREKA_COMPONENT_FIRST
az containerapp env java-component eureka-server-for-spring create \ --environment $ENVIRONMENT \ --resource-group $RESOURCE_GROUP \ --name $EUREKA_COMPONENT_SECOND
Bind components together
For the Eureka servers to work in a high-availability configuration, they need to be linked together.
Bind the first Eureka server to the second.
az containerapp env java-component eureka-server-for-spring update \
    --environment $ENVIRONMENT \
    --resource-group $RESOURCE_GROUP \
    --name $EUREKA_COMPONENT_FIRST \
    --bind $EUREKA_COMPONENT_SECOND
Bind the second Eureka server to the first.
az containerapp env java-component eureka-server-for-spring update \
    --environment $ENVIRONMENT \
    --resource-group $RESOURCE_GROUP \
    --name $EUREKA_COMPONENT_SECOND \
    --bind $EUREKA_COMPONENT_FIRST
Deploy and bind the application
With the server components linked together, you can create the container app and binding it to the two Eureka components.
Create the container app.
az containerapp create \
    --name $APP_NAME \
    --resource-group $RESOURCE_GROUP \
    --environment $ENVIRONMENT \
    --image $IMAGE \
    --min-replicas 1 \
    --max-replicas 1 \
    --ingress external \
    --target-port 8080
Bind the container app to the first Eureka server component.
az containerapp update \
    --name $APP_NAME \
    --resource-group $RESOURCE_GROUP \
    --bind $EUREKA_COMPONENT_FIRST
Bind the container app to the second Eureka server component.
az containerapp update \
    --name $APP_NAME \
    --resource-group $RESOURCE_GROUP \
    --bind $EUREKA_COMPONENT_SECOND
View the dashboards
Important
To view the dashboard, you need to have at least the Microsoft.App/managedEnvironments/write role assigned to your account on the managed environment resource. You can either explicitly assign Owner or Contributor role on the resource or follow the steps to create a custom role definition and assign it to your account.
Create the custom role definition.
az role definition create --role-definition '{
    "Name": "Java Component Dashboard Access",
    "IsCustom": true,
    "Description": "Can access managed Java Component dashboards in managed environments",
    "Actions": [
        "Microsoft.App/managedEnvironments/write"
    ],
    "AssignableScopes": ["/subscriptions/<SUBSCRIPTION_ID>"]
}'
Make sure to replace placeholder in between the
<>brackets in theAssignableScopesvalue with your subscription ID.Assign the custom role to your account on managed environment resource.
Get the resource ID of the managed environment.
export ENVIRONMENT_ID=$(az containerapp env show \
    --name $ENVIRONMENT --resource-group $RESOURCE_GROUP \
    --query id \
    --output tsv)
Assign the role to your account.
Before running this command, replace the placeholder in between the
<>brackets with your user or service principal ID.az role assignment create \ --assignee <USER_OR_SERVICE_PRINCIPAL_ID> \ --role "Java Component Dashboard Access" \ --scope $ENVIRONMENT_IDGet the URL of the Eureka Server for Spring dashboard.
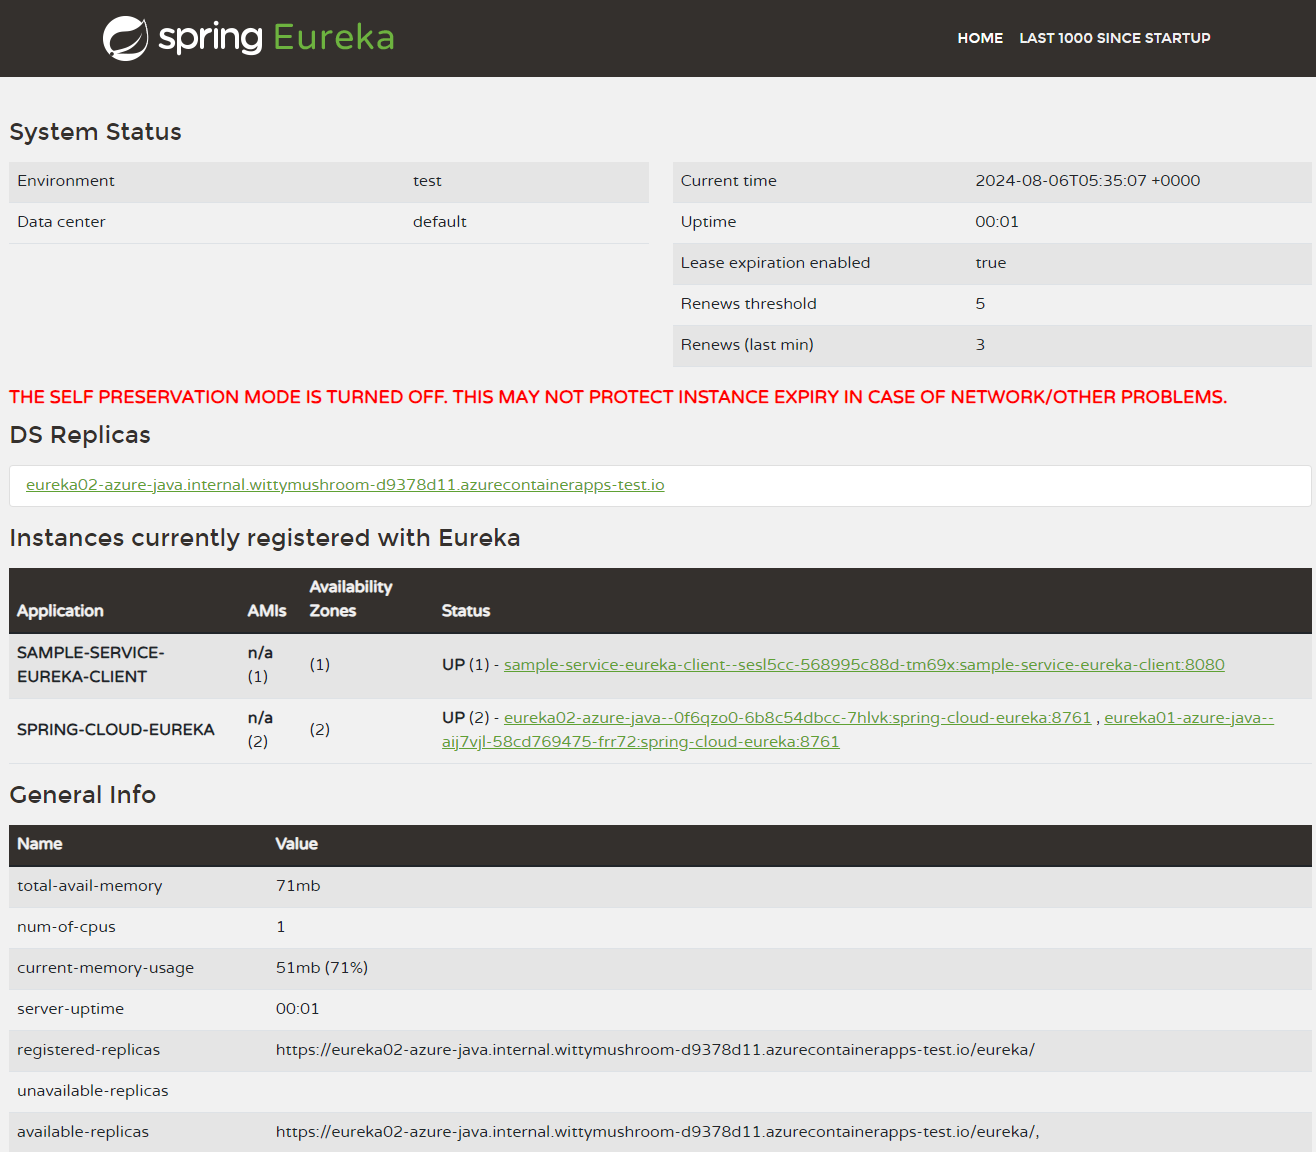
az containerapp env java-component eureka-server-for-spring show \
    --environment $ENVIRONMENT \
    --resource-group $RESOURCE_GROUP \
    --name $EUREKA_COMPONENT_FIRST \
    --query properties.ingress.fqdn \
    --output tsv
This command returns the URL you can use to access the Eureka Server for Spring dashboard. Through the dashboard, you can verify that the Eureka server setup consists of two replicas.
Clean up resources
The resources created in this tutorial have an effect on your Azure bill. If you aren't going to use these services long-term, run the following command to remove everything created in this tutorial.
az group delete --resource-group $RESOURCE_GROUP