Tutorial: Run a parallel workload with Azure Batch using the .NET API
Use Azure Batch to run large-scale parallel and high-performance computing (HPC) batch jobs efficiently in Azure. This tutorial walks through a C# example of running a parallel workload using Batch. You learn a common Batch application workflow and how to interact programmatically with Batch and Storage resources.
- Add an application package to your Batch account.
- Authenticate with Batch and Storage accounts.
- Upload input files to Storage.
- Create a pool of compute nodes to run an application.
- Create a job and tasks to process input files.
- Monitor task execution.
- Retrieve output files.
In this tutorial, you convert MP4 media files to MP3 format, in parallel, by using the ffmpeg open-source tool.
If you don't have an Azure subscription, create an Azure free account before you begin.
Prerequisites
Visual Studio 2017 or later, or .NET Core SDK for Linux, macOS, or Windows.
A Batch account and a linked Azure Storage account. To create these accounts, see the Batch quickstart guides for the Azure portal or Azure CLI.
Download the appropriate version of ffmpeg for your use case to your local computer. This tutorial and the related sample app use the Windows 64-bit full-build version of ffmpeg 4.3.1. For this tutorial, you only need the zip file. You do not need to unzip the file or install it locally.
Sign in to Azure
Sign in to the Azure portal.
Add an application package
Use the Azure portal to add ffmpeg to your Batch account as an application package. Application packages help you manage task applications and their deployment to the compute nodes in your pool.
In the Azure portal, click More services > Batch accounts, and select the name of your Batch account.
Click Applications > Add.
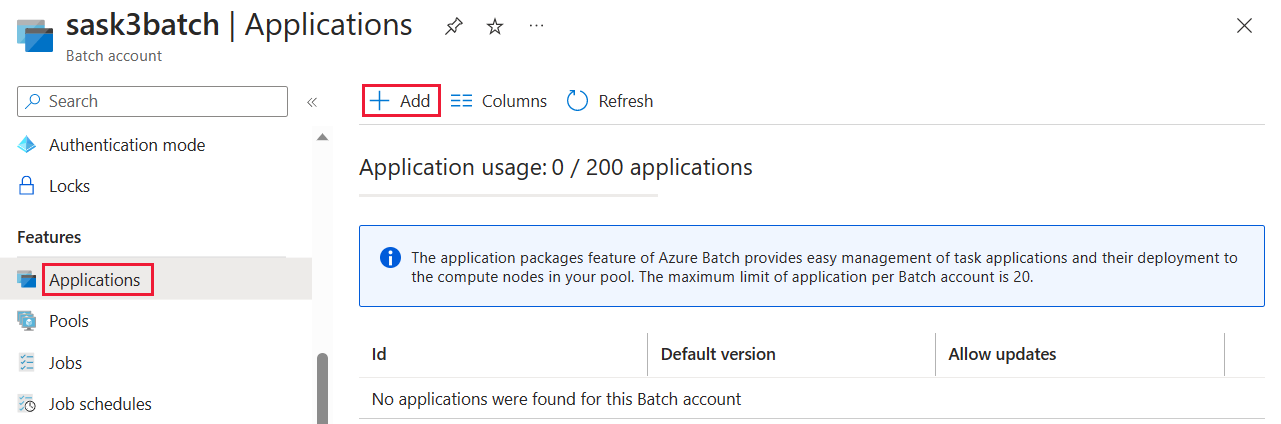
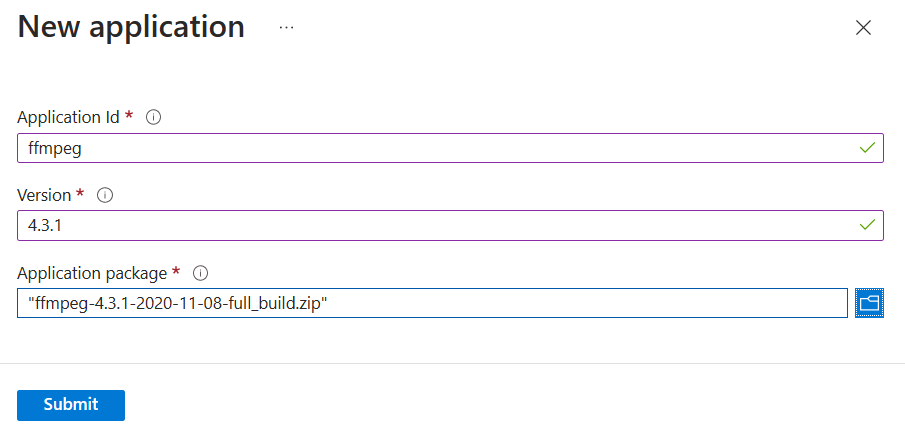
Enter ffmpeg in the Application Id field, and a package version of 4.3.1 in the Version field. Select the ffmpeg zip file that you downloaded, and then select Submit. The ffmpeg application package is added to your Batch account.
Get account credentials
For this example, you need to provide credentials for your Batch and Storage accounts. A straightforward way to get the necessary credentials is in the Azure portal. (You can also get these credentials using the Azure APIs or command-line tools.)
Select All services > Batch accounts, and then select the name of your Batch account.
To see the Batch credentials, select Keys. Copy the values of Batch account, URL, and Primary access key to a text editor.
To see the Storage account name and keys, select Storage account. Copy the values of Storage account name and Key1 to a text editor.
Download and run the sample app
Download the sample app
Download or clone the sample app from GitHub. To clone the sample app repo with a Git client, use the following command:
git clone https://github.com/Azure-Samples/batch-dotnet-ffmpeg-tutorial.git
Navigate to the directory that contains the Visual Studio solution file BatchDotNetFfmpegTutorial.sln.
Also, make sure that the ffmpeg application package reference in the solution matches the identifier and version of the ffmpeg package that you uploaded to your Batch account. For example, ffmpeg and 4.3.1.
const string appPackageId = "ffmpeg";
const string appPackageVersion = "4.3.1";
Build and run the sample project
Build and run the application in Visual Studio, or at the command line with the dotnet build and dotnet run commands. After running the application, review the code to learn what each part of the application does. For example, in Visual Studio:
Right-click the solution in Solution Explorer and select Build Solution.
Confirm the restoration of any NuGet packages, if you're prompted. If you need to download missing packages, ensure the NuGet Package Manager is installed.
Run the solution. When you run the sample application, the console output is similar to the following. During execution, you experience a pause at
Monitoring all tasks for 'Completed' state, timeout in 00:30:00...while the pool's compute nodes are started.
Sample start: 11/19/2018 3:20:21 PM

Container [input] created.
Container [output] created.
Uploading file LowPriVMs-1.mp4 to container [input]...
Uploading file LowPriVMs-2.mp4 to container [input]...
Uploading file LowPriVMs-3.mp4 to container [input]...
Uploading file LowPriVMs-4.mp4 to container [input]...
Uploading file LowPriVMs-5.mp4 to container [input]...
Creating pool [WinFFmpegPool]...
Creating job [WinFFmpegJob]...
Adding 5 tasks to job [WinFFmpegJob]...
Monitoring all tasks for 'Completed' state, timeout in 00:30:00...
Success! All tasks completed successfully within the specified timeout period.
Deleting container [input]...

Sample end: 11/19/2018 3:29:36 PM
Elapsed time: 00:09:14.3418742
Go to your Batch account in the Azure portal to monitor the pool, compute nodes, job, and tasks. For example, to see a heat map of the compute nodes in your pool, click Pools > WinFFmpegPool.
When tasks are running, the heat map is similar to the following:
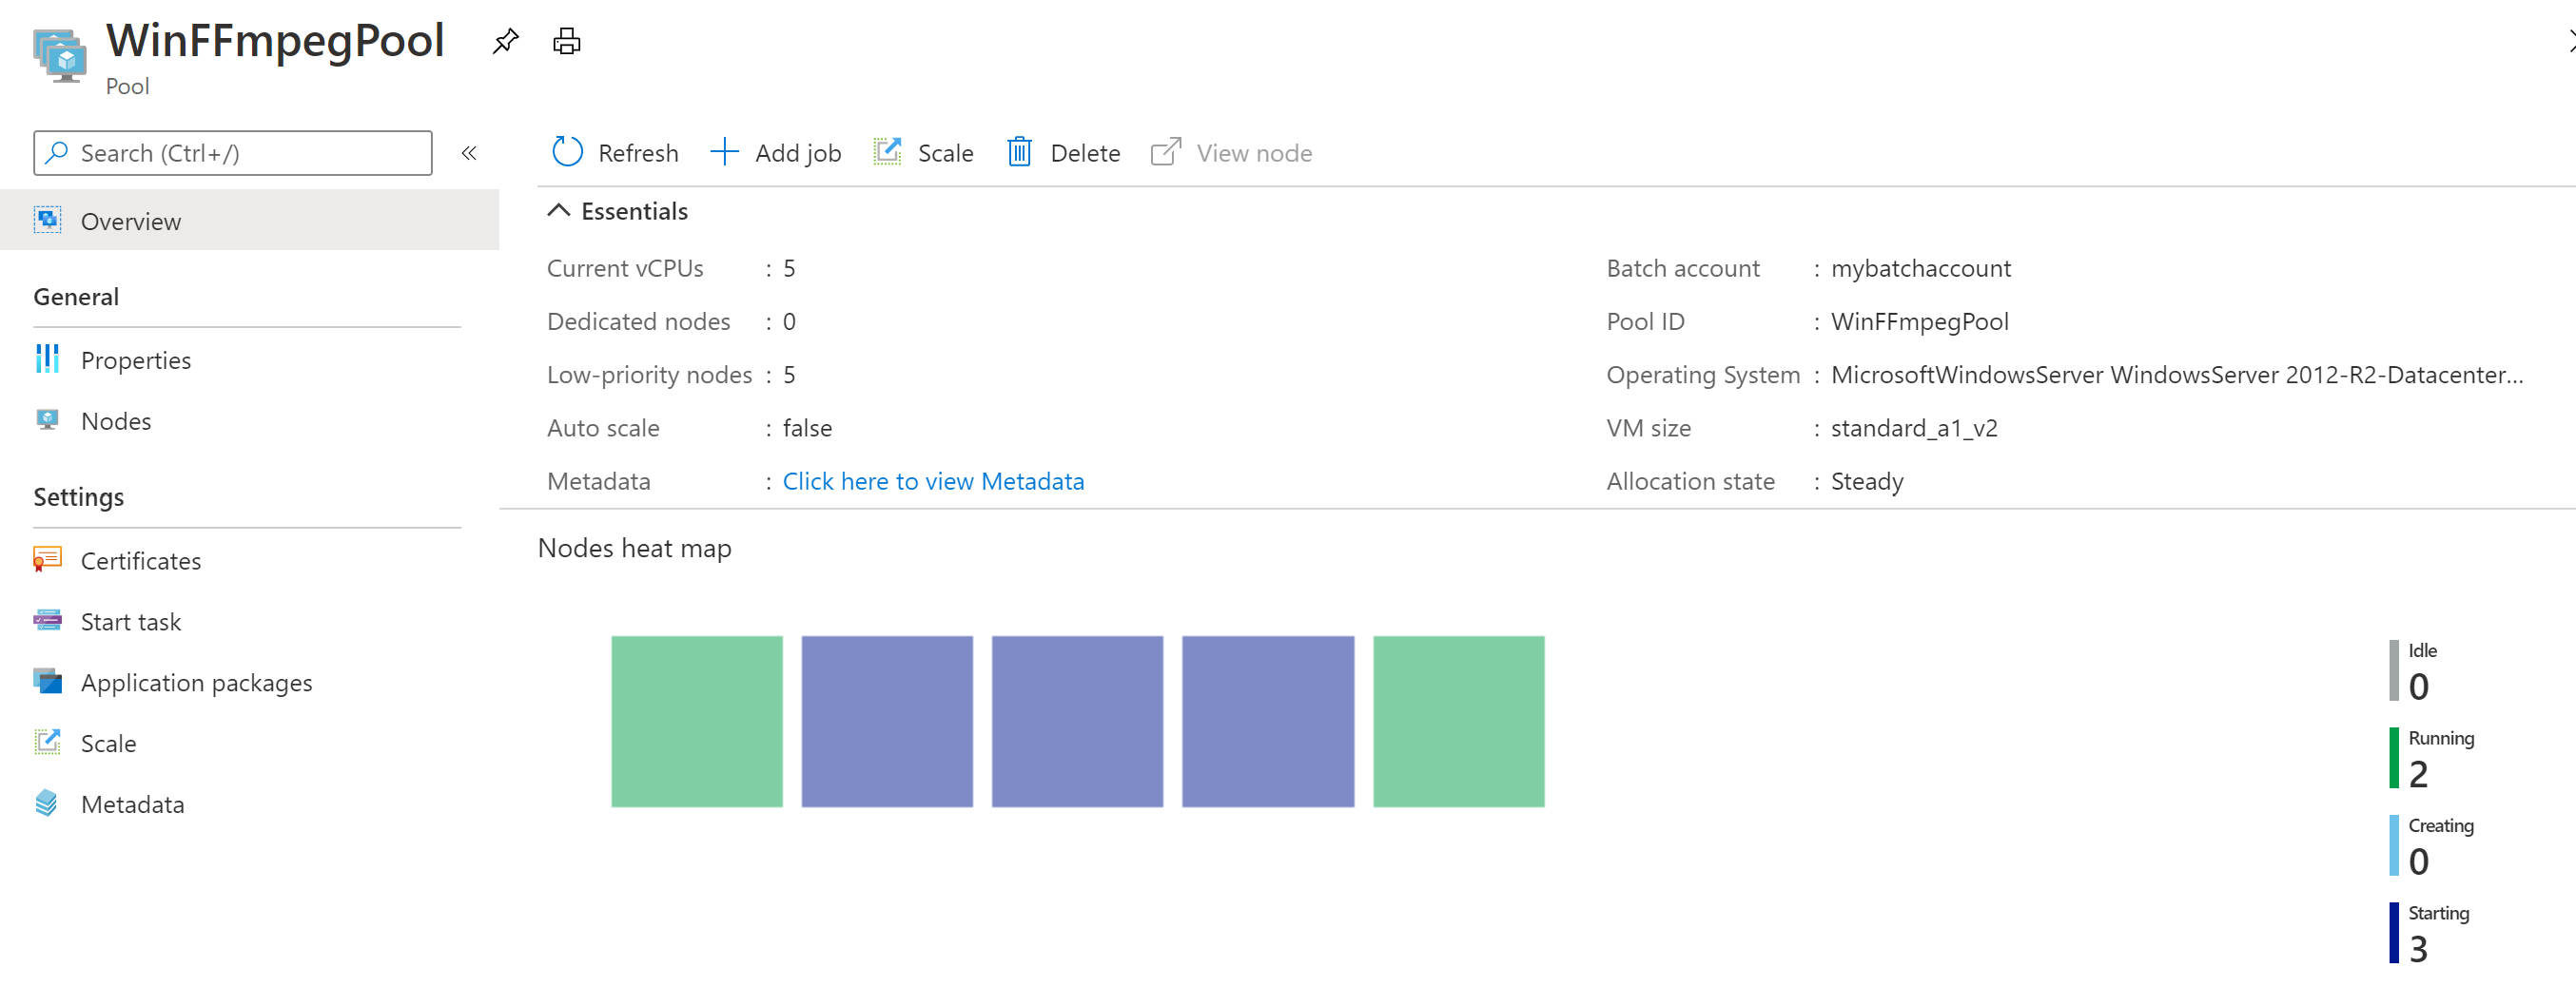
Typical execution time is approximately 10 minutes when you run the application in its default configuration. Pool creation takes the most time.
Retrieve output files
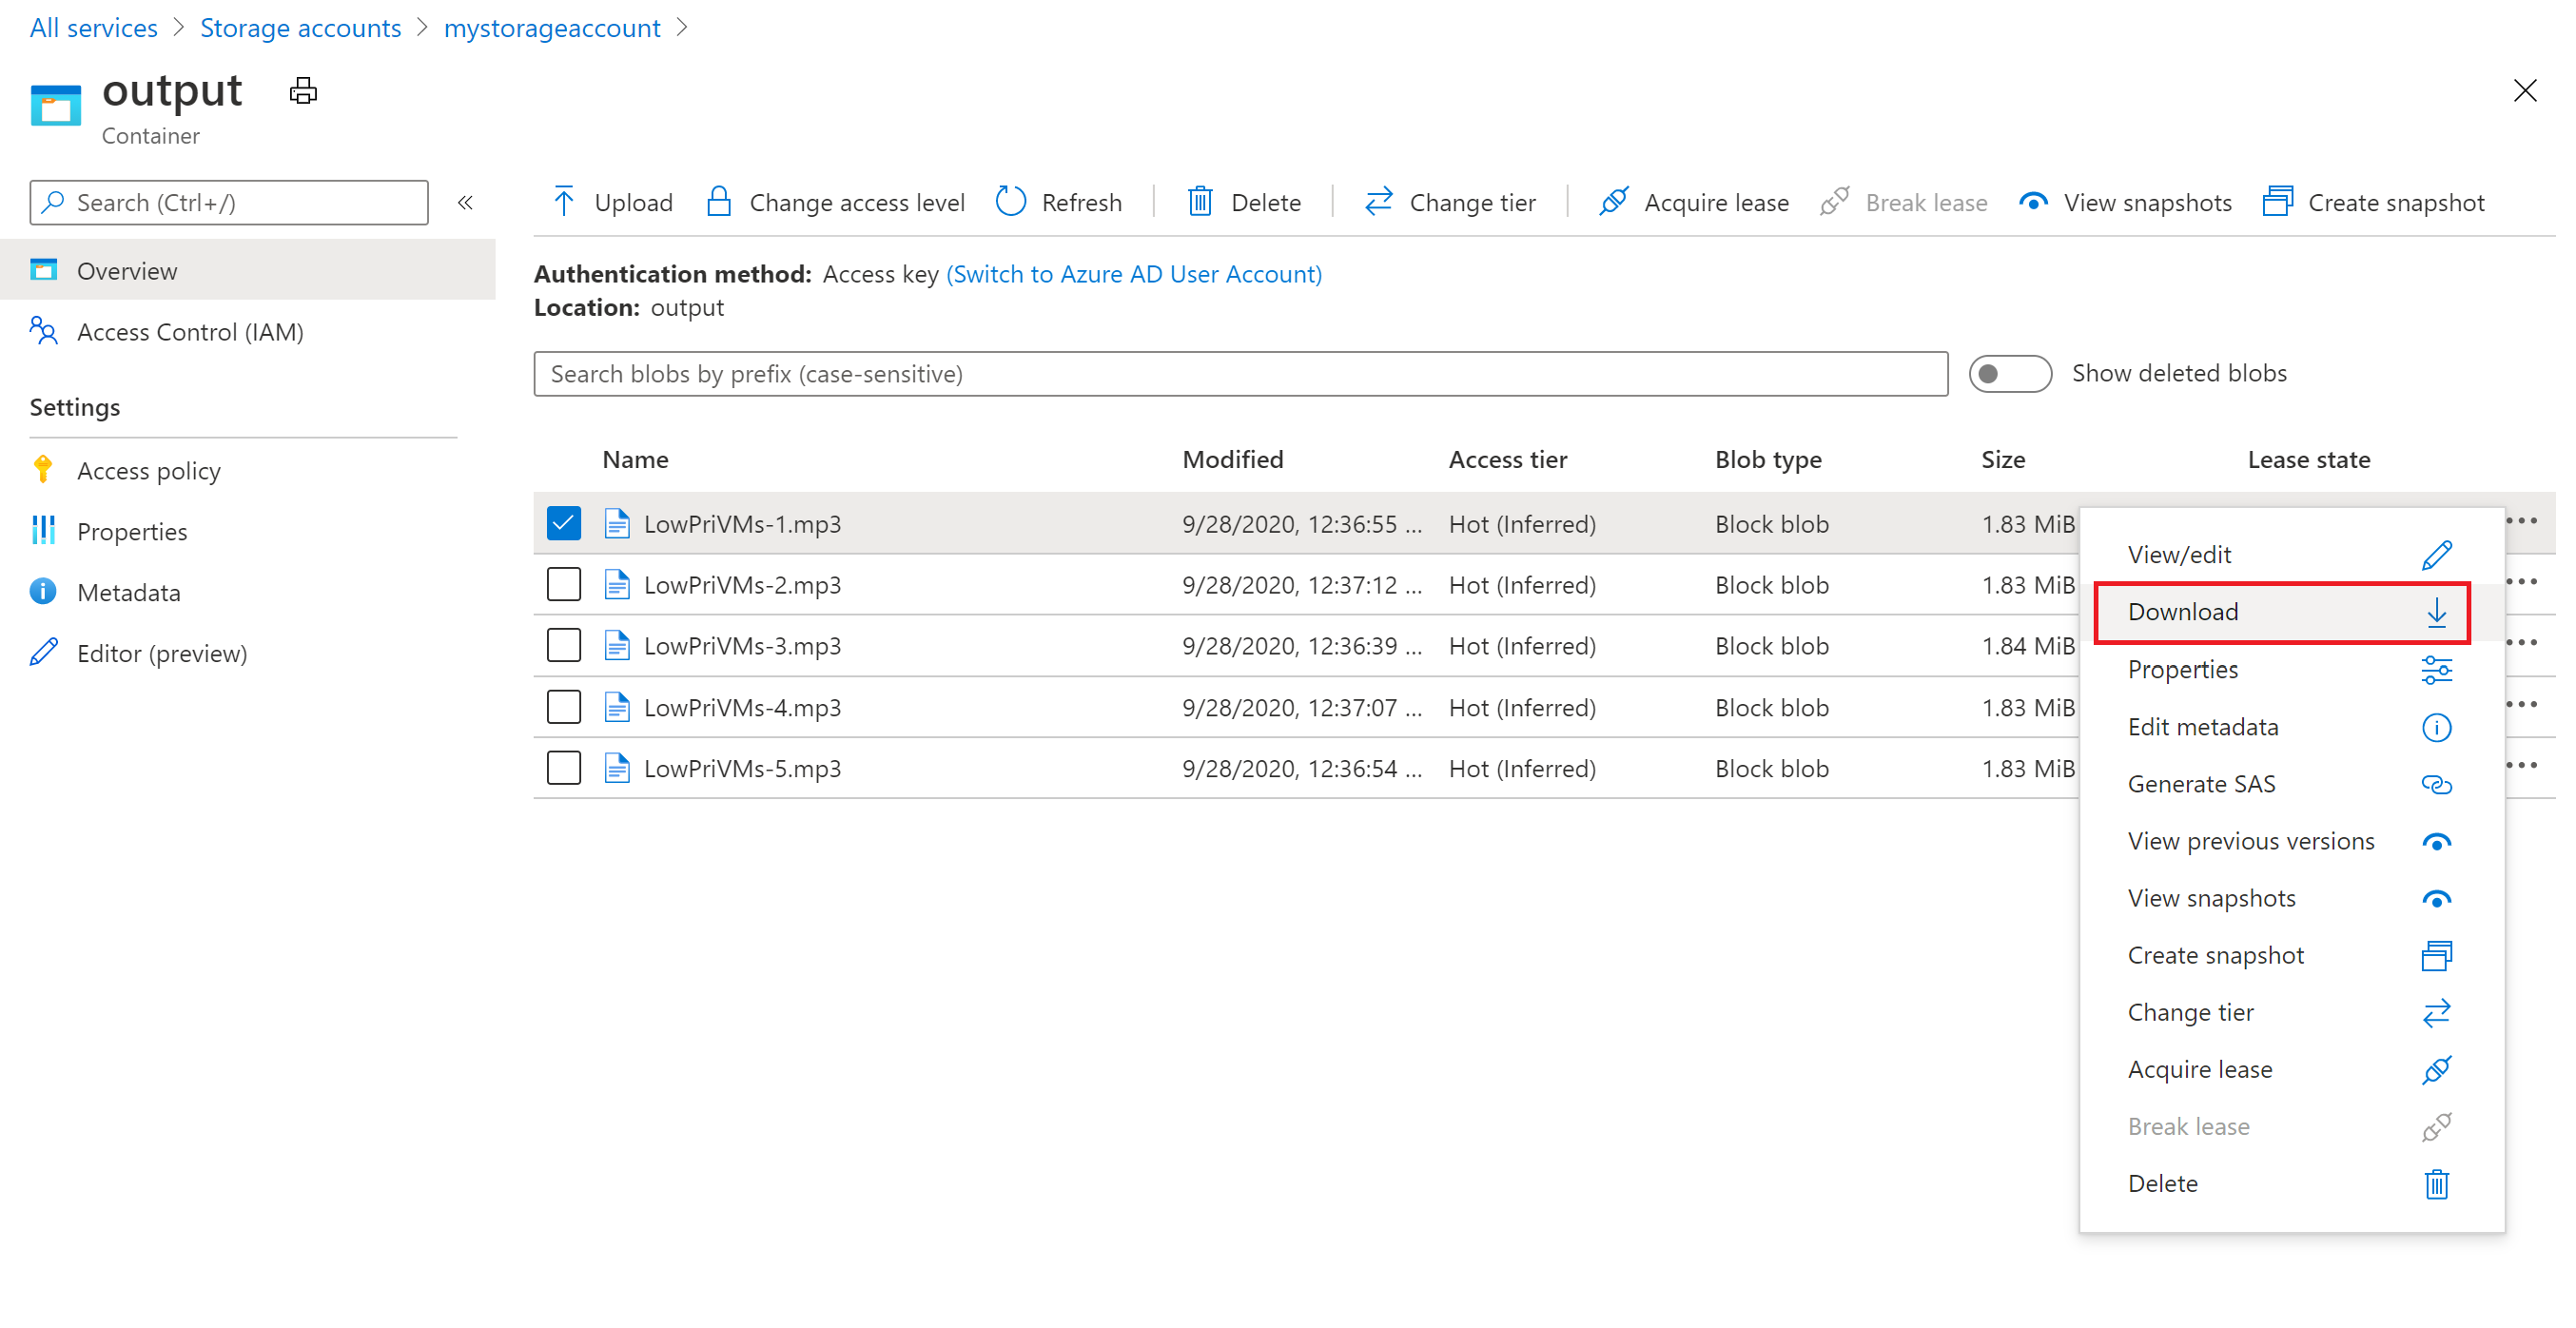
You can use the Azure portal to download the output MP3 files generated by the ffmpeg tasks.
- Click All services > Storage accounts, and then click the name of your storage account.
- Click Blobs > output.
- Right-click one of the output MP3 files and then click Download. Follow the prompts in your browser to open or save the file.
Although not shown in this sample, you can also download the files programmatically from the compute nodes or from the storage container.
Review the code
The following sections break down the sample application into the steps that it performs to process a workload in the Batch service. Refer to the file Program.cs in the solution while you read the rest of this article, since not every line of code in the sample is discussed.
Authenticate Blob and Batch clients
To interact with the linked storage account, the app uses the Azure.Storage.Blobs Library for .NET. Using the BlobServiceClient class which takes a reference to the account Uri and authenticating Token such as DefaultAzureCredential.
// TODO: Replace <storage-account-name> with your actual storage account name
Uri accountUri = new Uri("https://<storage-account-name>.blob.core.windows.net/");
BlobServiceClient blobClient = new BlobServiceClient(accountUri, new DefaultAzureCredential());
The app creates a reference to the BatchAccountResource via the Resource manager's ArmClient to create the pool in the Batch service. The Arm client in the sample uses DefaultAzureCredential authentication.
ArmClient _armClient = new ArmClient(new DefaultAzureCredential());
var batchAccountIdentifier = ResourceIdentifier.Parse(BatchAccountResourceID);
BatchAccountResource batchAccount = await _armClient.GetBatchAccountResource(batchAccountIdentifier).GetAsync();
The app creates a BatchClient object to create and jobs and tasks in the Batch service. The Batch client in the sample uses DefaultAzureCredential authentication.
// TODO: Replace <batch-account-name> with your actual storage account name
Uri batchUri = new Uri("https://<batch-account-name>t.eastus.batch.azure.com");
BatchClient _batchClient = new BatchClient(batchUri, new DefaultAzureCredential());
Upload input files
The app passes the blobServerClient object to the CreateContainerIfNotExist method to create a storage container for the input files (MP4 format) and a container for the task output.
CreateContainerIfNotExist(blobClient, inputContainerName);
CreateContainerIfNotExist(blobClient, outputContainerName);
Then, files are uploaded to the input container from the local InputFiles folder. The files in storage are defined as Batch ResourceFile objects that Batch can later download to compute nodes.
Two methods in Program.cs are involved in uploading the files:
UploadFilesToContainerAsync: Returns a collection ofResourceFileobjects and internally callsUploadResourceFileToContainerAsyncto upload each file that is passed in theinputFilePathsparameter.UploadResourceFileToContainerAsync: Uploads each file as a blob to the input container. After uploading the file, it obtains a shared access signature (SAS) for the blob and returns aResourceFileobject to represent it.
string inputPath = Path.Combine(Environment.CurrentDirectory, "InputFiles");

List<string> inputFilePaths = new List<string>(Directory.GetFileSystemEntries(inputPath, "*.mp4",
    SearchOption.TopDirectoryOnly));

List<ResourceFile> inputFiles = await UploadFilesToContainerAsync(
  blobClient,
  inputContainerName,
  inputFilePaths);
For details about uploading files as blobs to a storage account with .NET, see Upload, download, and list blobs using .NET.
Create a pool of compute nodes
Next, the sample creates a pool of compute nodes in the Batch account with a call to CreatePoolIfNotExistAsync. This defined method uses the BatchAccountResource.GetBatchAccountPools().CreateOrUpdateAsync method to set the number of nodes, VM size, and a pool configuration. Here, a BatchVmConfiguration object specifies an BatchImageReference to a Windows Server image published in the Azure Marketplace. Batch supports a wide range of VM images in the Azure Marketplace, as well as custom VM images.
The number of nodes and VM size are set using defined constants. Batch supports dedicated nodes and Spot nodes, and you can use either or both in your pools. Dedicated nodes are reserved for your pool. Spot nodes are offered at a reduced price from surplus VM capacity in Azure. Spot nodes become unavailable if Azure does not have enough capacity. The sample by default creates a pool containing only 5 Spot nodes in size Standard_A1_v2.
Note
Be sure you check your node quotas. See Batch service quotas and limits for instructions on how to create a quota request.
The ffmpeg application is deployed to the compute nodes by adding an ApplicationPackageReference to the pool configuration.
var credential = new DefaultAzureCredential();
ArmClient _armClient = new ArmClient(credential);

var batchAccountIdentifier = ResourceIdentifier.Parse(BatchAccountResourceID);
BatchAccountResource batchAccount = await _armClient.GetBatchAccountResource(batchAccountIdentifier).GetAsync();

BatchAccountPoolCollection collection = batchAccount.GetBatchAccountPools();
if (collection.Exists(poolId) == false)
{
    var poolName = poolId;
    var imageReference = new BatchImageReference()
    {
        Publisher = "MicrosoftWindowsServer",
        Offer = "WindowsServer",
        Sku = "2019-datacenter-smalldisk",
        Version = "latest"
    };
    string nodeAgentSku = "batch.node.windows amd64";


    ArmOperation<BatchAccountPoolResource> armOperation = await batchAccount.GetBatchAccountPools().CreateOrUpdateAsync(
        WaitUntil.Completed, poolName, new BatchAccountPoolData()
        {
            VmSize = "Standard_DS1_v2",
            DeploymentConfiguration = new BatchDeploymentConfiguration()
            {
                VmConfiguration = new BatchVmConfiguration(imageReference, nodeAgentSku)
            },
            ScaleSettings = new BatchAccountPoolScaleSettings()
            {
                FixedScale = new BatchAccountFixedScaleSettings()
                {
                    TargetDedicatedNodes = DedicatedNodeCount,
                    TargetLowPriorityNodes = LowPriorityNodeCount
                }
            },
            Identity = new ManagedServiceIdentity(ManagedServiceIdentityType.UserAssigned)
            {
                UserAssignedIdentities =
                {
                        [new ResourceIdentifier(ManagedIdentityId)] = new Azure.ResourceManager.Models.UserAssignedIdentity(),
                },
            },
            ApplicationPackages =
            {
                    new Azure.ResourceManager.Batch.Models.BatchApplicationPackageReference(new ResourceIdentifier(appPackageResourceID))
                    {
                        Version = appPackageVersion,
                    }
            },

        });
    BatchAccountPoolResource pool = armOperation.Value;
Create a job
A Batch job specifies a pool to run tasks on and optional settings such as a priority and schedule for the work. The sample creates a job with a call to CreateJobAsync. This defined method uses the BatchClient.CreateJobAsync method to create a job on your pool.
 BatchJobCreateContent batchJobCreateContent = new BatchJobCreateContent(jobId, new BatchPoolInfo { PoolId = poolId });
 await batchClient.CreateJobAsync(batchJobCreateContent);
Create tasks
The sample creates tasks in the job with a call to the AddTasksAsync method, which creates a list of BatchTask objects. Each BatchTask runs ffmpeg to process an input ResourceFile object using a CommandLine property. ffmpeg was previously installed on each node when the pool was created. Here, the command line runs ffmpeg to convert each input MP4 (video) file to an MP3 (audio) file.
The sample creates an OutputFile object for the MP3 file after running the command line. Each task's output files (one, in this case) are uploaded to a container in the linked storage account, using the task's OutputFiles property. Note the conditions set on the outputFile object. An output file from a task is only uploaded to the container after the task has successfully completed (OutputFileUploadCondition.TaskSuccess). See the full code sample on GitHub for further implementation details.
Then, the sample adds tasks to the job with the CreateTaskAsync method, which queues them to run on the compute nodes.
Replace the executable's file path with the name of the version that you downloaded. This sample code uses the example ffmpeg-4.3.1-2020-11-08-full_build.
// Create a collection to hold the tasks added to the job:
List<BatchTaskCreateContent> tasks = new List<BatchTaskCreateContent>();

for (int i = 0; i < inputFiles.Count; i++)
{
    // Assign a task ID for each iteration
    string taskId = String.Format("Task{0}", i);

    // Define task command line to convert the video format from MP4 to MP3 using ffmpeg.
    // Note that ffmpeg syntax specifies the format as the file extension of the input file
    // and the output file respectively. In this case inputs are MP4.
    string appPath = String.Format("%AZ_BATCH_APP_PACKAGE_{0}#{1}%", appPackageId, appPackageVersion);
    string inputMediaFile = inputFiles[i].StorageContainerUrl;
    string outputMediaFile = String.Format("{0}{1}",
        System.IO.Path.GetFileNameWithoutExtension(inputMediaFile),
        ".mp3");
    string taskCommandLine = String.Format("cmd /c {0}\\ffmpeg-4.3.1-2020-11-08-full_build\\bin\\ffmpeg.exe -i {1} {2}", appPath, inputMediaFile, outputMediaFile);

    // Create a batch task (with the task ID and command line) and add it to the task list

    BatchTaskCreateContent batchTaskCreateContent = new BatchTaskCreateContent(taskId, taskCommandLine);
    batchTaskCreateContent.ResourceFiles.Add(inputFiles[i]);

    // Task output file will be uploaded to the output container in Storage.
    // TODO: Replace <storage-account-name> with your actual storage account name
    OutputFileBlobContainerDestination outputContainer = new OutputFileBlobContainerDestination("https://<storage-account-name>.blob.core.windows.net/output/" + outputMediaFile)
    {
        IdentityReference = inputFiles[i].IdentityReference,
    };

    OutputFile outputFile = new OutputFile(outputMediaFile,
                                           new OutputFileDestination() { Container = outputContainer },
                                           new OutputFileUploadConfig(OutputFileUploadCondition.TaskSuccess));
    batchTaskCreateContent.OutputFiles.Add(outputFile);

    tasks.Add(batchTaskCreateContent);
}

// Call BatchClient.CreateTaskCollectionAsync() to add the tasks as a collection rather than making a
// separate call for each. Bulk task submission helps to ensure efficient underlying API
// calls to the Batch service.

await batchClient.CreateTaskCollectionAsync(jobId, new BatchTaskGroup(tasks));
Clean up resources
After it runs the tasks, the app automatically deletes the input storage container it created, and gives you the option to delete the Batch pool and job. The BatchClient has a method to delete a job DeleteJobAsync and delete a pool DeletePoolAsync, which are called if you confirm deletion. Although you're not charged for jobs and tasks themselves, you are charged for compute nodes. Thus, we recommend that you allocate pools only as needed. When you delete the pool, all task output on the nodes is deleted. However, the output files remain in the storage account.
When no longer needed, delete the resource group, Batch account, and storage account. To do so in the Azure portal, select the resource group for the Batch account and click Delete resource group.
Next steps
In this tutorial, you learned how to:
- Add an application package to your Batch account.
- Authenticate with Batch and Storage accounts.
- Upload input files to Storage.
- Create a pool of compute nodes to run an application.
- Create a job and tasks to process input files.
- Monitor task execution.
- Retrieve output files.
For more examples of using the .NET API to schedule and process Batch workloads, see the Batch C# samples on GitHub.