Deploy Bastion as private-only
This article helps you deploy Bastion as a private-only deployment. Private-only Bastion deployments lock down workloads end-to-end by creating a non-internet routable deployment of Bastion that allows only private IP address access. Private-only Bastion deployments don't allow connections to the bastion host via public IP address. In contrast, a regular Azure Bastion deployment allows users to connect to the bastion host using a public IP address.
The following diagram shows the Azure Bastion dedicated private-only deployment architecture. Bastion is deployed to the virtual network. A user that's connected to Azure via ExpressRoute private-peering can securely connect to Bastion using the private IP address of the bastion host. Bastion can then make the connection via private IP address to a virtual machine that's within the same virtual network as the bastion host. In a private-only Bastion deployment, Bastion doesn't allow outbound access outside of the virtual network.
Items to consider:
Private-only Bastion is configured at the time of deployment and requires the Premium SKU Tier.
You can't change from a regular Bastion deployment to a private-only deployment.
To deploy private-only Bastion to a virtual network that already has a Bastion deployment, first remove Bastion from your virtual network, then deploy Bastion back to the virtual network as private-only. You don't need to delete and recreate the AzureBastionSubnet.
If you want to create end-to-end private connectivity, connect using the native client instead of connecting via the Azure portal.
If your client machine is on-premises and non-Azure, you will need to deploy an ExpressRoute or VPN and enable IP-based connection on the Bastion resource
Prerequisites
The steps in this article assume you have the following prerequisites:
- An Azure subscription. If you don't have one, create a free account before you begin.
- A virtual network that doesn't have Azure Bastion deployment.
Example values
You can use the following example values when creating this configuration, or you can substitute your own.
Basic virtual network and virtual machine values
| Name | Value |
|---|---|
| Resource group | TestRG1 |
| Region | East US |
| Virtual network | VNet1 |
| Address space | 10.1.0.0/16 |
| Subnet 1 name: FrontEnd | 10.1.0.0/24 |
| Subnet 2 name: AzureBastionSubnet | 10.1.1.0/26 |
Bastion values
| Name | Value |
|---|---|
| Name | VNet1-bastion |
| Tier/SKU | Premium |
| Instance count (host scaling) | 2 or greater |
| Assignment | Static |
Deploy private-only Bastion
This section helps you deploy Bastion as private-only to your virtual network.
Important
Hourly pricing starts from the moment that Bastion is deployed, regardless of outbound data usage. For more information, see Pricing and SKUs. If you're deploying Bastion as part of a tutorial or test, we recommend that you delete this resource after you finish using it.
Sign in to the Azure portal and go to your virtual network. If you don't already have one, you can create a virtual network. If you're creating a virtual network for this exercise, you can create the AzureBastionSubnet (from the next step) at the same time you create your virtual network.
Create the subnet to which your Bastion resources will be deployed. In the left pane, select Subnets -> +Subnet to add the AzureBastionSubnet.
- The subnet must be /26 or larger (for example, /26, /25, or /24) to accommodate features available with the Premium SKU Tier.
- The subnet must be named AzureBastionSubnet.
Select Save at the bottom of the pane to save your values.
Next, on your virtual network page, select Bastion from the left pane.
On the Bastion page, expand Dedicated Deployment Options (if that section appears). Select the Configure manually button. If you don't select this button, you can't see required settings to deploy Bastion as private-only.
On the Create a Bastion pane, configure the settings for your bastion host. The Project details values are populated from your virtual network values.
Under Instance details, configure these values:
Name: The name that you want to use for your Bastion resource.
Region: The Azure public region in which the resource will be created. Choose the region where your virtual network resides.
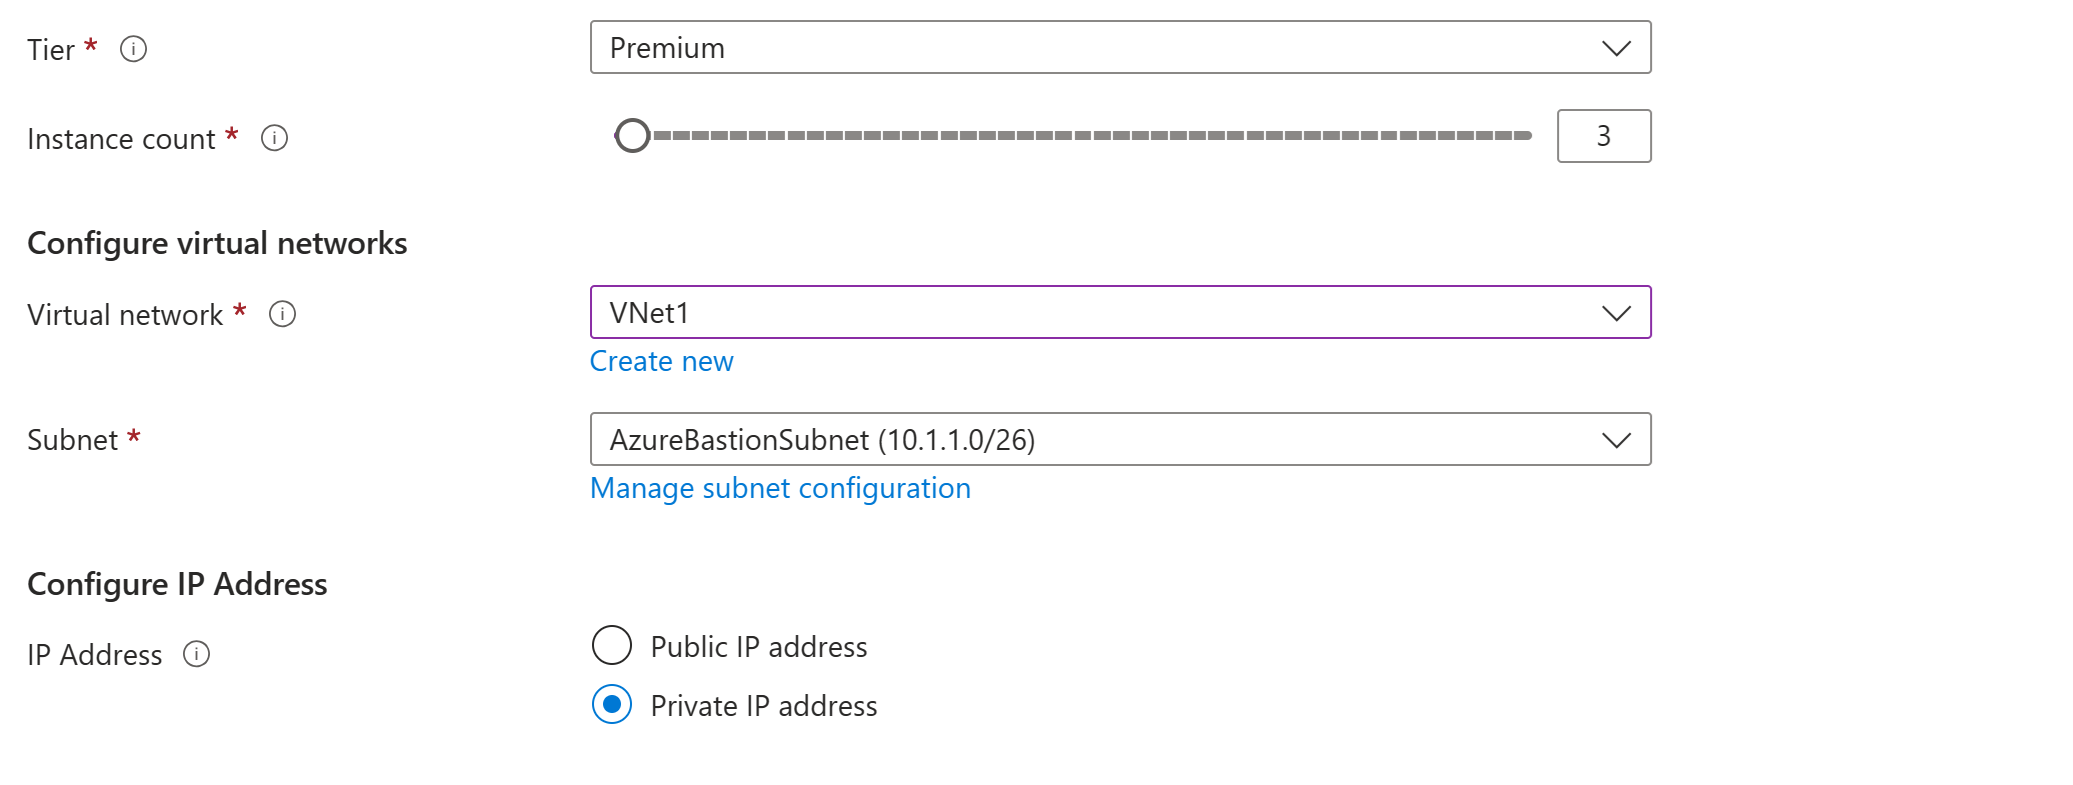
Tier: You must select Premium for a private-only deployment.
Instance count: The setting for host scaling. You configure host scaling in scale unit increments. Use the slider or enter a number to configure the instance count that you want. For more information, see Instances and host scaling and Azure Bastion pricing.
For Configure virtual networks settings, select your virtual network from the dropdown list. If your virtual network isn't in the dropdown list, make sure that you selected the correct Region value in the previous step.
The AzureBastionSubnet will automatically populate if you already created it in the earlier steps.
The Configure IP address section is where you specify that this is a private-only deployment. You must select Private IP address from the options.
When you select Private IP address, the Public IP address settings are automatically removed from the configuration screen.
If you plan to use ExpressRoute or VPN with Private-only Bastion, go to the Advanced tab. Select IP-based connection.
When you finish specifying the settings, select Review + Create. This step validates the values.
After the values pass validation, you can deploy Bastion. Select Create.
A message shows that your deployment is in process. The status appears on this page as the resources are created. It takes about 10 minutes for the Bastion resource to be created and deployed.
Next steps
For more information about configuration settings, see Azure Bastion configuration settings and the Azure Bastion FAQ.

