Encrypt backup data in a Backup vault by using customer-managed keys
You can use Azure Backup to encrypt your backup data via customer-managed keys (CMKs) instead of platform-managed keys (PMKs), which are enabled by default. Your keys to encrypt the backup data must be stored in Azure Key Vault.
The encryption key that you use for encrypting backups might be different from the one that you use for the source. An AES 256-based data encryption key (DEK) helps protect the data. Your key encryption keys (KEKs), in turn, help protect the DEK. You have full control over the data and the keys.
To allow encryption, you must grant the Backup vault’s managed identity that you want to use for CMK, the permissions to access the encryption key in the key vault. You can change the key when necessary.
Note
Encryption Settings and CMK are used interchangeably.
Supported regions
CMKs for Backup vaults are currently available in all Azure public regions.
Key Vault and managed HSM key requirements
Before you enable encryption on a Backup vault, review the following requirements:
Encryption settings use Azure Key Vault or a managed hardware security module (HSM) key, along with the details of the Backup vault's managed identity.
The Backup vault's managed identity needs to have:
- A built-in Crypto Service Encryption User role assigned, if your key vault is using a role-based access control (RBAC) configuration that's based on identity and access management (IAM).
- Get, Wrap, and Unwrap permissions if your key vault is using a configuration that's based on access policies.
- Get, Wrap, and Unwrap permissions granted via local RBAC on the key if you're using a managed HSM. Learn more.
Ensure that you have a valid, enabled Key Vault key. Don't use an expired or disabled key, because it can't be used for encryption at rest and will lead to failures of backup and restore operations. The Key Vault term also indicates a managed HSM if you didn't note it earlier.
Key Vault must have soft delete and purge protection enabled.
Encryption settings support Azure Key Vault RSA and RSA-HSM keys only of sizes 2,048, 3,072, and 4,096. Learn more about keys. Before you consider Key Vault regions for encryption settings, see Key Vault disaster recovery scenarios for regional failover support.
Considerations
Before you enable encryption on a Backup vault, review the following considerations:
After you enable encryption by using CMKs for a Backup vault, you can't revert to using PMKs (the default). You can change the encryption keys or the managed identity to meet requirements.
CMK is applied on the Azure Backup storage vault and vault-archive tiers. It isn't applicable for the operational tier.
Moving a CMK-encrypted Backup vault across resource groups and subscriptions isn't currently supported.
After you enable encryption settings on the Backup vault, don't disable or detach the managed identity or remove Key Vault permissions used for encryption settings. These actions lead to failure of backup, restore, tiering, and restore-point expiration jobs. They'll incur costs for the data stored in the Backup vault until:
- You restore the Key Vault permissions.
- You reenable a system-assigned identity, grant the key vault permissions to it, and update encryption settings (if you used the system-assigned identity for encryption settings).
- You reattach the managed identity make sure that it has permissions to access the key vault and the key to use the new user-assigned identity.
Encryption settings use the Azure Key Vault key and the Backup vault's managed identity details.
If the key or Key Vault that you're using is deleted or access is revoked and can't be restored, you'll lose access to the data stored in the Backup vault. Also, ensure that you have appropriate permissions to provide and update managed identity, Backup vault, and key vault details.
Vaults that use user-assigned managed identities for CMK encryption don't support the use of private endpoints for Azure Backup.
Key vaults that limit access to specific networks are currently not supported with User-assigned managed identities for CMK encryption.
Enable encryption by using customer-managed keys at vault creation
When you create a Backup vault, you can enable encryption on backups by using CMKs. Learn how to create a Backup vault.
Choose a client:
To enable the encryption, follow these steps:
In the Azure portal, go to the Backup vault.
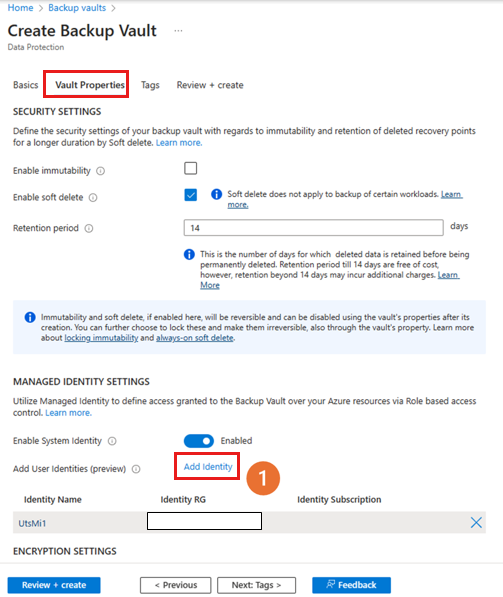
On the Vault Properties tab, select Add Identity.
On the Select user assigned managed identity blade, select a managed identity from the list that you want to use for encryption, and then select Add.
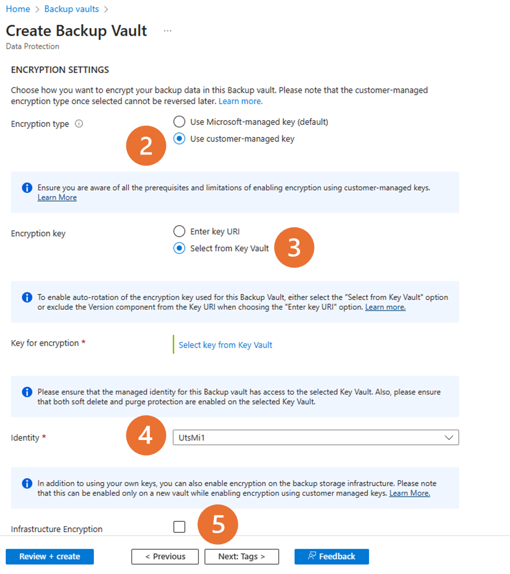
For Encryption type, select Use customer-managed key.
To specify the key to be used for encryption, select the appropriate option.
To enable autorotation of the encryption key version used for the Backup vault, choose Select from Key Vault. Or remove the version component from the key URI by selecting Enter key URI. Learn more about autorotation.
Provide the URI for the encryption key. You can also browse and select the key.
Add the user-assigned managed identity to manage encryption with CMKs.
During the vault creation, only user-assigned managed identities can be used for CMK.
To use CMK with system-assigned managed identity, update the vault properties after creating the vault.
To enable encryption on the backup storage infrastructure, select Infrastructure Encryption.
You can enable Infrastructure Encryption only on a new vault during creation and using Customer-Managed Keys (CMK).
Add tags (optional) and continue creating the vault.
Update the Backup vault properties to encrypt by using customer-managed keys
You can modify the Encryption Settings of a Backup vault in the following scenarios:
- Enable Customer Managed Key for an already existing vault. For Backup vaults, you can enable CMK before or after protecting items to the vault.
- Update details in the Encryption Settings, such as the managed identity or encryption key.
Let's enable Customer Managed Key for an existing vault.
To configure a vault, perform the following actions in sequence:
Enable a managed identity for your Backup vault.
Assign permissions to the Backup vault to access the encryption key in Azure Key Vault.
Enable soft delete and purge protection on Azure Key Vault.
Assign the encryption key to the Backup vault.
The following sections discuss each of these actions in detail.
Enable a managed identity for your Backup vault
Azure Backup uses system-assigned managed identities and user-assigned managed identities of the Backup vault to access encryption keys stored in Azure Key Vault. You can choose which managed identity to use.
Note
After you enable a managed identity, you must not disable it (even temporarily). Disabling the managed identity might lead to inconsistent behavior.
For security reasons, you can't update both a Key Vault key URI and a managed identity in a single request. Update one attribute at a time.
Enable a system-assigned managed identity for the vault
Choose a client:
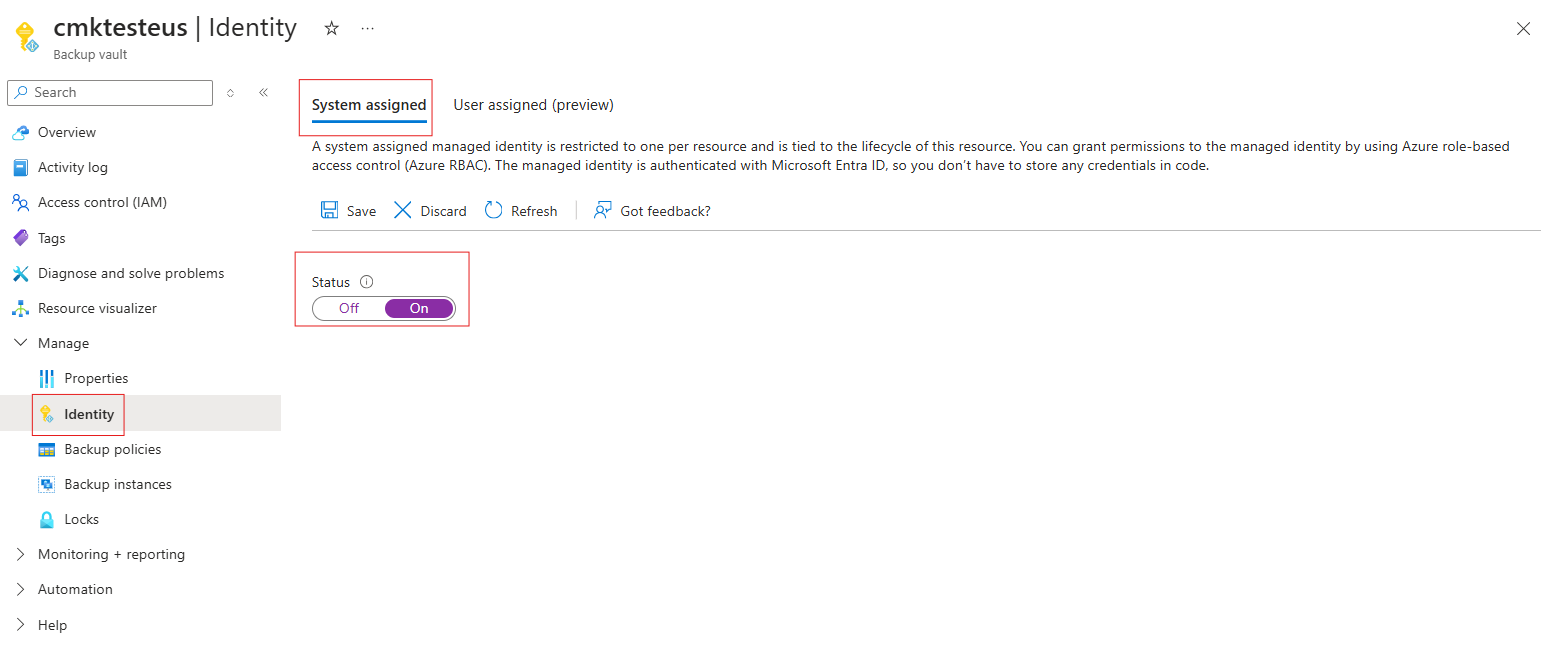
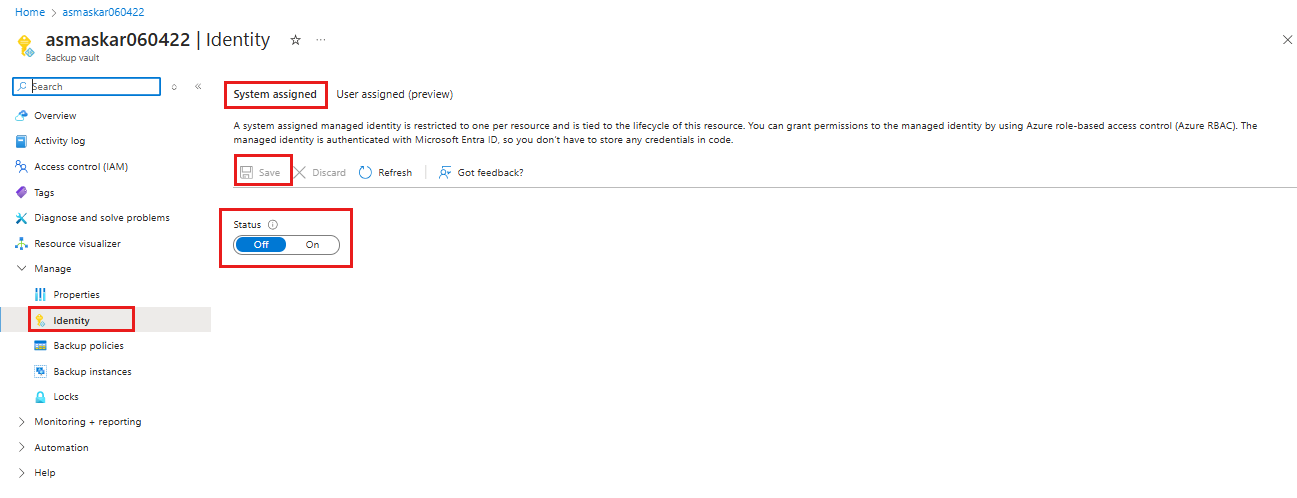
To enable a system-assigned managed identity for your Backup vault, follow these steps:
Go to your Backup vault > Identity.
Select the System assigned tab.
Change the Status to On.
Select Save to enable the identity for the vault.
The preceding steps generate an object ID, which is the system-assigned managed identity of the vault.
Assign a user-assigned managed identity to the vault
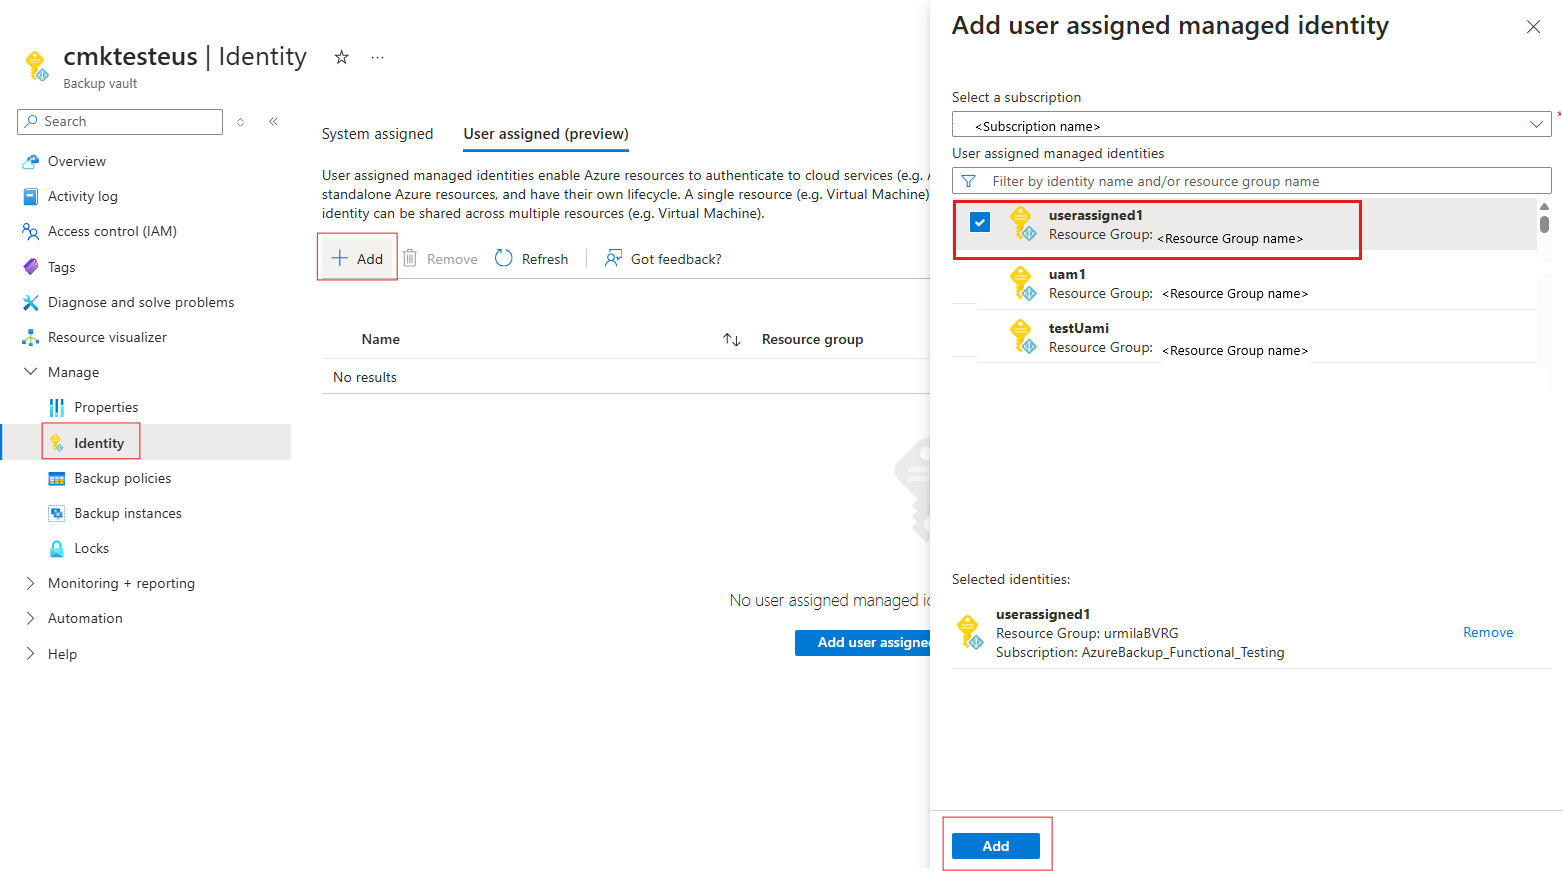
To assign a user-assigned managed identity for your Backup vault, follow these steps:
Go to your Backup vault > Identity.
Select the User assigned (preview) tab.
Select +Add to add a user-assigned managed identity.
On the Add user assigned managed identity panel, select the subscription for your identity.
Select the identity from the list. You can also filter by the name of the identity or resource group.
Select Add to finish assigning the identity.
Note
Key vaults that limit access to specific networks aren't yet supported for use with user-assigned managed identities for CMK encryption.
Assign permissions to the Backup vault's Managed Identity(system or user-assigned) to access the encryption key in Azure Key Vault
Choose a client:
You need to permit the Backup vault's managed identity to access the key vault that contains the encryption key.
Scenario: Key Vault has access control (IAM) configuration enabled
Follow these steps:
- Go to your key vault > Access Control, and then select Add Role Assignment.
- Select the Key Vault Crypto Service Encryption User role from Job function roles.
- Select Next > Assign Access to > Managed Identity > Select Members.
- Select your Backup vault's managed identity.
- Select Next and assign.
Scenario: Key vault has configuration of access policies enabled
Follow these steps:
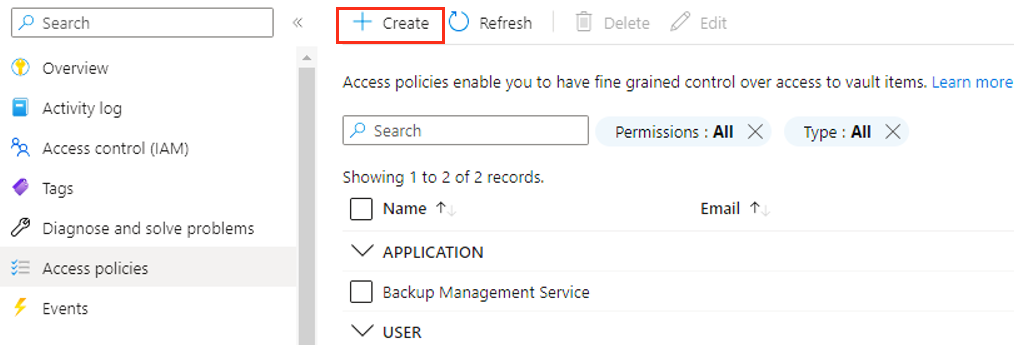
Go to your key vault > Access policies, and then select +Create.
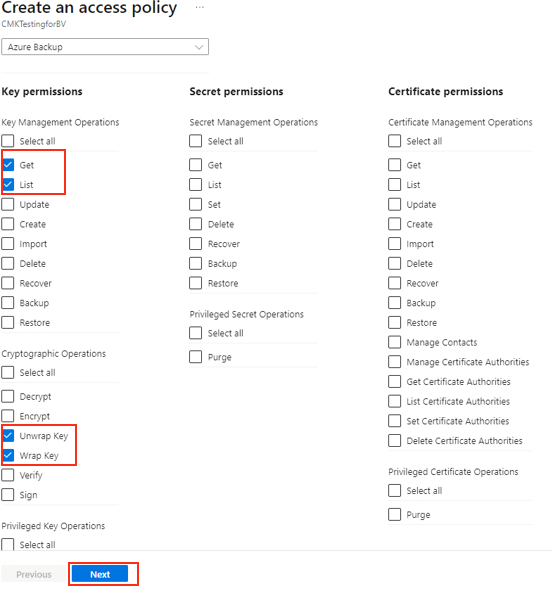
Specify the actions to permit on the key. Under Key permissions, select the Get, List, Unwrap Key, and Wrap Key operations. Then select Next.
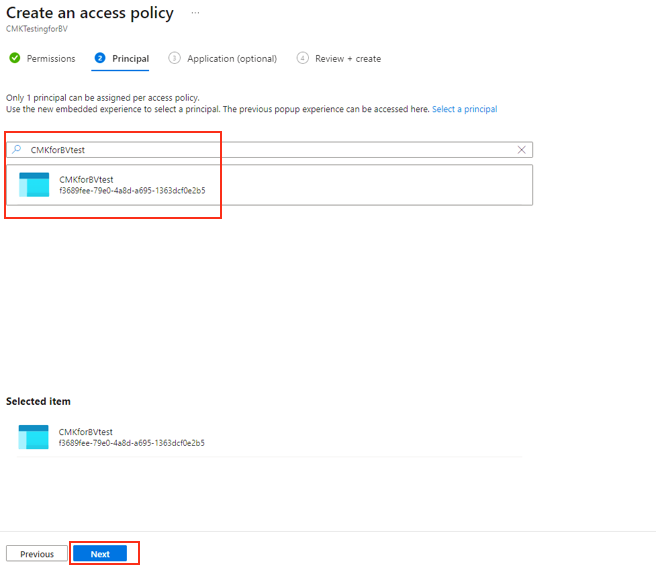
On the Principal tab, search for your vault in the search box by using its name or managed identity. When the vault appears, select it and then select Next.
Select Add to add the new access policy.
Select Save to save changes that you made to the access policy of the key vault.
If you're using a user-assigned identity, you must assign the same permissions to it.
You can also assign an RBAC role to the Backup vault that contains the previously mentioned permissions, such as the Key Vault Crypto Officer role. This role might contain additional permissions.
Enable soft delete and purge protection on Azure Key Vault
You need to enable soft delete and purge protection on the key vault that stores your encryption key.
Choose a client:
You can set these properties from the Azure Key Vault interface, as shown in the following screenshot. Alternatively, you can set these properties while creating the key vault. Learn more about these Key Vault properties.
Assign the encryption key to the Backup vault
Before you select the encryption key for your vault, ensure that you have successfully:
- Enabled the Backup vault's managed identity and assigned the required permissions to it.
- Enabled soft delete and purge protection for the key vault.
Note
If there're any updates to the current Key Vault details in the Encryption Settings with new key vault information, the managed identity used for Encryption Settings must retain access to the original Key Vault, with Get and Unwrap permissions, and the key should be in Enabled state. This access is necessary to execute the key rotation from the previous key to the new key.
To assign the key, follow these steps:
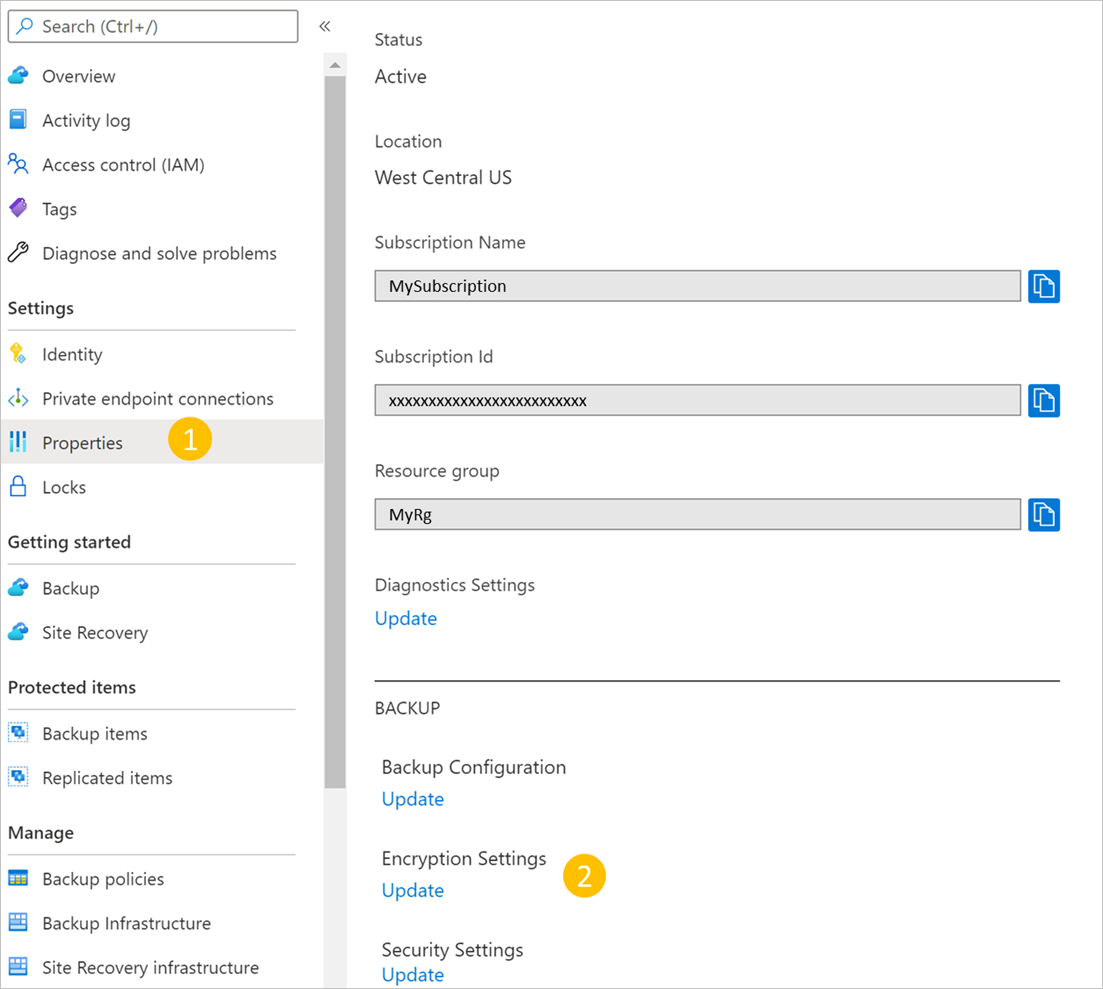
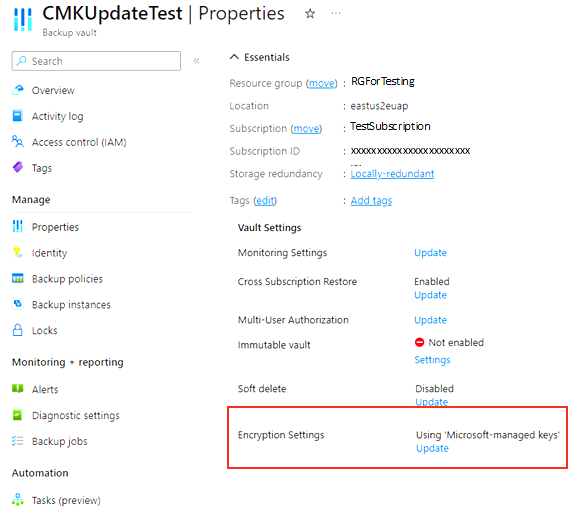
Go to your Backup vault > Properties.
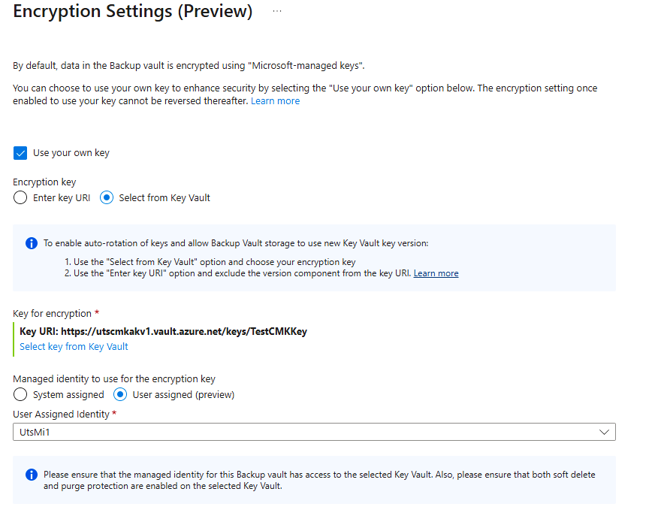
For Encryption Settings, select Update.
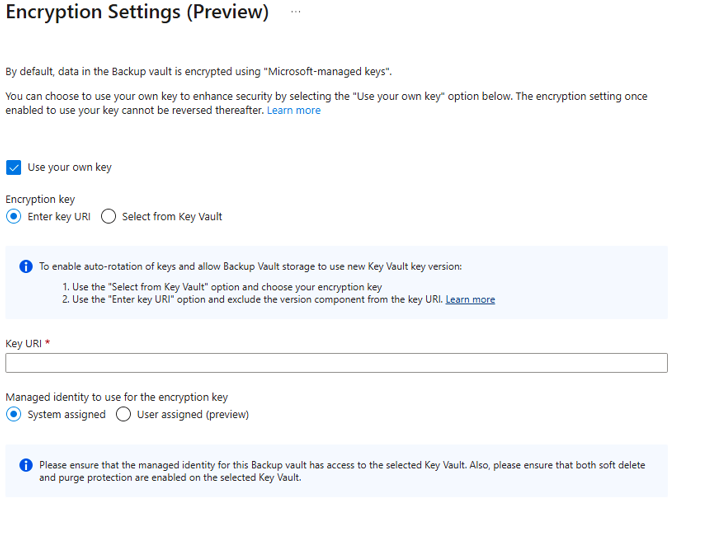
On the Encryption Settings blade, select Use your own key and then specify the key by using one of the following options. Be sure to use an RSA key that's in an enabled and active state.
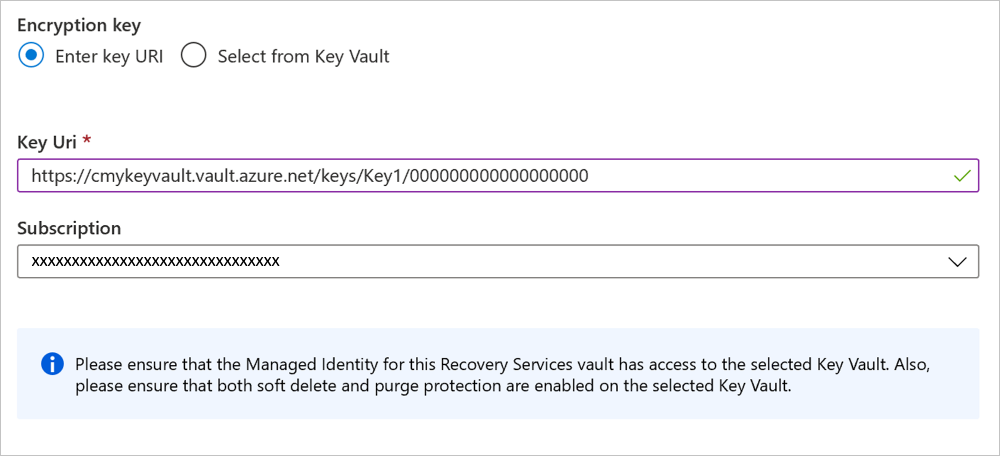
Select Enter key URI. In the Key URI box, enter the URI for the key that you want to use for encrypting data in this Backup vault. You can also get this key URI from the corresponding key in your key vault.
Be sure to copy the key URI correctly. We recommend that you use the Copy to clipboard button provided with the key identifier.
When you try to update encryption settings but the update operation fails because of an internal error, the encryption setting is updated to Inconsistent and requires your attention. In such cases, check your encryption settings details, ensure that they are correct. For example, the Update Encryption Settings operation runs again with the existing Managed Identity attached to the vault. If the encryption settings details are same, the update operation is not affected.
Also if you disable or detach the managed identity being used in Encryption Settings, the Encryption Settings would change to ‘Inconsistent’ state unless you re-enable system assign identity(if it was used), grant the required Key Vault permissions and perform Encryption Settings update operation again. For User Assigned Identity, when you re-attach the identity, Encryption Settings state will be automatically be restored if the Key Vault permissions are there.
When you're specifying the encryption key by using the full key URI with the version component, the key won't be autorotated. You need to update keys manually by specifying the new key or version when required. Alternatively, remove the version component of the key URI to get automatic key version rotation.
Choose Select from Key Vault. On the Key picker pane, browse to and select the key from the key vault.
When you specify the encryption key by using the Key picker pane, the key version will be autorotated whenever a new version for the key is enabled. Learn more about enabling autorotation of encryption keys.
Select Update.
Track the progress and status of the encryption key assignment under Notifications.
Update encryption settings
You can update the encryption settings anytime. Whenever you want to use a new key URI, ensure that your existing key vault still has access to the managed identity and the key is valid. Otherwise, the update operation will fail.
The managed identity that you want to use for encryption needs the appropriate permissions.
Back up to a vault encrypted via customer-managed keys
Before you configure backup protection, confirm that you have successfully:
- Created a Backup vault.
- Enabled the Backup vault's system-assigned managed identity or assigned a user-assigned managed identity to the vault.
- Assigned permissions to your Backup vault (or the user-assigned managed identity) to access encryption keys from your key vault.
- Enabled soft delete and purge protection for your key vault.
- Assigned a valid encryption key for your Backup vault.
The process to configure and perform backups to a Backup vault that's encrypted via CMKs is the same as the process to configure and perform backups to a vault that uses PMKs. There are no changes to the experience.
Private Endpoint support
You can use Azure Key Vault with Private Endpoint (PE) using System-Assigned Managed Identity of the vault.
If the public network access of the Azure Key Vault is disabled, the access restrictions will prevent you to use Azure portal from outside the private endpoint enabled network machine to Select Key Vault and Key on the Encryption Settings blade. However, you can use the Key Vault key URI to provide Key Vault key details in Encryption Settings.
Troubleshoot operation errors for encryption settings
This section lists the various troubleshooting scenarios that you might encounter for Backup vault encryption.
Backup, restore, and background operations failures
Causes:
Cause 1: If there's an issue with your Backup vault Encryption Settings, such as you have removed Key Vault permissions from Encryption Settings’ managed identity, disabled system-assigned identity, or detached/deleted the managed identity from the Backup vault that you're using for encryption settings, then backup and restore jobs fail.
Cause 2: Tiering of restore points and restore-points expiration jobs will fail without showing errors in the Azure portal or other interfaces (for example, REST API or CLI). These operations will continue to fail and incur costs.
Recommended actions:
Recommendation 1: Restore the permissions, update the managed identity details that have access to the key vault.
Recommendation 2: Restore the required encryption settings to the Backup vault.
Missing permissions for a managed identity
Error code: UserErrorCMKMissingMangedIdentityPermissionOnKeyVault
Cause: This error occurs when:
- The managed identity that you're using for encryption settings doesn't have the permissions to access the key vault. Also, the backup or restore jobs might fail with this error code if the access is removed after encryption settings are updated or a managed identity is disabled or detached from the Backup vault.
- You're using a non-RSA key URI.
Recommended action: Ensure that the managed identity that you use for encryption settings has the required permissions and the key is an RSA type. Then retry the operation.
Vault authentication failure
Error code: UserErrorCMKKeyVaultAuthFailure
Cause: The managed identity in the encryption settings doesn't have the required permissions to access the key vault or key. The backup vault's managed identity (system-assigned or user-assigned identity used for encryption settings) should have the following permissions on your key vault:
If your key vault is using an RBAC configuration that's based on IAM, you need Key Vault Crypto Service Encryption User built-in role permissions.
If you use access policies, you need Get, Wrap and Unwrap permissions.
The Key Vault and key don't exist, and aren't reachable to the Azure Backup service via network settings.
Recommended action: Check the Key Vault access policies and grant permissions accordingly.
Vault deletion failure
Error code: CloudServiceRetryableError
Cause: If there is an issue with your Backup Vault Encryption Settings (such as you have removed Key Vault/MHSM permissions from the managed identity of the Encryption Settings, disabled system-assigned identity, detached/deleted the managed identity from the Backup vault used for encryption settings, or the key vault/MHSM key is deleted), then vault deletion might fail.
Recommended action: To address this issue:
- Ensure that the managed identity being used for Encryption Settings still has the permissions to access the key vault/MHSM. Restore them before you proceed for deletion of the vault.
- Reattach/enable the managed identity and assign the required Key Vault/MHSM permissions.
- If the key vault key is deleted, then the vault deletion might fail. However, to recover the deleted key from the Soft Deleted state, ensure that you have the required permissions to the managed identity on the key vault/MHSM, and then retry the delete Backup vault operation.
Validate error codes
Azure Backup validates the selected Azure Key Vault when CMK is applied on the backup vault. If the Key Vault doesn't have the required configuration settings (Soft Delete Enabled and Purge Protection Enabled), the following error-codes appear:
UserErrorCMKPurgeProtectionNotEnabledOnKeyVault
Error code: UserErrorCMKPurgeProtectionNotEnabledOnKeyVault
Cause: Soft delete isn't enabled on the Key Vault.
Recommended action: Enable soft delete on the Key Vault, and then retry the operation.
UserErrorCMKSoftDeleteNotEnabledOnKeyVault
Error code: UserErrorCMKSoftDeleteNotEnabledOnKeyVault
Cause: Purge Protection isn't enabled on the Key Vault.
Recommended action: Enable Purge Protection on the Key Vault, and then retry the operation.
