Configure customer-managed keys with managed Hardware Security Module for Azure NetApp Files volume encryption
Azure NetApp Files volume encryption with customer-managed keys with the managed Hardware Security Module (HSM) is an extension to customer-managed keys for Azure NetApp Files volumes encryption feature. Customer-managed keys with HSM allows you to store your encryptions keys in a more secure FIPS 140-2 Level 3 HSM instead of the FIPS 140-2 Level 1 or Level 2 service used by Azure Key Vault (AKV).
Requirements
- Customer-managed keys with managed HSM is supported using the 2022.11 or later API version.
- Customer-managed keys with managed HSM is only supported for Azure NetApp Files accounts that don't have existing encryption.
- Before creating a volume using customer-managed key with managed HSM volume, you must have:
- created an Azure Key Vault, containing at least one key.
- The key vault must have soft delete and purge protection enabled.
- The key must be type RSA.
- created a VNet with a subnet delegated to Microsoft.Netapp/volumes.
- a user- or system-assigned identity for your Azure NetApp Files account.
- provisioned and activated a managed HSM.
- created an Azure Key Vault, containing at least one key.
Supported regions
- Australia Central
- Australia Central 2
- Australia East
- Australia Southeast
- Brazil South
- Brazil Southeast
- Canada Central
- Canada East
- Central India
- Central US
- East Asia
- East US
- East US 2
- France Central
- Germany North
- Germany West Central
- Israel Central
- Italy North
- Japan East
- Japan West
- Korea Central
- Korea South
- North Central US
- North Europe
- Norway East
- Norway West
- Qatar Central
- South Africa North
- South Central US
- South India
- Southeast Asia
- Spain Central
- Sweden Central
- Switzerland North
- Switzerland West
- UAE Central
- UAE North
- UK South
- West Europe
- West US
- West US 2
- West US 3
Register the feature
This feature is currently in preview. You need to register the feature before using it for the first time. After registration, the feature is enabled and works in the background. No UI control is required.
Register the feature:
Register-AzProviderFeature -ProviderNamespace Microsoft.NetApp -FeatureName ANFManagedHsmEncryptionCheck the status of the feature registration:
Note
The RegistrationState may be in the
Registeringstate for up to 60 minutes before changing toRegistered. Wait until the status is Registered before continuing.Get-AzProviderFeature -ProviderNamespace Microsoft.NetApp -FeatureName ANFManagedHsmEncryption
You can also use Azure CLI commands az feature register and az feature show to register the feature and display the registration status.
Configure customer-managed keys with managed HSM for system-assigned identity
When you configure customer-managed keys with a system-assigned identity, Azure configures the NetApp account automatically by adding a system-assigned identity. The access policy is created on your Azure Key Vault with key permissions of Get, Encrypt, and Decrypt.
Requirements
To use a system-assigned identity, the Azure Key Vault must be configured to use Vault access policy as its permission model. Otherwise, you must use a user-assigned identity.
Steps
In the Azure portal, navigate to Azure NetApp Files then select Encryption.
In the Encryption menu, provide the following values:
- For Encryption key source, select Customer Managed Key.
- For Key URI, select Enter Key URI then provide the URI for the managed HSM.
- Select the NetApp Subscription.
- For Identity type, select System-assigned.
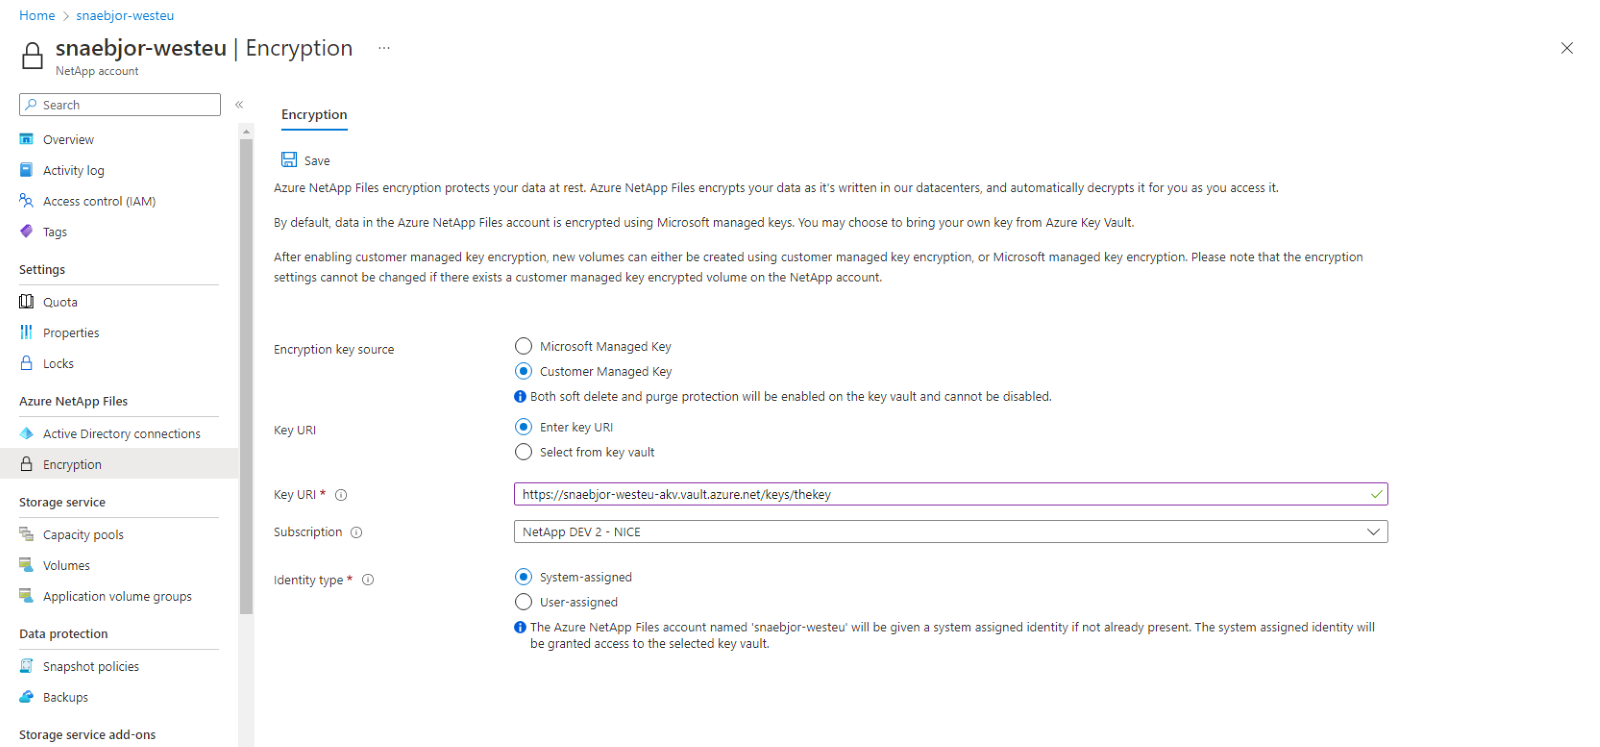
Select Save.

Configure customer-managed keys with managed HSM for user-assigned identity
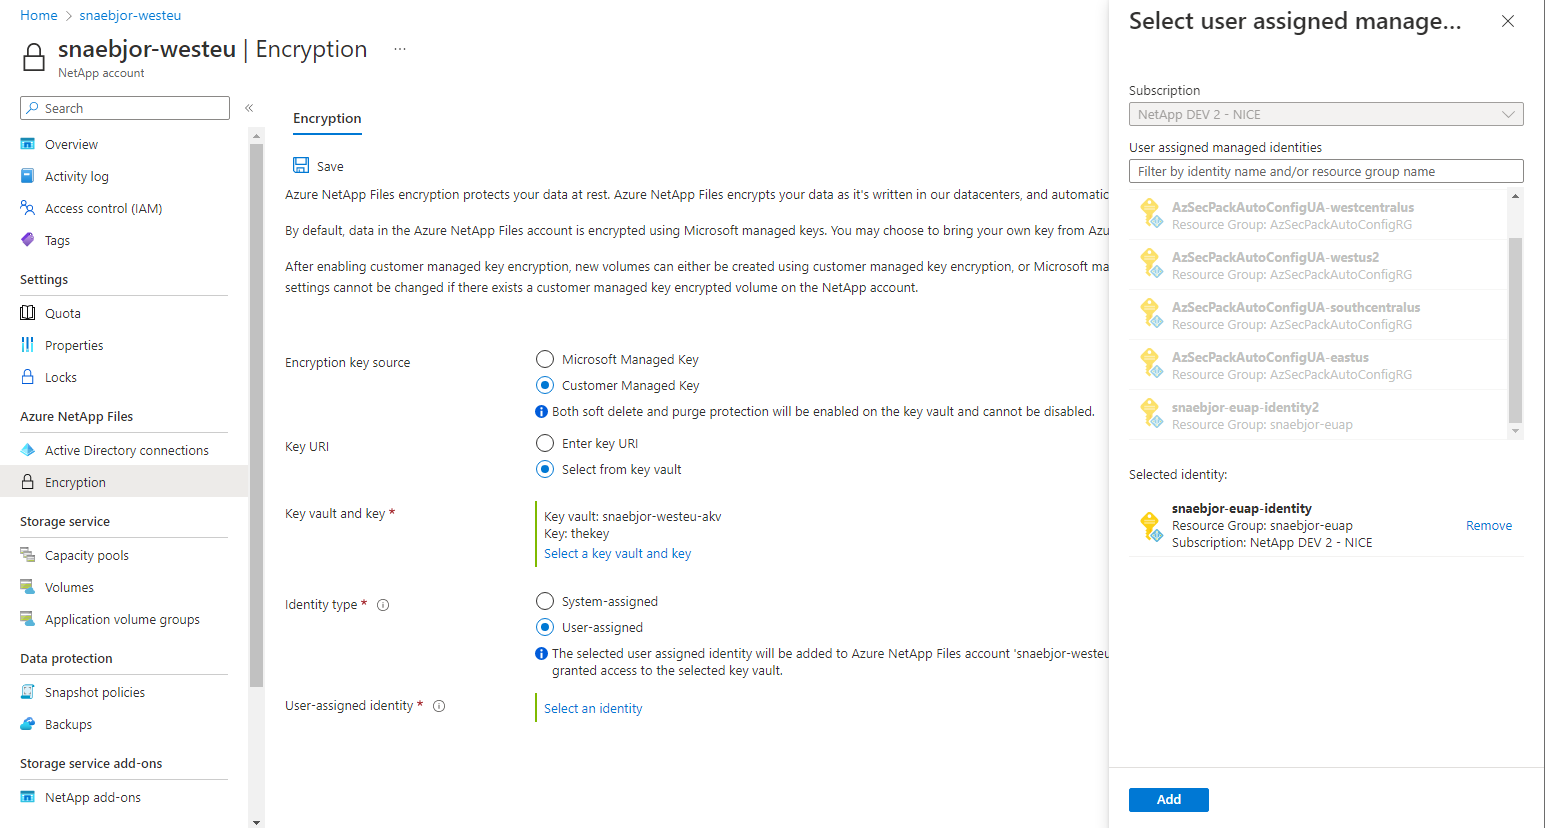
In the Azure portal, navigate to Azure NetApp Files then select Encryption.
In the Encryption menu, provide the following values:
- For Encryption key source, select Customer Managed Key.
- For Key URI, select Enter Key URI then provide the URI for the managed HSM.
- Select the NetApp Subscription.
- For Identity type, select User-assigned.
When you select User-assigned, a context pane opens to select the identity.
- If your Azure Key Vault is configured to use a Vault access policy, Azure configures the NetApp account automatically and adds the user-assigned identity to your NetApp account. The access policy is created on your Azure Key Vault with key permissions of Get, Encrypt, and Decrypt.
- If your Azure Key Vault is configured to use Azure role-based access control (RBAC), ensure the selected user-assigned identity has a role assignment on the key vault with permissions for data actions:
- "Microsoft.KeyVault/vaults/keys/read"
- "Microsoft.KeyVault/vaults/keys/encrypt/action"
- "Microsoft.KeyVault/vaults/keys/decrypt/action" The user-assigned identity you select is added to your NetApp account. Due to RBAC being customizable, the Azure portal doesn't configure access to the key vault. For more information, see Using Azure RBAC secret, key, and certificate permissions with Key Vault
Select Save.
