Use the Azure Managed Lustre CSI driver with Azure Kubernetes Service
In this article, you learn how to plan, install, and use Azure Managed Lustre in Azure Kubernetes Service (AKS) with the Azure Lustre CSI Driver for Kubernetes. This driver is based on the Container Support Interface (CSI) specification.
You can use the Azure Lustre CSI Driver for Kubernetes to access Azure Managed Lustre storage as persistent storage volumes from Kubernetes containers deployed in AKS.
Compatible Kubernetes versions
The Azure Lustre CSI Driver for Kubernetes is compatible with AKS. Other Kubernetes installations are not currently supported.
AKS Kubernetes versions 1.21 and later are supported. This support includes all versions currently available when you're creating a new AKS cluster.
Important
The Azure Lustre CSI Driver for Kubernetes currently works only with the Ubuntu Linux OS SKU for node pools of AKS.
Compatible Lustre versions
The Azure Lustre CSI Driver for Kubernetes is compatible with Azure Managed Lustre. Other Lustre installations are not currently supported.
Azure Lustre CSI Driver for Kubernetes versions 0.1.10 and later are supported with the current version of the Azure Managed Lustre service.
Prerequisites
- An Azure account with an active subscription. Create an account for free.
- A terminal environment with the Azure CLI tools installed. See Get started with the Azure CLI.
- kubectl, the Kubernetes management tool, installed in your terminal environment. See Quickstart: Deploy an Azure Kubernetes Service (AKS) cluster by using the Azure CLI.
- An Azure Managed Lustre deployment. See the Azure Managed Lustre documentation.
Plan your AKS deployment
When you're deploying Azure Kubernetes Service, several options affect the operation between AKS and Azure Managed Lustre.
Determine the network type to use with AKS
Two network types are compatible with the Ubuntu Linux OS SKU: kubenet and the Azure Container Network Interface (CNI) driver. Both options work with the Azure Lustre CSI Driver for Kubernetes, but they have different requirements that you need understand when you're setting up virtual networking and AKS. For more information on determining the proper selection, see Networking concepts for applications in Azure Kubernetes Service (AKS).
Determine the network architecture for interconnectivity of AKS and Azure Managed Lustre
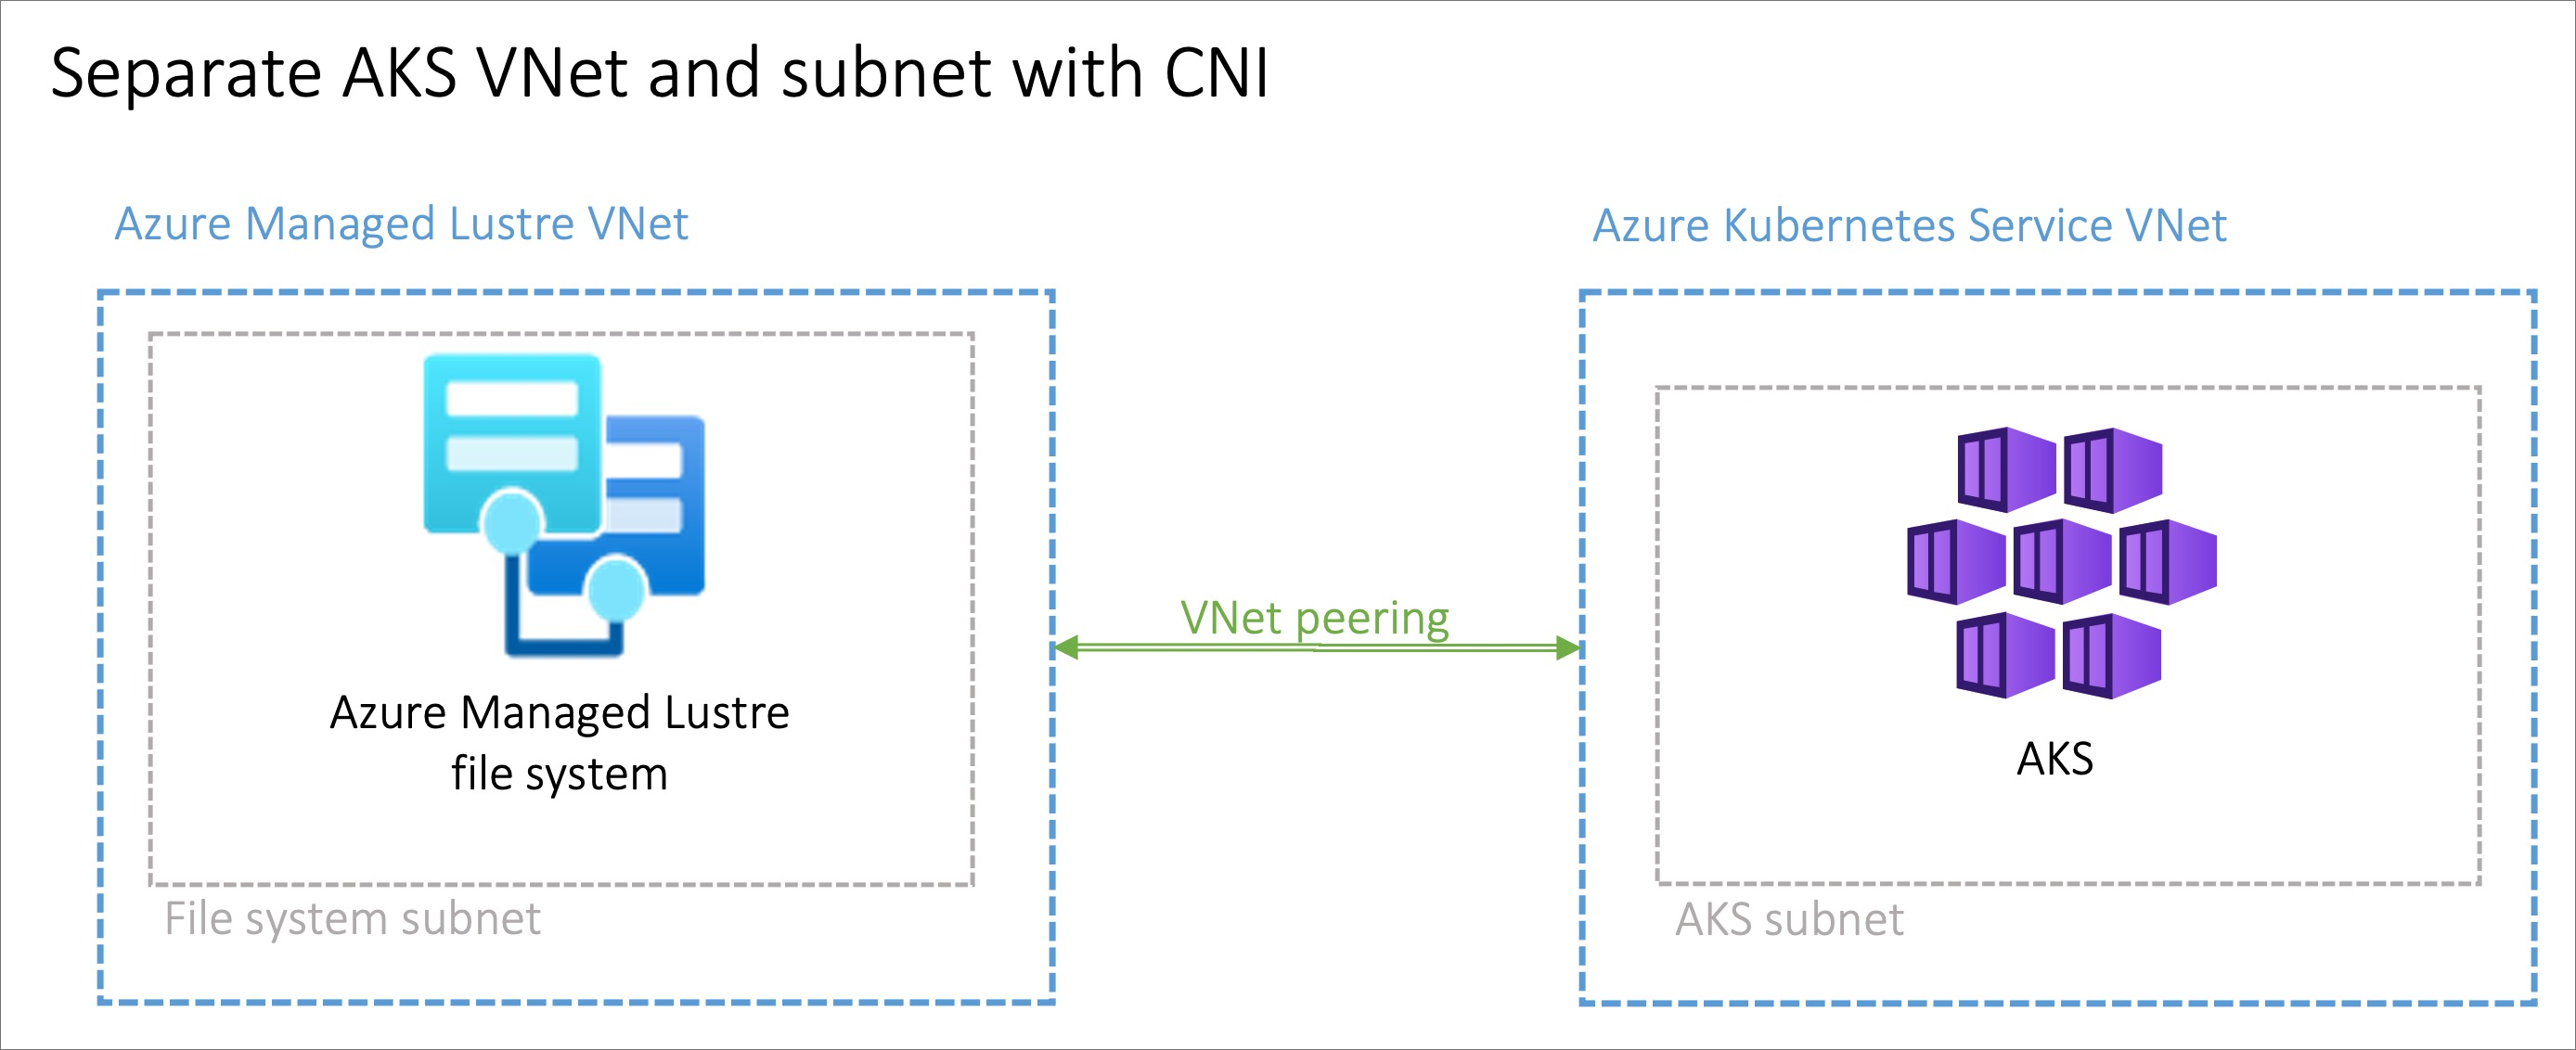
Azure Managed Lustre operates within a private virtual network. Your AKS instance must have network connectivity to the Azure Managed Lustre virtual network. There are two common ways to configure the networking between Azure Managed Lustre and AKS:
- Install AKS in its own virtual network and create a virtual network peering with the Azure Managed Lustre virtual network.
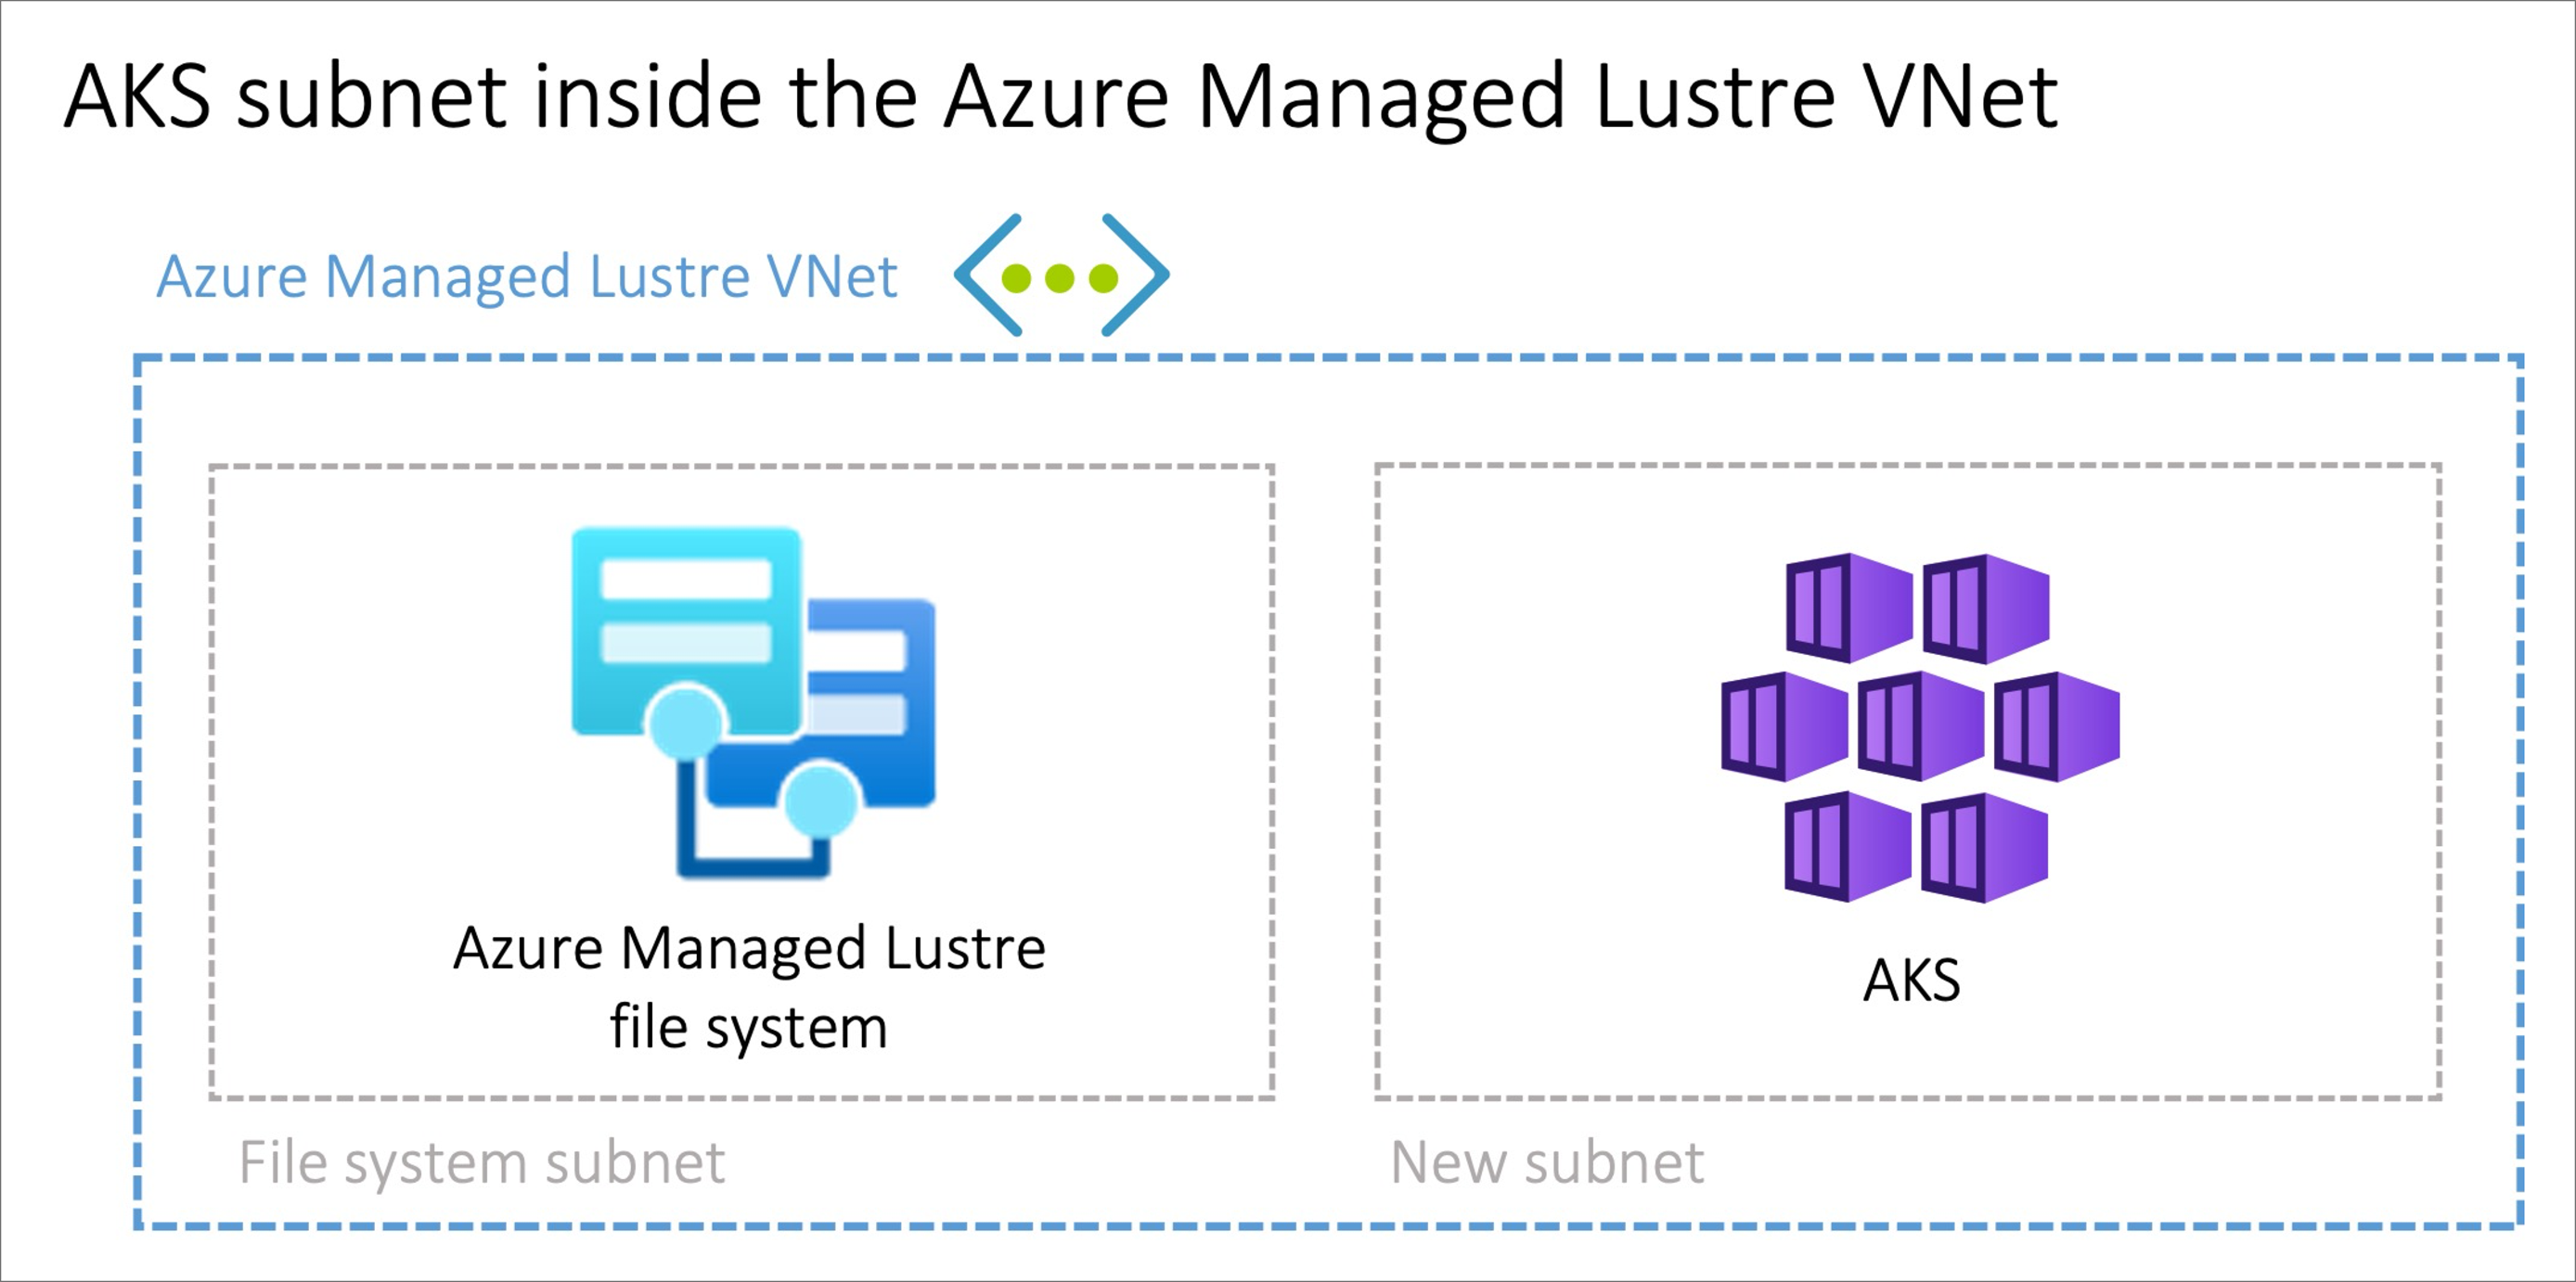
- Use the Bring your own Azure virtual network option in AKS to install AKS in a new subnet on the Azure Managed Lustre virtual network.
Note
We don't recommend that you install AKS in the same subnet as Azure Managed Lustre.
Peering AKS and Azure Managed Lustre virtual networks
The option to peer two virtual networks has the advantage of separating the management of the networks into different privileged roles. Peering can also provide additional flexibility, because you can implement it across Azure subscriptions or regions. Virtual network peering requires coordination between the two networks to avoid choosing conflicting IP network spaces.
Installing AKS in a subnet on the Azure Managed Lustre virtual network
The option to install the AKS cluster in the Azure Managed Lustre virtual network with the Bring your own Azure virtual network feature in AKS can be advantageous in scenarios where the network is managed singularly. You'll need to create an additional subnet, sized to meet your AKS networking requirements, in the Azure Managed Lustre virtual network.
There is no privilege separation for network management when you're provisioning AKS on the Azure Managed Lustre virtual network. The AKS service principal needs privileges on the Azure Managed Lustre virtual network.
Set up the driver
To enable the Azure Lustre CSI Driver for Kubernetes, perform these steps:
Check the installation by optionally using an echo pod to confirm that the driver is working.
The following sections describe each task in greater detail.
Create an Azure Managed Lustre file system cluster
If you haven't already created your Azure Managed Lustre file system cluster, create the cluster now. For instructions, see Create an Azure Managed Lustre file system by using the Azure portal. Currently, the driver can be used only with an existing Azure Managed Lustre file system.
Create an AKS cluster
If you haven't already created your AKS cluster, create a cluster deployment. See Deploy an Azure Kubernetes Service (AKS) cluster by using the Azure portal.
Create a virtual network peering
Note
Skip this network peering step if you installed AKS in a subnet on the Azure Managed Lustre virtual network.
The AKS virtual network is created in a separate resource group from the AKS cluster's resource group. You can find the name of this resource group by going to your AKS cluster in the Azure portal, going to Properties, and finding the Infrastructure resource group. This resource group contains the virtual network that needs to be paired with the Azure Managed Lustre virtual network. It matches the pattern MC_<aks-rg-name>_<aks-cluster-name>_<region>.
To peer the AKS virtual network with your Azure Managed Lustre virtual network, consult Virtual network peering.
Tip
Due to the naming of the MC_ resource groups and virtual networks, names of networks can be similar or the same across multiple AKS deployments. When you're setting up peering, be careful to choose the AKS networks that you intend to choose.
Connect to the AKS cluster
Open a terminal session with access to the Azure CLI tools and sign in to your Azure account:
az loginSign in to the Azure portal.
Find your AKS cluster. On the Overview pane, select the Connect button, and then copy the command for Download cluster credentials.
In your terminal session, paste in the command to download the credentials. The command is similar to:
az aks get-credentials --subscription <AKS_subscription_id> --resource_group <AKS_resource_group_name> --name <name_of_AKS>Install kubectl if it's not present in your environment:
az aks install-cliVerify that the current context is the AKS cluster where you just installed the credentials and that you can connect to it:
kubectl config current-context
kubectl get deployments --all-namespaces=true
Install the driver
To install the Azure Lustre CSI Driver for Kubernetes, run the following command:
curl -skSL https://raw.githubusercontent.com/kubernetes-sigs/azurelustre-csi-driver/main/deploy/install-driver.sh | bash
To get sample commands for a local installation, see Install the Azure Lustre CSI driver on a Kubernetes cluster.
Create and configure a persistent volume
To create a persistent volume for an existing Azure Managed Lustre file system:
Copy the following configuration files from the /docs/examples/ folder in the azurelustre-csi-driver repository. If you cloned the repository when you installed the driver, you have local copies available already.
- storageclass_existing_lustre.yaml
- pvc_storageclass.yaml
If you don't want to clone the entire repository, you can download each file individually. Open each of the following links, copy the file's contents, and then paste the contents into a local file with the same file name.
In the storageclass_existing_lustre.yaml file, update the internal name of the Lustre cluster and the Lustre Management Service (MGS) IP address.
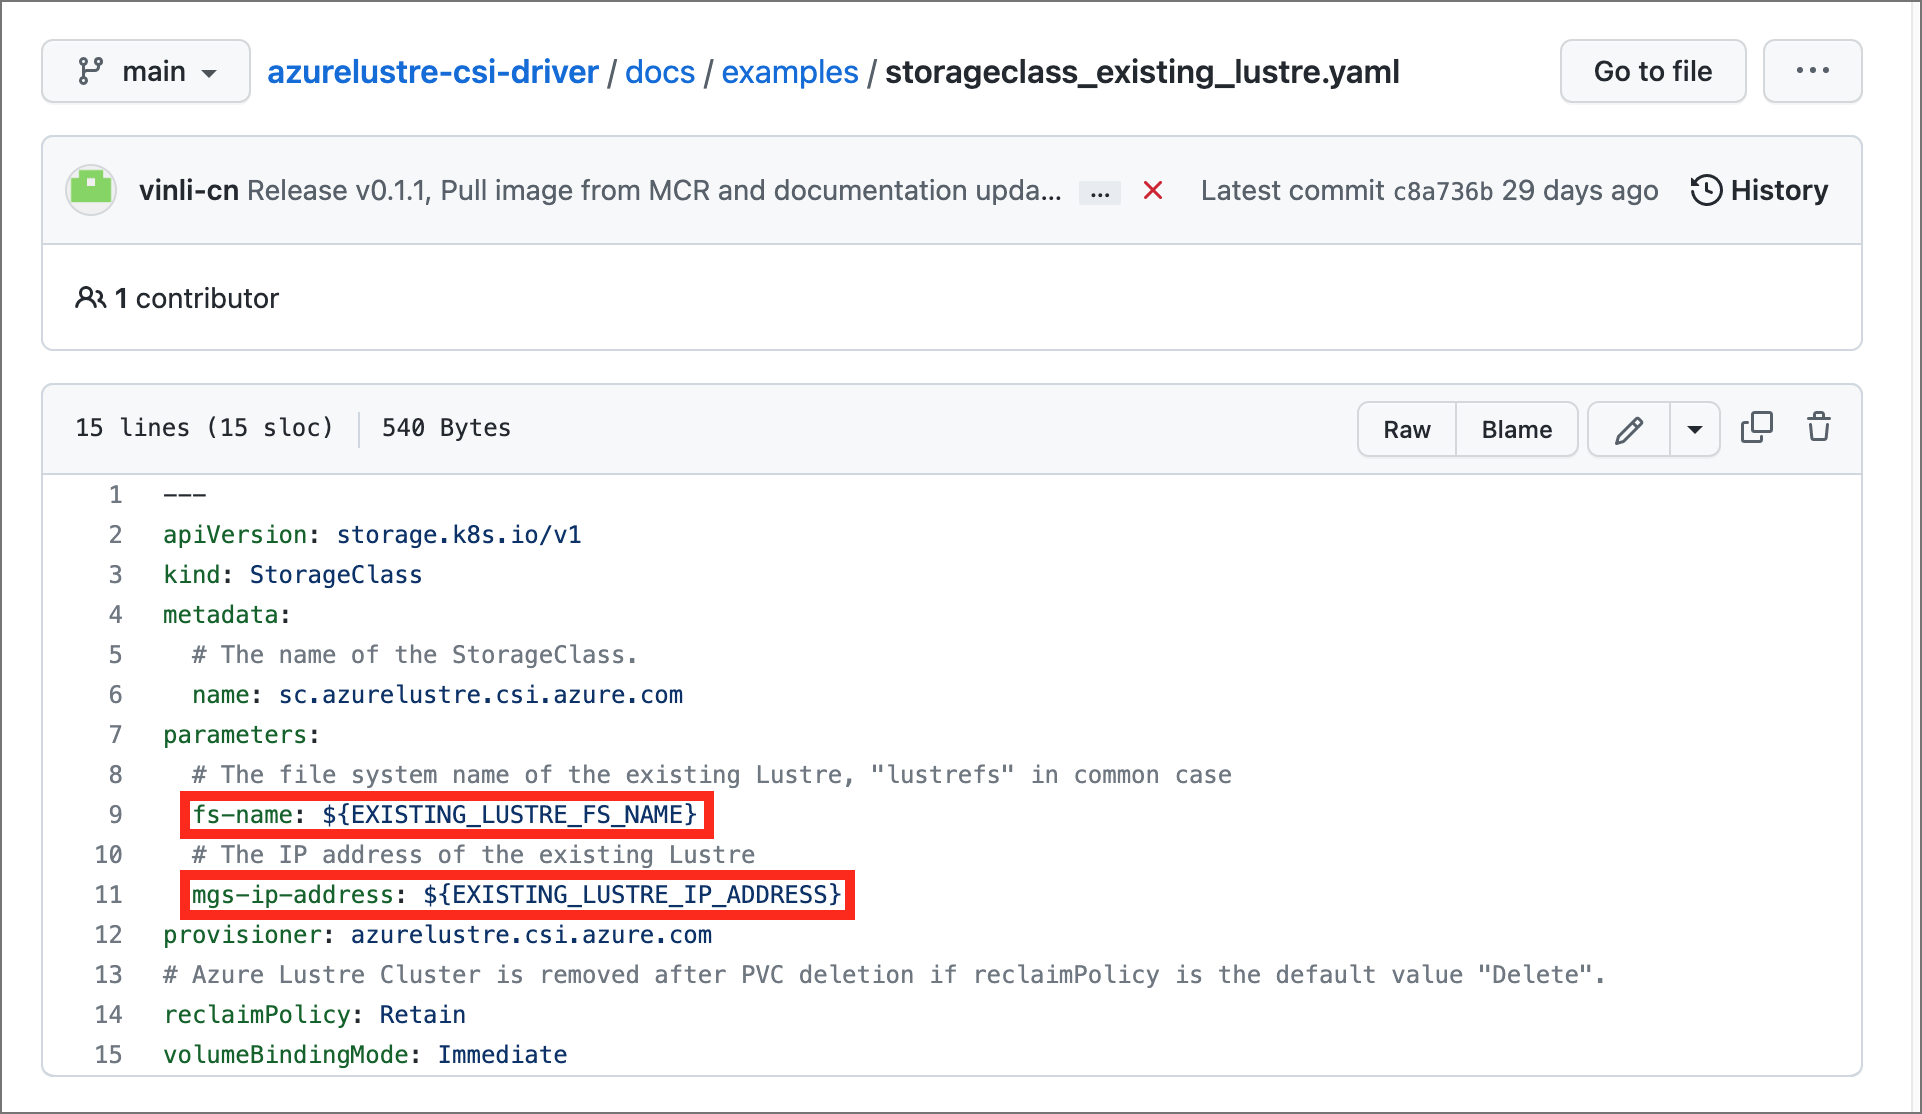
Both settings are displayed in the Azure portal, on the Client connection pane for your Azure Managed Lustre file system.

Make these updates:
Replace
EXISTING_LUSTRE_FS_NAMEwith the system-assigned internal name of the Lustre cluster in your Azure Managed Lustre file system. The internal name is usuallylustrefs. The internal name isn't the name that you gave the file system when you created it.The suggested
mountcommand includes the name highlighted in the following address string.
Replace
EXISTING_LUSTRE_IP_ADDRESSwith the MGS IP address.
To create the storage class and the persistent volume claim, run the following
kubectlcommand:kubectl create -f storageclass_existing_lustre.yaml kubectl create -f pvc_storageclass.yaml
Check the installation
If you want to check your installation, you can optionally use an echo pod to confirm that the driver is working.
To view time stamps in the console during writes, run the following commands:
Add the following code to the echo pod:
while true; do echo $(date) >> /mnt/lustre/outfile; tail -1 /mnt/lustre/outfile; sleep 1; doneTo view time stamps in the console during writes, run the following
kubectlcommand:`kubectl logs -f lustre-echo-date`