Custom domain suffix for App Service Environments
An App Service Environment is an Azure App Service feature that provides a fully isolated and dedicated environment for running App Service apps securely at high scale. The DNS settings for your App Service Environment's default domain suffix don't restrict your apps to only being accessible by those names. Custom domain suffix is an internal load balancer (ILB) App Service Environment feature that allows you to use your own domain suffix to access the apps in your App Service Environment.
If you don't have an App Service Environment, see How to Create an App Service Environment v3.
The custom domain suffix defines a root domain used by the App Service Environment. In the public variation of Azure App Service, the default root domain for all web apps is azurewebsites.net. For ILB App Service Environments, the default root domain is appserviceenvironment.net. However, since an ILB App Service Environment is internal to a customer's virtual network, customers can use a root domain in addition to the default one that makes sense for use within a company's internal virtual network. For example, a hypothetical Contoso Corporation might use a default root domain of internal.contoso.com for apps that are intended to only be resolvable and accessible within Contoso's virtual network. An app in this virtual network could be reached by accessing APP-NAME.internal.contoso.com.
The custom domain suffix is for the App Service Environment. This feature is different from a custom domain binding on an App Service. For more information on custom domain bindings, see Map an existing custom DNS name to Azure App Service.
If the certificate used for the custom domain suffix contains a Subject Alternate Name (SAN) entry for *.scm.CUSTOM-DOMAIN, the scm site is also reachable from APP-NAME.scm.CUSTOM-DOMAIN. You can only access scm over custom domain using basic authentication. Single sign-on is only possible with the default root domain.
Unlike earlier versions, the FTPS endpoints for your App Services on your App Service Environment v3 can only be reached using the default domain suffix.
The connection to the custom domain suffix endpoint needs to use Server Name Indication (SNI) for TLS based connections.
Prerequisites
- ILB variation of App Service Environment v3.
- Valid SSL/TLS certificate must be stored in an Azure Key Vault in .PFX format. For more information on using certificates with App Service, see Add a TLS/SSL certificate in Azure App Service.
- Certificate must be less than 20 kb.
Managed identity
A managed identity is used to authenticate against the Azure Key Vault where the SSL/TLS certificate is stored. If you don't currently have a managed identity associated with your App Service Environment, you need to configure one.
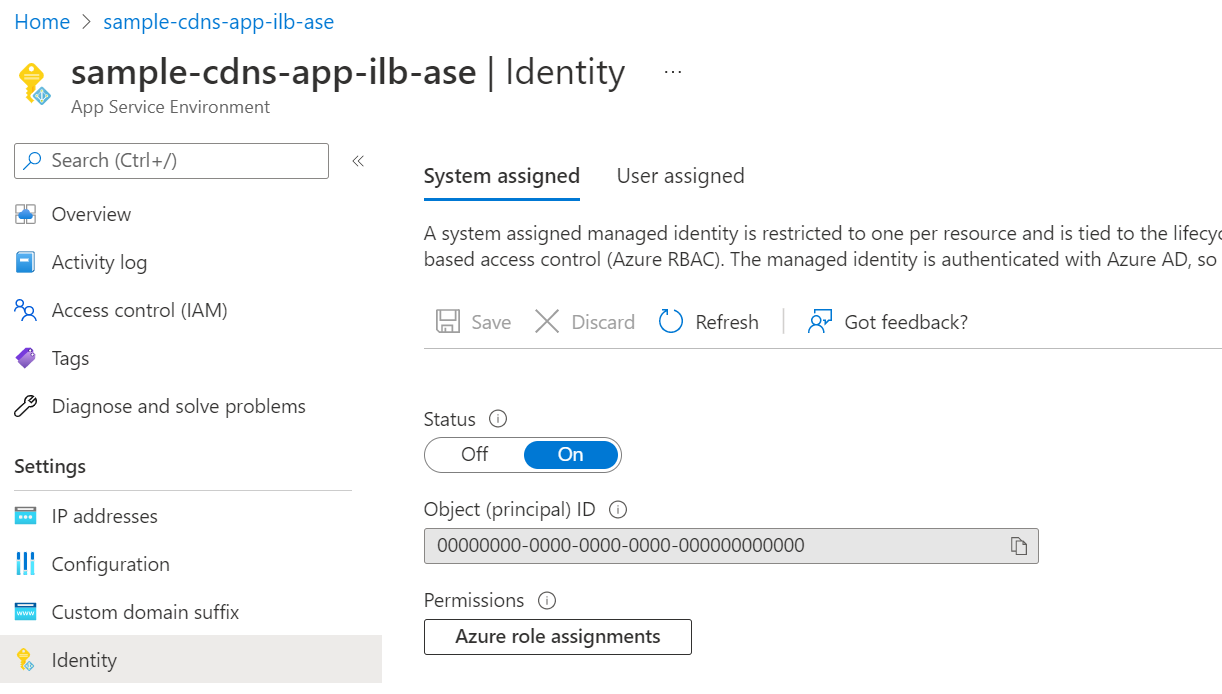
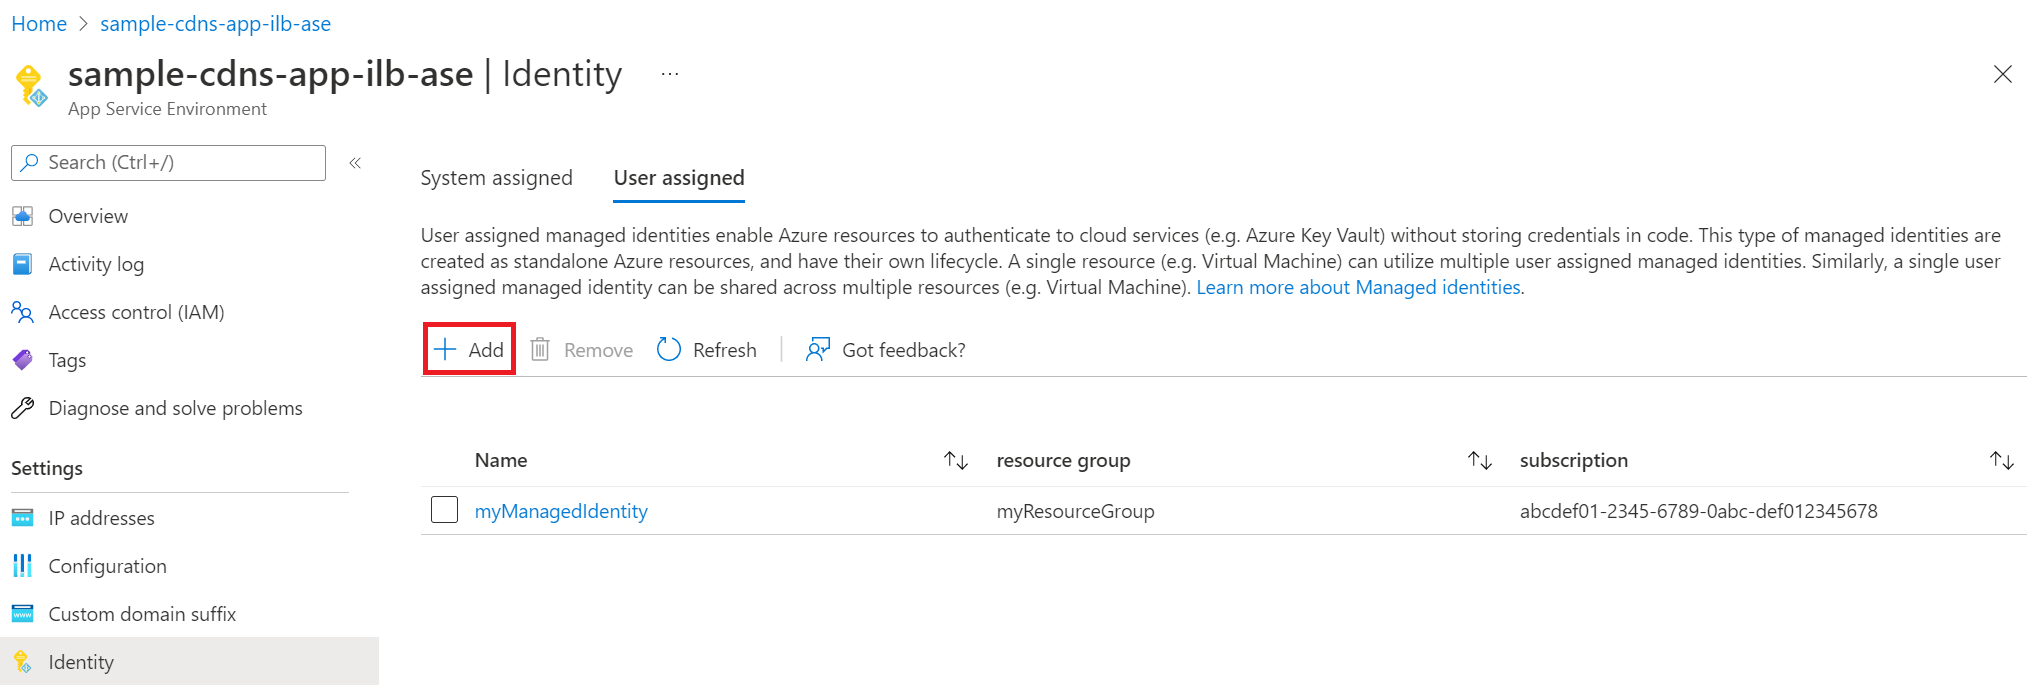
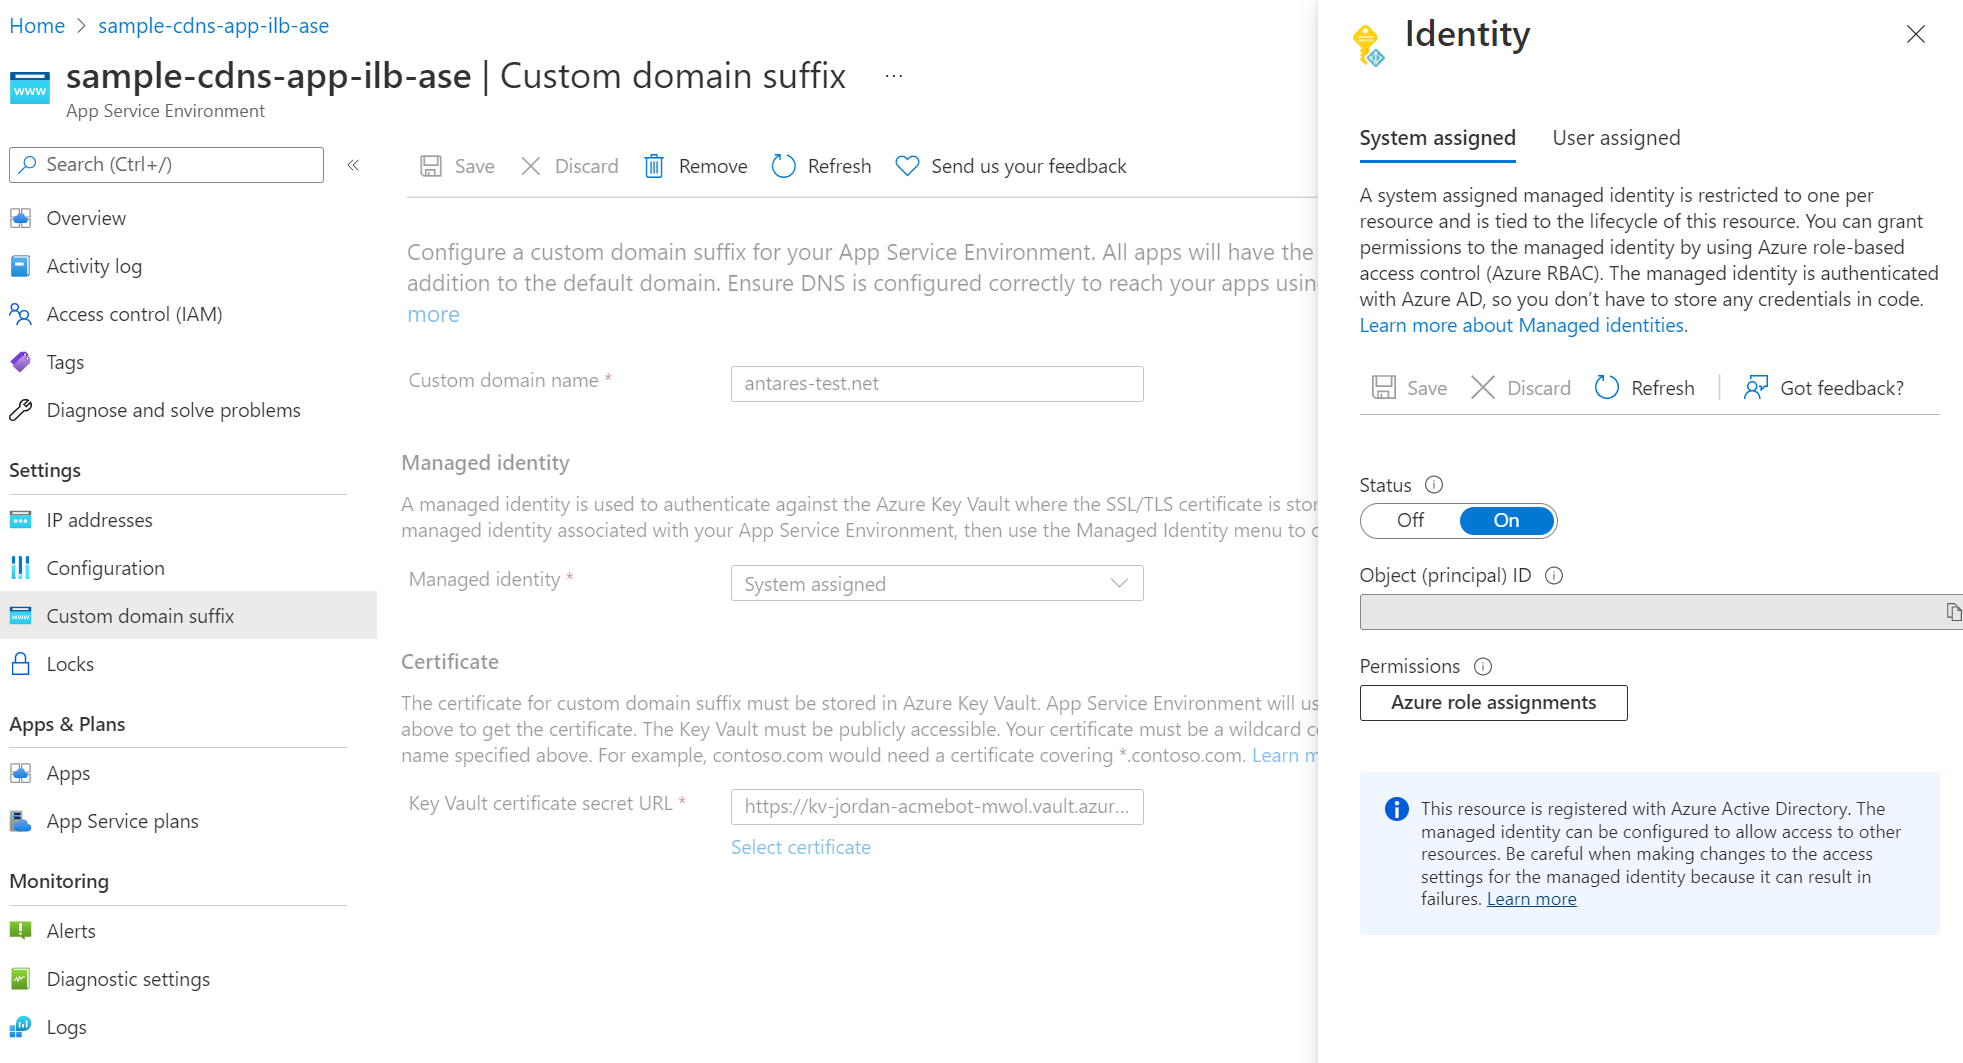
You can use either a system assigned or user assigned managed identity. To create a user assigned managed identity, see manage user-assigned managed identities. If you'd like to use a system assigned managed identity and don't already have one assigned to your App Service Environment, the Custom domain suffix portal experience guides you through the creation process. Alternatively, you can go to the Identity page for your App Service Environment and configure and assign your managed identities there.
To enable a system assigned managed identity, set the Status to On.
To assign a user assigned managed identity, select "Add and find the managed identity you want to use.
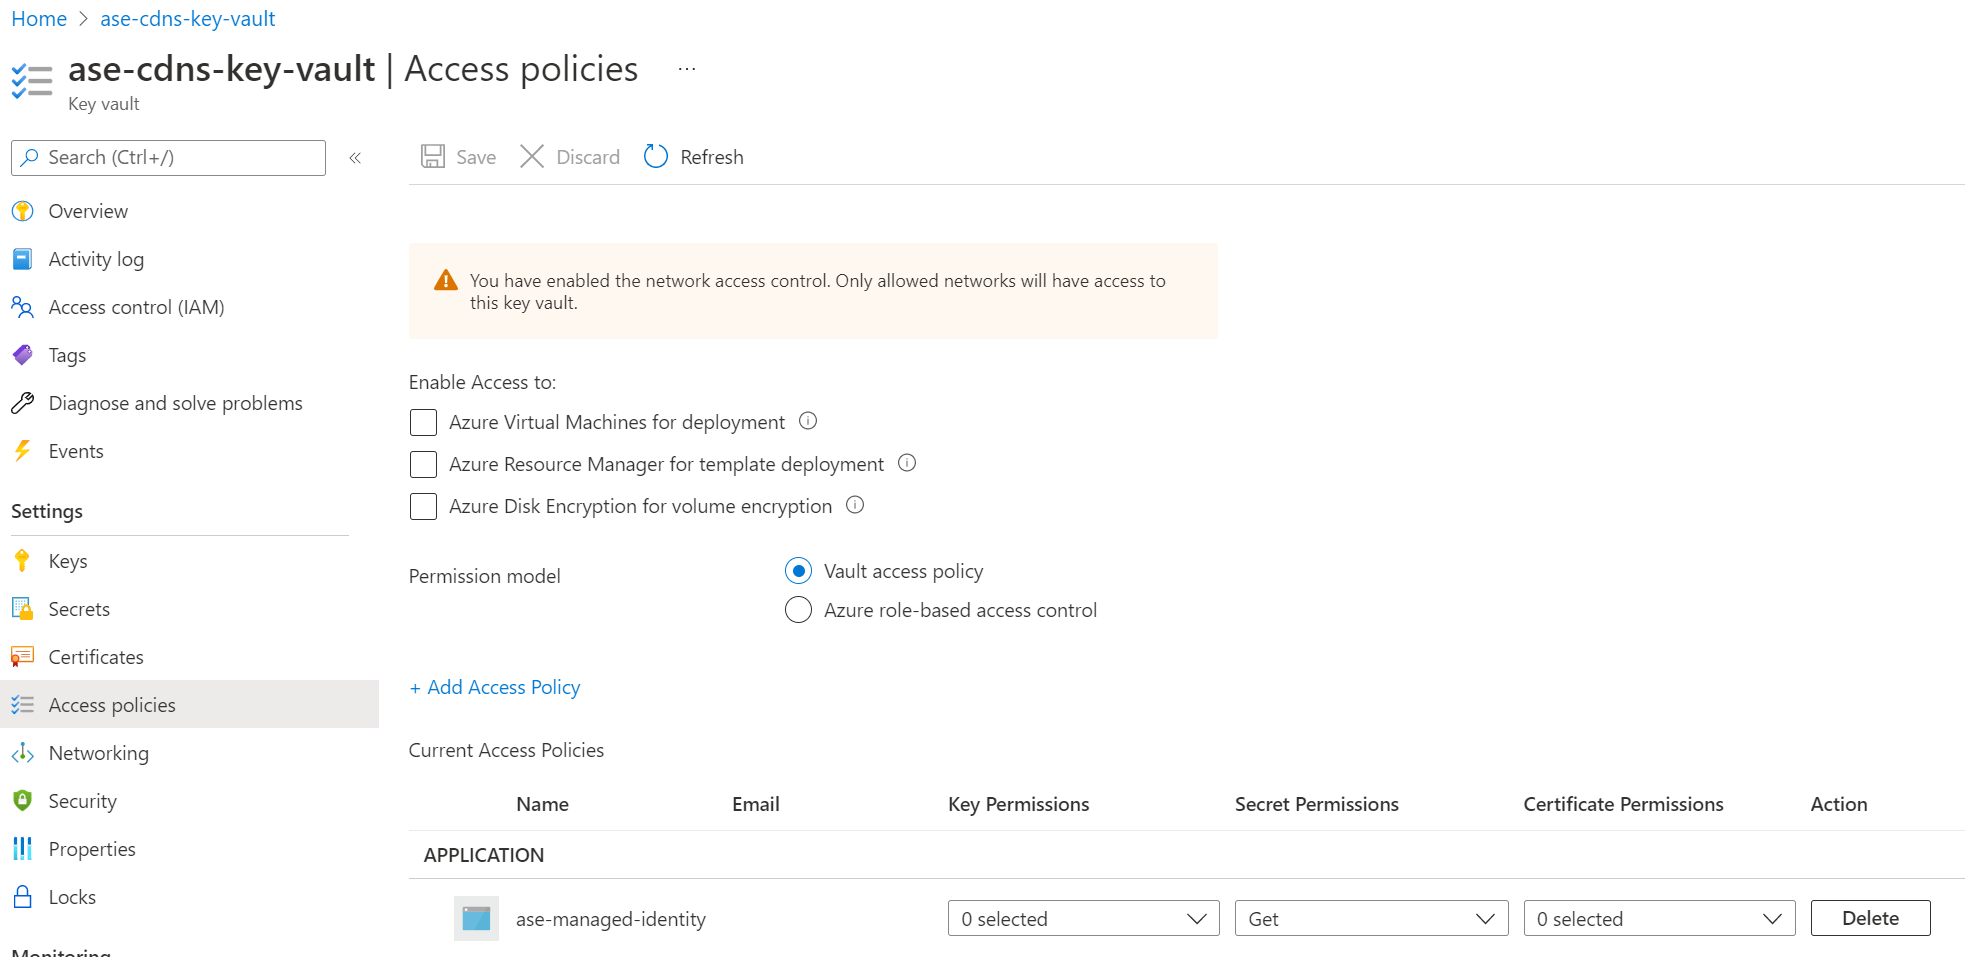
Once you assign the managed identity to your App Service Environment, ensure the managed identity has sufficient permissions for the Azure Key Vault. You can either use a vault access policy or Azure role-based access control.
If you use a vault access policy, the managed identity needs at a minimum the "Get" secrets permission for the key vault.
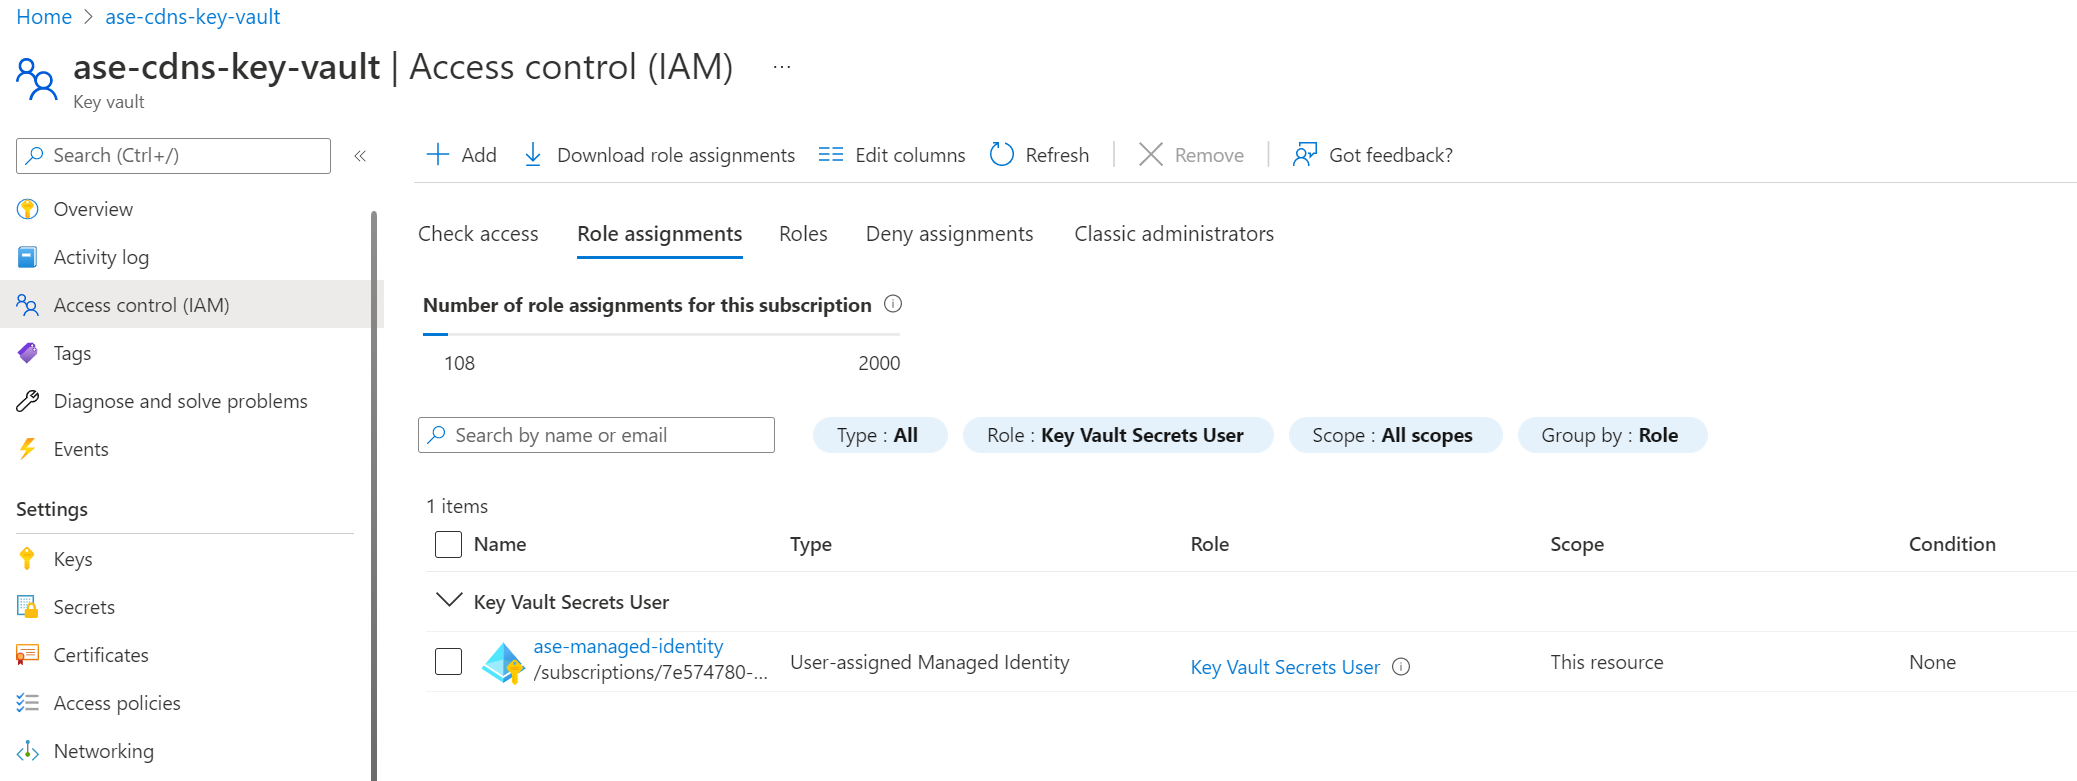
If you choose to use Azure role-based access control to manage access to your key vault, you need to give your managed identity at a minimum the "Key Vault Secrets User" role.
Certificate
The certificate for custom domain suffix must be stored in an Azure Key Vault. The certificate must be uploaded in .PFX format and be smaller than 20 kb. Certificates in .PEM format aren't supported at this time. App Service Environment uses the managed identity you selected to get the certificate.
Your certificate must be a wildcard certificate for the selected custom domain name. For example, internal.contoso.com would need a certificate covering *.internal.contoso.com. If the certificate used by the custom domain suffix contains a Subject Alternate Name (SAN) entry for scm, for example *.scm.internal.contoso.com, the scm site is also available using the custom domain suffix.
If you rotate your certificate in Azure Key Vault, the App Service Environment picks up the change within 24 hours.
Network access to Key Vault
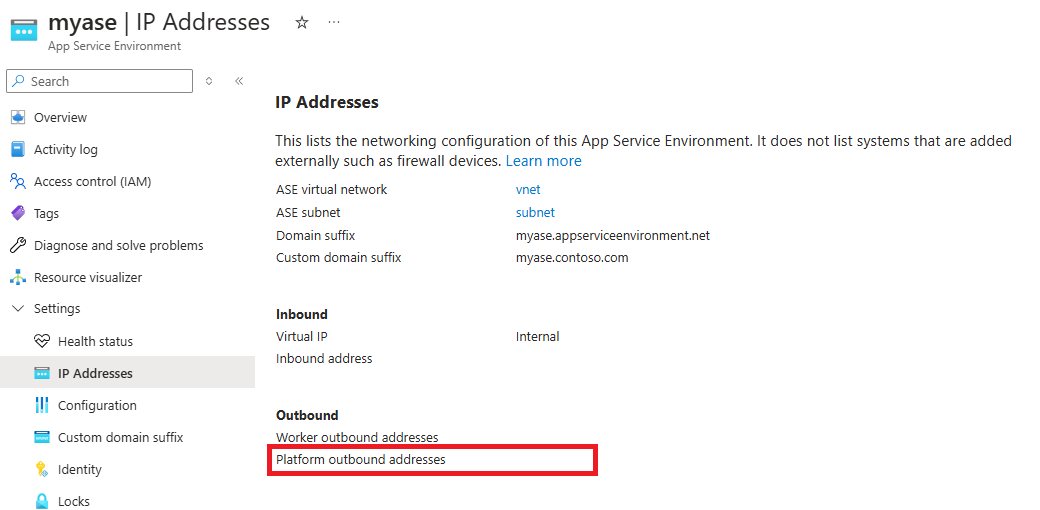
The key vault can be accessed publicly or through a private endpoint accessible from the subnet that the App Service Environment is deployed to. To learn how to configure a private endpoint, see Integrate Key Vault with Azure Private Link. If you use public access, you can secure your key vault to only accept traffic from the outbound IP address of the App Service Environment. The App Service Environment uses the platform outbound IP address as the source address when accessing the key vault. You can find the IP address in the IP Addresses page in Azure portal.
Use the Azure portal to configure custom domain suffix
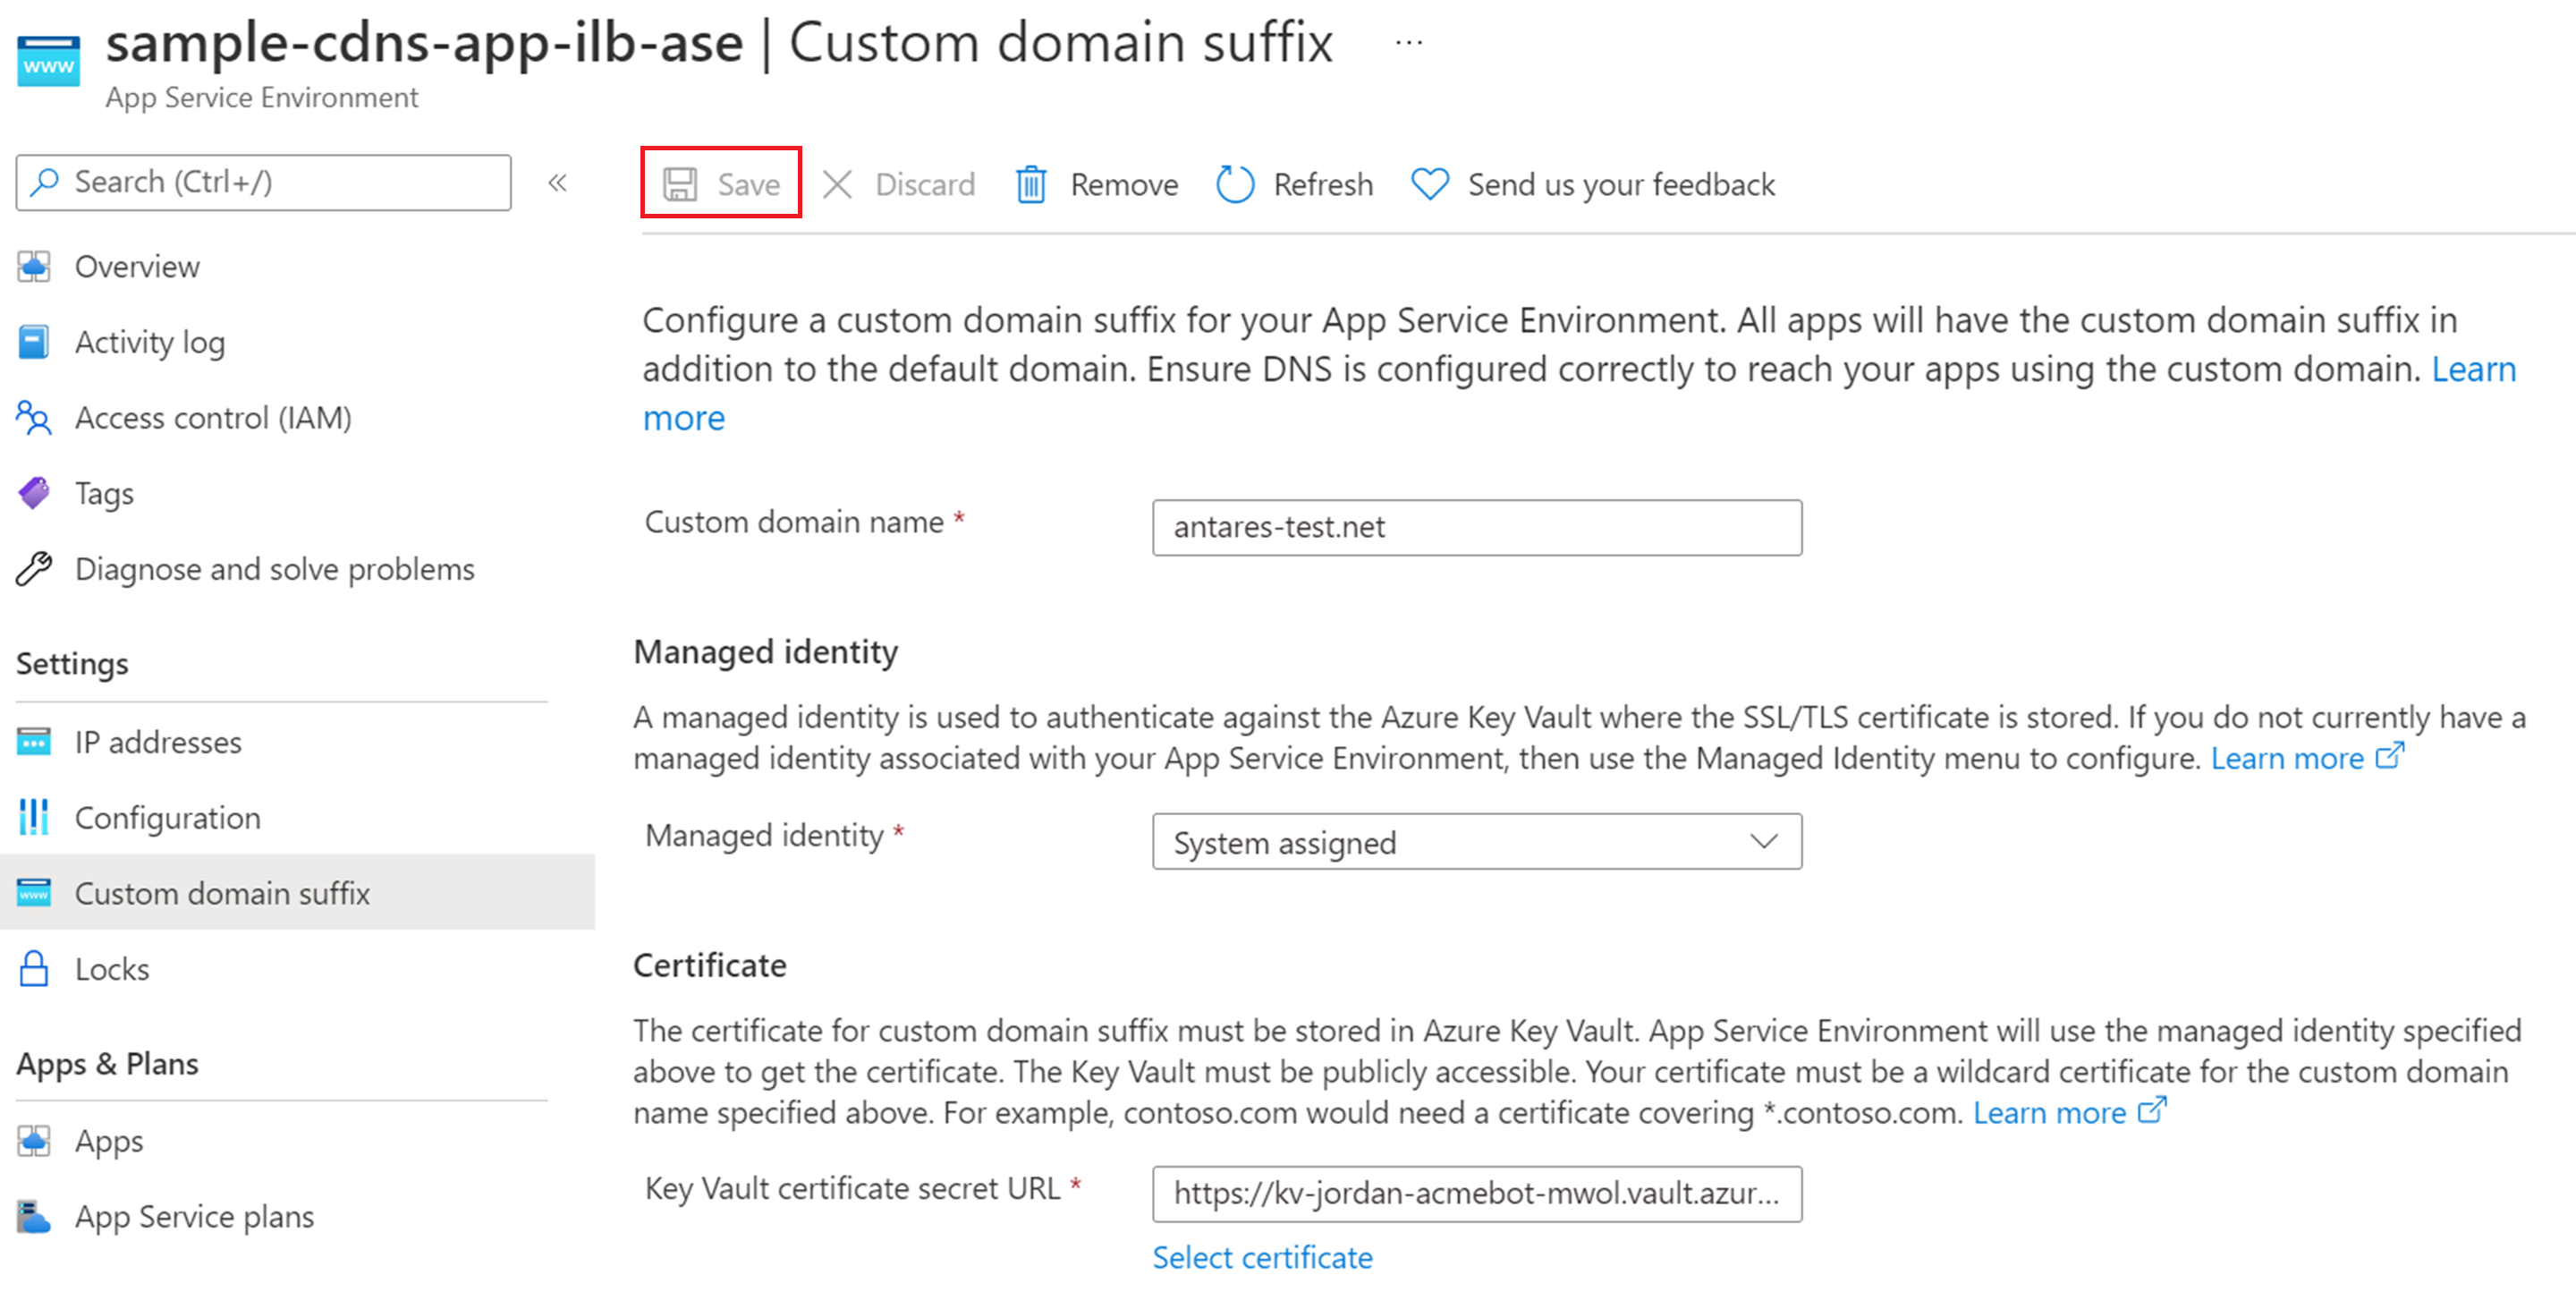
- From the Azure portal, navigate to the Custom domain suffix page for your App Service Environment.
- Enter your custom domain name.
- Select the managed identity you define for your App Service Environment. You can use either a system assigned or user assigned managed identity. You're able to configure your managed identity if you haven't done so already. You can configure the managed identity directly from the custom domain suffix page using the "Add identity" option in the managed identity selection box.
- Select the certificate for the custom domain suffix.
- If you use a private endpoint to access the key vault, since network access is restricted to the private endpoint, you can't use the portal interface to select the certificate. You must manually enter the certificate URL.
- Select "Save" at the top of the page. To see the latest configuration updates, refresh the page.
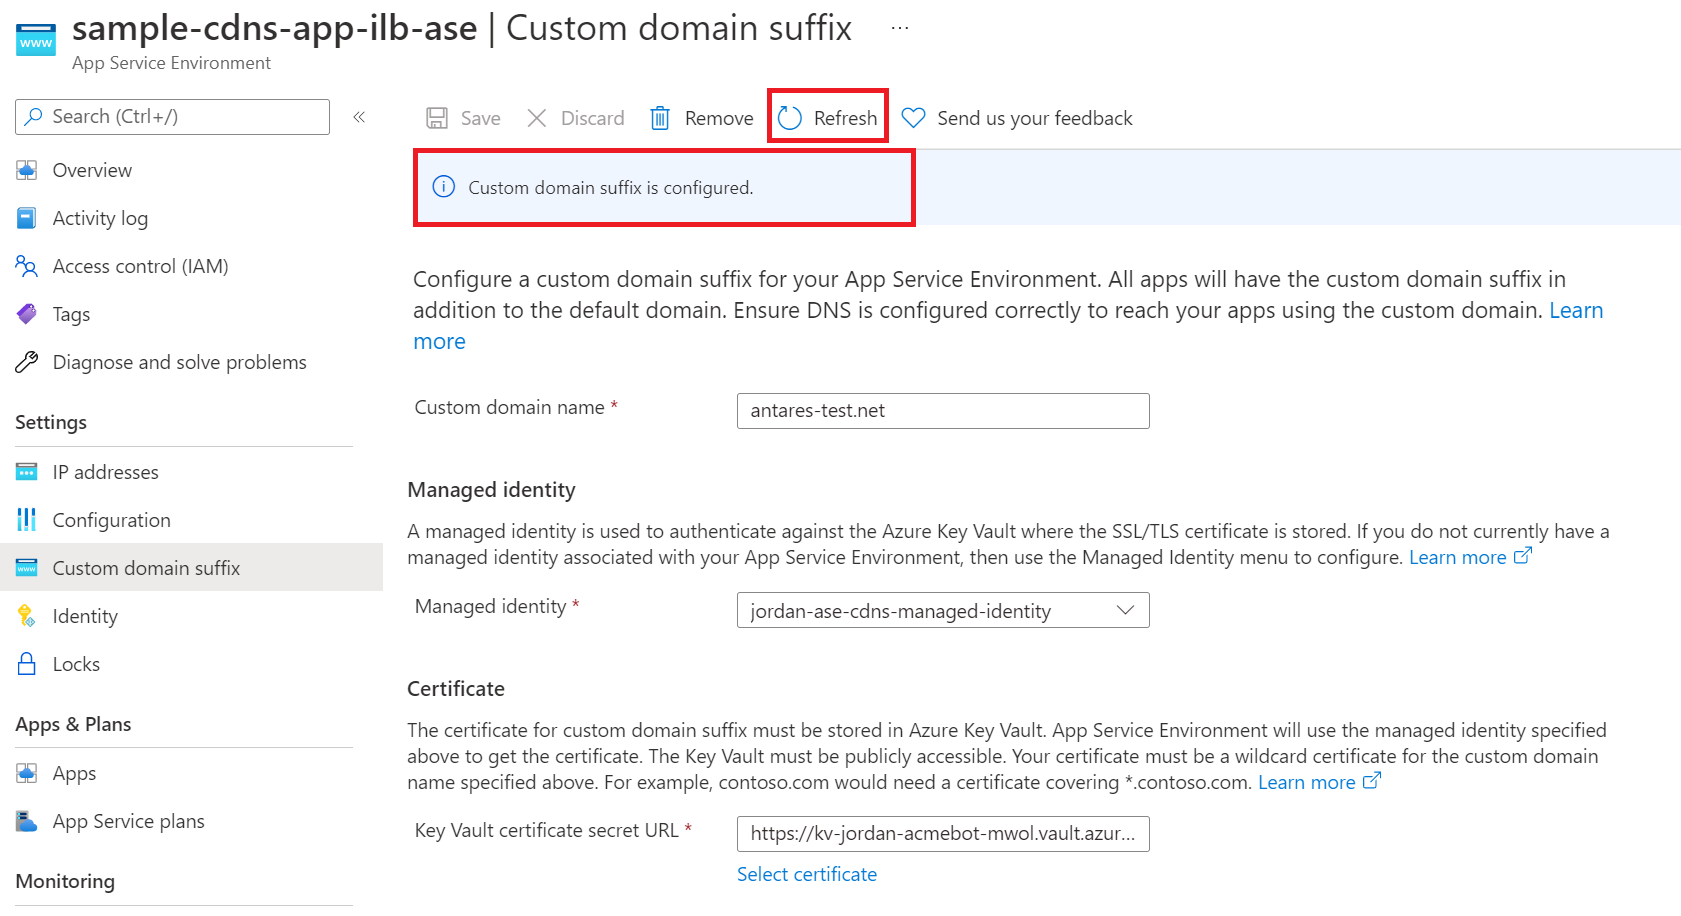
- It takes a few minutes for the custom domain suffix configuration to be set. Check the status by selecting "Refresh" at the top of the page. The banner updates with the latest progress. Once complete, the banner will state that the custom domain suffix is configured.
Use Azure Resource Manager to configure custom domain suffix
To configure a custom domain suffix for your App Service Environment using an Azure Resource Manager template, you need to include the below properties. Ensure that you meet the prerequisites and that your managed identity and certificate are accessible and have the appropriate permissions for the Azure Key Vault.
You need to configure the managed identity and ensure it exists before assigning it in your template. For more information on managed identities, see the managed identity overview.
Use a user assigned managed identity
"resources": [
{
    "apiVersion": "2022-03-01",
    "type": "Microsoft.Web/hostingEnvironments",
    "name": ...,
    "location": ...,
    "identity": {
        "type": "UserAssigned",
        "userAssignedIdentities": {
            "/subscriptions/aaaa0a0a-bb1b-cc2c-dd3d-eeeeee4e4e4e/resourcegroups/asev3-cdns-rg/providers/Microsoft.ManagedIdentity/userAssignedIdentities/ase-cdns-managed-identity"
        }
    },
    "properties": {
        "customDnsSuffixConfiguration": {
            "dnsSuffix": "antares-test.net",
            "certificateUrl": "https://kv-sample-key-vault.vault.azure.net/secrets/wildcard-antares-test-net",
            "keyVaultReferenceIdentity": "/subscriptions/aaaa0a0a-bb1b-cc2c-dd3d-eeeeee4e4e4e/resourcegroups/asev3-cdns-rg/providers/Microsoft.ManagedIdentity/userAssignedIdentities/ase-cdns-managed-identity"
        },
        "internalLoadBalancingMode": "Web, Publishing",
        etc...
    }
}
Use a system assigned managed identity
"resources": [
{
    "apiVersion": "2022-03-01",
    "type": "Microsoft.Web/hostingEnvironments",
    "name": ...,
    "location": ...,
    "identity": {
        "type": "SystemAssigned"
    }
    "properties": {
        "customDnsSuffixConfiguration": {
            "dnsSuffix": "antares-test.net",
            "certificateUrl": "https://kv-sample-key-vault.vault.azure.net/secrets/wildcard-antares-test-net",
            "keyVaultReferenceIdentity": "systemassigned"
        },
        "internalLoadBalancingMode": "Web, Publishing",
        etc...
    }
}
Use Azure Resource Explorer to configure custom domain suffix
Alternatively, you can update your existing ILB App Service Environment using Azure Resource Explorer.
- In Resource Explorer, go to the node for the App Service Environment (subscriptions > {your Subscription} > resourceGroups > {your Resource Group} > providers > Microsoft.Web > hostingEnvironments). Then select the specific App Service Environment that you want to update.
- Select Read/Write in the upper toolbar to allow interactive editing in Resource Explorer.
- Select the Edit button to make the Resource Manager template editable.
- Scroll to the bottom of the right pane. The customDnsSuffixConfiguration attribute is at the bottom.
- Enter your values for dnsSuffix, certificateUrl, and keyVaultReferenceIdentity.
- Navigate to the identity attribute and enter the details associated with the managed identity you're using.
- Select the PUT button at the top to commit the change to the App Service Environment.
- The provisioningState under customDnsSuffixConfiguration provides a status on the configuration update.
DNS configuration
To access your apps in your App Service Environment using your custom domain suffix, you need to either configure your own DNS server or configure DNS in an Azure private DNS zone for your custom domain.
If you want to use your own DNS server, add the following records:
- Create a zone for your custom domain.
- Create an A record in that zone that points * to the inbound IP address used by your App Service Environment.
- Create an A record in that zone that points @ to the inbound IP address used by your App Service Environment.
- Optionally create a zone for scm subdomain with a * A record that points to the inbound IP address used by your App Service Environment
To configure DNS in Azure DNS private zones:
- Create an Azure DNS private zone named for your custom domain. In the following example, the custom domain is internal.contoso.com.
- Create an A record in that zone that points * to the inbound IP address used by your App Service Environment.
- Create an A record in that zone that points @ to the inbound IP address used by your App Service Environment.
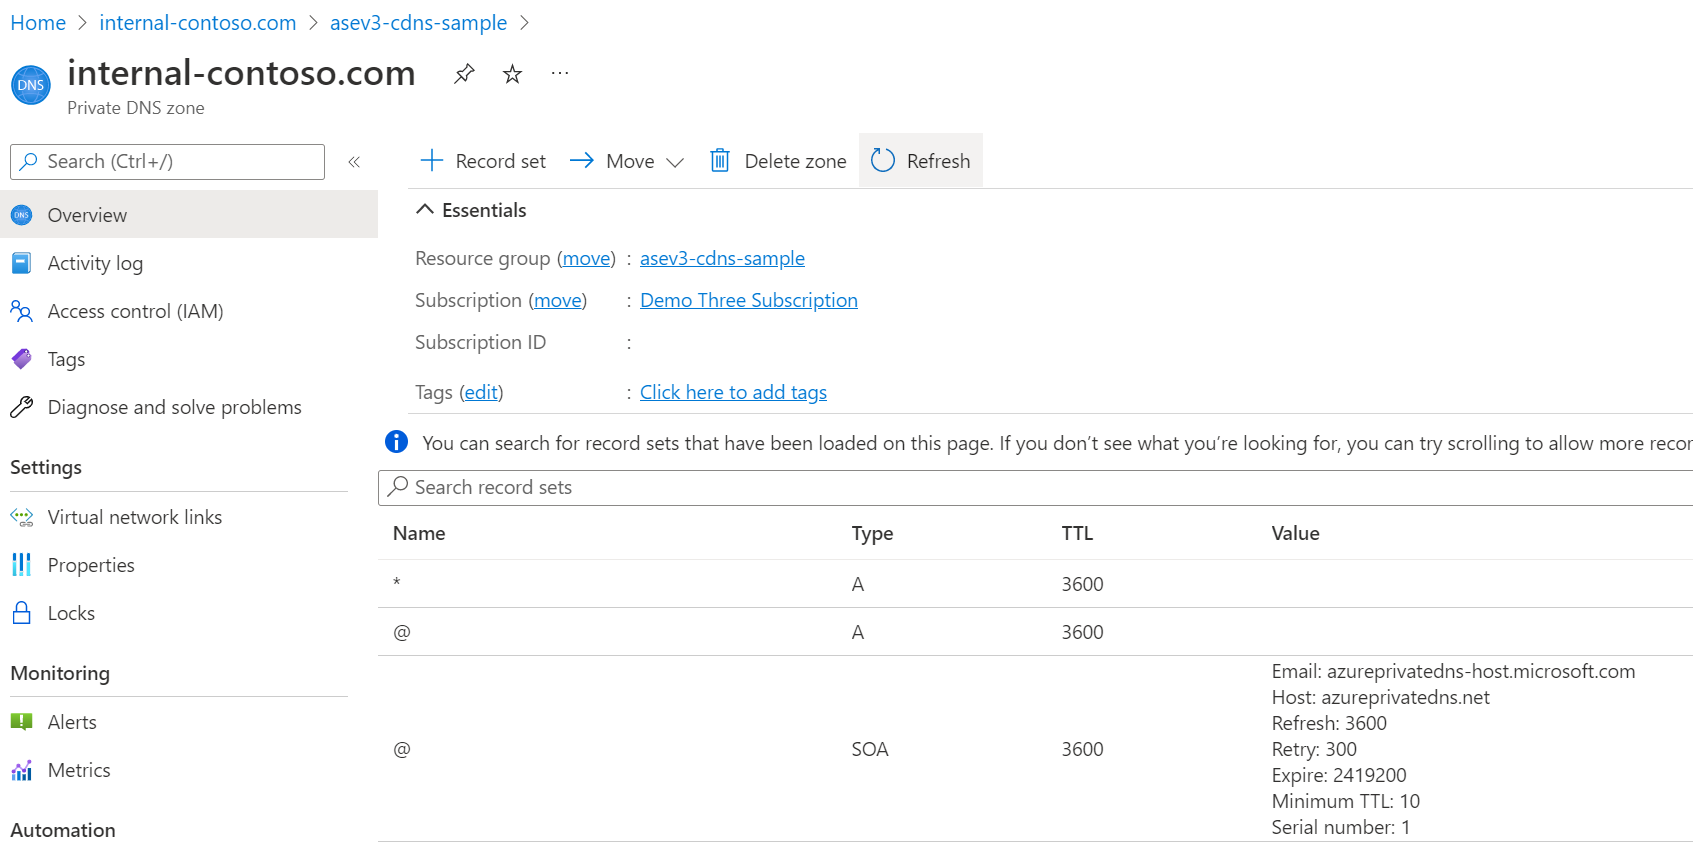
- Link your Azure DNS private zone to your App Service Environment's virtual network.

- Optionally create an A record in that zone that points *.scm to the inbound IP address used by your App Service Environment.
For more information on configuring DNS for your domain, see Use an App Service Environment.
Note
In addition to configuring DNS for your custom domain suffix, you should also consider configuring DNS for the default domain suffix to ensure all App Service features function as expected.
Access your apps
After configuring the custom domain suffix and DNS for your App Service Environment, you can go to the Custom domains page for one of your App Service apps in your App Service Environment and confirm the addition of the assigned custom domain for the app.
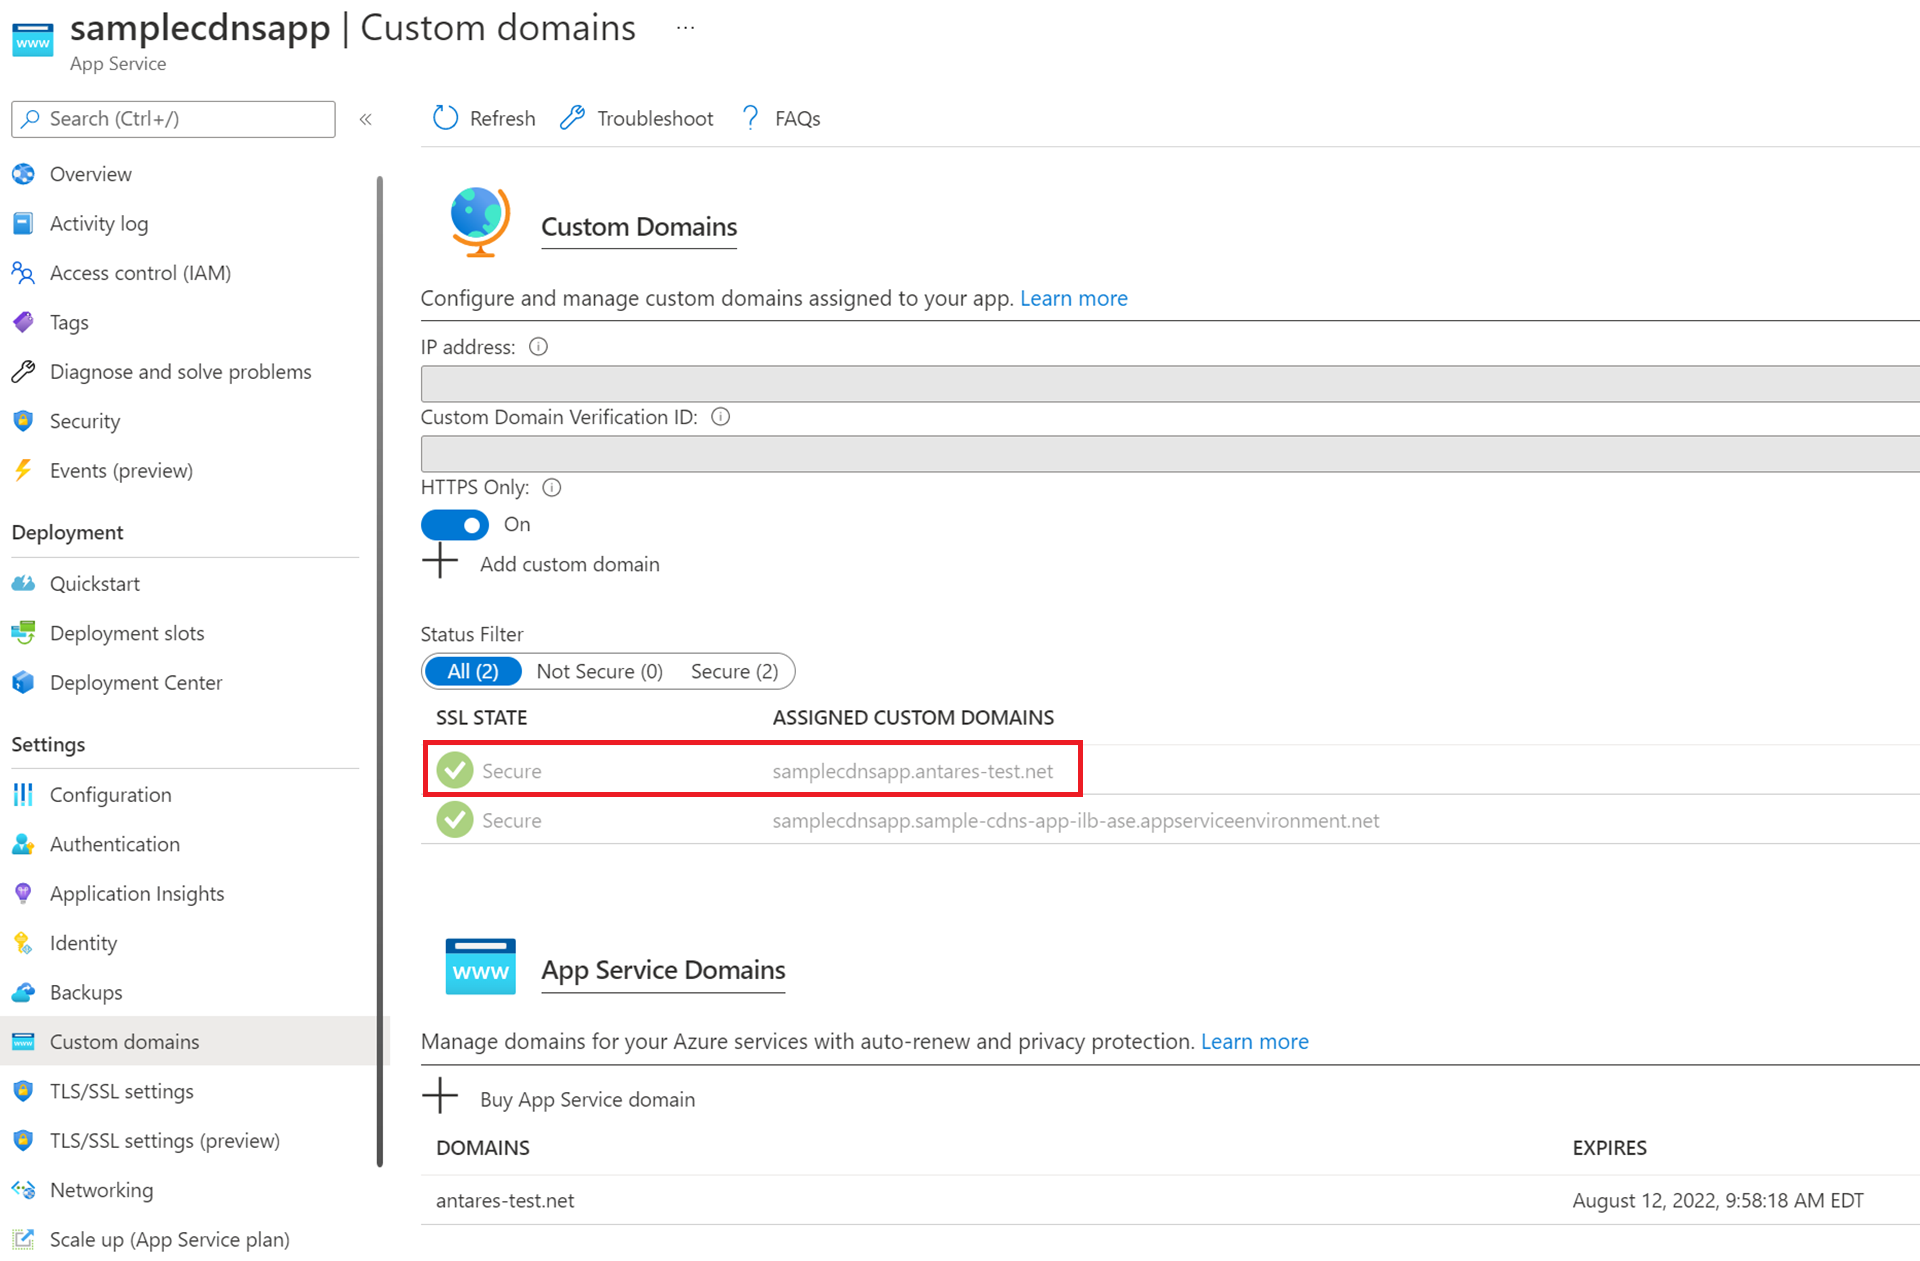
Apps on the ILB App Service Environment can be accessed securely over HTTPS by going to either the custom domain you configured or the default domain appserviceenvironment.net like in the previous image. The ability to access your apps using the default App Service Environment domain and your custom domain is a unique feature that is only supported on App Service Environment v3.
However, just like apps running on the public multitenant service, you can also configure custom host names for individual apps, and then configure unique SNI TLS/SSL certificate bindings for individual apps.
Troubleshooting
The App Service platform periodically checks if your App Service Environment can access your key vault and if your certificate is valid. If your permissions or network settings for your managed identity, key vault, or App Service Environment aren't set appropriately or recently changed, you aren't able to configure a custom domain suffix. You receive an error similar to the example shown in the screenshot. Review the prerequisites to ensure you configured the needed permissions. You also see a similar error message if the App Service platform detects that your certificate is degraded or expired.
