Use an external Redis-compatible cache in Azure API Management
APPLIES TO: All API Management tiers
In addition to utilizing the built-in cache, Azure API Management allows for caching responses in an external Redis-compatible cache, such as Azure Cache for Redis or Azure Managed Redis.
Using an external cache allows you to overcome a few limitations of the built-in cache:
- Avoid having your cache periodically cleared during API Management updates
- Have more control over your cache configuration
- Cache more data than your API Management tier allows
- Use caching with the Consumption tier of API Management
- Enable caching in the API Management self-hosted gateway
For more detailed information about caching, see API Management caching policies and Custom caching in Azure API Management.
Note
Currently, this feature isn't available in workspaces.
What you'll learn:
- Add an external cache in API Management
Prerequisites
To complete this tutorial, you need to:
Understand caching in Azure API Management
Have an Azure Cache for Redis, Azure Managed Redis, or another Redis-compatible cache available.
Important
Azure API Management uses a Redis connection string to connect to the cache. If you use Azure Cache for Redis or Azure Managed Redis, enable access key authentication in your cache to use a connection string. Currently, you can't use Microsoft Entra authentication to connect Azure API Management to Azure Cache for Redis or Azure Managed Redis.
Redis cache for Kubernetes
For an API Management self-hosted gateway, caching requires an external cache. For caching to be effective, a self-hosted gateway and the cache it relies on must be located close to each other to minimize lookup and store latencies. Deploying a Redis cache into the same Kubernetes cluster or in a separate cluster nearby are the best options. Learn how to deploy Redis cache to a Kubernetes cluster.
Add an external cache
Follow the steps below to add an external Redis-compatible cache in Azure API Management. You can limit the cache to a specific gateway in your API Management instance.
Use from setting
The Use from setting in the configuration specifies the location of your API Management instance that will use the cache. Select one of the following:
The Azure region where the API Management instance is hosted (or one of the configured locations, if you have a multi-region deployment)
A self-hosted gateway location
Default, to configure the cache as the default for all gateway locations in the API Management instance
A cache used for Default is overridden by a cache used for a specific matching region or location.
For example, consider an API Management instance that's hosted in the East US, Southeast Asia, and West Europe regions. There are two caches configured, one for Default and one for Southeast Asia. In this example, API Management in Southeast Asia uses its own cache, while the other two regions use the Default cache entry.
Note
You can configure the same external cache for more than one API Management instance. The API Management instances can be in the same or different regions. When sharing the cache for more than one instance, you must select Default in the Use from setting.
Add an Azure Cache for Redis or Azure Managed Redis instance from the same subscription
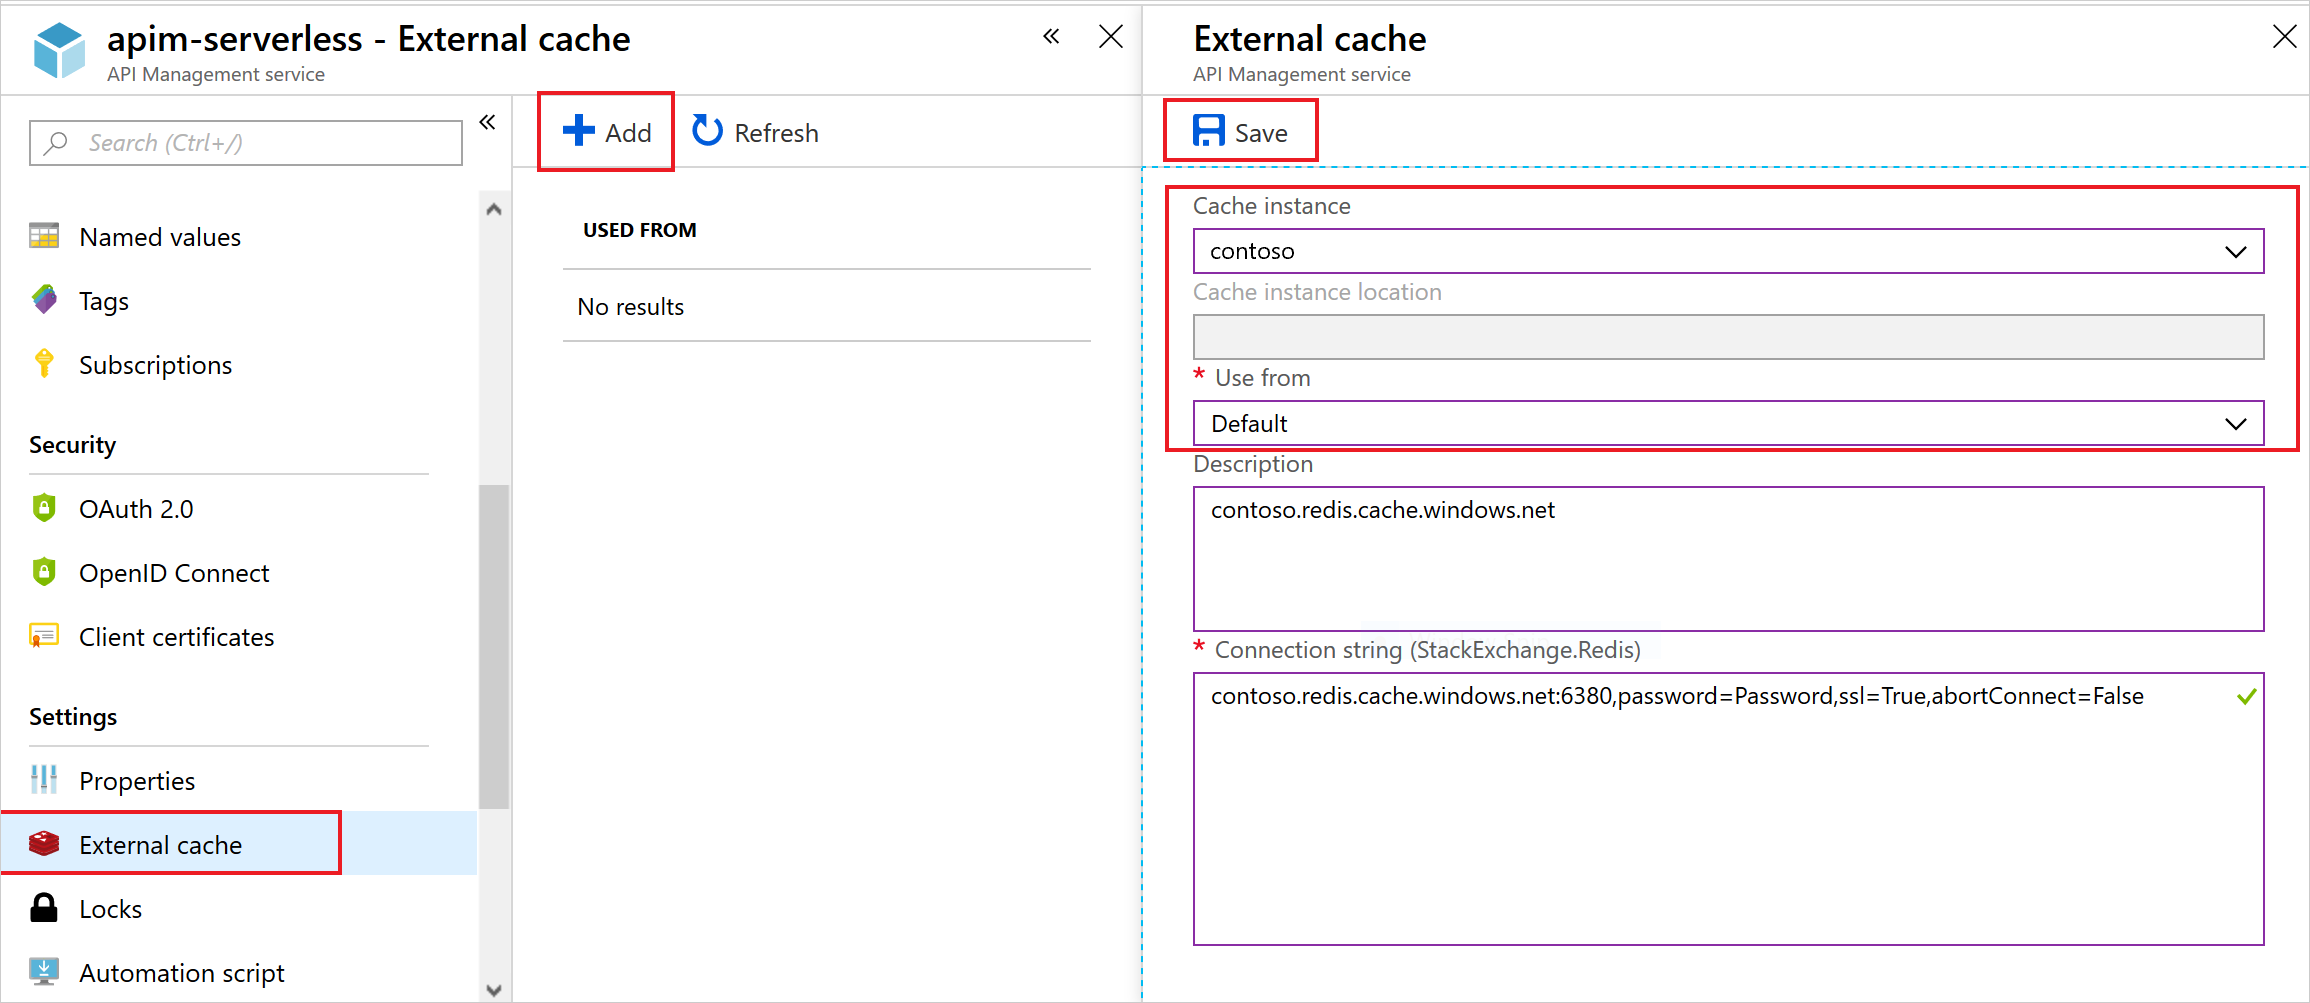
- Browse to your API Management instance in the Azure portal.
- In the left menu, under Deployment + infrastructure select External cache.
- Select + Add.
- In the Cache instance dropdown, select your cache.
- In the Use from dropdown, select Default or specify the desired region. The Connection string is automatically populated.
- Select Save.
Add a Redis-compatible cache hosted outside of the current Azure subscription or Azure in general
- Browse to your API Management instance in the Azure portal.
- In the left menu, under Deployment + infrastructure select External cache.
- Select + Add.
- In the Cache instance dropdown, select Custom.
- In the Use from dropdown, select Default or specify the desired region.
- Enter your Azure Cache for Redis, Azure Managed Redis, or Redis-compatible cache connection string in the Connection string field.
- Select Save.
Add a Redis cache to a self-hosted gateway
- In the left menu, under Deployment + infrastructure select External cache.
- Select + Add.
- In the Cache instance dropdown, select Custom.
- In the Use from dropdown, select Default or specify the desired region.
- Enter your Redis cache connection string in the Connection string field.
- Select Save.
Use the external cache
After adding a Redis-compatible cache, configure caching policies to enable response caching, or caching of values by key, in the external cache.
For a detailed example, see Add caching to improve performance in Azure API Management.
Related content
- For more information about caching policies, see Caching policies in the API Management policy reference.
- To cache items by key using policy expressions, see Custom caching in Azure API Management.
- Learn how to enable semantic caching for Azure OpenAI APIs.