Register APIs in your API center using GitHub Actions
This article shows how to set up a basic GitHub Actions workflow to register an API in your organization's API center when an API specification file is added to a GitHub repository.
Using a GitHub Actions workflow to register APIs in your API center provides a consistent and repeatable CI/CD process for every new or updated API. The workflow can be extended to include steps such as adding metadata to the API registration.
The following diagram shows how API registration in your API center can be automated using a GitHub Actions workflow.

- Set up a GitHub Actions workflow in your repository that triggers when a pull request adding an API definition file is merged.
- Create a branch from the main branch in your GitHub repository.
- Add an API definition file, commit the changes, and push to the new branch.
- Create a pull request to merge the new branch into the main branch.
- Merge the pull request.
- The merge triggers a GitHub Actions workflow that registers the API in your API center.
Prerequisites
An API center in your Azure subscription. If you haven't created one already, see Quickstart: Create your API center.
Permissions to create a service principal in the Microsoft Entra ID tenant
A GitHub account and a GitHub repo in which you can configure secrets and GitHub Actions workflows
For Azure CLI:
Use the Bash environment in Azure Cloud Shell. For more information, see Quickstart for Bash in Azure Cloud Shell.

If you prefer to run CLI reference commands locally, install the Azure CLI. If you're running on Windows or macOS, consider running Azure CLI in a Docker container. For more information, see How to run the Azure CLI in a Docker container.
If you're using a local installation, sign in to the Azure CLI by using the az login command. To finish the authentication process, follow the steps displayed in your terminal. For other sign-in options, see Sign in with the Azure CLI.
When you're prompted, install the Azure CLI extension on first use. For more information about extensions, see Use extensions with the Azure CLI.
Run az version to find the version and dependent libraries that are installed. To upgrade to the latest version, run az upgrade.
Note
az apiccommands require theapic-extensionAzure CLI extension. If you haven't usedaz apiccommands, the extension can be installed dynamically when you run your firstaz apiccommand, or you can install the extension manually. Learn more about Azure CLI extensions.See the release notes for the latest changes and updates in the
apic-extension. Certain features may require a preview or specific version of the extension.Note
Azure CLI command examples in this article can run in PowerShell or a bash shell. Where needed because of different variable syntax, separate command examples are provided for the two shells.
Set up a GitHub Actions workflow
In this section, you set up the GitHub Actions workflow for this scenario:
- Create a service principal to use for Azure credentials in the workflow.
- Add the credentials as a secret in your GitHub repository.
- Configure a GitHub Actions workflow that triggers when a pull request that adds an API definition file is merged. The workflow YAML file includes a step that uses the Azure CLI to register the API in your API center from the definition file.
Set up a service principal secret
In the following steps, create a Microsoft Entra ID service principal, which will be used to add credentials to the workflow to authenticate with Azure.
Note
Configuring a service principal is shown for demonstration purposes. The recommended way to authenticate with Azure for GitHub Actions is with OpenID Connect, an authentication method that uses short-lived tokens. Setting up OpenID Connect with GitHub Actions is more complex but offers hardened security. Learn more
Create a service principal using the az ad sp create-for-rbac command. The following example first uses the az apic show command to retrieve the resource ID of the API center. The service principal is then created with the Azure API Center Service Contributor role for the API center.
#! /bin/bash
apiCenter=<api-center-name>
resourceGroup=<resource-group-name>
spName=<service-principal-name>

apicResourceId=$(az apic show --name $apiCenter --resource-group $resourceGroup --query "id" --output tsv)

az ad sp create-for-rbac --name $spName --role "Azure API Center Service Contributor" --scopes $apicResourceId --json-auth
Copy the JSON output, which should look similar to the following:
{
  "clientId": "<GUID>",
  "clientSecret": "<GUID>",
  "subscriptionId": "<GUID>",
  "tenantId": "<GUID>",
  "activeDirectoryEndpointUrl": "https://login.microsoftonline.com",
  "resourceManagerEndpointUrl": "https://management.azure.com/",
  [...other endpoints...]
}
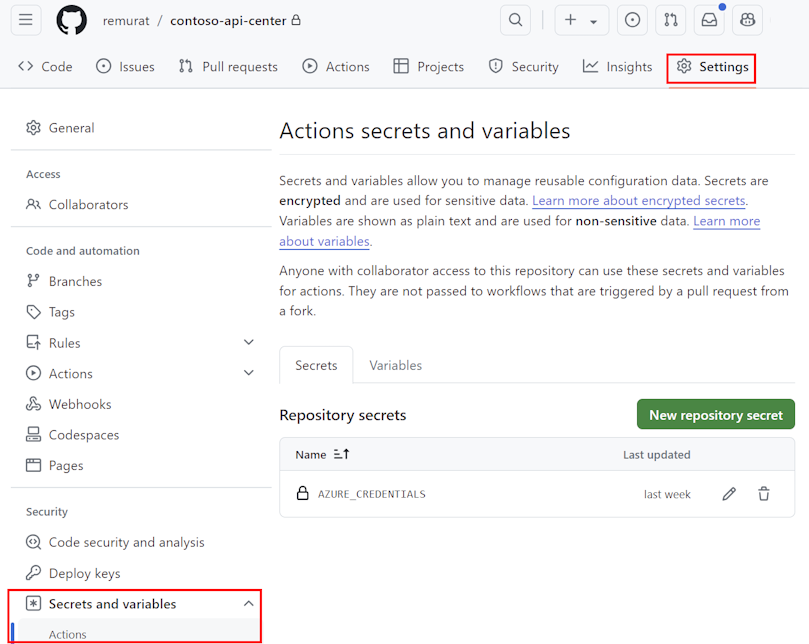
Add the service principal as a GitHub secret
In GitHub, browse your repository. Select Settings.
Under Security, select Secrets and variables > Actions
Select New repository secret.
Paste the entire JSON output from the Azure CLI command into the secret's value field. Name the secret
AZURE_CREDENTIALS. Select Add secret.The secret is listed under Repository secrets.

When you configure the GitHub workflow file later, you use the secret for the input creds of the Azure/login action. For example:
- uses: azure/login@v1
  with:
    creds: ${{ secrets.AZURE_CREDENTIALS }}
Add the workflow file to your GitHub repository
A GitHub Actions workflow is represented by a YAML (.yml) definition file. This definition contains the various steps and parameters that make up the workflow. Learn more
The following is a basic workflow file for this example that you can use or modify.
In this example:
- The workflow is triggered when a pull request that adds a JSON definition in the
APIspath is closed on the main branch. - The location of the definition is extracted from the pull request using a GitHub script, which is authenticated with the default GitHub token.
- The Azure credentials saved in your repo are used to sign into Azure.
- The az apic register command registers the API in the API center specified in the environment variables.
To configure the workflow file:
- Copy and save the file under a name such as
register-api.yml. - Confirm or update the name of the repository folder (
APIs) where you'll add the API definition file. - Add this workflow file in the
/.github/workflows/path in your GitHub repository. - Set the Actions variables
SERVICE_NAMEandRESOURCE_GROUPin your repo for your API center name and resource group name in Azure.
Tip
Using the Visual Studio Code extension for Azure API Center, you can generate a starting workflow file by running an extension command. In the Command Palette, select Azure API Center: Register APIs. Select CI/CD > GitHub. You can then modify or extend the file for your scenario.
name: Register API Definition to Azure API Center
on:
  pull_request:
    types: [ closed ]
    branches:
      - [ "main" ]
    paths:
      - "APIs/**/*.json"
permissions:
  contents: read
  pull-requests: read
jobs:
  register:
    runs-on: ubuntu-latest
    environment: production
    steps:
      - uses: actions/checkout@v2

      - name: Get specification file path in the PR
        id: get-file-location
        uses: actions/github-script@v5
        with:
          github-token: ${{ secrets.GITHUB_TOKEN }}
          script: |
            const pull_number = context.payload.pull_request.number;
            const owner = context.repo.owner;
            const repo = context.repo.repo;
            const files = await github.rest.pulls.listFiles({
              owner,
              repo,
              pull_number
            });
            if (files.data.length === 1) {
              const filename = files.data[0].filename;
              core.exportVariable('API_FILE_LOCATION', filename);
              console.log(`API_FILE_LOCATION: ${{ env.API_FILE_LOCATION }}`);
            }
            else {
              console.log('The PR does not add exactly one specification file.');
            }

      - name: Azure login
        uses: azure/login@v1
        with:
          creds: ${{ secrets.AZURE_CREDENTIALS }}

      - name: Register to API Center
        uses: azure/CLI@v2
        with:
          azcliversion: latest
          inlineScript: |
            az apic api register -g ${{ vars.RESOURCE_GROUP }} -n ${{ vars.SERVICE_NAME }} --api-location ${{ env.API_FILE_LOCATION }}
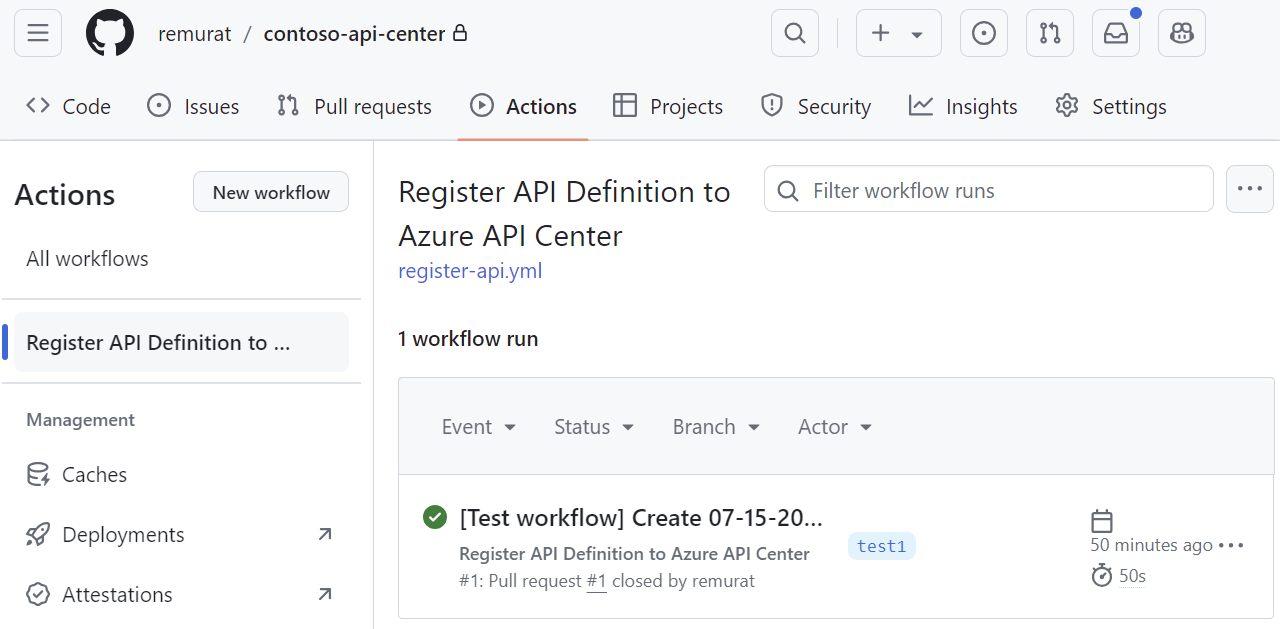
Add API definition file to the repository
Test the workflow by adding an API definition file to the repository. Follow these high-level steps, which are typical of a development workflow. For details on working with GitHub branches, see the GitHub documentation.
Create a new working branch from the main branch in your repository.
Add the API definition file to the repository in the
APIspath. For example,APIs/catfacts-api/07-15-2024.json.Commit the changes and push them to the working branch.
Create a pull request to merge the working branch into the main branch.
After review, merge the pull request. The merge triggers the GitHub Actions workflow that registers the API in your API center.
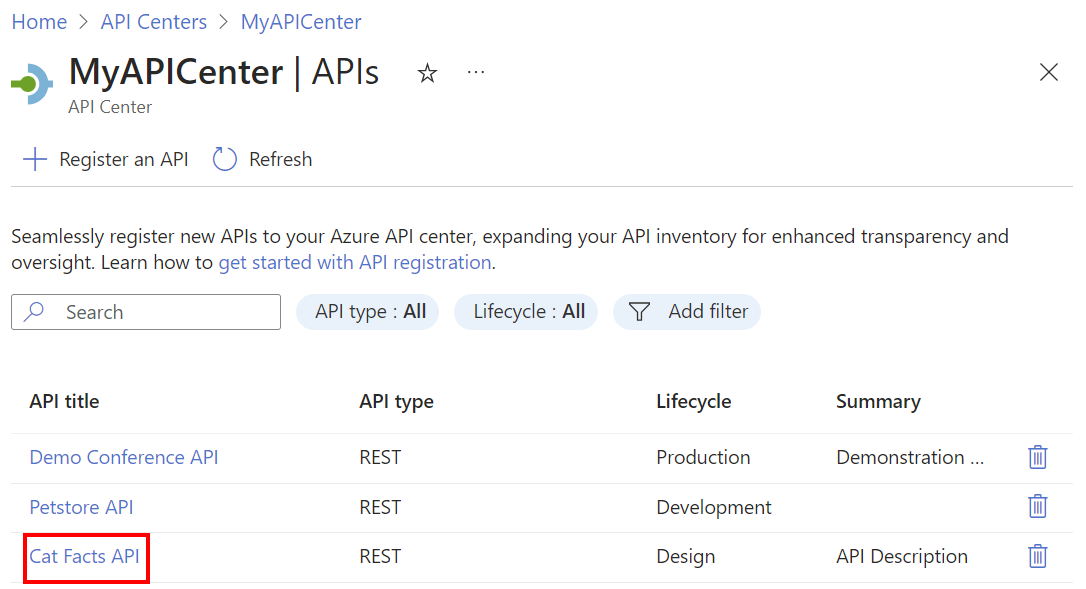
Verify the API registration
Verify that the API is registered in your API center.
- In the Azure portal, navigate to your API center.
- In the left menu, under Assets, select APIs.
- Verify that the newly registered API appears in the list of APIs.
Add a new API version
To add a new version to an existing API in your API center, follow the preceding steps, with a slight modification:
- Change to the same working branch in your repo, or create a new working branch.
- Add a new API definition file to the repository in the
APIspath, in the folder for an existing API. For example, if you previously added a Cat Facts API definition, add a new version such asAPIs/catfacts-api/07-22-2024.json. - Commit the changes and push them to the working branch.
- Create a pull request to merge the working branch into the main branch.
- After review, merge the pull request. The merge triggers the GitHub Actions workflow that registers the new API version in your API center.
- In the Azure portal, navigate to your API center and confirm that the new version is registered.
Extend the scenario
You can extend the GitHub Actions workflow to include other steps, such as adding metadata for the API registration. For example:
Using the metadata schema in your API center, create a metadata JSON file to apply metadata values to your API registration.
For example, if the metadata schema includes properties such as
approver,team, andcost center, a metadata JSON file might look like this:{ "approver": "diego@contoso.com", "team": "Store API dev team", "costCenter": "12345" }Upload a metadata JSON file in the folder for each API in the repository.
Add a workflow step to apply the metadata to the API registration using the az apic api update command. In the following example, the API ID and metadata file are passed in environment variables, which would be set elsewhere in the workflow file.
[...]
- name: Apply metadata to API in API Center
    uses: azure/CLI@v2
    with:
      azcliversion: latest
      inlineScript: |
        az apic api update -g ${{ vars.RESOURCE_GROUP }} -n ${{ vars.SERVICE_NAME }} --api-id {{ env.API_ID }} --custom-properties {{ env.METADATA_FILE }}