How to deploy a Kubernetes cluster using the Azure portal
Applies to: Azure Local, version 23H2
This article describes how to create Kubernetes clusters in Azure Local using the Azure portal. The workflow is as follows:
- How to create a Kubernetes cluster using the Azure portal. By default, the cluster is Azure Arc-connected.
- While creating the cluster, you provide a Microsoft Entra group that contains the list of Microsoft Entra users with Kubernetes cluster administrator access.
Before you begin
- Before you begin, make sure you have the following details from your on-premises infrastructure administrator:
- Azure subscription ID: the Azure subscription ID where Azure Resource Bridge, AKS Arc extensions, and custom location is created.
- Custom Location ID: the Azure Resource Manager ID of the custom location. Your infrastructure admin should give you "Contributor" access to the custom location. Custom Location is a required parameter to create Kubernetes clusters.
- AKS Arc logical network ID: the Azure Resource Manager ID of the Azure Arc logical network. Your infrastructure admin should give you "Contributor" access to an AKS Arc logical network. The logical network ID is a required parameter to create Kubernetes clusters.
- In order to connect to the cluster from anywhere, you must create a Microsoft Entra group and add members to it. All the members in the Microsoft Entra group have cluster administrator access to the AKS Arc cluster. Make sure to add yourself to the Microsoft Entra group. If you don't add yourself, you can't access the AKS Arc cluster using kubectl. For more information about creating Microsoft Entra groups and adding users, see create Microsoft Entra groups using Azure portal.
Create a Kubernetes cluster
Sign in to the Azure portal.
On the Azure portal search bar, type Kubernetes Azure Arc.
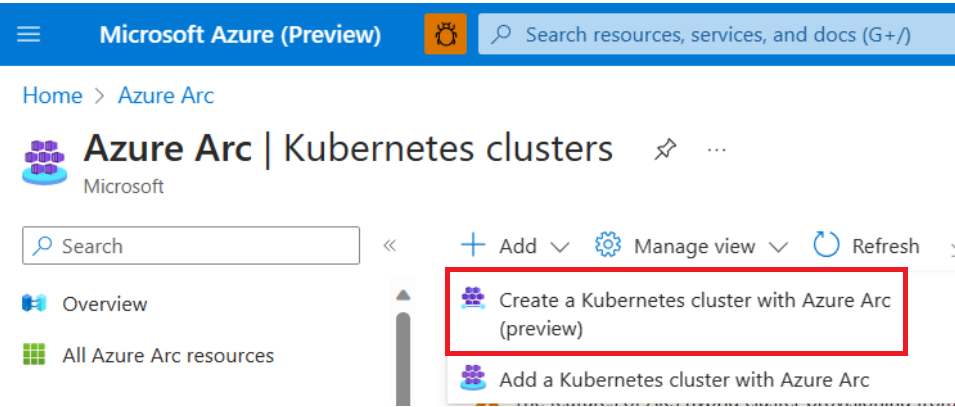
Select Add > Create a Kubernetes cluster with Azure Arc:
On the Basics page, configure the following options:
- Project details:
- Select an Azure subscription. This Azure subscription is where your infrastructure administrator deployed the Arc Resource Bridge, AKS Arc extension and custom location.
- Select an Azure Resource group, such as myResourceGroup.
- Cluster details:
- Enter a Kubernetes cluster name, such as myk8scluster. The name of a Kubernetes cluster name must consist of lowercase alphanumeric characters.
- Select a custom location where you want to deploy the cluster. Make sure your infrastructure administrator gave you "Contributor" access on a custom location.
- Select a K8s version from the list of available versions.
- Primary node pool:
- You can leave the default values selected, or change the default value from the drop down list.
- SSH Keys
- Configure SSH access to the underlying VMs in your Kubernetes nodes for troubleshooting operations. You must provide an existing SSH public key.
- Provide an RSA public key in the single line format (starting with "ssh-rsa") or the multi-line PEM format. You can generate SSH keys using PuTTYGen on Windows.
- Project details:
Select Next: Node pools when complete.
On the Node pools page, configure the following options:
- Control plane nodes:
- Control plane nodes host Kubernetes components that make global decisions about the cluster, such as scheduling containers and detecting and responding to cluster events; for example, starting up a new pod. For simplicity and reliability, we run these important Kubernetes components in separate control plane nodes.
- Leave the default values selected.
- Node pools:
- You can choose to add optional node pools in addition to the primary node pool you created on the Basics page.
- Control plane nodes:
At the bottom of the screen, select Next: Access.
On the Access page, configure the following options:
- The default value for Kubernetes cluster authentication is Local accounts with Kubernetes RBAC. This option requires that you have a direct line of sight to your on-premises infrastructure, to access the cluster using kubectl.
- Select Microsoft Entra authentication with Kubernetes RBAC. This option lets you choose one or more Microsoft Entra groups. By default, all members of the specified Microsoft Entra groups have cluster administrator access to the Kubernetes cluster. This option also enables you to connect to AKS Arc from anywhere, without requiring a line of sight to the on-premises infrastructure. Make sure to add yourself to the Microsoft Entra group. If you don't add yourself, you can't access the AKS Arc cluster using kubectl.
- Choose one or more Microsoft Entra groups and then at the bottom of the screen, select Next: Networking.
On the Networking page, select an AKS Arc logical network from the drop down list, called Logical Network. The Kubernetes nodes and services in your cluster get IP addresses and networking configurations from this logical network. Make sure your infrastructure administrator gave you Contributor access on an AKS Arc logical network.
Select Integration. Connect your cluster to other services such as Azure Monitor, which is enabled by default. You can also add Kubernetes extensions to your cluster from the Home >
YourClusterName> Settings > Extensions blade.You can choose the default Log Analytics workspace. or create one of your own. This workspace stores monitoring data.
Next, Select Tags. Tags are name/value pairs that enable you to categorize resources and view consolidated billing by applying the same tag to multiple resources and resource groups. Use this page to assign tags (optional) to your resource groups.
Select Review + create. When you navigate to the Review + create tab, Azure runs validation on the settings that you chose. If validation passes, you can create the cluster by selecting Create. If validation fails, it then indicates which settings you must modify.
It takes a few minutes to create the cluster. When your deployment is complete, navigate to your resource by either selecting Go to resource, or browse to the Kubernetes cluster resource group and select the resource.

