Tutorial: Part 2 - Build a custom knowledge retrieval (RAG) app with the Azure AI Foundry SDK
In this tutorial, you use the Azure AI Foundry SDK (and other libraries) to build, configure, and evaluate a chat app for your retail company called Contoso Trek. Your retail company specializes in outdoor camping gear and clothing. The chat app should answer questions about your products and services. For example, the chat app can answer questions such as "which tent is the most waterproof?" or "what is the best sleeping bag for cold weather?".
This part two shows you how to enhance a basic chat application by adding retrieval augmented generation (RAG) to ground the responses in your custom data. Retrieval Augmented Generation (RAG) is a pattern that uses your data with a large language model (LLM) to generate answers specific to your data. In this part two, you learn how to:
- Get example data
- Create a search index of the data for the chat app to use
- Develop custom RAG code
This tutorial is part two of a three-part tutorial.
Prerequisites
Complete Tutorial: Part 1 - Create resources for building a custom chat application with the Azure AI SDK to:
- Create a project with a connected Azure AI Search index
- Install the Azure CLI, Python, and required packages
- Configure your environment variables
Create example data for your chat app
The goal with this RAG-based application is to ground the model responses in your custom data. You use an Azure AI Search index that stores vectorized data from the embeddings model. The search index is used to retrieve relevant documents based on the user's question.
If you already have a search index with data, you can skip to Get product documents. Otherwise, you can create a simple example data set to use in your chat app.
Create an assets directory and add this example data to a products.csv file:
id,name,price,category,brand,description
1,TrailMaster X4 Tent,250.0,Tents,OutdoorLiving,"Unveiling the TrailMaster X4 Tent from OutdoorLiving, your home away from home for your next camping adventure. Crafted from durable polyester, this tent boasts a spacious interior perfect for four occupants. It ensures your dryness under drizzly skies thanks to its water-resistant construction, and the accompanying rainfly adds an extra layer of weather protection. It offers refreshing airflow and bug defence, courtesy of its mesh panels. Accessibility is not an issue with its multiple doors and interior pockets that keep small items tidy. Reflective guy lines grant better visibility at night, and the freestanding design simplifies setup and relocation. With the included carry bag, transporting this convenient abode becomes a breeze. Be it an overnight getaway or a week-long nature escapade, the TrailMaster X4 Tent provides comfort, convenience, and concord with the great outdoors. Comes with a two-year limited warranty to ensure customer satisfaction."
2,Adventurer Pro Backpack,90.0,Backpacks,HikeMate,"Venture into the wilderness with the HikeMate's Adventurer Pro Backpack! Uniquely designed with ergonomic comfort in mind, this backpack ensures a steadfast journey no matter the mileage. It boasts a generous 40L capacity wrapped up in durable nylon fabric ensuring its long-lasting performance on even the most rugged pursuits. It's meticulously fashioned with multiple compartments and pockets for organized storage, hydration system compatibility, and adjustable padded shoulder straps all in a lightweight construction. The added features of a sternum strap and hip belt enhance stability without compromising on comfort. The Adventurer Pro Backpack also prioritizes your safety with its reflective accents for when night falls. This buoyant beauty does more than carry your essentials; it carries the promise of a stress-free adventure!"
3,Summit Breeze Jacket,120.0,Hiking Clothing,MountainStyle,"Discover the joy of hiking with MountainStyle's Summit Breeze Jacket. This lightweight jacket is your perfect companion for outdoor adventures. Sporting a trail-ready, windproof design and a water-resistant fabric, it's ready to withstand any weather. The breathable polyester material and adjustable cuffs keep you comfortable, whether you're ascending a mountain or strolling through a park. And its sleek black color adds style to function. The jacket features a full-zip front closure, adjustable hood, and secure zippered pockets. Experience the comfort of its inner lining and the convenience of its packable design. Crafted for night trekkers too, the jacket has reflective accents for enhanced visibility. Rugged yet chic, the Summit Breeze Jacket is more than a hiking essential, it's the gear that inspires you to reach new heights. Choose adventure, choose the Summit Breeze Jacket."
4,TrekReady Hiking Boots,140.0,Hiking Footwear,TrekReady,"Introducing the TrekReady Hiking Boots - stepping up your hiking game, one footprint at a time! Crafted from leather, these stylistic Trailmates are made to last. TrekReady infuses durability with its reinforced stitching and toe protection, making sure your journey is never stopped short. Comfort? They have that covered too! The boots are a haven with their breathable materials, cushioned insole, with padded collar and tongue; all nestled neatly within their lightweight design. As they say, it's what's inside that counts - so inside you'll find a moisture-wicking lining that quarantines stank and keeps your feet fresh as that mountaintop breeze. Remember the fear of slippery surfaces? With these boots, you can finally tell it to 'take a hike'! Their shock-absorbing midsoles and excellent traction capabilities promise stability at your every step. Beautifully finished in a traditional lace-up system, every adventurer deserves a pair of TrekReady Hiking Boots. Hike more, worry less!"
5,BaseCamp Folding Table,60.0,Camping Tables,CampBuddy,"CampBuddy's BaseCamp Folding Table is an adventurer's best friend. Lightweight yet powerful, the table is a testament to fun-meets-function and will elevate any outing to new heights. Crafted from resilient, rust-resistant aluminum, the table boasts a generously sized 48 x 24 inches tabletop, perfect for meal times, games and more. The foldable design is a godsend for on-the-go explorers. Adjustable legs rise to the occasion to conquer uneven terrains and offer height versatility, while the built-in handle simplifies transportation. Additional features like non-slip feet, integrated cup holders and mesh pockets add a pinch of finesse. Quick to set up without the need for extra tools, this table is a silent yet indispensable sidekick during camping, picnics, and other outdoor events. Don't miss out on the opportunity to take your outdoor experiences to a new level with the BaseCamp Folding Table. Get yours today and embark on new adventures tomorrow! "
6,EcoFire Camping Stove,80.0,Camping Stoves,EcoFire,"Introducing EcoFire's Camping Stove, your ultimate companion for every outdoor adventure! This portable wonder is precision-engineered with a lightweight and compact design, perfect for capturing that spirit of wanderlust. Made from high-quality stainless steel, it promises durability and steadfast performance. This stove is not only fuel-efficient but also offers an easy, intuitive operation that ensures hassle-free cooking. Plus, it's flexible, accommodating a variety of cooking methods whether you're boiling, grilling, or simmering under the starry sky. Its stable construction, quick setup, and adjustable flame control make cooking a breeze, while safety features protect you from any potential mishaps. And did we mention it also includes an effective wind protector and a carry case for easy transportation? But that's not all! The EcoFire Camping Stove is eco-friendly, designed to minimize environmental impact. So get ready to enhance your camping experience and enjoy delicious outdoor feasts with this unique, versatile stove!"
7,CozyNights Sleeping Bag,100.0,Sleeping Bags,CozyNights,"Embrace the great outdoors in any season with the lightweight CozyNights Sleeping Bag! This durable three-season bag is superbly designed to give hikers, campers, and backpackers comfort and warmth during spring, summer, and fall. With a compact design that folds down into a convenient stuff sack, you can whisk it away on any adventure without a hitch. The sleeping bag takes comfort seriously, featuring a handy hood, ample room and padding, and a reliable temperature rating. Crafted from high-quality polyester, it ensures long-lasting use and can even be zipped together with another bag for shared comfort. Whether you're gazing at stars or catching a quick nap between trails, the CozyNights Sleeping Bag makes it a treat. Don't just sleep— dream with CozyNights."
8,Alpine Explorer Tent,350.0,Tents,AlpineGear,"Welcome to the joy of camping with the Alpine Explorer Tent! This robust, 8-person, 3-season marvel is from the responsible hands of the AlpineGear brand. Promising an enviable setup that is as straightforward as counting sheep, your camping experience is transformed into a breezy pastime. Looking for privacy? The detachable divider provides separate spaces at a moment's notice. Love a tent that breathes? The numerous mesh windows and adjustable vents fend off any condensation dragon trying to dampen your adventure fun. The waterproof assurance keeps you worry-free during unexpected rain dances. With a built-in gear loft to stash away your outdoor essentials, the Alpine Explorer Tent emerges as a smooth balance of privacy, comfort, and convenience. Simply put, this tent isn't just a shelter - it's your second home in the heart of nature! Whether you're a seasoned camper or a nature-loving novice, this tent makes exploring the outdoors a joyous journey."
9,SummitClimber Backpack,120.0,Backpacks,HikeMate,"Adventure waits for no one! Introducing the HikeMate SummitClimber Backpack, your reliable partner for every exhilarating journey. With a generous 60-liter capacity and multiple compartments and pockets, packing is a breeze. Every feature points to comfort and convenience; the ergonomic design and adjustable hip belt ensure a pleasantly personalized fit, while padded shoulder straps protect you from the burden of carrying. Venturing into wet weather? Fear not! The integrated rain cover has your back, literally. Stay hydrated thanks to the backpack's hydration system compatibility. Travelling during twilight? Reflective accents keep you visible in low-light conditions. The SummitClimber Backpack isn't merely a carrier; it's a wearable base camp constructed from ruggedly durable nylon and thoughtfully designed for the great outdoors adventurer, promising to withstand tough conditions and provide years of service. So, set off on that quest - the wild beckons! The SummitClimber Backpack - your hearty companion on every expedition!"
10,TrailBlaze Hiking Pants,75.0,Hiking Clothing,MountainStyle,"Meet the TrailBlaze Hiking Pants from MountainStyle, the stylish khaki champions of the trails. These are not just pants; they're your passport to outdoor adventure. Crafted from high-quality nylon fabric, these dapper troopers are lightweight and fast-drying, with a water-resistant armor that laughs off light rain. Their breathable design whisks away sweat while their articulated knees grant you the flexibility of a mountain goat. Zippered pockets guard your essentials, making them a hiker's best ally. Designed with durability for all your trekking trials, these pants come with a comfortable, ergonomic fit that will make you forget you're wearing them. Sneak a peek, and you are sure to be tempted by the sleek allure that is the TrailBlaze Hiking Pants. Your outdoors wardrobe wouldn't be quite complete without them."
11,TrailWalker Hiking Shoes,110.0,Hiking Footwear,TrekReady,"Meet the TrekReady TrailWalker Hiking Shoes, the ideal companion for all your outdoor adventures. Constructed with synthetic leather and breathable mesh, these shoes are tough as nails yet surprisingly airy. Their cushioned insoles offer fabulous comfort for long hikes, while the supportive midsoles and traction outsoles with multidirectional lugs ensure stability and excellent grip. A quick-lace system, padded collar and tongue, and reflective accents make these shoes a dream to wear. From combating rough terrain with the reinforced toe cap and heel, to keeping off trail debris with the protective mudguard, the TrailWalker Hiking Shoes have you covered. These waterproof warriors are made to endure all weather conditions. But they're not just about being rugged, they're light as a feather too, minimizing fatigue during epic hikes. Each pair can be customized for a perfect fit with removable insoles and availability in multiple sizes and widths. Navigate hikes comfortably and confidently with the TrailWalker Hiking Shoes. Adventure, here you come!"
12,TrekMaster Camping Chair,50.0,Camping Tables,CampBuddy,"Gravitate towards comfort with the TrekMaster Camping Chair from CampBuddy. This trusty outdoor companion boasts sturdy construction using high-quality materials that promise durability and enjoyment for seasons to come. Impeccably lightweight and portable, it's designed to be your go-to seat whether you're camping, at a picnic, cheering at a sporting event, or simply relishing in your backyard pleasures. Beyond its foldable design ensuring compact storage and easy transportation, its ergonomic magic is in the details. An adjustable recline, padded seat and backrest, integrated cup holder, and side pockets ensure the greatest outdoor comfort. Weather resistant, easy to clean, and capable of supporting diverse body types, this versatile chair also comes with a carry bag, ready for your next adventure."
13,PowerBurner Camping Stove,100.0,Camping Stoves,PowerBurner,"Unleash your inner explorer with the PowerBurner Dual Burner Camping Stove. It's designed for the adventurous heart, with sturdy construction and a high heat output that makes boiling and cooking a breeze. This stove isn't just about strength—it's got finesse too. With adjustable flame control, you can simmer, sauté, or sizzle with absolute precision. Its compact design and integrated carrying handle make transportation effortless. Moreover, it's crafted to defy the elements, boasting a wind-resistant exterior and piezo ignition system for quick, reliable starts. And when the cooking's done, its removable grates make cleanup swift and easy. Rugged, versatile and reliable, the PowerBurner marks a perfect blend of practicality and performance. So, why wait? Let's turn up the heat on your outdoor culinary adventures today."
14,MountainDream Sleeping Bag,130.0,Sleeping Bags,MountainDream,"Meet the MountainDream Sleeping Bag: your new must-have companion for every outdoor adventure. Designed to handle 3-season camping with ease, it comes equipped with a premium synthetic insulation that will keep you cozy even when temperatures fall down to 15°F! Sporting a durable water-resistant nylon shell and soft breathable polyester lining, this bag doesn't sacrifice comfort for toughness. The star of the show is the contoured mummy shape that not only provides optimal heat retention but also cuts down on the weight. A smooth, snag-free YKK zipper with a unique anti-snag design allows for hassle-free operation, while the adjustable hood and full-length zipper baffle work together to ensure you stay warm all night long. Need to bring along some essentials? Not to worry! There's an interior pocket just for that. And when it's time to pack up? Just slip it into the included compression sack for easy storage and transport. Whether you're a backpacking pro or a camping novice, the MountainDream Sleeping Bag is the perfect blend of durability, warmth, and comfort that you've been looking for."
15,SkyView 2-Person Tent,200.0,Tents,OutdoorLiving,"Introducing the OutdoorLiving SkyView 2-Person Tent, a perfect companion for your camping and hiking adventures. This tent offers a spacious interior that houses two people comfortably, with room to spare. Crafted from durable waterproof materials to shield you from the elements, it is the fortress you need in the wild. Setup is a breeze thanks to its intuitive design and color-coded poles, while two large doors allow for easy access. Stay organized with interior pockets, and store additional gear in its two vestibules. The tent also features mesh panels for effective ventilation, and it comes with a rainfly for extra weather protection. Light enough for on-the-go adventurers, it packs compactly into a carrying bag for seamless transportation. Reflective guy lines ensure visibility at night for added safety, and the tent stands freely for versatile placement. Experience the reliability of double-stitched seams that guarantee increased durability, and rest easy under the stars with OutdoorLiving's SkyView 2-Person Tent. It's not just a tent; it's your home away from home."
16,TrailLite Daypack,60.0,Backpacks,HikeMate,"Step up your hiking game with HikeMate's TrailLite Daypack. Built for comfort and efficiency, this lightweight and durable backpack offers a spacious main compartment, multiple pockets, and organization-friendly features all in one sleek package. The adjustable shoulder straps and padded back panel ensure optimal comfort during those long exhilarating treks. Course through nature without worry as the daypack's water-resistant fabric protects your essentials from unexpected showers. Plus, never run dry with the integrated hydration system. And did we mention it comes in a plethora of colors and designs? So you can choose one that truly speaks to your outdoorsy soul! Keeping your visibility in mind, we've added reflective accents that light up in low-light conditions. Don't just carry a backpack, adorn a companion that takes you a step ahead in your adventures. Trust the TrailLite Daypack for a hassle-free, enjoyable hiking experience."
17,RainGuard Hiking Jacket,110.0,Hiking Clothing,MountainStyle,"Introducing the MountainStyle RainGuard Hiking Jacket - the ultimate solution for weatherproof comfort during your outdoor undertakings! Designed with waterproof, breathable fabric, this jacket promises an outdoor experience that's as dry as it is comfortable. The rugged construction assures durability, while the adjustable hood provides a customizable fit against wind and rain. Featuring multiple pockets for safe, convenient storage and adjustable cuffs and hem, you can tailor the jacket to suit your needs on-the-go. And, don't worry about overheating during intense activities - it's equipped with ventilation zippers for increased airflow. Reflective details ensure visibility even during low-light conditions, making it perfect for evening treks. With its lightweight, packable design, carrying it inside your backpack requires minimal effort. With options for men and women, the RainGuard Hiking Jacket is perfect for hiking, camping, trekking and countless other outdoor adventures. Don't let the weather stand in your way - embrace the outdoors with MountainStyle RainGuard Hiking Jacket!"
18,TrekStar Hiking Sandals,70.0,Hiking Footwear,TrekReady,"Meet the TrekStar Hiking Sandals from TrekReady - the ultimate trail companion for your feet. Designed for comfort and durability, these lightweight sandals are perfect for those who prefer to see the world from a hiking trail. They feature adjustable straps for a snug, secure fit, perfect for adapting to the contours of your feet. With a breathable design, your feet will stay cool and dry, escaping the discomfort of sweaty hiking boots on long summer treks. The deep tread rubber outsole ensures excellent traction on any terrain, while the cushioned footbed promises enhanced comfort with every step. For those wild and unpredictable trails, the added toe protection and shock-absorbing midsole protect your feet from rocky surprises. Ingeniously, the removable insole makes for easy cleaning and maintenance, extending the lifespan of your sandals. Available in various sizes and a handsome brown color, the versatile TrekStar Hiking Sandals are just as comfortable on a casual walk in the park as they are navigating rocky slopes. Explore more with TrekReady!"
19,Adventure Dining Table,90.0,Camping Tables,CampBuddy,"Discover the joy of outdoor adventures with the CampBuddy Adventure Dining Table. This feature-packed camping essential brings both comfort and convenience to your memorable trips. Made from high-quality aluminum, it promises long-lasting performance, weather resistance, and easy maintenance - all key for the great outdoors! It's light, portable, and comes with adjustable height settings to suit various seating arrangements and the spacious surface comfortably accommodates meals, drinks, and other essentials. The sturdy yet lightweight frame holds food, dishes, and utensils with ease. When it's time to pack up, it fold and stows away with no fuss, ready for the next adventure!  Perfect for camping, picnics, barbecues, and beach outings - its versatility shines as brightly as the summer sun! Durable, sturdy and a breeze to set up, the Adventure Dining Table will be a loyal companion on every trip. Embark on your next adventure and make lifetime memories with CampBuddy. As with all good experiences, it'll leave you wanting more! "
20,CompactCook Camping Stove,60.0,Camping Stoves,CompactCook,"Step into the great outdoors with the CompactCook Camping Stove, a convenient, lightweight companion perfect for all your culinary camping needs. Boasting a robust design built for harsh environments, you can whip up meals anytime, anywhere. Its wind-resistant and fuel-versatile features coupled with an efficient cooking performance, ensures you won't have to worry about the elements or helpless taste buds while on adventures. The easy ignition technology and adjustable flame control make cooking as easy as a walk in the park, while its compact, foldable design makes packing a breeze. Whether you're camping with family or hiking solo, this reliable, portable stove is an essential addition to your gear. With its sturdy construction and safety-focused design, the CompactCook Camping Stove is a step above the rest, providing durability, quality, and peace of mind. Be wild, be free, be cooked for with the CompactCook Camping Stove!"
Create a search index
The search index is used to store vectorized data from the embeddings model. The search index is used to retrieve relevant documents based on the user's question.
Create the file create_search_index.py in your main folder (that is, the same directory where you placed your assets folder, not inside the assets folder).
Copy and paste the following code into your create_search_index.py file.
Add the code to import the required libraries, create a project client, and configure some settings:
import os
from azure.ai.projects import AIProjectClient
from azure.ai.projects.models import ConnectionType
from azure.identity import DefaultAzureCredential
from azure.core.credentials import AzureKeyCredential
from azure.search.documents import SearchClient
from azure.search.documents.indexes import SearchIndexClient
from config import get_logger

# initialize logging object
logger = get_logger(__name__)

# create a project client using environment variables loaded from the .env file
project = AIProjectClient.from_connection_string(
    conn_str=os.environ["AIPROJECT_CONNECTION_STRING"], credential=DefaultAzureCredential()
)

# create a vector embeddings client that will be used to generate vector embeddings
embeddings = project.inference.get_embeddings_client()

# use the project client to get the default search connection
search_connection = project.connections.get_default(
    connection_type=ConnectionType.AZURE_AI_SEARCH, include_credentials=True
)

# Create a search index client using the search connection
# This client will be used to create and delete search indexes
index_client = SearchIndexClient(
    endpoint=search_connection.endpoint_url, credential=AzureKeyCredential(key=search_connection.key)
)
Now add the function to define a search index:
import pandas as pd
from azure.search.documents.indexes.models import (
    SemanticSearch,
    SearchField,
    SimpleField,
    SearchableField,
    SearchFieldDataType,
    SemanticConfiguration,
    SemanticPrioritizedFields,
    SemanticField,
    VectorSearch,
    HnswAlgorithmConfiguration,
    VectorSearchAlgorithmKind,
    HnswParameters,
    VectorSearchAlgorithmMetric,
    ExhaustiveKnnAlgorithmConfiguration,
    ExhaustiveKnnParameters,
    VectorSearchProfile,
    SearchIndex,
)


def create_index_definition(index_name: str, model: str) -> SearchIndex:
    dimensions = 1536  # text-embedding-ada-002
    if model == "text-embedding-3-large":
        dimensions = 3072

    # The fields we want to index. The "embedding" field is a vector field that will
    # be used for vector search.
    fields = [
        SimpleField(name="id", type=SearchFieldDataType.String, key=True),
        SearchableField(name="content", type=SearchFieldDataType.String),
        SimpleField(name="filepath", type=SearchFieldDataType.String),
        SearchableField(name="title", type=SearchFieldDataType.String),
        SimpleField(name="url", type=SearchFieldDataType.String),
        SearchField(
            name="contentVector",
            type=SearchFieldDataType.Collection(SearchFieldDataType.Single),
            searchable=True,
            # Size of the vector created by the text-embedding-ada-002 model.
            vector_search_dimensions=dimensions,
            vector_search_profile_name="myHnswProfile",
        ),
    ]

    # The "content" field should be prioritized for semantic ranking.
    semantic_config = SemanticConfiguration(
        name="default",
        prioritized_fields=SemanticPrioritizedFields(
            title_field=SemanticField(field_name="title"),
            keywords_fields=[],
            content_fields=[SemanticField(field_name="content")],
        ),
    )

    # For vector search, we want to use the HNSW (Hierarchical Navigable Small World)
    # algorithm (a type of approximate nearest neighbor search algorithm) with cosine
    # distance.
    vector_search = VectorSearch(
        algorithms=[
            HnswAlgorithmConfiguration(
                name="myHnsw",
                kind=VectorSearchAlgorithmKind.HNSW,
                parameters=HnswParameters(
                    m=4,
                    ef_construction=1000,
                    ef_search=1000,
                    metric=VectorSearchAlgorithmMetric.COSINE,
                ),
            ),
            ExhaustiveKnnAlgorithmConfiguration(
                name="myExhaustiveKnn",
                kind=VectorSearchAlgorithmKind.EXHAUSTIVE_KNN,
                parameters=ExhaustiveKnnParameters(metric=VectorSearchAlgorithmMetric.COSINE),
            ),
        ],
        profiles=[
            VectorSearchProfile(
                name="myHnswProfile",
                algorithm_configuration_name="myHnsw",
            ),
            VectorSearchProfile(
                name="myExhaustiveKnnProfile",
                algorithm_configuration_name="myExhaustiveKnn",
            ),
        ],
    )

    # Create the semantic settings with the configuration
    semantic_search = SemanticSearch(configurations=[semantic_config])

    # Create the search index definition
    return SearchIndex(
        name=index_name,
        fields=fields,
        semantic_search=semantic_search,
        vector_search=vector_search,
    )
Create the function to add a csv file to the index:
# define a function for indexing a csv file, that adds each row as a document
# and generates vector embeddings for the specified content_column
def create_docs_from_csv(path: str, content_column: str, model: str) -> list[dict[str, any]]:
    products = pd.read_csv(path)
    items = []
    for product in products.to_dict("records"):
        content = product[content_column]
        id = str(product["id"])
        title = product["name"]
        url = f"/products/{title.lower().replace(' ', '-')}"
        emb = embeddings.embed(input=content, model=model)
        rec = {
            "id": id,
            "content": content,
            "filepath": f"{title.lower().replace(' ', '-')}",
            "title": title,
            "url": url,
            "contentVector": emb.data[0].embedding,
        }
        items.append(rec)

    return items


def create_index_from_csv(index_name, csv_file):
    # If a search index already exists, delete it:
    try:
        index_definition = index_client.get_index(index_name)
        index_client.delete_index(index_name)
        logger.info(f"🗑️  Found existing index named '{index_name}', and deleted it")
    except Exception:
        pass

    # create an empty search index
    index_definition = create_index_definition(index_name, model=os.environ["EMBEDDINGS_MODEL"])
    index_client.create_index(index_definition)

    # create documents from the products.csv file, generating vector embeddings for the "description" column
    docs = create_docs_from_csv(path=csv_file, content_column="description", model=os.environ["EMBEDDINGS_MODEL"])

    # Add the documents to the index using the Azure AI Search client
    search_client = SearchClient(
        endpoint=search_connection.endpoint_url,
        index_name=index_name,
        credential=AzureKeyCredential(key=search_connection.key),
    )

    search_client.upload_documents(docs)
    logger.info(f"➕ Uploaded {len(docs)} documents to '{index_name}' index")
Finally, run the functions to build the index and register it to the cloud project:
if __name__ == "__main__":
    import argparse

    parser = argparse.ArgumentParser()
    parser.add_argument(
        "--index-name",
        type=str,
        help="index name to use when creating the AI Search index",
        default=os.environ["AISEARCH_INDEX_NAME"],
    )
    parser.add_argument(
        "--csv-file", type=str, help="path to data for creating search index", default="assets/products.csv"
    )
    args = parser.parse_args()
    index_name = args.index_name
    csv_file = args.csv_file

    create_index_from_csv(index_name, csv_file)
From your console, log in to your Azure account and follow instructions for authenticating your account:
az loginRun the code to build your index locally and register it to the cloud project:
python create_search_index.pyOnce the script is run, you can view your newly created index in the Data + indexes page of your Azure AI Foundry project. For more information, see How to build and consume vector indexes in Azure AI Foundry portal.
If you run the script again with the same index name, it creates a new version of the same index.
Get product documents
Next, you create a script to get product documents from the search index. The script queries the search index for documents that match a user's question.
Create script to get product documents
When the chat gets a request, it searches through your data to find relevant information. This script uses the Azure AI SDK to query the search index for documents that match a user's question. It then returns the documents to the chat app.
Create the get_product_documents.py file in your main directory. Copy and paste the following code into the file.
Start with code to import the required libraries, create a project client, and configure settings:
import os
from pathlib import Path
from opentelemetry import trace
from azure.ai.projects import AIProjectClient
from azure.ai.projects.models import ConnectionType
from azure.identity import DefaultAzureCredential
from azure.core.credentials import AzureKeyCredential
from azure.search.documents import SearchClient
from config import ASSET_PATH, get_logger

# initialize logging and tracing objects
logger = get_logger(__name__)
tracer = trace.get_tracer(__name__)

# create a project client using environment variables loaded from the .env file
project = AIProjectClient.from_connection_string(
    conn_str=os.environ["AIPROJECT_CONNECTION_STRING"], credential=DefaultAzureCredential()
)

# create a vector embeddings client that will be used to generate vector embeddings
chat = project.inference.get_chat_completions_client()
embeddings = project.inference.get_embeddings_client()

# use the project client to get the default search connection
search_connection = project.connections.get_default(
    connection_type=ConnectionType.AZURE_AI_SEARCH, include_credentials=True
)

# Create a search index client using the search connection
# This client will be used to create and delete search indexes
search_client = SearchClient(
    index_name=os.environ["AISEARCH_INDEX_NAME"],
    endpoint=search_connection.endpoint_url,
    credential=AzureKeyCredential(key=search_connection.key),
)
Add the function to get product documents:
from azure.ai.inference.prompts import PromptTemplate
from azure.search.documents.models import VectorizedQuery


@tracer.start_as_current_span(name="get_product_documents")
def get_product_documents(messages: list, context: dict = None) -> dict:
    if context is None:
        context = {}

    overrides = context.get("overrides", {})
    top = overrides.get("top", 5)

    # generate a search query from the chat messages
    intent_prompty = PromptTemplate.from_prompty(Path(ASSET_PATH) / "intent_mapping.prompty")

    intent_mapping_response = chat.complete(
        model=os.environ["INTENT_MAPPING_MODEL"],
        messages=intent_prompty.create_messages(conversation=messages),
        **intent_prompty.parameters,
    )

    search_query = intent_mapping_response.choices[0].message.content
    logger.debug(f"🧠 Intent mapping: {search_query}")

    # generate a vector representation of the search query
    embedding = embeddings.embed(model=os.environ["EMBEDDINGS_MODEL"], input=search_query)
    search_vector = embedding.data[0].embedding

    # search the index for products matching the search query
    vector_query = VectorizedQuery(vector=search_vector, k_nearest_neighbors=top, fields="contentVector")

    search_results = search_client.search(
        search_text=search_query, vector_queries=[vector_query], select=["id", "content", "filepath", "title", "url"]
    )

    documents = [
        {
            "id": result["id"],
            "content": result["content"],
            "filepath": result["filepath"],
            "title": result["title"],
            "url": result["url"],
        }
        for result in search_results
    ]

    # add results to the provided context
    if "thoughts" not in context:
        context["thoughts"] = []

    # add thoughts and documents to the context object so it can be returned to the caller
    context["thoughts"].append(
        {
            "title": "Generated search query",
            "description": search_query,
        }
    )

    if "grounding_data" not in context:
        context["grounding_data"] = []
    context["grounding_data"].append(documents)

    logger.debug(f"📄 {len(documents)} documents retrieved: {documents}")
    return documents
Finally, add code to test the function when you run the script directly:
if __name__ == "__main__":
    import logging
    import argparse

    # set logging level to debug when running this module directly
    logger.setLevel(logging.DEBUG)

    # load command line arguments
    parser = argparse.ArgumentParser()
    parser.add_argument(
        "--query",
        type=str,
        help="Query to use to search product",
        default="I need a new tent for 4 people, what would you recommend?",
    )

    args = parser.parse_args()
    query = args.query

    result = get_product_documents(messages=[{"role": "user", "content": query}])
Create prompt template for intent mapping
The get_product_documents.py script uses a prompt template to convert the conversation to a search query. The template instructs how to extract the user's intent from the conversation.
Before you run the script, create the prompt template. Add the file intent_mapping.prompty to your assets folder:
---
name: Chat Prompt
description: A prompty that extract users query intent based on the current_query and chat_history of the conversation
model:
    api: chat
    configuration:
        azure_deployment: gpt-4o
inputs:
    conversation:
        type: array
---
system:
# Instructions
- You are an AI assistant reading a current user query and chat_history.
- Given the chat_history, and current user's query, infer the user's intent expressed in the current user query.
- Once you infer the intent, respond with a search query that can be used to retrieve relevant documents for the current user's query based on the intent
- Be specific in what the user is asking about, but disregard parts of the chat history that are not relevant to the user's intent.
- Provide responses in json format

# Examples
Example 1:
With a conversation like below:
```
 - user: are the trailwalker shoes waterproof?
 - assistant: Yes, the TrailWalker Hiking Shoes are waterproof. They are designed with a durable and waterproof construction to withstand various terrains and weather conditions.
 - user: how much do they cost?
```
Respond with:
{
    "intent": "The user wants to know how much the Trailwalker Hiking Shoes cost.",
    "search_query": "price of Trailwalker Hiking Shoes"
}

Example 2:
With a conversation like below:
```
 - user: are the trailwalker shoes waterproof?
 - assistant: Yes, the TrailWalker Hiking Shoes are waterproof. They are designed with a durable and waterproof construction to withstand various terrains and weather conditions.
 - user: how much do they cost?
 - assistant: The TrailWalker Hiking Shoes are priced at $110.
 - user: do you have waterproof tents?
 - assistant: Yes, we have waterproof tents available. Can you please provide more information about the type or size of tent you are looking for?
 - user: which is your most waterproof tent?
 - assistant: Our most waterproof tent is the Alpine Explorer Tent. It is designed with a waterproof material and has a rainfly with a waterproof rating of 3000mm. This tent provides reliable protection against rain and moisture.
 - user: how much does it cost?
```
Respond with:
{
    "intent": "The user would like to know how much the Alpine Explorer Tent costs.",
    "search_query": "price of Alpine Explorer Tent"
}

user:
Return the search query for the messages in the following conversation:
{{#conversation}}
 - {{role}}: {{content}}
{{/conversation}}
Test the product document retrieval script
Now that you have both the script and template, run the script to test out what documents the search index returns from a query. In a terminal window run:
python get_product_documents.py --query "I need a new tent for 4 people, what would you recommend?"
Develop custom knowledge retrieval (RAG) code
Next you create custom code to add retrieval augmented generation (RAG) capabilities to a basic chat application.
Create a chat script with RAG capabilities
In your main folder, create a new file called chat_with_products.py. This script retrieves product documents and generates a response to a user's question.
Add the code to import the required libraries, create a project client, and configure settings:
import os
from pathlib import Path
from opentelemetry import trace
from azure.ai.projects import AIProjectClient
from azure.identity import DefaultAzureCredential
from config import ASSET_PATH, get_logger, enable_telemetry
from get_product_documents import get_product_documents


# initialize logging and tracing objects
logger = get_logger(__name__)
tracer = trace.get_tracer(__name__)

# create a project client using environment variables loaded from the .env file
project = AIProjectClient.from_connection_string(
    conn_str=os.environ["AIPROJECT_CONNECTION_STRING"], credential=DefaultAzureCredential()
)

# create a chat client we can use for testing
chat = project.inference.get_chat_completions_client()
Create the chat function that uses the RAG capabilities:
from azure.ai.inference.prompts import PromptTemplate


@tracer.start_as_current_span(name="chat_with_products")
def chat_with_products(messages: list, context: dict = None) -> dict:
    if context is None:
        context = {}

    documents = get_product_documents(messages, context)

    # do a grounded chat call using the search results
    grounded_chat_prompt = PromptTemplate.from_prompty(Path(ASSET_PATH) / "grounded_chat.prompty")

    system_message = grounded_chat_prompt.create_messages(documents=documents, context=context)
    response = chat.complete(
        model=os.environ["CHAT_MODEL"],
        messages=system_message + messages,
        **grounded_chat_prompt.parameters,
    )
    logger.info(f"💬 Response: {response.choices[0].message}")

    # Return a chat protocol compliant response
    return {"message": response.choices[0].message, "context": context}
Finally, add the code to run the chat function:
if __name__ == "__main__":
    import argparse

    # load command line arguments
    parser = argparse.ArgumentParser()
    parser.add_argument(
        "--query",
        type=str,
        help="Query to use to search product",
        default="I need a new tent for 4 people, what would you recommend?",
    )
    parser.add_argument(
        "--enable-telemetry",
        action="store_true",
        help="Enable sending telemetry back to the project",
    )
    args = parser.parse_args()
    if args.enable_telemetry:
        enable_telemetry(True)

    # run chat with products
    response = chat_with_products(messages=[{"role": "user", "content": args.query}])
Create a grounded chat prompt template
The chat_with_products.py script calls a prompt template to generate a response to the user's question. The template instructs how to generate a response based on the user's question and the retrieved documents. Create this template now.
In your assets folder, add the file grounded_chat.prompty:
---
name: Chat with documents
description: Uses a chat completions model to respond to queries grounded in relevant documents
model:
    api: chat
    configuration:
        azure_deployment: gpt-4o
inputs:
    conversation:
        type: array
---
system:
You are an AI assistant helping users with queries related to outdoor outdooor/camping gear and clothing.
If the question is not related to outdoor/camping gear and clothing, just say 'Sorry, I only can answer queries related to outdoor/camping gear and clothing. So, how can I help?'
Don't try to make up any answers.
If the question is related to outdoor/camping gear and clothing but vague, ask for clarifying questions instead of referencing documents. If the question is general, for example it uses "it" or "they", ask the user to specify what product they are asking about.
Use the following pieces of context to answer the questions about outdoor/camping gear and clothing as completely, correctly, and concisely as possible.
Do not add documentation reference in the response.

# Documents

{{#documents}}

## Document {{id}}: {{title}}
{{content}}
{{/documents}}
Run the chat script with RAG capabilities
Now that you have both the script and the template, run the script to test your chat app with RAG capabilities:
python chat_with_products.py --query "I need a new tent for 4 people, what would you recommend?"
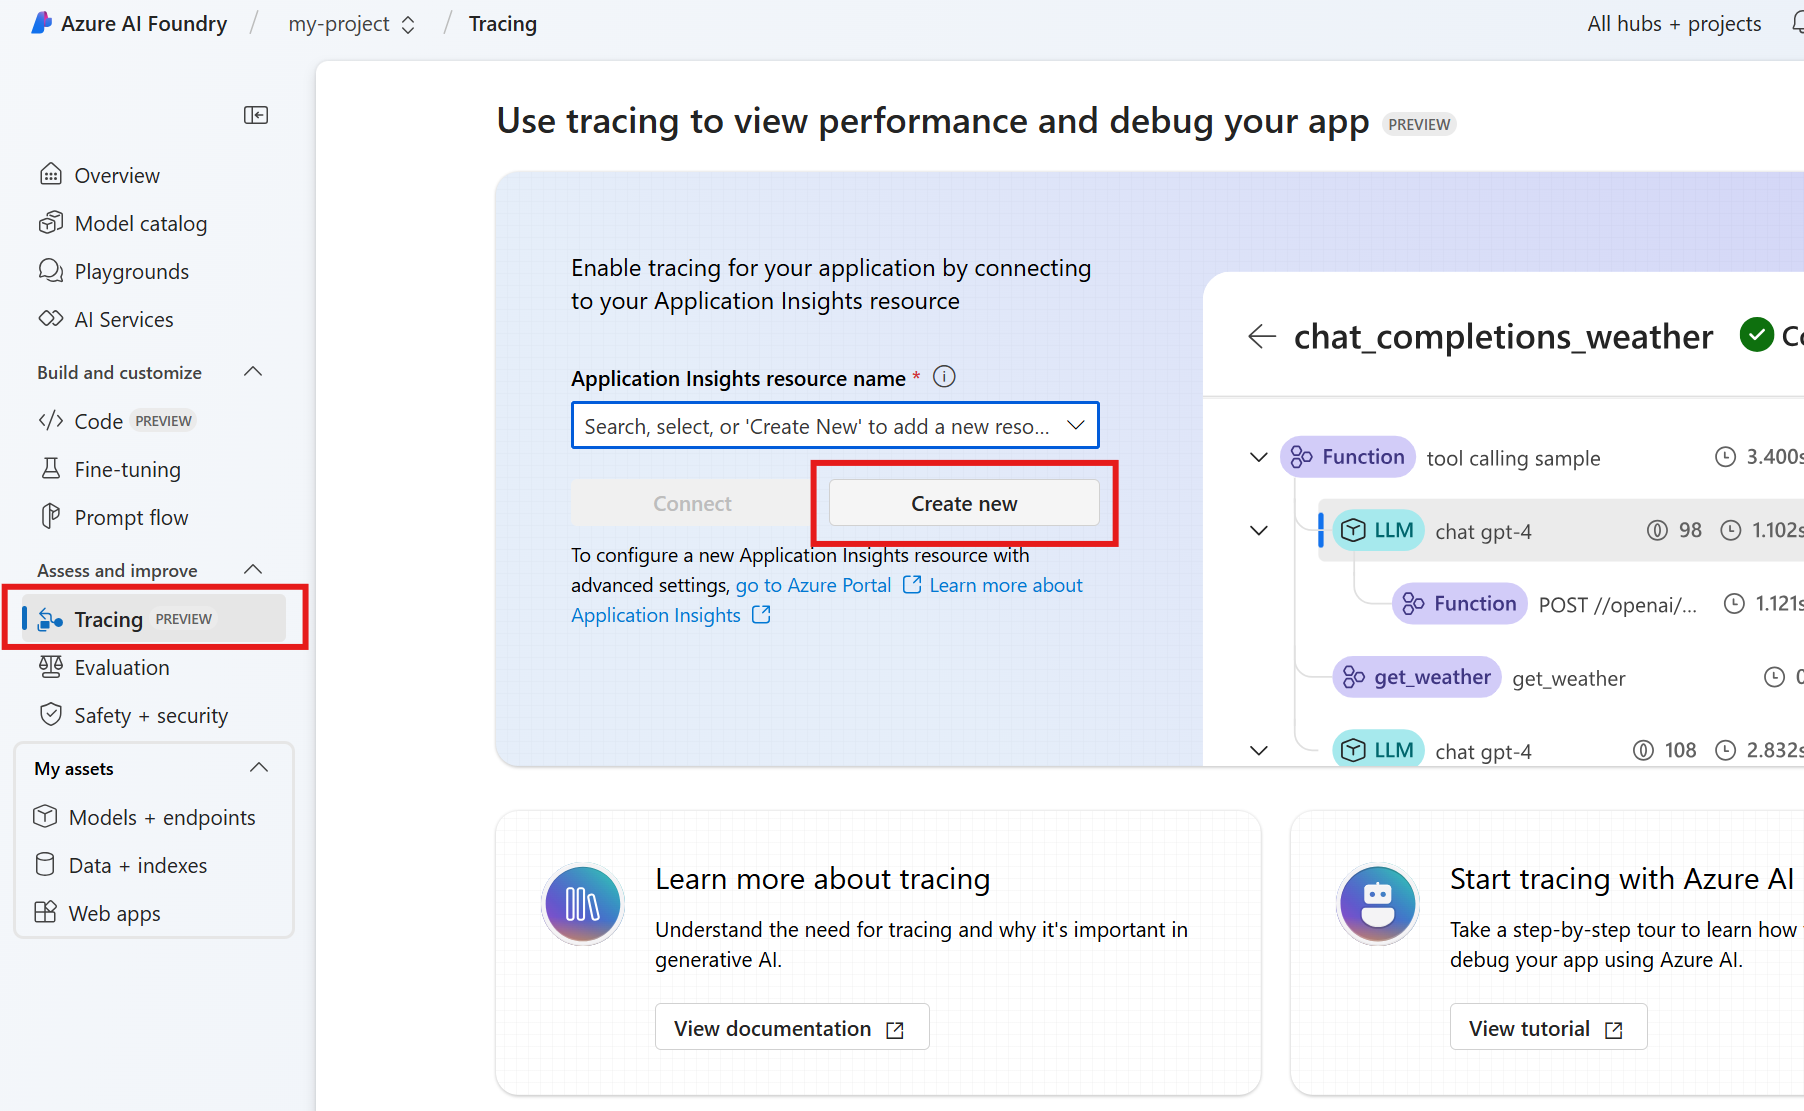
Add telemetry logging
To enable logging of telemetry to your project:
Add an Application Insights resource to your project. Navigate to the Tracing tab in the Azure AI Foundry portal, and create a new resource if you don't already have one.
Install
azure-monitor-opentelemetry:pip install azure-monitor-opentelemetryAdd the
--enable-telemetryflag when you use thechat_with_products.pyscript:python chat_with_products.py --query "I need a new tent for 4 people, what would you recommend?" --enable-telemetry

Clean up resources
To avoid incurring unnecessary Azure costs, you should delete the resources you created in this tutorial if they're no longer needed. To manage resources, you can use the Azure portal.
But don't delete them yet, if you want to deploy your chat app to Azure in the next part of this tutorial series.