Deploy models as serverless APIs
In this article, you learn how to deploy a model from the model catalog as a serverless API with pay-as-you-go token based billing.
Important
Models that are in preview are marked as preview on their model cards in the model catalog.
Certain models in the model catalog can be deployed as a serverless API with pay-as-you-go billing. This kind of deployment provides a way to consume models as an API without hosting them on your subscription, while keeping the enterprise security and compliance that organizations need. This deployment option doesn't require quota from your subscription.
This article uses a Meta Llama model deployment for illustration. However, you can use the same steps to deploy any of the models in the model catalog that are available for serverless API deployment.
Prerequisites
An Azure subscription with a valid payment method. Free or trial Azure subscriptions won't work. If you don't have an Azure subscription, create a paid Azure account to begin.
Azure role-based access controls (Azure RBAC) are used to grant access to operations in Azure AI Foundry portal. To perform the steps in this article, your user account must be assigned the Azure AI Developer role on the resource group. For more information on permissions, see Role-based access control in Azure AI Foundry portal.
You need to install the following software to work with Azure AI Foundry:
You can use any compatible web browser to navigate Azure AI Foundry.
Find your model and model ID in the model catalog
- Sign in to Azure AI Foundry.
- If you’re not already in your project, select it.
- Select Model catalog from the left navigation pane.
Note
For models offered through the Azure Marketplace, ensure that your account has the Azure AI Developer role permissions on the resource group, or that you meet the permissions required to subscribe to model offerings.
Models that are offered by non-Microsoft providers (for example, Llama and Mistral models) are billed through the Azure Marketplace. For such models, you're required to subscribe your project to the particular model offering. Models that are offered by Microsoft (for example, Phi-3 models) don't have this requirement, as billing is done differently. For details about billing for serverless deployment of models in the model catalog, see Billing for serverless APIs.
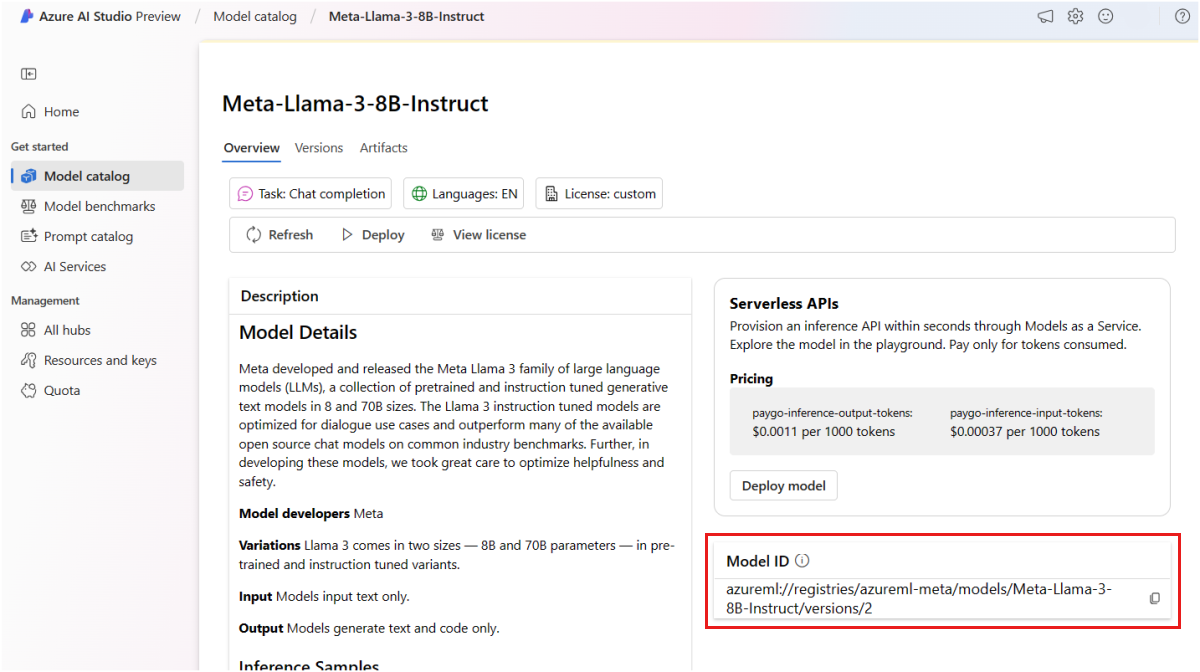
Select the model card of the model you want to deploy. In this article, you select a Meta-Llama-3-8B-Instruct model.
If you're deploying the model using Azure CLI, Python, or ARM, copy the Model ID.
Important
Do not include the version when copying the Model ID. Serverless API endpoints always deploy the model's latest version available. For example, for the model ID
azureml://registries/azureml-meta/models/Meta-Llama-3-8B-Instruct/versions/3, copyazureml://registries/azureml-meta/models/Meta-Llama-3-8B-Instruct.
The next section covers the steps for subscribing your project to a model offering. You can skip this section and go to Deploy the model to a serverless API endpoint, if you're deploying a Microsoft model.
Subscribe your project to the model offering
Serverless API endpoints can deploy both Microsoft and non-Microsoft offered models. For Microsoft models (such as Phi-3 models), you don't need to create an Azure Marketplace subscription and you can deploy them to serverless API endpoints directly to consume their predictions. For non-Microsoft models, you need to create the subscription first. If it's your first time deploying the model in the project, you have to subscribe your project for the particular model offering from the Azure Marketplace. Each project has its own subscription to the particular Azure Marketplace offering of the model, which allows you to control and monitor spending.
Tip
Skip this step if you are deploying models from the Phi-3 family of models. Directly deploy the model to a serverless API endpoint.
Note
Models offered through the Azure Marketplace are available for deployment to serverless API endpoints in specific regions. Check Model and region availability for Serverless API deployments to verify which models and regions are available. If the one you need is not listed, you can deploy to a workspace in a supported region and then consume serverless API endpoints from a different workspace.
Create the model's marketplace subscription. When you create a subscription, you accept the terms and conditions associated with the model offer.
On the model's Details page, select Deploy. A Deployment options window opens up, giving you the choice between serverless API deployment and deployment using a managed compute.
Note
For models that can be deployed only via serverless API deployment, the serverless API deployment wizard opens up right after you select Deploy from the model's details page.
Select Serverless API with Azure AI Content Safety (preview) to open the serverless API deployment wizard.
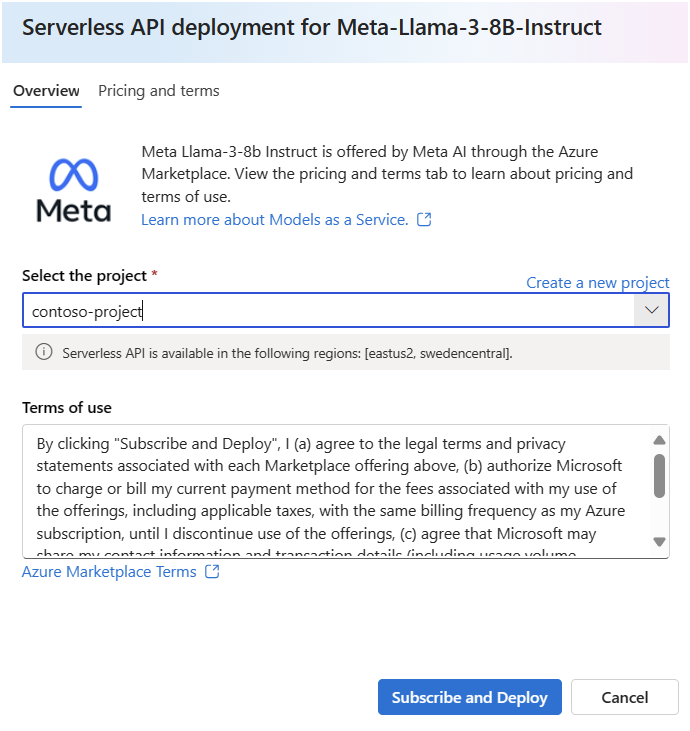
Select the project in which you want to deploy your models. To use the serverless API model deployment offering, your project must belong to one of the regions that are supported for serverless deployment for the particular model.
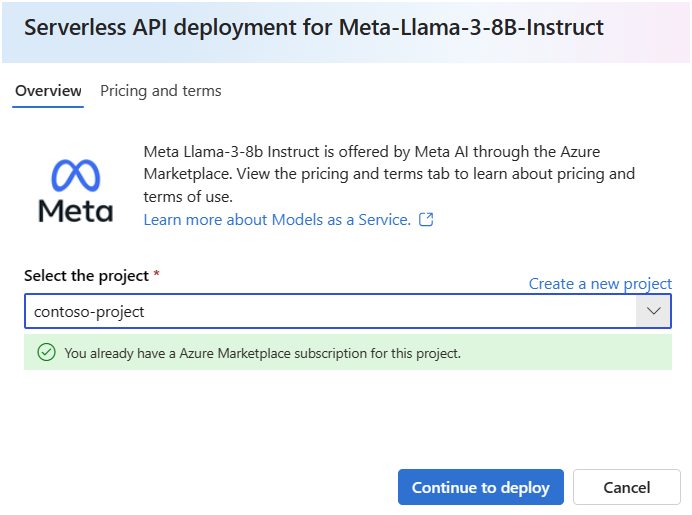
If you see the note You already have an Azure Marketplace subscription for this project, you don't need to create the subscription since you already have one. You can proceed to Deploy the model to a serverless API endpoint.
In the deployment wizard, select the link to Azure Marketplace Terms to learn more about the terms of use. You can also select the Pricing and terms tab to learn about pricing for the selected model.
Select Subscribe and Deploy.
Once you subscribe the project for the particular Azure Marketplace offering, subsequent deployments of the same offering in the same project don't require subscribing again.
At any point, you can see the model offers to which your project is currently subscribed:
Go to the Azure portal.
Navigate to the resource group where the project belongs.
On the Type filter, select SaaS.
You see all the offerings to which you're currently subscribed.
Select any resource to see the details.
Deploy the model to a serverless API endpoint
Once you've created a subscription for a non-Microsoft model, you can deploy the associated model to a serverless API endpoint. For Microsoft models (such as Phi-3 models), you don't need to create a subscription.
The serverless API endpoint provides a way to consume models as an API without hosting them on your subscription, while keeping the enterprise security and compliance organizations need. This deployment option doesn't require quota from your subscription.
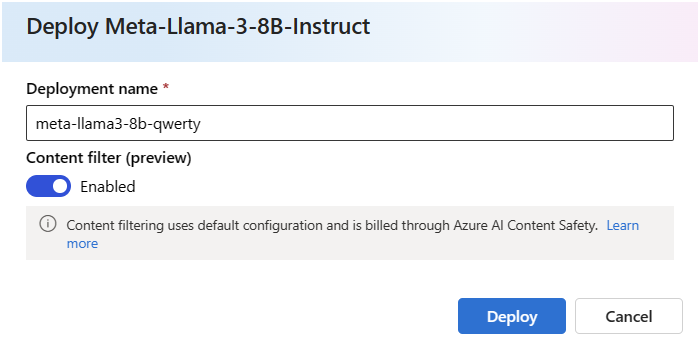
In this section, you create an endpoint with the name meta-llama3-8b-qwerty.
Create the serverless endpoint
To deploy a Microsoft model that doesn't require subscribing to a model offering:
- Select Deploy and then select Serverless API with Azure AI Content Safety (preview) to open the deployment wizard.
- Select the project in which you want to deploy your model. Notice that not all the regions are supported.
Alternatively, for a non-Microsoft model that requires a model subscription, if you've just subscribed your project to the model offer in the previous section, continue to select Deploy. Alternatively, select Continue to deploy (if your deployment wizard had the note You already have an Azure Marketplace subscription for this project).
Give the deployment a name. This name becomes part of the deployment API URL. This URL must be unique in each Azure region.
Tip
The Content filter (preview) option is enabled by default. Leave the default setting for the service to detect harmful content such as hate, self-harm, sexual, and violent content. For more information about content filtering (preview), see Content filtering in Azure AI Foundry portal.
Select Deploy. Wait until the deployment is ready and you're redirected to the Deployments page.
At any point, you can see the endpoints deployed to your project:
Go to your project.
In the My assets section, select Models + endpoints.
Serverless API endpoints are displayed.
The created endpoint uses key authentication for authorization. Use the following steps to get the keys associated with a given endpoint.
You can select the deployment, and note the endpoint's Target URI and Key. Use them to call the deployment and generate predictions.
Note
When using the Azure portal, serverless API endpoints aren't displayed by default on the resource group. Use the Show hidden types option to display them on the resource group.
At this point, your endpoint is ready to be used.
If you need to consume this deployment from a different project or hub, or you plan to use prompt flow to build intelligent applications, you need to create a connection to the serverless API deployment. To learn how to configure an existing serverless API endpoint on a new project or hub, see Consume deployed serverless API endpoints from a different project or from Prompt flow.
Tip
If you're using prompt flow in the same project or hub where the deployment was deployed, you still need to create the connection.
Use the serverless API endpoint
Models deployed in Azure Machine Learning and Azure AI Foundry in Serverless API endpoints support the Azure AI Model Inference API that exposes a common set of capabilities for foundational models and that can be used by developers to consume predictions from a diverse set of models in a uniform and consistent way.
Read more about the capabilities of this API and how you can use it when building applications.
Network isolation
Endpoints for models deployed as Serverless APIs follow the public network access (PNA) flag setting of the Azure AI Foundry portal Hub that has the project in which the deployment exists. To secure your MaaS endpoint, disable the PNA flag on your Azure AI Foundry Hub. You can secure inbound communication from a client to your endpoint by using a private endpoint for the hub.
To set the PNA flag for the Azure AI Foundry hub:
- Go to the Azure portal.
- Search for the Resource group to which the hub belongs, and select the Azure AI hub from the resources listed for this resource group.
- From the hub Overview page on the left menu, select Settings > Networking.
- Under the Public access tab, you can configure settings for the public network access flag.
- Save your changes. Your changes might take up to five minutes to propagate.
Delete endpoints and subscriptions
You can delete model subscriptions and endpoints. Deleting a model subscription makes any associated endpoint become Unhealthy and unusable.
To delete a serverless API endpoint:
Go to the Azure AI Foundry.
Go to your project.
In the My assets section, select Models + endpoints.
Open the deployment you want to delete.
Select Delete.
To delete the associated model subscription:
Go to the Azure portal
Navigate to the resource group where the project belongs.
On the Type filter, select SaaS.
Select the subscription you want to delete.
Select Delete.
Cost and quota considerations for models deployed as serverless API endpoints
Quota is managed per deployment. Each deployment has a rate limit of 200,000 tokens per minute and 1,000 API requests per minute. However, we currently limit one deployment per model per project. Contact Microsoft Azure Support if the current rate limits aren't sufficient for your scenarios.
Cost for Microsoft models
You can find the pricing information on the Pricing and terms tab of the deployment wizard when deploying Microsoft models (such as Phi-3 models) as serverless API endpoints.
Cost for non-Microsoft models
Non-Microsoft models deployed as serverless API endpoints are offered through the Azure Marketplace and integrated with Azure AI Foundry for use. You can find the Azure Marketplace pricing when deploying or fine-tuning these models.
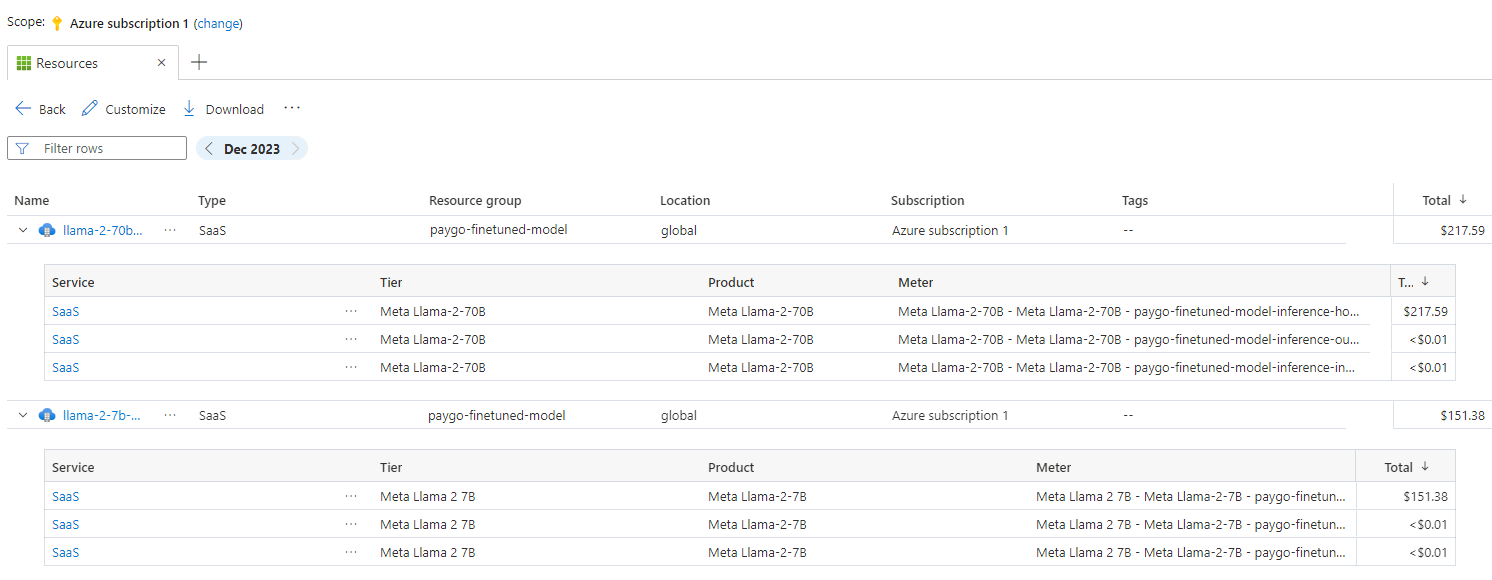
Each time a project subscribes to a given offer from the Azure Marketplace, a new resource is created to track the costs associated with its consumption. The same resource is used to track costs associated with inference and fine-tuning; however, multiple meters are available to track each scenario independently.
For more information on how to track costs, see Monitor costs for models offered through the Azure Marketplace.
Permissions required to subscribe to model offerings
Azure role-based access controls (Azure RBAC) are used to grant access to operations in Azure AI Foundry portal. To perform the steps in this article, your user account must be assigned the Owner, Contributor, or Azure AI Developer role for the Azure subscription. Alternatively, your account can be assigned a custom role that has the following permissions:
On the Azure subscription—to subscribe the workspace to the Azure Marketplace offering, once for each workspace, per offering:
Microsoft.MarketplaceOrdering/agreements/offers/plans/readMicrosoft.MarketplaceOrdering/agreements/offers/plans/sign/actionMicrosoft.MarketplaceOrdering/offerTypes/publishers/offers/plans/agreements/readMicrosoft.Marketplace/offerTypes/publishers/offers/plans/agreements/readMicrosoft.SaaS/register/action
On the resource group—to create and use the SaaS resource:
Microsoft.SaaS/resources/readMicrosoft.SaaS/resources/write
On the workspace—to deploy endpoints (the Azure Machine Learning data scientist role contains these permissions already):
Microsoft.MachineLearningServices/workspaces/marketplaceModelSubscriptions/*Microsoft.MachineLearningServices/workspaces/serverlessEndpoints/*
For more information on permissions, see Role-based access control in Azure AI Foundry portal.
