BizTalk Server: Basic Principles of Maps
Introduction
Maps or transformations are one of the most common components in the integration processes. They act as essential translators in the decoupling between the different systems to connect. In this article, as we explore the BizTalk Mapper Designer, we will explain its main concepts, covering slightly themes such as product architecture, BizTalk Schemas and some of the most widely used standards in the translation of messages.
This article intends to be an introductory note for whom is taking the first steps in this technology.
We can define BizTalk, in a very generic and simple manner, as a server for message routing, capable of handling, validate, transform and control numerous processes, simplifying the needs of adjustments to connect each system, i.e., is a tool and infrastructure unique, ideal to be used primarily for Enterprise Application Integration (EAI), Business to Business (B2B) Integration. Besides the patterns “Fire & Forget”, BizTalk Server is also used for more complex scenarios where the business logic (workflow) depends on various messages that need to be correlated with orchestrations - Business Process Management (BPM) solutions. In this article we will focus only in the process of mapping and transformation of messages.
Architecture
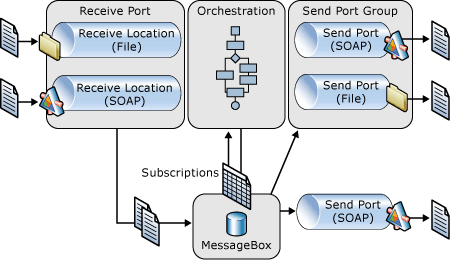
All messages are received by BizTalk through physical ports, called Receive Ports. A Receive Port is a logical container for one or several receive locations, whereas, the Receive Locations are where you specify the details about the transport to be used, the exact address where the message is to be received and any other specific properties to that transport type, as you can see in the following example:
A FILE adapter could be, for example, a network folder (\fileshare.local\orders\ with a filter (*.edifact) and parallel we could also be receiving orders from a Web Service (SOAP/REST/XML).
When a message is receives from the adapter, it will execute a pipeline. A Pipeline is a simply sequential composition of components whose main objective is:
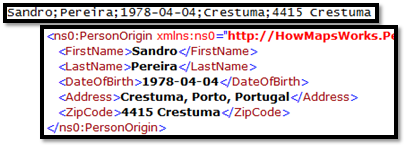
- Translate and transform messages: which may be in different formats: text files (Flat File), compressed files (ZIP) to the format that BizTalk uses internally to process messages: XML (Extensible Markup Language).
- Validate incoming messages: In its normal functioning, BizTalk Server only processes messages that are internally recognized. For that, it uses XML Schema that allow to describe the structure (records, elements, attributes, namespace, names, data types) and that also defines the validation rules (whether it is required or not, number of times the element may appear (occurrence), hierarchy) of the XML messages.
Then the messages are dumped inside the MessageBox (database) where the different subscribers (1 or more interested in this message) will subscribe the message and receive them. These subscribers can be other physical ports, typically, send Ports (for message routing scenarios) or orchestrations, launching new processes or waking up those who were waiting (through correlated fields)
Note
The key to understanding port terminology in BizTalk is to understand the notions of logical ports (also called orchestration ports) and physical ports. To oversimplify, it’s the difference between creating ports in Orchestration Designer (logical), and using BizTalk Explorer or BizTalk Administration Console (physical). When a developer creates a Specify Later port in Orchestration Designer, he’s configuring a logical port, leaving the corresponding physical port properties to be configured later by the BizTalk administrator. Giving the administrator the flexibility to configure the physical port in the production environment is a key reason why Specify Later is the most frequently used option.
What are maps and where BizTalk can use them?
BizTalk maps are graphical representations of XSLT (Extensible Stylesheet Language Transformation) documents that allow us to perform, in a simple and visual manner, transformations between XML messages.
We can enumerate the following standards used in the BizTalk Mapper:
- XML (Extensible Markup Language) – designed to transport and store data of messages.
- XML Schema (XSD - XML Schema Definition) – describes the structure of an XML document.
- E XSLT (Extensible Stylesheet Language Transformation) – is a style sheet language for XML documents (stands for XSL Transformations), it defines the transformation rules of the messages.
To emphasize, that they all are W3C recommendation. W3C ((Worldwide Web Consortium)) is an international consortium where Member organizations, a full-time staff, and the public work together to develop Web standards.
We can define that there are two types of transformations:
- Syntax Transformations: This type of transformations occurs in the receive or send pipelines and aim to transform a document into another representation, e.g. CSV to XML. Here the document maintains the same data (semantics), but changes the syntax that is represented. I.e. we translate the document, but typically we don't modify the structure. Normally, this type of transformation is bidirectional, since we still have the same semantic content, we can apply the same transformation logic and obtain the document in its original format.
- Semantic Transformations: This type of transformation usually occurs only in BizTalk maps. Here the document maintains the same syntax that is represented (XML), but changes its semantics (data content). This type of transformation are typically one-way, since that when we added and aggregate small parts of the information, that compose the document into another differently document, we may miss important details for its reconstruction.
Note
In this article we will talk only of semantic transformations, i.e., maps in BizTalk.
Where maps can be used?
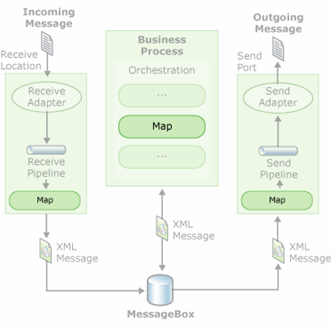
Maps can be used for processing messages received at a receive port, inside orchestrations or for processing messages sent to a send port, as the following figure suggest:
The biggest difference between using maps in ports or in orchestrations is that, when we use maps inside orchestrations we can have multiple messages inputs (transformations of many documents into one final document – transformations N->1) and ports only allows a single input message (transformations 1->1).
Introduction to map editor - BizTalk Mapper Designer
The map editor, BizTalk Mapper Designer, enables us to perform transformations of complex messages in a visual and extremely simple way, expressed in graphics associations of links that define the relationships between the various elements of messages.
These relationships between elements are internally implemented as XSL Transformations (XSLT - Extensible Stylesheet Language Transformation) which is the standard recommended by Worldwide Web Consortium (W3C) to perform transformations between XML schemas.
The BizTalk Mapper resides in the Visual Studio Shell and some of its functionalities rely on the user interface elements of the Visual Studio shell. For example, you use the File, Edit, and View menus just as you would for other development in Visual Studio. It becomes active when you add a new map to a BizTalk project, when you open an existing map (a .btm file), or when you reactivate a map by clicking its tab in the main Visual Studio editing window.
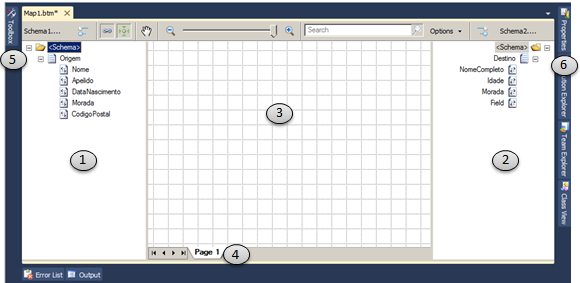
The editor consists essentially of three modules:
- Source Schema view: this is the data structure of the source message and is on the left side of the main window – point 1;
- Destination Schema view: this is the data structure of the target message and is on the right side of the main window – point 2; The links that define the mapping lead into the destination schema tree view from the grid view, and ultimately from the source schema tree view.
- Mapper Grid view: is in the middle of the main window, between the two data structures (source and target) – point 3; This area plays a critical role in the definition of maps, containing the links and functoids that control how data in a source instance message is transformed into an instance message that conforms to the destination schema. The grid view can have multiple layers, called grid pages, allowing you to organize complex maps into logical subdivisions of mappings and are accessible through the tabs that are at the bottom of the mapper grid view – point 4.
Apart from these three modules, there are two windows of extreme importance for the developer:
- Toolbox window: typically is at the left side of the source schema – point 5; providing access to all functoids that we can use in BizTalk maps.
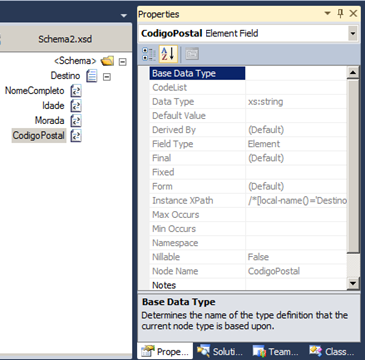
- Properties window: in this window we can see and modify the properties of a selected object on the mapper grid or in the schemas (link or functoid in a grid page; a schema node in the source or destination schema), usually is available at the right of the destination schema – point 6.
In general, this tool allows us to map elements from one schema to another, using predefined functions to transform values (functoids), custom XSLT transformations, custom .NET/C#, COM, VBscript code or using external XSLT, but the use of these options rely heavily on the experience of the programmer.
In fact, this editor is generating an XSLT file that can be used in others .NET (non-BizTalk) applications.
Links and Functoids
Transformations inside maps can be defined as simple relations, such as copying a name or address of a document to another. We can express a direct copy of the data using a link, which is represented in the BizTalk Mapper Designer as a line connecting the elements from source to destination elements:
- Links specify the basic function of copying data from an element or attribute in an input instance message to an element or attribute in an output instance. You create links between records and fields in the source and destination schemas at design time. This drives the creation, at run time, of an output instance message conforming to the destination schema from an input instance message conforming to the source schema.
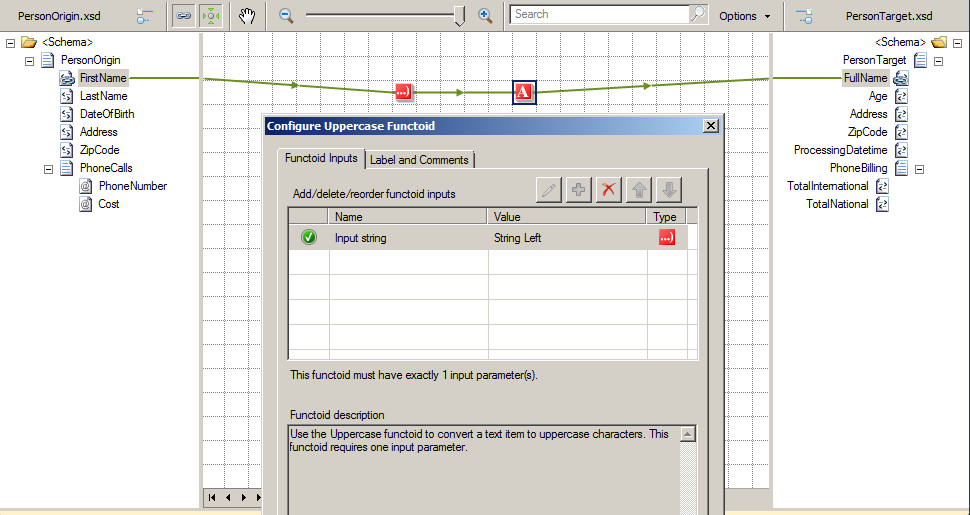
The user can also specify more complex transformations using functoids. We can consider functoids, as pre-defined functions that we can use to perform complex mappings and transformations.
Typically on a map, the data is copied from source to destination by dragging links between elements of the two schemes. Functoids stays in the middle of these operations and apply an operation on the incoming data in order to transform them to the requirements of the destination. BizTalk Mapper Designer represents a functoid as a box in the middle of the link or links between the processing elements.
BizTalk Mapper provides an extensive set of functoids that can be used in maps to perform a variety of operations on data that is being mapped from a source instance message to a destination instance message.
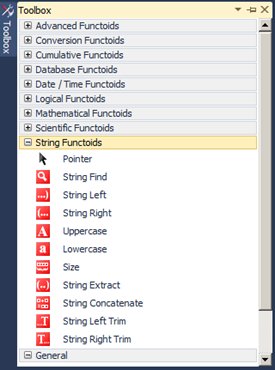
By default, the functoids are organized into nine categories based on their intended purpose:
- Advanced Functoids: used to create various types of data manipulation, such as implementing custom script (C#, Visual Basic .NET, XSLT), value mapping, and managing and extracting data from looping records.
- Conversion Functoids: used to convert data, such as: convert ASCII to characters or to convert numbers from one base to another (hex, decimal).
- Cumulative Functoids: used to perform various types of accumulation operations for values that occur multiple times within an instance message.
- Database Functoids: used to look up data from a database and to perform simple cross-referencing operations (sometimes called ID mapping).
- Date and Time Functoids: this is a set of operations applicable on dates like, add date, time, date and time, or add days to a specified date, in output data.
- Logical Functoids: used to conditionally control the behavior of other functoids and to determine whether particular output data is created.
- Mathematical Functoids: used to perform specific numeric calculations such as addition, multiplication, and division.
- Scientific Functoids: used to perform specific scientific calculations such as logarithmic, exponential, and trigonometric functions.
- String Functoids: used to manipulate data strings (text alphanumeric) by using well-known string functions such as concatenation, length, find, and trim.
However, the platform allows that new functoids can be created by the developer as well as organize and create new categories.
Reference project for the creation and installation of new functoids: “BizTalk Mapper Extensions UtilityPack”.
Mapper Grid
The mapper grid plays a critical role in the definition of maps, containing the links and functoids that control how data in a source instance message is transformed into an instance message that conforms to the destination schema.
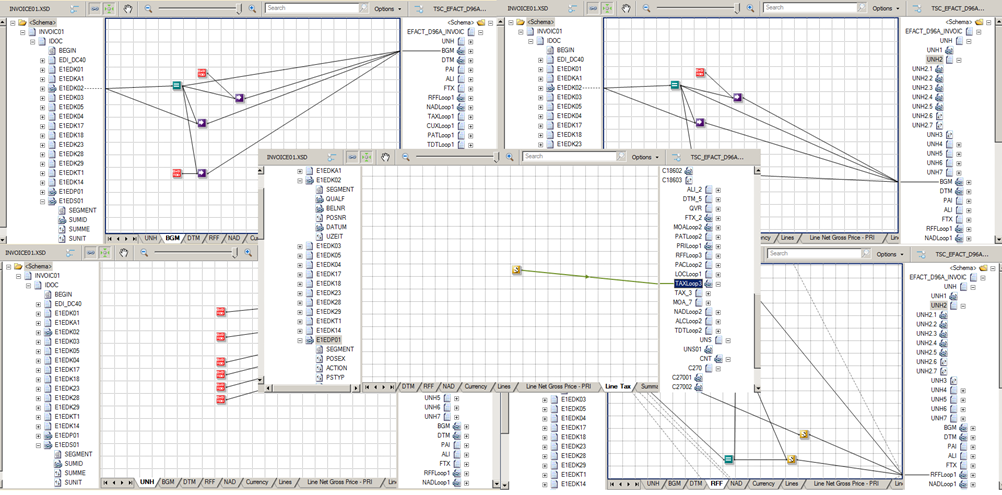
The grid view can have multiple layers, called grid pages, allowing you to organize complex maps into logical subdivisions of mappings. BizTalk 2010 no longer has the limitation of 20 grid pages that exist in the previous versions of the product.
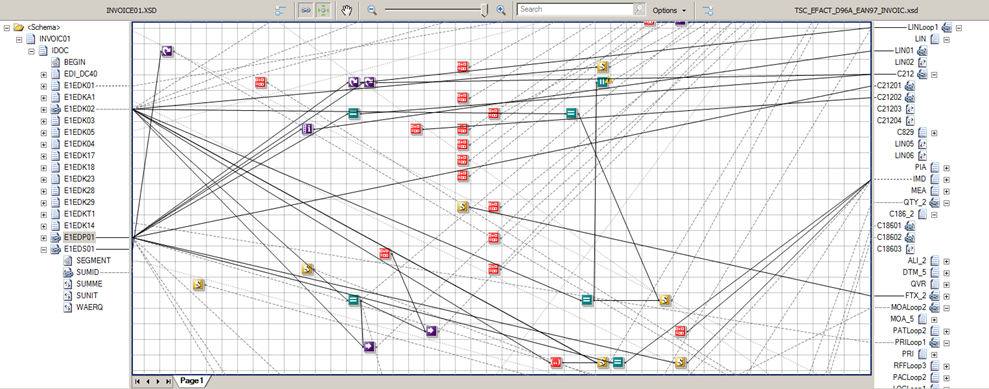
Partitioning maps on different pages, in addition to being a good practice, can become extremely useful in order to organize them and thus make them more readable. Although in small maps, one page is enough, when dealing with complex schemes such as EDI, "infecting" a page with numerous links and functoids makes them unreadable or difficult to understand, getting to the point of not being able to distinguish one element from another.
We can define the pages as logical containers of links and functoids, serving only to organize the maps, this because, at run time they don't have any impact since they are invisible to the compiler.
Possible operations on pages
By default, a map file is created with one grid page named “Page 1”. Once you have selected source and destination schemas, you can access the grid page menu by right-clicking the tab at the bottom of the grid page.
Despite the most frequent operations to be: the creation and renaming of pages, there are 4 operations that can be carried on pages:
- Add new page: This is the most common operation, adds a new grid page, also known as a layer, to the grid view that allows us to organize different areas of the map in logical containers.
- Right-clicking the tab at the bottom of the grid page and select “Add Page” option to add a new grid page to the map.
- Rename an existing page: very often forgotten, this option allows renaming of the displayed grid page, in order to make them more legible and give them visual impact.
- Right-clicking the tab at the bottom of the grid page and select “Rename Page” option.
- Delete an existing page: eliminate unnecessary or obsolete pages.
- Right-clicking the tab at the bottom of the grid page and select “Delete Page” option.
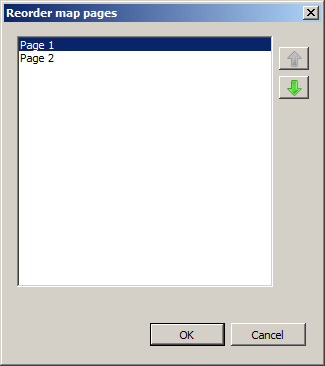
- Reorder map pages: very often we have the need to organize the disposition of the pages in a different sequence, to do this just:
- Right-clicking the tab at the bottom of the grid page and select “Reorder Pages” option.
Basic maps functionalities (Document mapping)
When we perform a transformation in the message there are 5 basic functionalities that typically arise:
- Simple mapping of a given value (direct copy)
- Concatenation of values
- Conditional selection
- Custom scripts
- Add new values (data)
Simple mapping of a given value (direct copy)
This is the most basic operation of all, where we intend to move a value from the source to the destination schema, without perform any kind of operation on the values (direct copy or simple drag-and-drop).
For this we need only to drag-and-drop the element in the source schema to the element in the destination schema. This operation is exemplified in the next image with the mapping of the element "Address"
Concatenation of values
Concatenate two or more values from the source to a particular element in the destination schema, is another of the daily operations in mapping, for this we need to:
- Open the Toolbox window and drag the String Concatenate functoid onto the grid;
- Drag-and-drop a link of the desired elements from the source to the String Concatenate functoid, for example the elements: “FirstName” and ���LastName”;
- Drag-and-drop a link from the String Concatenate functoid to the element “FullName” in the destination schema;
Note
The order of the input to the functoid is very important since the concatenation is carried out by the order in which the elements were associated to the functoid (we will explore this topic further on).
Conditional selection
Often we don't want to simply move values from source to destination schema and sometimes we need to generate data output according with certain conditions. We can make these conditions in many different ways using functoids or through custom scripts, here's an example: test whether the value in the source is a valid string, if so map it to the destination schema, for this we need to:
- Open the Toolbox window and drag the Logical String functoid onto the grid, this functoid validates whether the input parameter is a valid string, similar to the C# function String.IsNullOrEmpty.
- Returns “False” if the string is empty or null;
- Returns “True” if the value specified by the input parameter is a valid string;
- Drag-and-drop a link of the desired element from the source to the Logical String functoid, in this case the element “ZipCode”
- Drag the Value Mapping functoid from the Toolbox window onto the grid. This functoid returns the value of its second parameter if its first parameter is true, i.e., enables you, based in a Boolean value, to control whether an entire structure or another single value in an input instance message gets copied to an output instance message. The functoid receives two parameters:
- The first will be a Boolean (True/False);
- The second is the value to be mapped;
- If the value of the first parameter is true, then the value of the second parameter is mapped to the destination schema; otherwise it will not be mapped.
- Drag a link from the Logical String functoid to the Value Mapping functoid;
- Drag a link from the element “ZipCode” from the source schema to the Value Mapping functoid;
- Drag a link from the Value Mapping functoid to the element “ZipCode” in the destination schema;
Custom scripts
Custom scripts are commonly used in more complex transformations or to facilitate some mapping conditions. Basically there are two main scenarios where we can or should use this functoid:
- When none of the existing functoids allows doing what we want, the example that we will see is convert a date of birth in age.
- Or when the use of existing functoids becomes extremely complex to solve a problem of mapping.
There is a "rule" that we normally use to determine whether we should use functoids or custom scripts which tells us: “If you need more than 6 functoids to solve a problem of mapping, you should consider using a script. If you need six or less functoids, you should not use a script”.
I like to use this rule in a thoughtful way and not to the letter, i.e., if the existing functoids help me to easily solve the problem, I use the existing functoids. If it becomes extremely complex, then I choose to use custom scripts.
The Scripting functoid enables you to use custom script or code at run time to perform functions otherwise not available. For example, you can call a .NET assembly at run time by using the Scripting functoid and writing your own custom functions. BizTalk Server 2010 supports the following languages for the Scripting functoid:
- C# .NET
- JScript .NET
- Visual Basic .NET
- Extensible Stylesheet Language Transformations (XSLT)
- XSLT Call Templates
There are available to the developer six types of scripts:
- External Assembly: It allows us to associate this functoid with an existing function in assembly published on Global Assembly Cache (GAC).
- Inline C#: This option allows us to associate and invoke C# code directly into the functoid.
- Inline JScript .NET: Same as above but using code JScript .NET
- Inline Visual Basic .NET: Same as above but using code Visual Basic .NET
- Inline XSLT: This option allows us to associate the Scripting functoid with XSLT.
- Inline XSLT Call Template: identical to the above, however it allows us to associate and call XSLT templates directly into the functoid.
In this example, we want to convert a date of birth in age, for this we need to:
- Open the Toolbox window and drag the Scripting functoid onto the grid,
- Drag a link from the element “DateOfBirth” from the source schema to the Scripting functoid;
- Drag a link from the Scripting functoid to the element “Age” in the destination schema;
The result should look like:
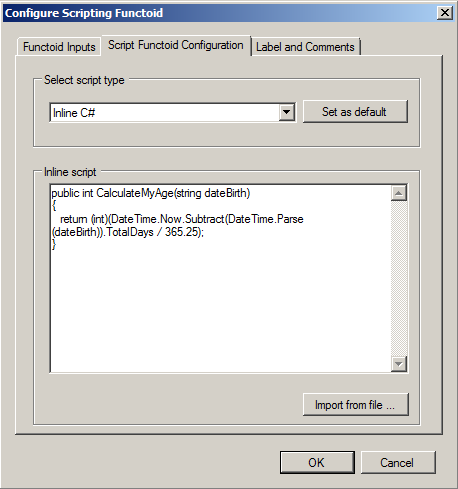
For the mapping problem to be completed, we only need to configure the custom script. For this sample we will use "Inline C #" script type, for this we need to:
- Make double-click in the Scripting functoid and select the “Script Functoid Configuration” tab;
- Go to the “Select script type” drop-down box, and select “Inline C#” option. The “inline script” box will display a sample script;
- Inside “Inline script” property box place the following script:
Add new values (data)
In many scenarios we need to add new data to the final message that do not exist in in the source message. It is normal to find situations where, based on existing data in the source message, we will need to consult an external system, e.g. database, in order to acquire more information to complete the required data in the final message. An example, more basic and simple, is to add a stamp date in the final message, describing the date and time it was processed. For this we need to:
- Open the Toolbox window and drag the Date and Time functoid onto the grid;
- Drag a link from the Date and Time functoid to the element “ProcessingDatetime” in the destination schema;
Note
As you can see, this functoid doesn't require any input data, returning the current date and time of the system.
Organizing Maps
If you are dealing with large maps, they can become very complex and therefore very difficult to maintain and read.
To minimize this problem, BizTalk server provides two main features to aid in the readability and maintainability of maps:
- Grid Pages
- Link Labels
Grid Pages
You can segment groups of links in to different grid pages. BizTalk allows to create/remove/delete and order grid pages. You can see this like different pages or segments of links of the map. By default, map file is created with one grid page named “Page 1”. This feature has been described earlier.
Link Labels
In previous versions of the product, by default, The XPATH query is presented if a link from the source schema is established to a functoid:
- /*[LOCAL-NAME()='PERSONORIGIN' AND NAMESPACE-URI()='HTTP://HOWMAPSWORKS.PERSONORIGIN']/*[LOCAL-NAME()='FIRSTNAME' AND NAMESPACE-URI()='']
Or it will show the name of the previous functoid if it’s linked from another functoid, which may cause the reading of maps more difficult.
In BizTalk Server 2010 this behavior was slightly improved. Currently, the default value is the name of the element of the source schema from where the link comes:
Or the name of the previous functoid:
However, the map editor allows us to label the links, replacing the XPATH query (in previous versions) or the name the element of the source schema, with a friendly description, for this we need to:
- Select the link to be labeled, right-click, and select properties;
- Fill the label property
Usually this feature is forgotten by developers.
Although it may seem a trivial feature and without significant impact, in my opinion, this is an important supporting map feature in the long term. While the ideas are fresh in our head we know what we are doing, but if it is necessary to intervene after some time and review the mappings, this feature will make our task easier.
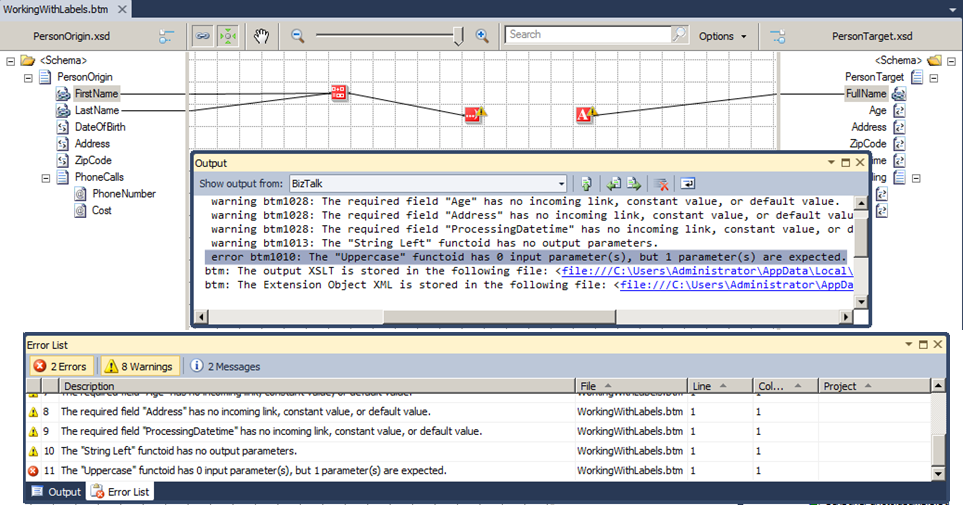
Testing and Validation of maps (at design time)
At design time we have, included in Visual Studio, 3 features that allow us to test and validate the maps:
- Test Map: Tests the selected map.
- Validate Map: Validates the map
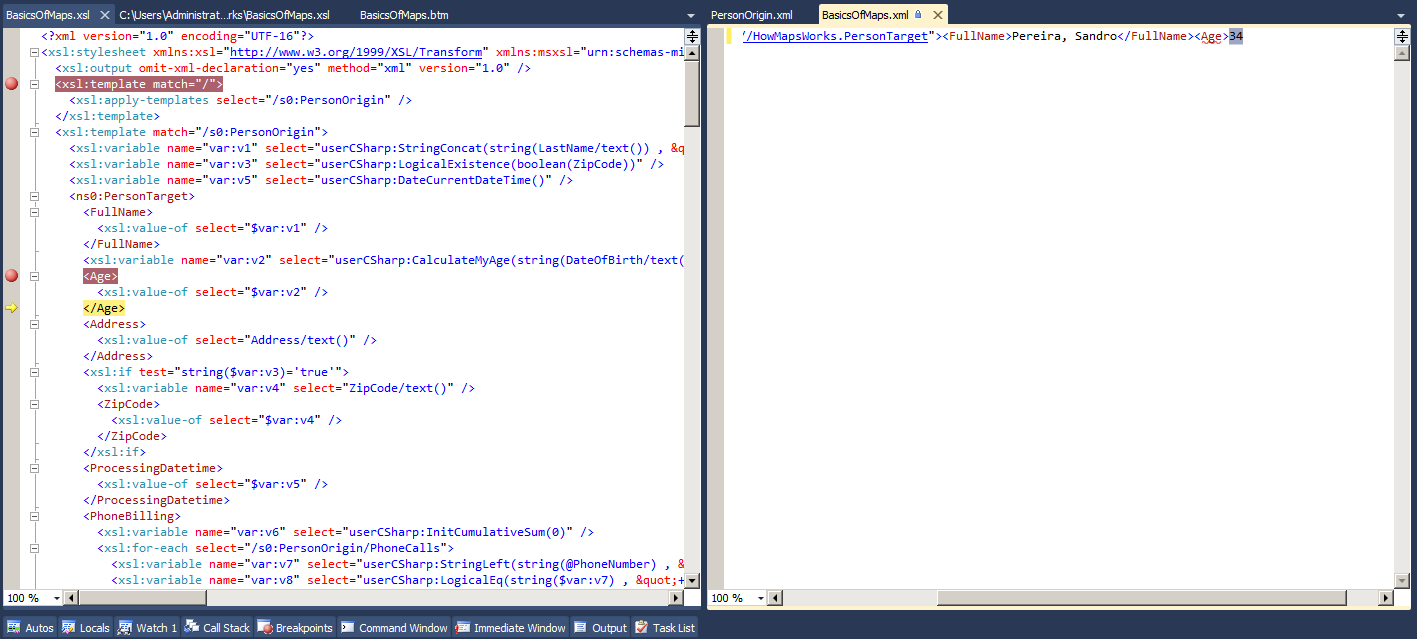
- Debug Map: If a map is compiled successfully, Debug Map launches the XSLT debugger. It allows you to step through the generated XLST, just like any other Visual Studio debugger.
These features are available to developers in an easy manner and directly of the development tool, Visual Studio, without the need to build and deploy the maps or even create and configure ports.
Test Map
Testing should be a continuous process as you build your map, not only at the end of development, but when necessary or when an important mapping block is complete. For this we need to:
- Open the Solution Explorer windows
- And execute the test by right-clicking the map name and selecting Test Map option
By default an instance of the input schema is generated automatically with dummy values, according to their type, and tested in the selected map. At the end, the generated result or the errors that occurred are displayed in the output window.
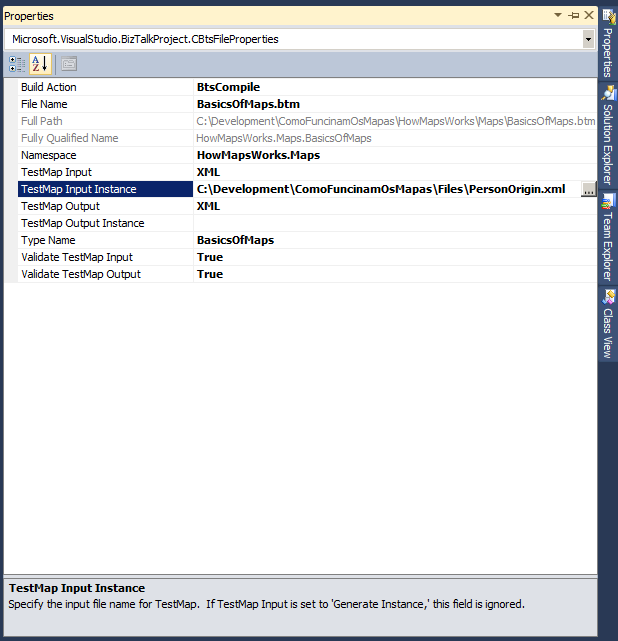
However all too often, this scenario is not ideal, and what we want is to test an existing document, not a dummy one, with the map. For this we only need to configure the properties of the map before we execute the test:
- Right-clicking the map name and select Properties option;
- In the Properties window set “TestMap Input Instance” property with the path to the input file.
In this window we can also configure other properties such as: specify the format of the input instance message (TestMap Input) or the format for the output instance message (TestMap Output); specify the location where the Test Map should generate the output message (TestMap Output Instance), but more importantly we can specify whether we want to validate input instance messages against the source schema before you test the map (Validate TestMap Input) or the output instance messages against the destination schema after you test the map (Validate TestMap Output).
This last option, “Validate TestMap Output”, is extremely important for the partial tests of maps. By setting this property as "False", allows us to test an incomplete map without being shown errors due lack of mandatory data, many of them associated with areas still to map, therefore, validating only the work done to date.
Note
This property must be set as “True” for the final test.
Validate Map
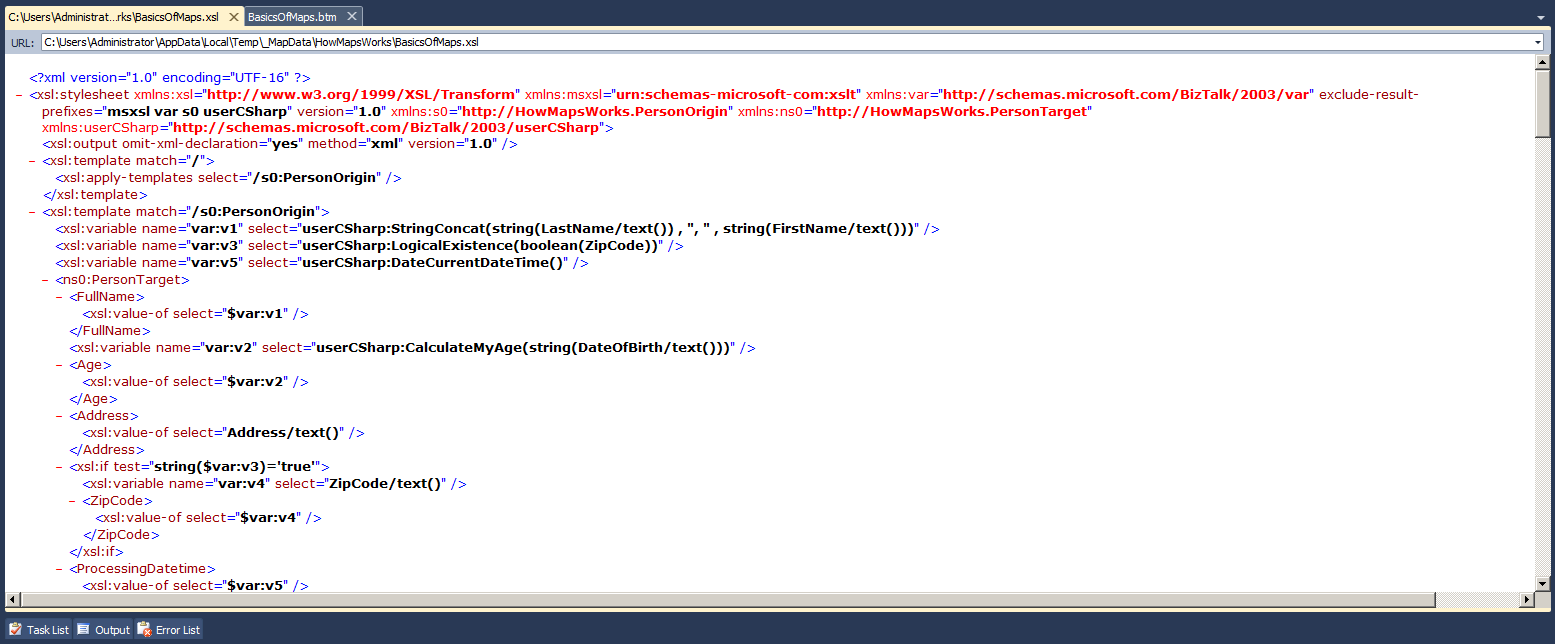
This option allows us to validate the structure of the map. This way we can inspect and analyze the XSLT code generated by the compiler, providing us with more information on how the maps work and also with an option to debug maps.
You can also extract the XSLT generated by the BizTalk Mapper for possible hand-crafting or for use in another project.
To perform this option, we need to:
- Right-click your BizTalk Mapper file in the Solution Explorer, and select Validate Map option
Verify that there is a message in the Output window indicating that the operation succeeded. Also in the Output window, note the name and path of the output XSLT. This XSL file will be given the same name as the map file, but with an XSL extension. You can press CTRL and click the link to display the XSL file in the BizTalk Editor.
Debug Map
This option allows us debugging a map, thereby facilitate the identification and correction of complex problems of mapping at design time. Debugging a map is very straightforward, and can be useful in many situations.
When debugging the map, the Debug Map feature uses the map file properties, such as TestMap Input Instance and TestMap Output Instance. Therefore, before you debug the map, it is recommend that you configure the input and output instance properties on the map file.
To perform this option, we need to:
- In Solution Explorer, right-click the map you want to test, and then click Debug Map. Visual Studio displays the map in XSLT format in its editor.
- Press F10 or F11 to debug the XSL code.
- When you press F11 on a functoid call, Visual Studio steps into the C# code for the functoid. You can view the values of variables used in the functoid source code in the Locals debugger window.
- Standard debug shortcuts apply, including: F9 to toggle a breakpoint and F5 to continue
Source Code
All source code used in this article is available on MSDN Code Gallery to download: BizTalk Server – Basics principles of Maps.
Conclusion
Due to the countless number of different existing systems and applications in organizations, it is imperative to use good tools and techniques to produce solutions that work for many years in a controlled and easy way to maintain. At the same time, new processes are added and existing ones will suffer minor improvements, all this without losing track of what is happening in production environment.
BizTalk Server helps us solve many of these problems, offering numerous features "out of the box" with the product. In this article I think I managed to explain in an intuitive way the main concepts of basic maps.
Author
Sandro Pereira
DevScope | MVP & MCTS BizTalk Server 2010
http://sandroaspbiztalkblog.wordpress.com/ | @sandro_asp
Other languages
This article is also available in the following languages
See Also
Read suggested related topics:
- BizTalk Server: How Maps Work
- BizTalk Server: Transform text files (Flat Files) into XML
- BizTalk Virtual Mapper VS Custom-XSLT
- BizTalk Server: BizTalk Mapper Patterns
- BizTalk Server 2010: Mapper
- BizTalk Server : How Map Works on Port Level
Another important place to find an extensive amount of BizTalk related articles is the TechNet Wiki itself. The best entry point is BizTalk Server Resources on the TechNet Wiki.
