Test Lab Guide Mini-Module: Homenet Subnet for Windows Server 2012
Windows Server 2012 Base Configuration Test Lab Mini-Module for the Homenet Subnet
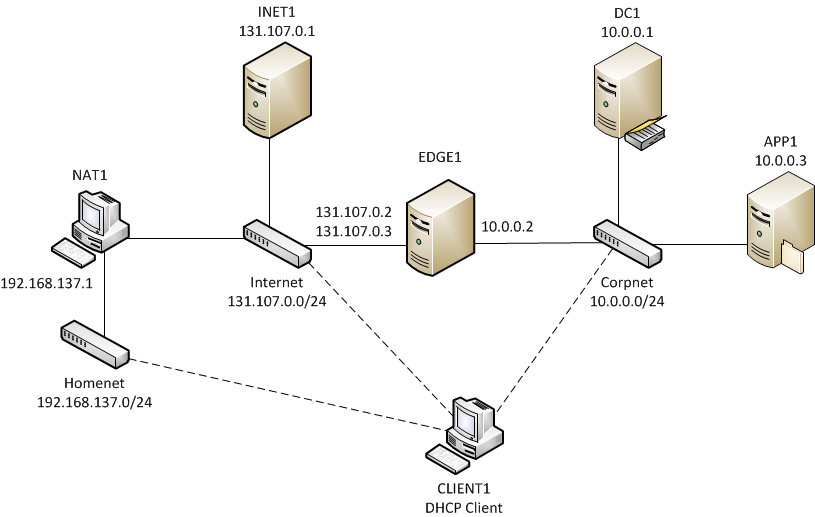
This Test Lab Guide Mini-Module describes how to add the Homenet subnet to the base configuration test lab. The Homenet subnet simulates a home network behind an Internet gateway device that provides network address translation (NAT). The resulting test lab configuration is illustrated in Figure 1 (click on it for a larger version).
Figure 1 Windows Server 2012 Base Configuration with the Homenet Subnet
If you are running the base configuration test lab in a virtual environment, you can create snapshots of the virtual machines (VMs) for all of the test lab computers before performing the following procedure.
There are two steps to adding the Homenet subnet to the Windows Server 2012 Base Configuration test lab.
1. Add and configure NAT1.
2. Test Internet access from the Homenet subnet.
Step 1: Configure NAT1
NAT1 is a Windows 8 client PC that acts as a NAT between the Internet and Homenet subnets. NAT1 configuration consists of the following:
- Install the operating system.
- Configure network connection properties.
- Configure Internet Connection Sharing.
NAT1 must have two network adapters installed. Connect one adapter to the physical or virtual switch for the Internet subnet, and connect the second adapter to the physical or virtual switch for the Homenet subnet.
Install the operating system on NAT1
To install the operating system on NAT1
1. Start the installation of Windows 8. 2. When you are prompted for a computer name, type NAT1. 3. When you are prompted by the Settings dialog, click Use express settings. 4. At the Log on prompt, click Don't want to sign in with a Microsoft account? Click Local account. 5. When you are prompted for a user name, type User1. Type a strong password twice, and type a password hint. Click Finish. 6. Connect NAT1 to a network that has Internet access and run Windows Update to install the latest updates for Windows 8. 7. Connect one adapter on NAT1 to the Internet network, and connect the second adapter to the Homenet network. Click Yes, turn on sharing and connect to devices when prompted. |
Configure Network Connections properties
Next, configure the names of the adapters in the Network Connections folder for the subnets to which they are connected.
To configure Network Connections properties
1. From the Desktop, open Network and Sharing Center (right-click the network icon in the System Notification Area and select Open Network and Sharing Center). 2. In Network and Sharing Center, click Change adapter settings. 3. In the Network Connections window, right-click the network connection that is connected to the Homenet subnet, and then click Rename. 4. Type Homenet, and then press ENTER. 5. In the Network Connections window, right-click the network connection that is connected to the Internet subnet, and then click Rename. 6. Type Internet, and then press ENTER. 7. Leave the Network Connections window open for the next procedure. 8. On the Start screen, type command. Right-click Command Prompt, and then click Run as Administrator. 9. To check network communication between NAT1 and INET1, in the Command Prompt window, type ping inet1.isp.example.com, and then press ENTER. 10. Verify that there are four responses from 131.107.0.1. 11. In the Command Prompt window, type netsh interface 6to4 set state state=disabled, and then press ENTER. 12. Close the Command Prompt window. |
Configure Internet Connection Sharing on NAT1
To configure Internet Connection Sharing on NAT1
|
Step 2: Test Internet Access
Test access to Internet resources from the Homenet subnet
Next, connect CLIENT1 to the Homenet subnet and test connectivity to resources on INET1 and EDGE1.
** To test access to Internet resources from CLIENT1 when connected to the Homenet subnet**
1. Move CLIENT1 from the Corpnet subnet to the Homenet subnet. Note that after network detection is complete, the warning symbol on the network icon in the system notification area no longer appears. Hover over the network icon in the system notification area and notice that it indicates Internet access. 2. From the Start screen, click the Internet Explorer icon. 3. In the Address bar, type http://inet1.isp.example.com/, and then press ENTER. You should see the default Internet Information Server 8 web page. 4. Close the Internet Explorer window. 5. Open a command prompt window. Type ping inet1.isp.example.com and press ENTER. You should see four responses from 131.107.0.1. Type ping edge1.contoso.com and press ENTER. You should see four failures from 131.107.0.2 indicating that the name resolved correctly, but the request timed out. Recall that Windows Firewall with Advanced Security on EDGE1 blocks the ping messages. 7. Move CLIENT1 from the Homenet subnet to the Corpnet subnet. |
Snapshot the Configuration
This completes the Base Configuration test lab mini-module for the Homenet subnet. To save this configuration for additional test labs, do the following:
- On all physical computers or virtual machines in the test lab, close all windows and then perform a graceful shutdown.
- If your lab is based on virtual machines, save a snapshot of each virtual machine and name the snapshots Windows Server 2012 Base Configuration with Homenet subnet. If your lab uses physical computers, create disk images to save the Base Configuration.
Additional Resources
For a list of all of the Windows Server 2012 TLGs, see Windows Server 2012 Test Lab Guides in the TechNet Wiki.
