SQL Server 2008 Reporting Services – Localizing Reports
Introduction
This is a step-by-step walk-through of how to implement localization for SQL Server Reporting Services (SQL 2008). One major distinction between this article and others is that it is a complete end-to-end walk through leaving no guess work for you to figure out where this code should go or what it is doing. An additional item this article covers which other articles do not is the ability to use the un-compiled resource files (*.resx) rather than a compiled DLL.
Requirements
- Provide a solution to localize reports without creating separate language specific reports
- Provide a solution that will not require additional configuration/deployment when new reports or languages are added
- Provide a solution that uses a fall-back methodology so the user is not presented with an error
- Provide a solution that will work in a load-balanced environment
- Provide a solution that will work correctly and consistently in multiple environments with no code changes between environments
- Local Development
- Development Server
- Quality Assurance Server
- Customer Acceptance Server
- Production Server
- Provide a solution that will leverage the Microsoft localization methods and can make use of un-compiled resource files (*.resx)
Required Knowledge
This article assumes a basic knowledge of Reporting Services report development, Microsoft C#.NET development, and Microsoft Visual Studio 2008. A little server architecture and computer system knowledge wouldn’t hurt either.
First things first, you will need to use Visual Studio 2008 to create a new solution containing a SQL Server Report Server Project and a C# Class Library. Please note that at the time of writing this article, Microsoft does not support report development using Visual Studio 2010, so opening existing reports using Visual Studio 2010 may cause unintended results.
Create Report Server Project
In Visual Studio 2008 select “File” then click “New Project…” and you should see a dialog similar to the image below. Select “Business Intelligence Projects” from the left pane and “Report Server Project” from the right pane. In the Name field type “SSRS.Reports” and verify your screen looks similar to the image below before clicking “OK”.
Create Class Library Project
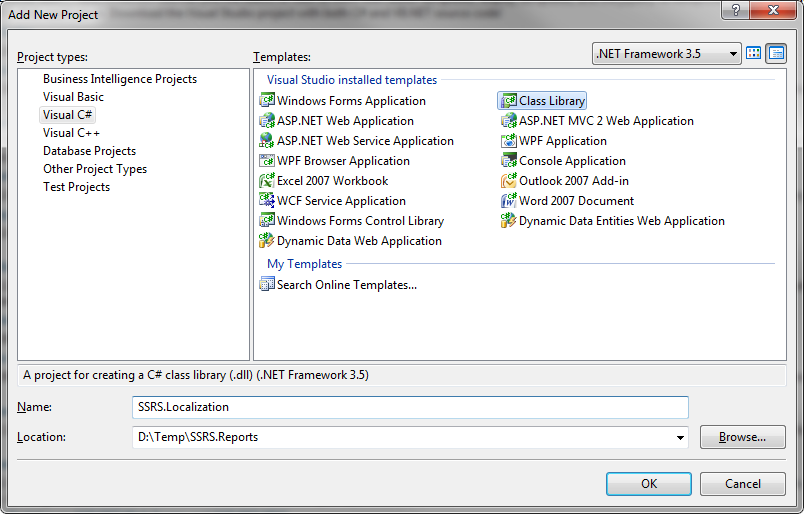
Once the project is created, right click on Solution SSRS.Reports solution from the Solution Explorer and select “Add” then click “New Project” and you should see a dialog similar to the image below. Select “Visual C#” from the left pane and “Class Library” from the right pane. In the Name field type “SSRS.Localization” and verify your screen looks similar to the screen shot below before clicking “OK”.
Create Class “Localized Value”
Once the project has finished setup, right click on the “Class1.cs” file under the SSRS.Localization project and click “Rename”. Type “LocalizedValue.cs” and hit enter. You may be prompted to rename your all references to Class1 as shown in the image below. Click “Yes” for this dialog box.
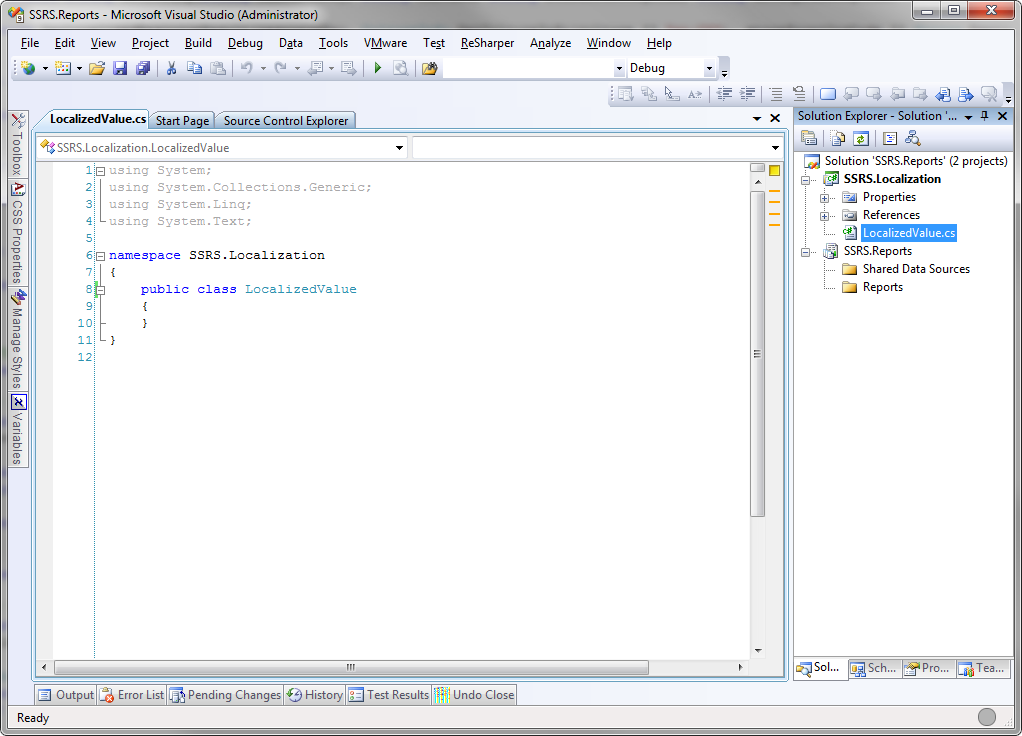
Your project should look something like this at this point. A solution with a C# Class Library project and a Report Server project under it.
Add Resources
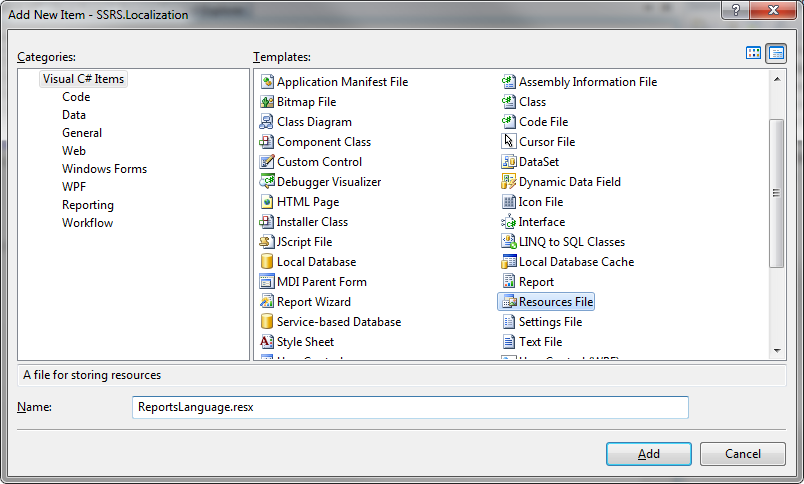
So let’s start coding our custom assembly to accommodate our business scenario. We will start by adding the resource files we will need to localize this project. Right click on “SSRS.Localization” in the Solution Explorer and select “Add” then click “New Item”. In the right pane, select “Resource File” and type “ReportsLanguage.resx” for the Name. Verify your screen looks similar to the image below before clicking “OK”.
The resource file will open once it is created. For now we will create a single entry in the resource file using the following information:
Name: HelloWorldText
Value: Hello World
Comment: Leave Blank
Save the resource file and close it. Right click on “ReportsLanguage.resx” in the Solution Explorer and click “Copy”. Now right click on “SSRS.Localization” and click “Paste”. This will create a copy of the resource file you just created and edited. Right click on “Copy of ReportsLanguage.resx” and select “Rename”. Rename the file to “ReportsLanguage.fr-FR.resx” and open the file when you are done renaming it. Replace the Value with the following text:
Name: HelloWorldText
Value: Bonjour tout le monde
Comment: Leave Blank
Save the resource file and close it. You now have a localized resource key called “HelloWorldText” which will display “Hello World” or “Bonjour tout le monde” based on the language preference of the viewer. Since we want to maintain these files as un-compiled resource files, right click on each of the ReportsLanguage.resx files and click “Properties”. Under the “Advanced” section you will find a setting for “Build Action”, select “Content”. This needs to be done for both files.
Implement Private Method “GetResourcePath”
Now we need to implement a method that will take advantage of these new resource files. The first thing we will want to do is build up some private methods to handle some of our tasks. Let’s setup a method to locate the resource files… You will notice in this code that a section has a comment indicating that you must assert permissions to access EnvironmentalVariables. Because this method provides a means to define the location of the resource files in the computer Environmental Variables section, we must assert permissions in order to access the Environmental Variables.
/// <summary>
/// GetResourcePath is a method that provides the path for the resource files.
/// This method is included to provide a way to place the resource path
/// in an environmental variable on servers where this assembly is deployed
/// thus allowing it to be deployed to many locations without having to recompile
/// for each environment while still maintaining the ability to locate the files.
/// </summary>
private static string GetResourcePath()
{
// You must assert permissins to access the EnvironmentVariables
var environmentPermission = new EnvironmentPermission(PermissionState.Unrestricted);
environmentPermission.Assert();
const string localpath = @"D:\Temp\SSRS.Reports\SSRS.Localization\;
string environmentalPath = Environment.GetEnvironmentVariable("ReportLanguageResources") + @"\;
return environmentalPath ?? localpath;
}
Implement Private Method “GetResourceValue”
Now that we know where the resource files are located, let’s build a method to access the file and get the value associated to the resource key. Again, you will notice that we must assert permissions to access the file system objects. This method will first verify the file exists, and then try to locate the resource key within the file. If either the file does not exist or the key does not exists, we want to return a String.Empty.
/// <summary>
/// GetResourceValue is a method that locates and parses the XML resource file
/// to locate the provided resource key and return the associated value. This
/// method should return a String.Empty if it is unable to locate the resource
/// file or the key within a file, thus allowing the business logic to continue.
/// </summary>
private static string GetResourceValue(string resourcePath, string resourceKey)
{
var resourceValue = String.Empty;
// You must assert permissins to access the File System
var filePerm = new FileIOPermission(FileIOPermissionAccess.Read, resourcePath);
filePerm.Assert();
XDocument resourceFile = null;
var organizationResourceFileInfo = new FileInfo(resourcePath);
if (organizationResourceFileInfo.Exists)
{
resourceFile = XDocument.Load(resourcePath);
}
if (resourceFile != null)
{
var xresult = (from e in resourceFile.Descendants("data")
where e.Attribute("name") != null
where e.Attribute("name").Value == resourceKey
select new
{
e.Element("value").Value,
Key = e.Attribute("name").Value
}
).FirstOrDefault();
if (xresult != null && xresult.Key == resourceKey)
{
resourceValue = xresult.Value;
}
else
{
resourceValue = String.Empty;
}
}
return resourceValue;
}
Implement Private Method “GetLocalizedResourceResult”
So, now that we have our supporting methods written, let’s write the method that contains the business logic to return the correct resource key value. This method calls both of the previous methods we wrote and also implements business logic to locate the resource key value by looking in the localized resource file then in the default resource file and finally returning the resource key within square brackets if it is unable to locate the resource key value.
/// <summary>
/// GetLocalizedResourceResult is the primary method that implements business
/// logic to ensure that a result is always returned. This logic first tries to
/// provide the result from the localized resource then from the default resource
/// if both of those fail, it will return the resourceKey in brackets to identify
/// a missing resouce key within the resource files.
/// </summary>
private static string GetLocalizedResourceResult(string resourceKey, CultureInfo culture)
{
var resourceValue = String.Empty;
var resourcePath = GetResourcePath();
resourceValue = GetResourceValue(resourcePath + "ReportsLanguage." +
culture.Name + ".resx", resourceKey);
if(resourceValue == String.Empty)
{
resourceValue = GetResourceValue(resourcePath +
"ReportsLanguage.resx", resourceKey);
if(resourceValue == String.Empty)
{
resourceValue = "[" + resourceKey + "]";
}
}
return resourceValue;
}
Implement Public Methods
Now that we have our private methods defined and written, let’s create some publicly accessible methods that our report can call to localize some resources within the report. We want to provide a couple of options, as this assembly could be used for other purposes beyond our little sample so we will include both a localized method and a method to return a en-US only resource key value.
/// <summary>
/// GetLocalizedValue(resourceKey,culture) is a publicly accessible method
/// that allows the calling application to pass a resource key and culture
/// and returns the value of the resource lookup.
/// </summary>
public static string GetLocalizedResourceValue(string resourceKey, string culture)
{
return GetLocalizedResourceResult(resourceKey, CultureInfo.GetCultureInfo(culture ?? "en-US"));
}
/// <summary>
/// GetLocalizedValue(resourceKey) is a publicly accessible method
/// that allows the calling application to pass a resource key and
/// returns the value of the resource lookup. The culture is always "en-US".
/// </summary>
public static string GetLocalizedResourceValue(string resourceKey)
{
return GetLocalizedResourceResult(resourceKey, CultureInfo.GetCultureInfo("en-US"));
}
Enable Reports to Access Assembly
AssemblyInfo.cs Modificaiton
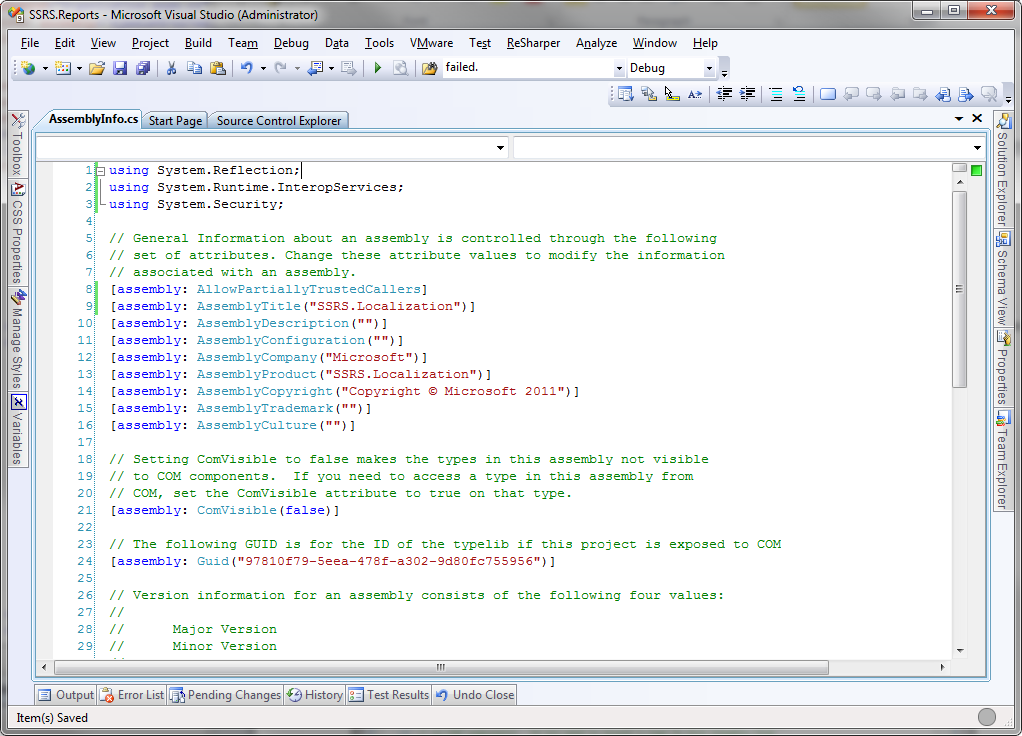
We have a few more things to do to make this assembly available to our reports. Under the SSRS.Localization project, locate the “Properties” folder and open the “AssemblyInfo.cs” file. Immediately following the upper set of comments, insert the following line, which will allow SQL Server Reporting Services and the Visual Studio 2008 Preview to access the assembly.
[assembly: AllowPartiallyTrustedCallers]
The file should something like the screen shot below.
Post-Build Events
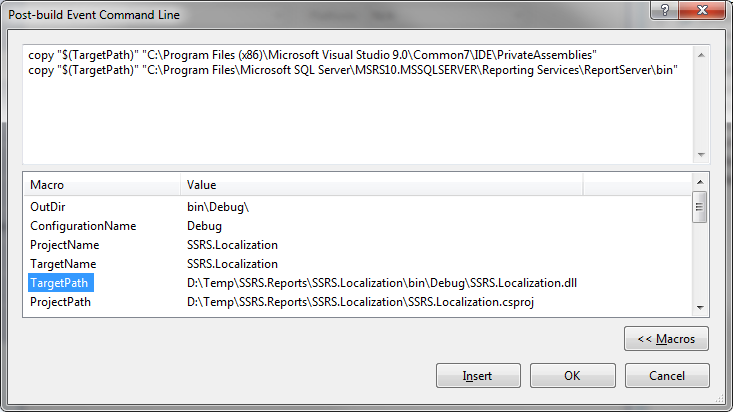
We also need to move our compiled assembly to the appropriate locations where SQL Server Reporting Services and Visual Studio 2008 will look for it when attempting to include this custom assembly in your report. Within Solution Explorer, right click on “SSRS.Localization” and select “Properties”. Click on the “Build Events” tab on the left side then click the “Edit Post-Build…” button.
You will need to insert the following lines:
copy "$(TargetPath)" "C:\Program Files (x86)\Microsoft Visual Studio 9.0\Common7\IDE\PrivateAssemblies"
copy "$(TargetPath)" "C:\Program Files\Microsoft SQL Server\MSRS10.MSSQLSERVER\Reporting Services\ReportServer\bin"
This uses the Macro of $(TargetPath) as shown in the highlighted macro section, to copy the compiled DLL to the Visual Studio 2008 location and the same compiled DLL to the SQL Server Reporting Services location for use in the reports. If you are using an automated build process, please review the section “Additional Environment Configuration & Automated Build Processes”.
If you are not using Window 64-bit edition, you will not need the top path, instead use the following:
copy "$(TargetPath)" "C:\Program Files\Microsoft Visual Studio 9.0\Common7\IDE\PrivateAssemblies"
Build the SSRS.Localization project and you should see it copy the DLL to the specified locations. You can verify the files have been copied to the location to ensure it went to the correct locations.
Reporting Services Policy Configurations
Before we can use this in the SQL Server Reporting Services or Visual Studio 2008 Preview, we have to modify a couple more files to give our reports access to the new custom assembly we just created.
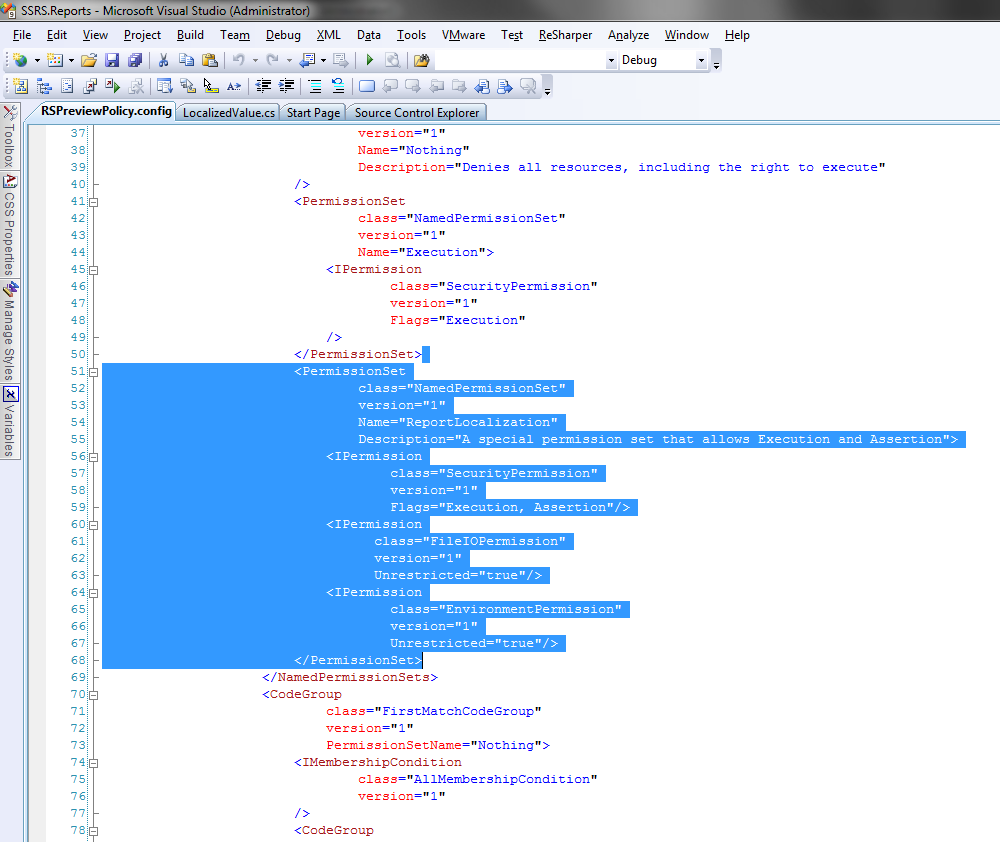
We will add the same code to both files. Locate and open the following files with Visual Studio 2008 then add the following code to each file. (Note the RSPreviewPolicy is only needed to preview the report through Visual Studio 2008 and is not necessary to be edited on a server):
C:\Program Files (x86)\Microsoft Visual Studio 9.0\Common7\IDE\PrivateAssemblies\RSPreviewPolicy.config
C:\Program Files\Microsoft SQL Server\MSRS10.MSSQLSERVER\Reporting Services\ReportServer\rssrvpolicy.config
In the <NamedPermissionSets> space, include the following code:
<PermissionSet
class="NamedPermissionSet"
version="1"
Name="ReportLocalization"
Description="A special permission set that allows Execution and Assertion">
<IPermission
class="SecurityPermission"
version="1"
Flags="Execution, Assertion"/>
<IPermission
class="FileIOPermission"
version="1"
Unrestricted="true"/>
<IPermission
class="EnvironmentPermission"
version="1"
Unrestricted="true"/>
</PermissionSet>
This code provides a new Named Permission Set called “ReportLocalization” and grants Execution and Assertion as well as FileIOPermission = Unrestricted and EnvironmentPermission = Unrestricted. These are necessary to Execute the DLL and assert permission for the File System Objects and Environmental Variables objects as we discussed when we were building our methods.
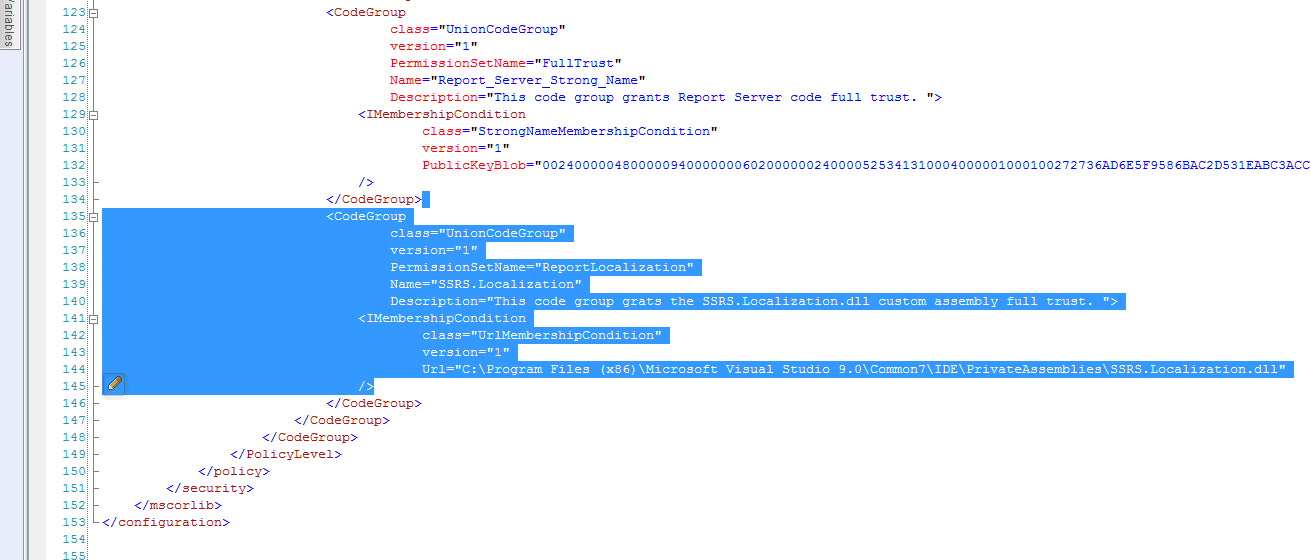
Within the <CodeGroup> space, include the following code:
<CodeGroup
class="UnionCodeGroup"
version="1"
PermissionSetName="ReportLocalization"
Name="SSRS.Localization"
Description="This grants the SSRS.Localization.dll ReportLocalization Permissions">
<IMembershipCondition
class="UrlMembershipCondition"
version="1"
Url="C:\Program Files (x86)\Microsoft Visual Studio
9.0\Common7\IDE\PrivateAssemblies\SSRS.Localization.dll"/>
</CodeGroup>
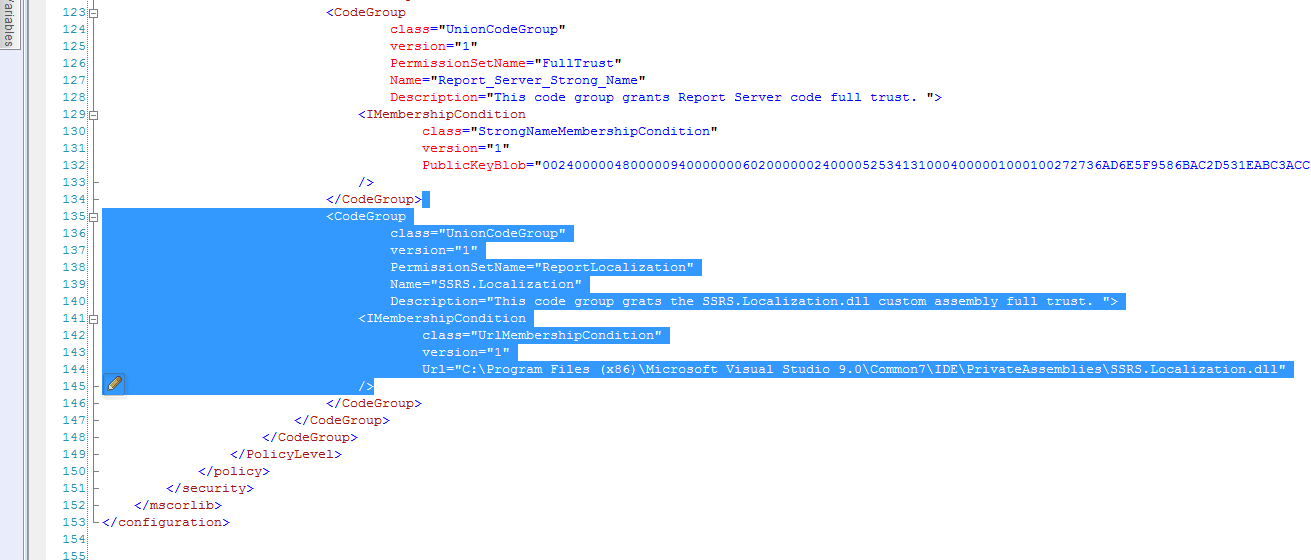
Use the following within the <CodeGroup> space within the rssrvpolicy.config file.
<CodeGroup
class="UnionCodeGroup"
version="1"
PermissionSetName="ReportLocalization"
Name="SSRS.Localization"
Description="This grants the SSRS.Localization.dll ReportLocalization Permissions">
<IMembershipCondition
class="UrlMembershipCondition"
version="1"
Url="C:\Program Files\Microsoft SQL Server\
MSRS10.MSSQLSERVER\Reporting Services\ReportServer\bin\SSRS.Localization.dll"/>
</CodeGroup>
This code assigns the DLL to the newly created Permission Set and specifies which DLL is to be given these permissions. This code is for the RSPreviewPolicy.config file.
Create Report
At this point we have completed all the steps necessary to utilize the SSRS.Localization assembly within our reports, so let’s build a simple report that will take advantage of this assembly. Right click on the “SSRS.Reports” project and select “Add” then click “New Item”. In the right pane of the Add New Item dialog box, choose “Report” and type “LocalizedReport.dll” in the name field. Verify your screen looks similar to the image below before clicking “Add”.
Implement Report References
Now that we have a blank report, we need to do a couple of things to access the assembly. Open LocalizedReport.rdl and right click on the blank space and click “Report Properties”. Select References from the left side menu then click the “Add” button under the heading “Add or remove assemblies:”
When you click the ellipse (…) you will need to click the “Browse” tab along the top of the “Add Reference” dialog box. Browse to your “C:\Program Files\Microsoft SQL Server\MSRS10.MSSQLSERVER\Reporting Services\ReportServer\bin” folder and highlight the “SSRS.Localization.dll” assembly before clicking “OK”.
You should see a new reference appear in your “Report Properties” dialog box, as shown in the screen shot below.
Implement Report “Code-Behind”
Now click on the “Code” option on the left side of the dialog box and add the following code.
Public Shared Function LocalizedValue(ByVal resourceKey As String, ByVal culture As String) As String
Try
Return SSRS.Localization.LocalizedValue. GetLocalizedResourceValue (resourceKey, culture)
Catch ex As Exception
Return ex.Message
End Try
End Function
Verify your screen looks similar to the image below before clicking “OK”.
Implement Report Language Variable
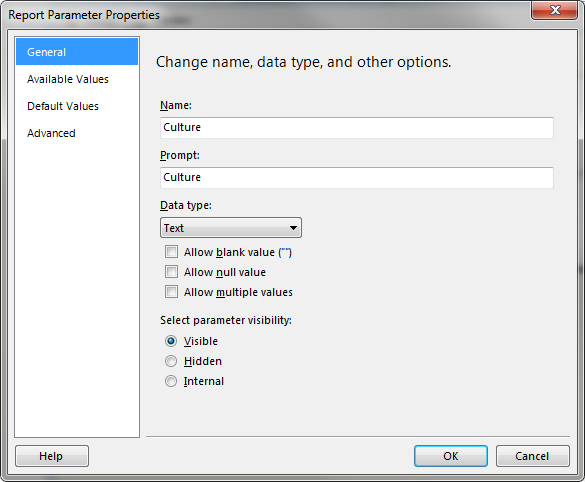
Now that we have the assembly referenced and our custom code in the report, it’s time to work on the report itself. Let’s start off by adding a parameter to quickly and easily change our language preference. I will explain how this can be controlled by the browser in a moment, but for now this will give us a quick way to switch between “en-US” and “fr-FR” for our testing purposes. In the “Report Data” toolbox, right click on “Parameters” and click “Add Parameter…” Use the following information to configure the parameter:
Name: Culture
Prompt: Culture
Data Type: Text
Allow blank value (“”): False
Allow null value: False
Allow multiple values: False
Select parameter visibility: Visible
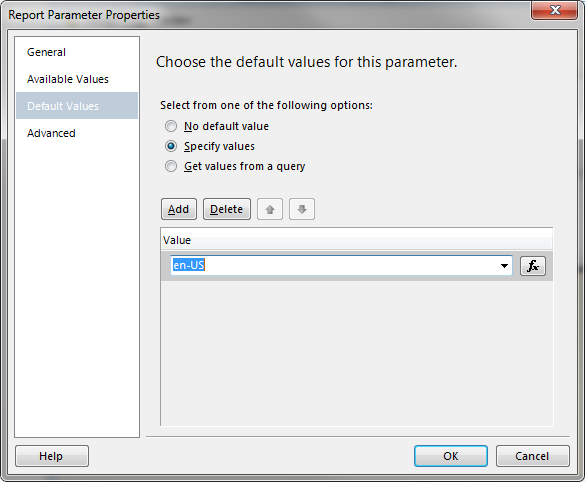
Now select “Default Values” on the left side of the dialog box and use the following information to continue to configure the parameter.
Select from on of the following options: Specify values
Click the “Add” button and type “en-US” in the value field. Verify your screen looks similar to the image below before clicking “OK”.
Implement Localized Report Labels
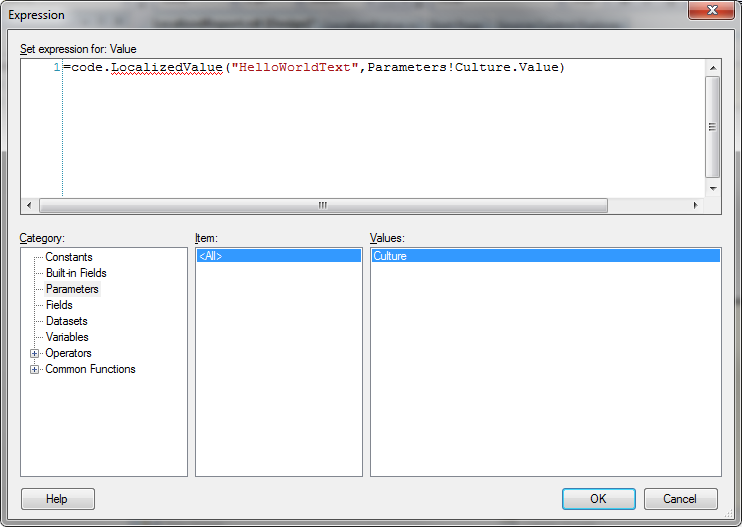
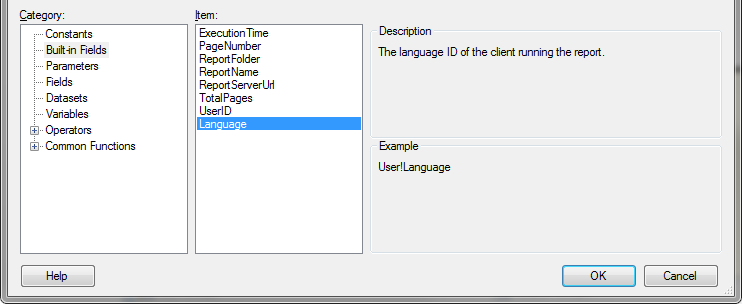
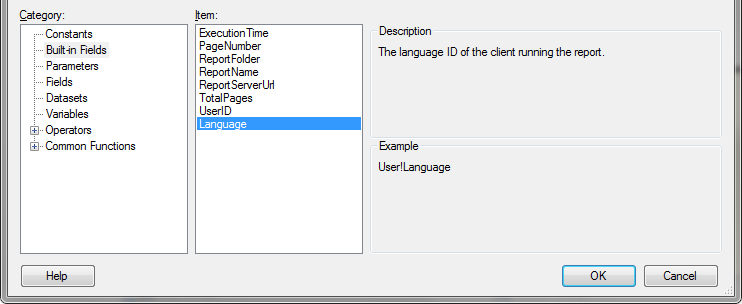
Using the “Toolbox” menu, drag a “Textbox” control onto the report surface. Now right click within the textbox and click “Expression”. An “Expression” dialog box will appear; type the following code and verify your screen looks similar to the image below before clicking “OK”. Note to use the browser language, you may use the “Built-in Fields” category with the “Language” item (shown in second image below). Remember the parameter is just an easy way for us to switch while testing…
At this point your project and report should look something like the image below.
Build and Test
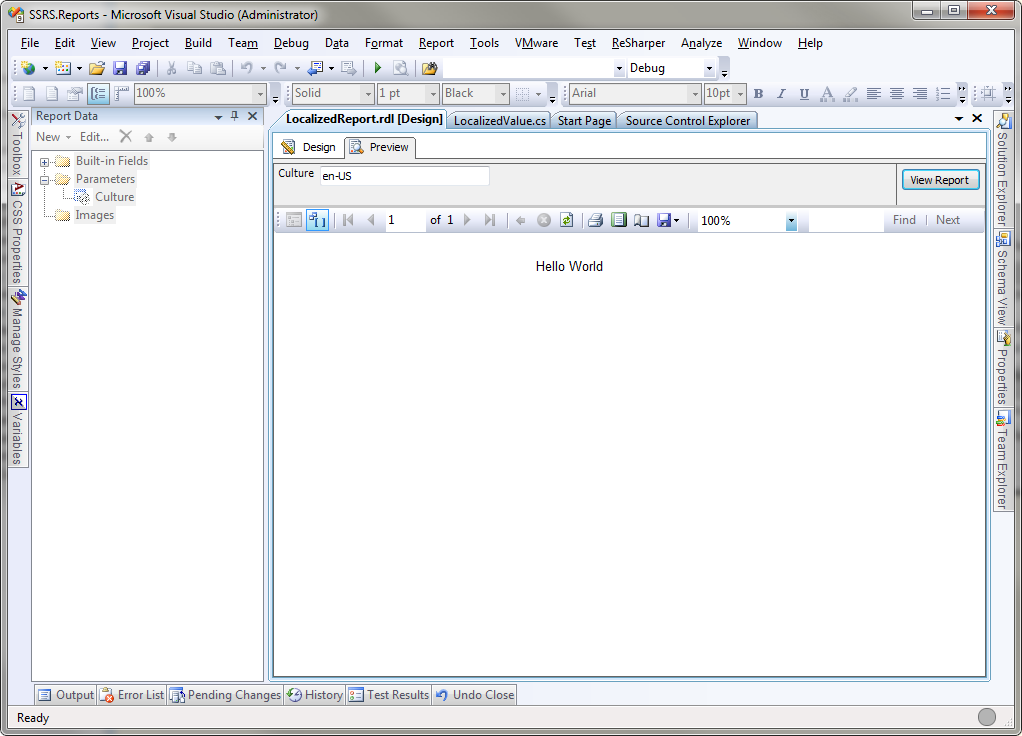
Make sure you are not in “Preview” mode and build the solution prior to attempting to preview the report. It is important not to be in preview mode as doing so will not allow the SSRS.Localization.dll to be copied to the Visual Studio 2008 directory. Once you have successfully built the solution, you can click on the “Preview” tab to see how the report looks. It should look something like the image below.
Now let’s adjust the “Culture” parameter we setup and see if our localized value is returned when we set the culture to “fr-FR”…
Congratulations, you now have a localized report that will utilize the built-in .NET localization methods and will allow you to add new resource files to the project without having to rebuild and re-deploy the SSRS.Localization assembly every time you make a change to or add resource files.
Happy Coding!
Additional Environment Configuration & Automated Build Processes
When you implement this solution in additional environments beyond your local development computer, there are a few items that will need to be done in order to make this work.
- Copy SSRS.Localization.dll to the “Drive:\Program Files\Microsoft SQL Server\MSRS10.MSSQLSERVER\Reporting Services\ReportServer\bin” directory on the Reporting Services computer. This is a onetime configuration (unless the SSRS.Localization project is updated with new code).
- Edit configuration file “Drive:\Program Files\Microsoft SQL Server\MSRS10.MSSQLSERVER\Reporting Services\ReportServer\rssrvpolicy.config” as described in section “Reporting Services Policy Configuration” This is a onetime configuration.
- Copy resource files to desired location (may be automated through build processes) – automating this may be desirable as these are the files most likely to changes
- If the resource files will reside on a network share (non-local drive) you will need to make sure to grant permissions to the SQL Server Reporting Services account (default is NT AUTHORITY\Network Service – grant computer account access to the location of the resource files). If you are using an automated build process which copies these files you will also need to grant permissions for that account.
- The Reporting Services account requires Read-Only permissions
- Automated Build/Copy process would require Read/Write/Modify permissions
If you utilize an automated build process such as MS Build, you may want to include conditional logic for your Post-Build Events to exclude the event which copies files to a specific location. You can use the code below in place of the Post-Build Events code described earlier in this article. This will prevent the copy from occurring except when the build type is set to “Debug”. Variations of this conditional logic may work better in your environment.
if "$(ConfigurationName)" == "Debug" copy "$(TargetPath)" "C:\Program Files (x86)\Microsoft Visual Studio 9.0\Common7\IDE\PrivateAssemblies"
if "$(ConfigurationName)" == "Debug" copy "$(TargetPath)" "C:\Program Files\Microsoft SQL Server\MSRS10.MSSQLSERVER\Reporting Services\ReportServer\bin"
References
http://www.codeproject.com/KB/reporting-services/SSRSReportLocalized.aspx
http://sqlbiconfessions.wordpress.com/2009/09/16/hello-world/
http://support.microsoft.com/kb/920769
http://support.microsoft.com/kb/842419
http://blogs.msdn.com/b/shawnfa/archive/2004/08/30/222918.aspx
http://msdn.microsoft.com/en-us/ms153587
http://msdn.microsoft.com/en-us/ms153561
This article was originally written by Bret Hill.

