Windows Checked Build
Introduction
Many users don't know that Windows has a "special version" that is provided only to MSDN Subscribers and aimed primarily at device drivers developers because of the "special" way is has been built: that is the debug (or checked) build.
What Is the Checked Build
The checked build (available only with an MSDN Professional or higher subscription) is a recompilation of the Windows source code with a compile-time flag defined called “DBG" (a preprocessor symbol), to cause compile time conditional debugging and tracing code to be included. Also, to make it easier to understand the machine code and to read the trace messages, the post-processing of the Windows binaries to optimize code layout for faster execution is not performed.
The checked build is provided primarily to aid device driver developers because it performs more stringent error checking on kernel-mode functions called by device drivers or other system code: for example, if a driver (or some other piece of kernel-mode code) makes an invalid call to a system function that is checking parameters (such as acquiring a spinlock at the wrong interrupt level), the system will stop execution when the problem is detected rather than allow some data structure to be corrupted and the system to possibly crash at a later time.
As Walter Oney wrote in the book "Programming the Microsoft Windows Driver Model, 2nd Edition", one of the things the developer can do is to provide additional code that will take effect only in the checked build by writing something like the following
#if DBG
    // extra debugging code
    ...
#endif
As previously mentioned, the "DBG" symbol equals "1" in the checked build enviroments, whereas it equals "0" in the free build environments: this code snippet will be executed only in the checked build enviroments.
Determining the System Build Type
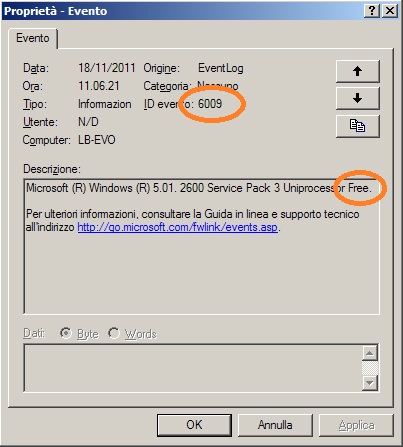
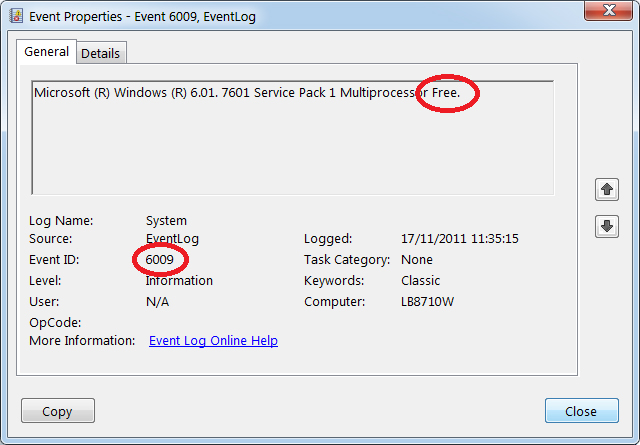
Distribution media that contain the checked build are clearly labeled as "Debug/Checked Build". Besides that, the user can determine which Windows build is running in two ways: the simplest one is opening the Event Viewer (Start -> Run..., type "eventvwr.msc" and hit ENTER) and look for event IDs 6009: these events are logged during every boot and indicates the operating system version, build number, service pack level, and other pertinent information about the system.
In the figures below, you can see this event logged in the Windows startup phase (figure 1-a refers to an Italian language Windows XP Professional x86 Service Pack 3 running on an Intel Pentium III-M CPU; figure 1-b refers to an English language Windows 7 Ultimate x64 Service Pack 1 running on an Intel Mobile Core 2 Duo T7800 CPU) along with the build type indication.
 |
| Figure 1-a: Event ID 6009 on Windows XP Professional x86 SP3. |
 |
| Figure 1-b: Event ID 6009 on Windows 7 Ultimate x64 SP1. |
As you can see, both these systems are running a free (or retail) build of Windows.
The other way of determining if the system is running the checked build is by querying the value of the Debug property of the Windows Management Instrumentation (WMI) Win32_OperatingSystem class. The book "Windows Internals, 5th Edition" provides the following sample Visual Basic script that demonstrates how to display this property:
strComputer = "."
Set objWMIService = GetObject("winmgmts:" _
 & "{impersonationLevel=impersonate}!\\" & strComputer _
 & "\root\cimv2")
Set colOperatingSystems = objWMIService.ExecQuery _
 ("SELECT * FROM Win32_OperatingSystem")
For Each objOperatingSystem in colOperatingSystems
    Wscript.Echo "Caption: " & objOperatingSystem.Caption
    Wscript.Echo "Debug: " & objOperatingSystem.Debug
    Wscript.Echo "Version: " & objOperatingSystem.Version
Next
To try this, type in the preceding script and save it as file. The following is the output from running the script on a English language Windows Vista installation:
C:\>cscript osversion.vbs
Microsoft (R) Windows Script Host Version 5.7
Copyright (C) Microsoft Corporation. All rights reserved.

Caption: Microsoft Windows Vista
Debug: False
Version: 6.0.6000
This system is not running the checked build, as the Debug flag shown here says False.
What Happens Inside
Much of the additional code in the checked-build binaries is a result of using the ASSERT macro, which is defined in the Windows Driver Kit (WDK) header file Ntddk.h and documented in the WDK documentation. This macro tests a condition (such as the validity of a data structure or parameter), and if the expression evaluates to FALSE, the macro calls the kernel-mode function RtlAssert, which calls DbgPrintEx to send the text of the debug message to a debug message buffer: if a kernel debugger is attached, this message is displayed automatically followed by a prompt asking the user what to do about the assertion failure (breakpoint, ignore, terminate process, or terminate thread); if the system wasn’t booted with the kernel debugger (using the debug option in the Boot Confguration Database — BCD) and no kernel debugger is currently attached, failure of an ASSERT test will bugcheck the system.
For a list of ASSERT checks made by some of the kernel support routines, see the section “Checked Build ASSERTs” in the WDK documentation. For a list and explanation of some of the common breakpoints and DbgPrintEx messages that a driver might encounter in the checked build enviroments, see the section "Checked Build Breakpoints and Messages" in the WDK documentation.
Who is the Checked Build Useful For
The checked build is also useful for system administrators because of the additional detailed informational tracing that can be enabled for certain components (for detailed instructions, see the Microsoft Knowledge Base article 314743, titled "HOWTO: Enable Verbose Debug Tracing in Various Drivers and Subsystems"). This information output is sent to an internal debug message buffer using the DbgPrintEx function referred to earlier. To view the debug messages, you can either attach a kernel debugger to the target system (which requires booting the target system in debugging mode), use the !dbgprint command while performing local kernel debugging, or use the DebugView tool from Windows Sysinternals. Finally, the checked build can also be useful for testing user-mode code only because the timing of the system is different (this is because of the additional checking taking place within the kernel and the fact that the components are compiled without optimizations). Often, multithreaded synchronization bugs are related to specifc timing conditions. By running your tests on a system running the checked build (or at least the checked kernel and HAL), the fact that the timing of the whole system is different might cause latent timing bugs to surface that do not occur on a normal retail system.
What the Checked Build Checks
The checked build includes a significant number of debugging checks that are normally not present in the system, including:
- Parameter validation checks
These checks ensure that the Windows operating system code ordinarily runs with as little overhead as possible. As a result, the NT-based operating systems implement the policy that all components running in kernel-mode, including drivers, implicitly "trust" each other. Thus, parameters that are passed from one kernel-mode component to another (such as parameters passed on function calls) are typically subject to minimal validation. - Internal checks for operating system correctness and consistency
These checks typically verify the correctness of key algorithms and data structures in the operating system. - Informational checks and tracing output
These checks and the resulting output that is displayed in the debugger are designed to assist debugging of drivers or other system-level components. Often, these types of checks must be individually enabled by setting debug flags (typically using the debugger) internally in the component of interest. The existence of such checks and their debug output may vary from release to release of the operating system and is documented in Microsoft Knowledge Base articles.
Debugging Symbols and Service Packs
As you've probably guessed, you cannot use the standard free debug symbols nor you cannot install the free service packs on a checked build installation: you must download the checked versions of debugging symbols and service packs and install them.
How to Install
You don’t have to install the entire checked build to take advantage of the debug version of the operating system: you can just copy the checked version of the kernel image (Ntoskrnl.exe) and the appropriate HAL (Hal.dll) to a normal retail installation. The advantage of this approach is that device drivers and other kernel code get the rigorous checking of the checked build without having to run the slower debug versions of all components in the system. For detailed instructions on how to do this, see the sections “Installing Just the Checked Operating System and HAL for Windows XP and Windows Server 2003” or "Installing Just the Checked Operating System and HAL for Windows Vista and Later" in the WDK documentation.
Other Languages
This article is also available in the following languages: