Note
Access to this page requires authorization. You can try signing in or changing directories.
Access to this page requires authorization. You can try changing directories.
Goal
The goal of this article is to bring an updated version of the white paper Implementing WSUS with ISA Server 2004 to Manage Remote Clients.
Scenario
This article explains how to publish WSUS 3 SP2 located in a DMZ to deploy updates to clients located in the external network. In this scenario, WSUS will be behind Forefront TMG 2010 SP2. We will use the same topology presented in the article Deploy Windows Server Updates Services (WSUS) 3 SP2 on a DMZ Protected by Forefront TMG 2010 SP2. On this scenario, remote clients will be receiving updates from an Internal WSUS that is already in use in the internal network.
Configuring Forefront TMG 2010 SP2
In order to configure Forefront TMG 2010 for this scenario you will need the following:
- 1 Forefront TMG Server with three network adapters
- Apply the 3 Leg Template on Forefront TMG
- Configure the network relationship between internal and DMZ as “Route”
- A certificate (PFX file) installed on Windows Server where Forefront TMG is installed.
- For this example the certificate name is wsus.contoso.com
- The certificate must be installed in the computer container and you must have the private key.
- Forefront TMG and the remote client must trust the CA that issued this certificate
Note: if the certificate was issued by an internal CA (behind Forefront TMG) you will need to also publish the CRL so that external clients can retrieve this list. If you are using a public CA you will not need to perform this step.
Once you have that configured you can configure the Forefront TMG publishing rule for WSUS. Follow the steps below to configure this rule:
- Open Forefront TMG Management Console. Right click Firewall Policy, point to New and click Web Site Publishing Rule.
- On the Welcome to the New Web Publishing Wizard page type the rule name as shown below and click Next.

Figure 1
On the Select Rule Action page choose Allow as shown below and click Next.

Figure 2On the Publishing Type page keep the default selection (Publish a single Web site or load balancer) as shown below and click Next to continue.

Figure 3
- On the Server Connection Security page click Use non-secured connections to connect the published Web server or farm as shown in figure below and click Next to continue.

Figure 4
- In the Internal Publishing Details page type the internal WSUS Server name as shown below and click Next to continue.
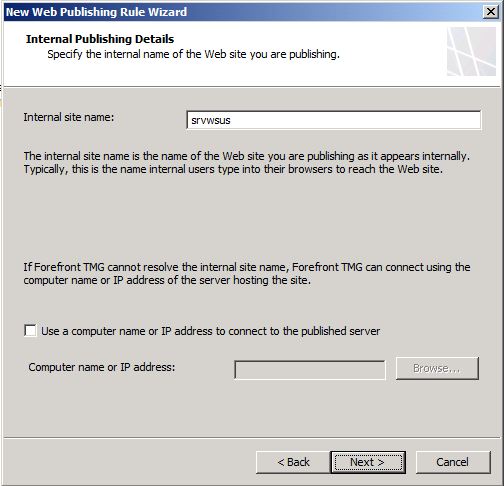
Figure 5
- In the Internal Publishing Details page type /* as shown below and click Next.
Note: It is important to mention that once we finish these steps we will remove this path and add the correct list of paths.
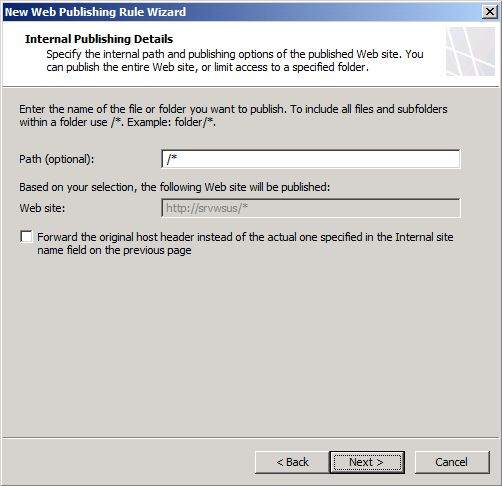
Figure 6
- In the Public Name Details page, type the public name that will be used by the remote clients to access WSUS Server (this name must match the subject name for the certificate installed on TMG) in the Public Name field as shown below and click Next.

Figure 7
- In the Select Web Listener page, click New, type a name for the web listener in the Welcome to the New Web Listener Wizard page and click Next.
- In the Client Connection Security page leave the default selection as shown below and click Next.

Figure 8
- In the Web Listener IP Address page click External and use the following decision matrix to choose the option that best fits with your scenario:
| Scenario | Steps to Use |
| First Web Listener in this TMG installation | In this case you can just select External and click Next. |
| There are others Web Listeners already configured in this TMG installation, HTTPS is in use by other Web Listener but there are multiple IP addresses in the External Adapter | Select External, click Select IP Addresses button and make sure to select an IP address that is not in use by another Web Listener. |
| There are other Web Listeners already configured in this TMG installation, there is only one IP address in this installation and HTTPS is not in use | In this case you can just select External and click Next. |
- Once you make your selection click Next and in the Listener SSL Certificates page click Select Certificate button. Make sure to select the certificate that matches the name that was used in step 8, click Select button and the Listener SSL Certificates page should appear as shown below. Click Next to continue.

Figure 9
13. In the Authentication Settings page click the drop down list, select No Authentication and click Next.
14. In the Single Sign On Settings page click Next and then click Finish.
15. Back to the Select Web Listener page, make sure that the new listener is selected and click Next.
16. In the Authentication Delegation page click the drop down list and select No delegation, but client may authenticate directly, click Next twice and click Finish.
Now that the rule is created there are some extra steps to make sure that the rule is correctly configured. Follow the steps below to customize this rule:
1. Right click on WSUS Publishing rule and click Properties.
2. Click Paths tab, remove the existing path by selecting it and click Remove button.
3. Click Add button and one by one, add the paths below:

Figure 10
- Once you finish adding all those paths click Apply and click Test Rule. The result should be similar to the one below:

Figure 11
- Notice that all tests passed, once you confirm that click Close.
- Click OK, click Apply, type a description and click Apply again.
Configuring WSUS
There is no additional change for the WSUS configuration if it is already configured using the guidelines from the article Deploy Windows Server Updates Services (WSUS) 3 SP2 on a DMZ Protected by Forefront TMG 2010 SP2.
Configuring Remote Clients
There are a set of pre-requisites to make sure that the remote clients are able to obtain updates from this published WSUS Server. The options are:
- They must be pointing to https://wsus.contoso.com/ update services as shown in the figure below:

Figure 12
- Client must trust the CA that issued the certificate to wsus.contoso.com and it should be installed in the correct container as shown below:

Figure 13
- External clients must be able to resolve this name (wsus.contoso.com)
Validating the Configuration on the Client Computer
After finishing the configuration you can start validating the configuration on the client computer by following the steps below:
1. Open command prompt and run the command gpupdate /force
2. Run the command rsop.msc and verify if the WSUS Server name is showing up in the Windows Update.
3. Click Start, All Programs and click Windows Update.
4. Click Check for Updates.
Note: if you have live logging enabled on Forefront TMG you should see the traffic pattern similar to the one below:

Figure 14
- On the client, open the file %windir%\windowsupdate.log and check if the client is trying to get update from the WSUS Server as shown below:
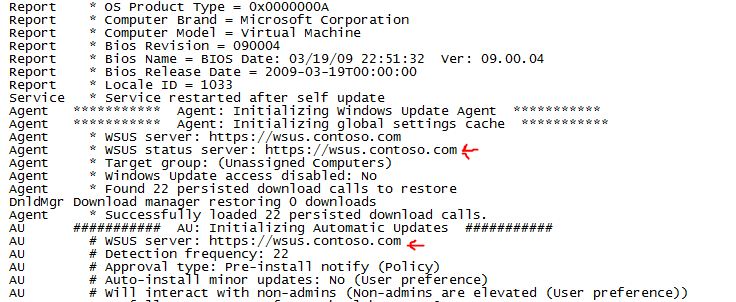
Figure 15
- Switch to WSUS Server and make sure that the computer is already reporting itself to WSUS.