Azure Cloud Services for Tello Drones: How to Control Tello by Azure C2D Messages
Introduction
Tello is a programmable mini drone, which is perfect and popular for beginners. Users can easily learn programming languages such as Scratch, Python, and Swift. Microsoft Azure provides a variety of cloud computing services including artificial intelligence, machine learning, IoT, storage, security, networking, media, integration and so on. For IoT applications, Azure IoT Hub provides a cloud-hosted solution back end to connect any device over the internet.
In this article, we will walk you through the steps required to control Tello remotely by Azure C2D (cloud to device) messages with Python Azure IoT SDK.
Prerequisites
- Tello Drone.
- Python Azure IoT Device SDK
- IDE: PyCharm Community
- Azure Subscription
Network Access for PC
Since Tello is connected to the PC by Wi-Fi, it is straightforward to know that our PC should equipped with two network interface cards, one is for connecting with Tello, and the other one is for connecting with Internet.
Fig. 1 Network Access
Azure cloud-to-device message
To send one-way notifications to a device app from your solution back end, we can make use of cloud-to-device messages. Messages can be retained by IoT Hub for up to 48 hours. In this project, we use Azure cloud-to-device messages to remotely control our Tello drones. For example, the “left” message is arranged to control Tello fly left, while the “right” message is used to control Tello fly right. For more details, please refer to the code below.
Install Python Packages and Create Azure IoTHub
In this project, we will install “djitellopy”, “azure-iot-device” and “Pygame” packages to accelerate the development. Please refer to the “Install Python Azure IoT SDK and Tello Python SDK” section of the article “Azure CloudServices for Tello Drones: How to send telemetry to Azure IoTHub” to complete this step. Also, you will see the detail steps to create an Azure IoTHub and register a new device.
Create and Debug Python Code on Your PC
Copy and paste the following code to your PyCharm project.
001.import asyncio
002.from azure.iot.device.aio import IoTHubDeviceClient
003.from djitellopy import tello
004.import KeyPressModule as kp
005.from time import sleep
006.
007.
008.kp.init()
009.me =  tello.Tello()
010.me.connect()
011.
012.
013.
014.
015.def getKeyboardInput():
016.    lr, fb, ud, yv =  0, 0, 0, 0
017.    speed =  15
018.
019.
020.    if kp.getKey("LEFT"):
021.        lr =  -speed
022.    elif kp.getKey("RIGHT"):
023.        lr =  speed
024.
025.
026.    if kp.getKey("UP"):
027.        fb =  speed
028.    elif kp.getKey("DOWN"):
029.        fb =  -speed
030.
031.
032.    if kp.getKey("w"):
033.        ud =  speed
034.    elif kp.getKey("s"):
035.        ud =  -speed
036.
037.
038.    if kp.getKey("a"):
039.        yv =  speed
040.    elif kp.getKey("d"):
041.        yv =  -speed
042.
043.
044.    if kp.getKey("q"):
045.        me.land()
046.    if kp.getKey("e"):
047.        me.takeoff()
048.
049.
050.    return [lr, fb, ud, yv]
051.
052.
053.
054.
055.# define behavior for receiving a message
056.# NOTE: this could be a function or a coroutine
057.def message_received_handler(message):
058.    lr, fb, ud, yv =  0, 0, 0, 0
059.    speed =  15
060.    print("the data in the message received was ")
061.    print(message.data)
062.    if message.data == b'left':
063.        lr =  -speed
064.    elif message.data == b'right':
065.        lr =  speed
066.
067.
068.    if message.data == b'forward':
069.        fb =  speed
070.    elif message.data == b'back':
071.        fb =  -speed
072.
073.
074.    if message.data == b'up':
075.        ud =  speed
076.    elif message.data == b'down':
077.        ud =  -speed
078.
079.
080.    if message.data == b'yaw':
081.        yv =  speed
082.    elif message.data == b'roll':
083.        yv =  -speed
084.
085.
086.    if message.data == b'land':
087.        me.land()
088.    if message.data == b'takeoff':
089.        me.takeoff()
090.
091.
092.    me.send_rc_control(lr, fb, ud, yv)
093.
094.
095.
096.
097.async def  main():
098.    conn_str =  "your connection string"
099.    # The client object is used to interact with your Azure IoT hub.
100.    device_client =  IoTHubDeviceClient.create_from_connection_string(conn_str)
101.
102.
103.    # connect the client.
104.    await device_client.connect()
105.
106.
107.    # set the message received handler on the client
108.    device_client.on_message_received =  message_received_handler
109.
110.
111.    while True:
112.        vals =  getKeyboardInput()
113.        # me.send_rc_control(vals[0], vals[1], vals[2], vals[3])
114.        sleep(0.1)
115.
116.
117.
118.
119.if __name__ == "__main__":
120.    asyncio.run(main())
In this Python application, we define a function getKeyboardInput to receive the keyboard input of the user, which return the control parameters to the loop in main function. However, the code that sending the control messages to the Tello is commented right now, since we focus on the control by azure cloud-to-device messages.
To achieve the control by azure cloud-to-device messages, we define a function message_received_handler to handle the messages. Then, the control command is sent to Tello by function send_rc_control. The four parameters of this function indicate the movement of the drone including left, right, up, down, forward, back, clockwise rotation, and counterclockwise rotation.
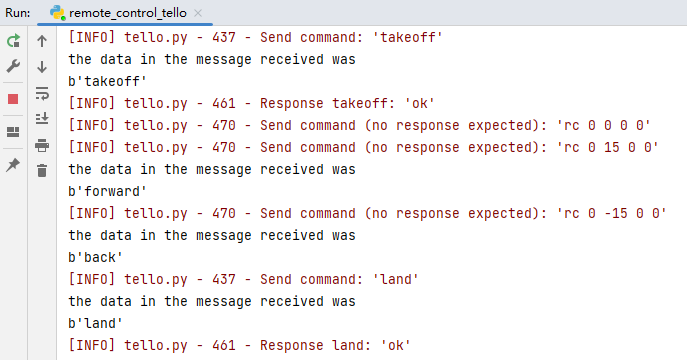
Please do substitute the connection string with yours that created before. Then, power on the Tello, connect your PC with Tello by Wi-Fi. You will notice that the LED on the Tello will flash quickly with yellow color. Press Run or Debug button to start the process. You will see the output in output window as shown in Fig. 2.
Fig. 2 Realtime Debug Information
Send cloud-to-device messages with Azure CLI
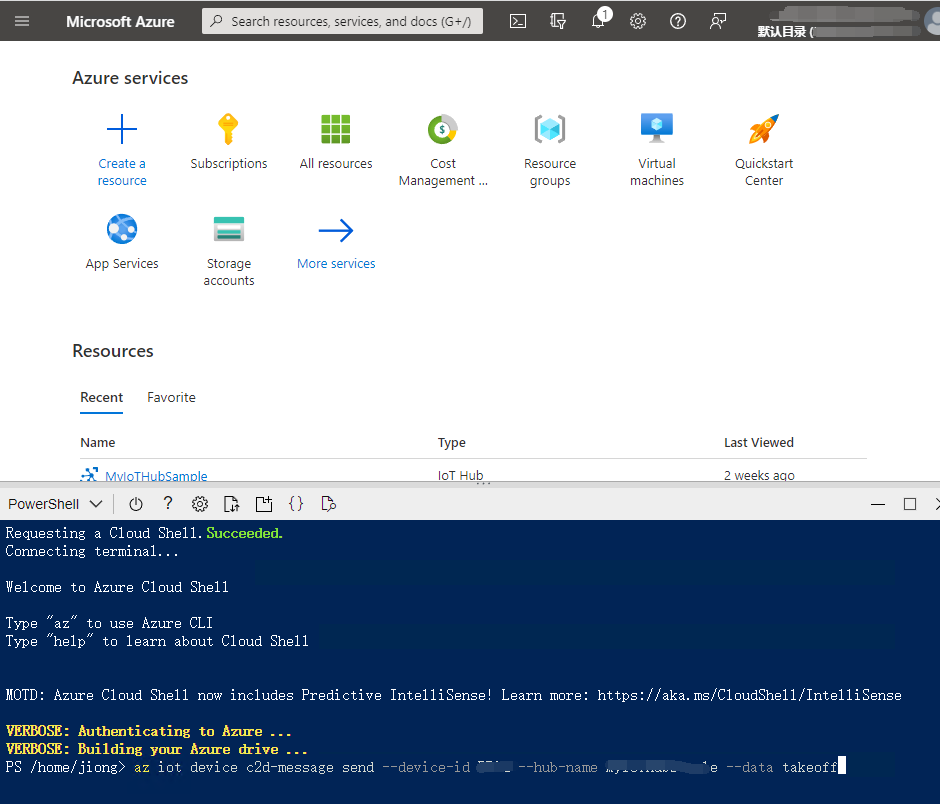
We can use Azure IoT Explorer to send cloud-to-device messages, as we mentioned in this article “Azure Cloud Services for Tello Drones: How to send telemetry to Azure IoTHub”. Additionally, we can directly send messages via AzureCLI. For example, we can send “takeoff” and “land” messages to the device to control it to fly and land respectively. The messages are organized as
az iot device c2d-message send --device-id <your device id> --hub-name <your IoT Hub name> --data <your message here>
please do substitute the device id and your IoT Hub name in the message. The example is shown in Fig. 3 below.
Fig. 3 Send cloud-to-device message via Azure CLI
Once the device application receives the message, it will be parsed and the corresponding commands will be sent to Tello to complete the control action. You will see the notification in the output window as shown in Fig. 4
Fig. 4 Debug Information
Summary
In this tutorial, we have presented the steps and Python codes on how to remotely control Tello drones by Azure cloud-to-device messages.
Resources
- MS Docs for Azure IoT Hub.
- MS Docs for Connect Raspberry Pi to Azure IoT Hub.
- MS Docs for cloud-to-device messages.
- MS Docs for Azure CLI.
See Also
Azure Cloud Services for Tello Drones: How to send telemetry to Azure IoTHub


