WPF/Entity Framework Core simple data validation (C#)
Introduction
Using the following article, WPF/Entity Framework Core primer (C#) learn how to data annotations to validate entities that are marked as modified, removed and added. In addition, synchronous operations become asynchronous operations to ensure the user interface remains responsive while reading and saving data to the database.
Synchronous to asynchronous
Moving to asynchronous read of data allows a user interface to remain responsive and in most cases is simple to implement. For instance in part one of this series employee data loaded as follows.
var employeeCollection = new  ObservableCollection<Employees>(Context.Employees.AsQueryable());
EmployeeGrid.ItemsSource = employeeCollection;
To read data asynchronously change the event signature from
protected override void OnContentRendered(EventArgs e)
To include async.
protected override async void OnContentRendered(EventArgs e)
Finally change the call above to which now reads data asynchronously.
var employeeCollection = new  ObservableCollection<Employees>();

await Task.Run(async () =>
{
    employeeCollection = new  ObservableCollection<Employees>(
        await Context.Employees.ToListAsync());
});
For saving changes, change the click event signature from
private void SaveChangesButton_Click(object sender, RoutedEventArgs e)
To
private async void SaveChangesButton_Click(object sender, RoutedEventArgs e)
Then replace Context.SaveChanges() to
await Task.Run(async () =>
{
    await Context.SaveChangesAsync();
});
User interface concerns
If the data take a while to load it would not be good if the save button was pressed or an attempt to perform a search. Handling the save issue set IsEnabled to false.
<Button x:Name="SaveButton"
    Grid.Column="1"
    HorizontalAlignment="Left"
    Content="Save"
    Width="70" IsEnabled="False"
    Margin="159,3,0,2" Height="27" Grid.ColumnSpan="2"
    Click="SaveChangesButton_Click"/>
Once data has been loaded enable the button.
SaveButton.IsEnabled = true;
Validating changes
Validation can be done in several places, for this article either by implementing IDataErrorInfo Interface or data annotations. In reality both can be used and extended past what is presented here.
DataGrid expose errors
In the last version of Employee class this was the signature.
public partial class Employees : INotifyPropertyChanged
To propagate validation issues to the user interface add IDataErrorInfo to the class.
public partial class Employees : INotifyPropertyChanged, IDataErrorInfo
Which requires the following members. this[string columnName] will receive a property name as a string which is interrogated in a switch inspecting for empty values and if found are returned in this case to the window hosting the DataGrid.
public string  Error
{
    get => throw new  NotImplementedException();
}
public string  this[string columnName]
{
    get
    {
        string errorMessage = null;
        switch (columnName)
        {
            case "FirstName":
                if (String.IsNullOrWhiteSpace(FirstName))
                {
                    errorMessage = "First Name is required.";
                }
                break;
            case "LastName":
                if (String.IsNullOrWhiteSpace(LastName))
                {
                    errorMessage = "Last Name is required.";
                }
                break;
        }
        return errorMessage;
    }
}
Modify the FirstName and LastName columns in the DataGrid where Binding.ValidatesOnDataErrors property gets the error message from the code above.
<DataGridTextColumn
    Header="First"
    Binding="{Binding FirstName, ValidatesOnDataErrors=True}"
    Width="*"  >
</DataGridTextColumn>

<DataGridTextColumn
    Header="Last"
    Binding="{Binding LastName, ValidatesOnDataErrors=True}"
    Width="*"  />
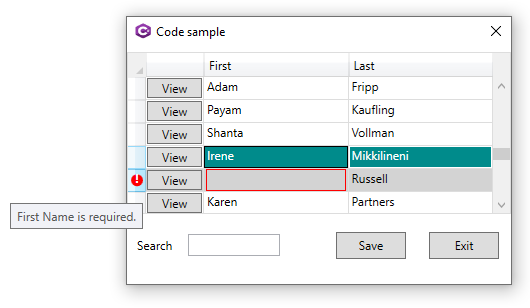
Build, run the application and when the data appears select a row and edit first or last name and empty the contents followed by leaving the cell. A red rectangle surrounds the cell and no other editing is permitted. To the user they have no idea what is wrong.
Adding a visual clue is in order which can be done using DataGrid.RowValidationErrorTemplate as shown in the following Microsoft documentation.
<DataGrid.RowValidationErrorTemplate>
  <ControlTemplate>
    <Grid Margin="0,-2,0,-2"
      ToolTip="{Binding RelativeSource={RelativeSource
      FindAncestor, AncestorType={x:Type DataGridRow}},
      Path=(Validation.Errors)[0].ErrorContent}">
      <Ellipse StrokeThickness="0" Fill="Red"
        Width="{TemplateBinding FontSize}"
        Height="{TemplateBinding FontSize}" />
      <TextBlock Text="!" FontSize="{TemplateBinding FontSize}"
        FontWeight="Bold" Foreground="White"
        HorizontalAlignment="Center"  />
    </Grid>
  </ControlTemplate>
</DataGrid.RowValidationErrorTemplate>
Since in the source code for this project styles are placed into App.xaml the above style can be placed here too with a few modifications.
<Setter Property="RowValidationErrorTemplate">
    <Setter.Value>
        <ControlTemplate>
            <Grid
                Margin="0,-2,0,-2"
                ToolTip="{Binding RelativeSource={RelativeSource FindAncestor, AncestorType={x:Type DataGridRow}},
                Path=(Validation.Errors)[0].ErrorContent}">

                <Ellipse
                    StrokeThickness="0"
                    Fill="Red"
                    Width="{TemplateBinding FontSize}"
                    Height="{TemplateBinding FontSize}" />

                <TextBlock
                    Text="!"
                    FontSize="{TemplateBinding FontSize}"
                    FontWeight="Bold"
                    Foreground="White"
                    HorizontalAlignment="Center"  />
            </Grid>
        </ControlTemplate>

    </Setter.Value>
</Setter>
Finally place the following style into App.xml to complete the formatting.
<Style x:Key="ErrorStyle" TargetType="{x:Type TextBox}">
    <Setter Property="Padding" Value="-2"/>
    <Style.Triggers>
        <Trigger Property="Validation.HasError" Value="True">
            <Setter Property="Background" Value="Red"/>
            <Setter Property="ToolTip" Value="{Binding RelativeSource={RelativeSource Self},
                Path=(Validation.Errors)[0].ErrorContent}"/>
        </Trigger>
    </Style.Triggers>
</Style>
Example when a cell is empty.
Entity Framework and data annotations
Another method is to validate information is by annotating properties in the class, in this case employees. Note [Required] indicates a required property, if not checked when performing saves back to the database an exception will be thrown. StringLength indicates the max length the column accepts in the back end table, if the value was in this case more than 20 characters the database will thrown a runtime exception.
[Required]
[StringLength(20, ErrorMessage = "Description Max Length is 20")]
public string  FirstName
{
    get => _firstName;
    set
    {
        if (value == _firstName) return;
        _firstName = value;
        OnPropertyChanged();
    }
}
[Required]
public string  LastName
{
    get => _lastName;
    set
    {
        if (value == _lastName) return;
        _lastName = value;
        OnPropertyChanged();
    }
}
See the following for other attributes available from Microsoft or create your own as provided in the following project included in the article's source code. One example is a custom password validator.
public class  PasswordCheck : ValidationAttribute
{
    public override  bool IsValid(object value)
    {
        var validPassword = false;
        var reason = string.Empty;
        string password = (value == null) ? string.Empty : value.ToString();

        if (string.IsNullOrWhiteSpace(password) || password.Length < 6)
        {
            reason = "new password must be at least 6 characters long. ";
        }
        else
        {
            Regex pattern = new  Regex("((?=.*\\d)(?=.*[a-z])(?=.*[A-Z])(?=.*[@#$%]).{6,20})");
            if (!(pattern.IsMatch(password)))
            {
                reason += "Your new password must contain at least 1 symbol character and number.";
            }
            else
            {
                validPassword = true;
            }
        }

        if (validPassword)
        {
            return true;
        }
        else
        {
            return false;
        }

    }

}
To validate prior to saving changes work with the Entity Framework ChangeTracker, look at deleted, modified and added.
IEnumerable<EntityEntry> modified = Context.ChangeTracker.Entries().Where(entry =>
    entry.State == EntityState.Deleted ||
    entry.State == EntityState.Modified ||
    entry.State == EntityState.Added);
Iterate the entities.
foreach (var entityEntry in modified)
{
    var employee = (Employees) entityEntry.Entity;

    EntityValidationResult validationResult = ValidationHelper.ValidateEntity(employee);
    if (validationResult.HasError)
    {
        InspectEntities(entityEntry);
        builderMessages.AppendLine($"{employee.EmployeeId} - {validationResult.ErrorMessageList()}");
    }
}
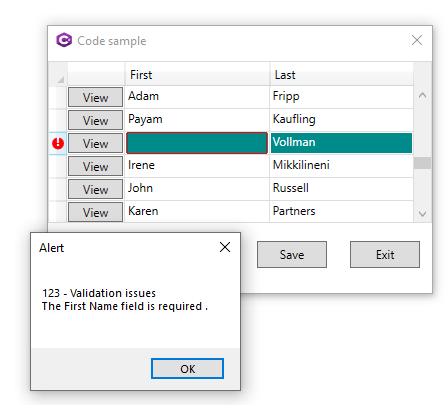
If there are validation issues present them to the user. If the code did not have the validation via IDataErrorInfo it's possible to have several validation issues while having IDataErrorInfo implemented only one issue at a time.
Validating entities is done by first having rules from database tables column rules which range from a column is required, not nullable, maximum and minimum string lengths for strings, valid dates, date ranges, numeric ranges, is a value a valid email address are basic rules. Next properties in models are annotated which applies column rules to properties.
Validation class project
Included with the source code is a class project which can be used in any Windows form or WPF project to perform validation using Data Annotations. Consider keeping custom rules in this project so they are reusable in other projects.
Inspecting values
While developing an application and working with validation during iterating entities from the DbContext ChangeTracker (as per above) the following method offers a look into changed items for both original and current values of properties.
private void  InspectEntities(EntityEntry entityEntry)
{
    foreach (var property in entityEntry.Metadata.GetProperties())
    {
        var originalValue = entityEntry.Property(property.Name).OriginalValue;
        var currentValue = entityEntry.Property(property.Name).CurrentValue;
        if (originalValue != null || currentValue != null)
        {
            if (!currentValue.Equals(originalValue))
            {
                Console.WriteLine($"{property.Name}: Original: '{originalValue}', Current: '{currentValue}'");
            }
        }
        else
        {
            // TODO handle nulls
        }

    }
}
Developing validation tip
Isolate data operations from the user interface either with unit testing or simply create a method to work through testing validation of objects which is the next best thing to unit testing while unit testing allows a developer to test and re-test code rather than keeping a test method in production code.
Example, adding a new entity.
Try
- Passing nothing for first and last name.
- Pass an invalid email address format
- etc.
private void  AddHardCodedEmployee()
{
    // create new employee
    var employee = new  Employees()
    {
        FirstName = "Jim",
        LastName = "Lewis",
        Email = "jlewis@comcast.net",
        HireDate = new  DateTime(2012, 3, 14),
        JobId = 4,
        Salary = 100000,
        DepartmentId = 9
    };

    EntityValidationResult validationResult = ValidationHelper.ValidateEntity(employee);
    if (validationResult.HasError)
    {
        var errors = validationResult.ErrorMessageList();
        MessageBox(errors,"Validation errors");
        return;
    }
    else
    {
        // add and set state for change tracker
        Context.Entry(employee).State = EntityState.Added;
        // add employee to the grid
        var test = EmployeeGrid.ItemsSource;
        ((ObservableCollection<Employees>)EmployeeGrid.ItemsSource).Add(employee);
        MessageBox("Added");
    }
}
Summary
In this part of the series, basic validation been presented along with how to style a DataGrid to present validation issues to the user. Changing from synchronous to asynchronous data operations to keep the user interface responsive.
Where to go from here is to first get familiar with what has been presented. If more is needed to consider looking at MVVM pattern.
See also
- Easy MVVM examples (in extreme detail)
- WPF ListBox data template/styling
- WPF: get all controls of a specific type using C#
- MVVMExtraLite Companion guide
- Displaying and Editing Many-to-Many Relational Data in a DataGrid
- WPF/C# Setting visibility of controls based off another control
- TechNet WPF portal
Source code
Clone or download source from the following GitHub repository which is a different branch then the first article. Once opened in Visual Studio run the data script, in solution explorer run restore NuGet packages.


