Exchange: How to Restore Exchange Database Availability Group (DAG)?
Business continuity, disaster recovery and user access are crucial in today’s business. Since most of the communication is done through emails, it’s vital for a company to have a low expected downtime. One cannot run a business with the only Exchange Server down. It may result in the loss of a good number of hours to recover the server, with the possibility of data loss. Apart from data loss, the company will lose a lot of business and could be a catastrophe. Microsoft Exchange Server introduces the Database Availability Group (DAG) that can help in business continuity, user access and disaster recovery. With Exchange Server DAG, you one can create a replica of mailbox database of all the members in the system. If one server goes down, the users will automatically switch to another member server. DAG can also be used to load balance user access where one can configure the primary mailbox database of some users on one server and the rest of the users on another server.
All works fine and the system is great, but what happens when it fails, and you need to recover a failed member server in your Exchange system? Taking into consideration a setup of two Exchange Server 2016 DAG systems, we will go through the process to recover a failed member server in the DAG. If the second server, which in this case we call it EX02 is failed, we need to make sure that EX01 is healthy and there are no corrupted exchange databases or issues. Some common reasons why a member server would fail are:
- Hardware Issue
- Software malfunction from a faulty update
- Third-party applications which are not application aware
- Malware or Ransomware
- Sudden power cut
First, you need to check if the user has the right permissions to see Mailbox Database copies. To do so,you must make sure that the user is assigned the role of Organization Management and Database Copies.
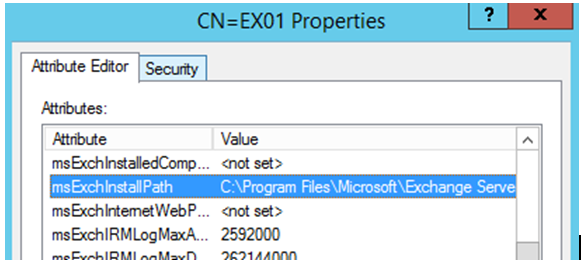
If the installation of Exchange Server was not done in the default folder i.e. %programfiles%\Microsoft\Exchange Server\V15, then you need to keep it handy. If you don’t know the path, then open ADSIEDIT.MSC and browse to the following Path.Here EX01 is the name of the Exchange Server, the domain is Mail.lan and the Organization name is ORG001.
Configuration
CN=Configuration,DC=mail,DC=lan
CN=Services
CN=Microsoft Exchange
CN=ORG001
CN=Administrative Groups
CN=Exchange Administrative Groups
CN=Servers
CN=EX01
Then right-click on the EX01 object and click Properties. In the **msExchInstallPath,**youwill find the path where the Exchange Server is installed.
Note: Be careful while using ADSIEDIT.MSC as any changes here are irreversible. It will cost you hard if you change anything out of place.
After all the above is done and the databases/servers are healthy, you need to start the process by removing the database copies from the failed server inthe DAG. This can be done by using the Remove-MailboxDatabaseCopy as below.
Get-MailboxDatabaseCopyStatus -Server EX02 | Remove-MailboxDatabaseCopy -Confirm:$False
The next step is to removethe server from the DAG membership by using Remove-DatabaseAvailabilityGroupServer. For this to work, you must use the -ConfigurationOnlyparameter so that the Active Directory doesn’t need to communicate with the failed server.
Remove-DatabaseAvailabilityGroupServer -Identity DAG01 -MailboxServer EX02 -ConfigurationOnly
When this is done and all went well with no issues,you need to evict the server from the Cluster.This can be done by using the Remove-ClusterNode cmdlet, as below.
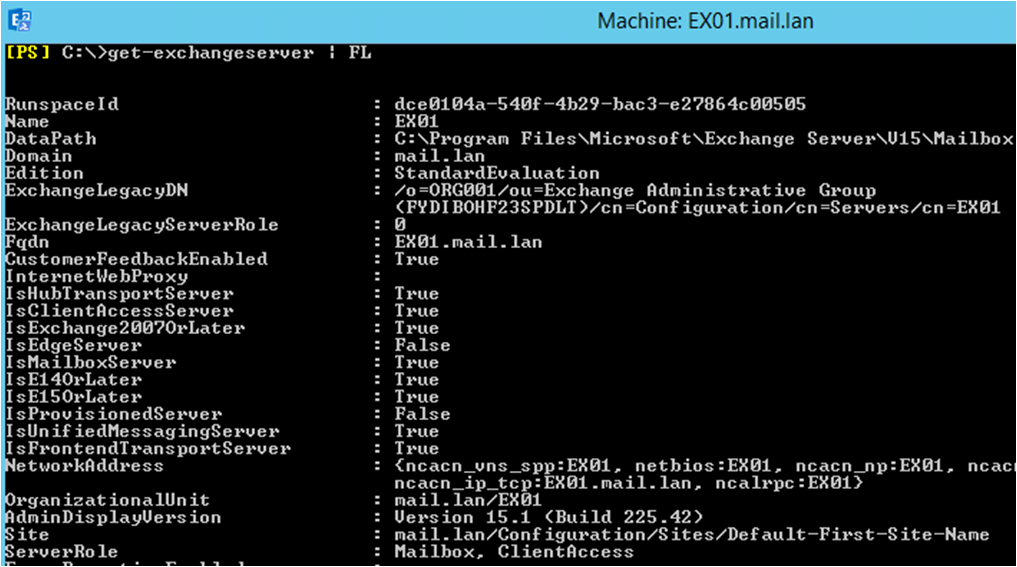
Now you have a DAG setup with only one Exchange Server member. You now need to rebuild the failed server (in this case it is EX02). Using the same computer name, install the server and the patches in-line with the other Exchange Server. Join it to the domain and all the necessary changes in the network and storage to match the previous server. Before going ahead and installing the Exchange Server 2016, the same version and build must be installed. This information can be achieved by running the Get-ExchangeServercmdlet (as given below) and notice the AdminDisplayVersion parameter.
At this stage, you have the server re-installed, joined to the domain, all necessary updates installed, and the installation of Exchange Server in-hand. Open command prompt as Administrator and launch the installation (as given below), noting the recoverserver parameter in the command.
After the installation, restart the server.The next step is to add the server to DAG by using PowerShell cmdlet Add-DatabaseAvailabilityGroupServer.
Add-DatabaseAvailabilityGroupServer -Identity DAG01 -MailboxServer EX02
This will take you to the step where youhave recovered the server, but with nodatabase copies on it. To add the database copies on the newly added server, use theAdd-MailboxDatabaseCopycmdlet, as given below.
Add-MailboxDatabaseCopy -Identity DBX01 -MailboxServer EX02
When the command is executed, it is best to restart the Information Store Service. After this, your database should start seeding on the new server. Depending on the size and performance of the original and new server, this will take some time. Obviously, taking into consideration the size of database, bandwidth between servers and load from the users.
Of course, the above method works when everything goes smooth. This includes taking into consideration that the Active Directory, network, primary server and its databases are healthy. Also, when this operation is complete and you run the Get-MailboxDatabaseCopyStatus to get information on the copy status, the databases are synchronizing between them and there are no issues.


