Note
Access to this page requires authorization. You can try signing in or changing directories.
Access to this page requires authorization. You can try changing directories.
Introduction
In this article we will learn on how to getting started and work with new Mobile Blazor Binding for developing Cross-Platform Mobile application using Blazor, here in this article
· How to install Mobile Blazor Binding
· we will create our first Mobile Blazor Binding Application
· Create an simple Mobile Game application to Find my Name with 5 attempts.
· Add Text to Speech functionality using the Xamarin Essentials..
On Jan 14th 2020 Microsoft introduced new Experimental Mobile Blazor Binding for developing Cross-Platform Mobile application using Blazor. Yes, for now this is only experimental release but still we can start working and play to learn on Mobile Blazor Binding to develop our Mobile application using the Blazor code. For all the C# programmer this will be great start to develop an mobile application using C# Code and not much need to know about Xamarine ,Andorid or IOS development.
Mobile Blazor Binding is the combination of Blazor and Xamarin.Forms .UI design part is based on the Xamarin.Forms UI Controls and the components and code part is based on the Blazor. The combination of Blazor, and Xamarin.Forms allows the user to create Native Mobile app development for both IOS and Android using the Web programming pattern. All the design and code part for both Andorid and IOS can be made from the Blazor project and using the Android and IOS project the app can be run on appropriate emulator or device.
Getting Started with Mobile Blazor Binding Application
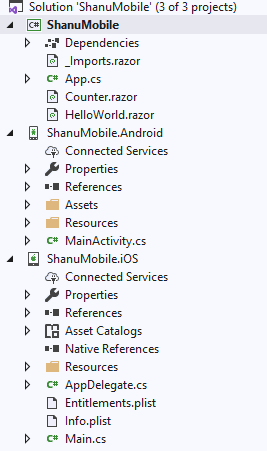
When we create the Mobile Blazor Binding Blazor application we can see by default 3 project will be added in our solution. In solution we can find 3 projects as
Blazor Project
The Blazor project where we design our page UI and do all business logic for mobile application development using Blazor. Note for the UI design part we will be using the same Xamarin.Forms UI controls in our Razor pages.In our code part we can see more in detail about adding new page creating our own Game using Blazor code.
Android Project
We can also see the Android project has been added in our solution and this project is used for building and running the Blazor application in Android Emulator or on the Android Device.
3) IOS Project
We can also see the IOS project has been added in our solution and this project is used for building and running the Blazor application in IOS Simulator or on the IOS Device.
Prerequisites
In order to work with Mobile Blazor Binding You need to have .NET Core 3.0 or higher version SDK,You need to have Visual Studio or Visual Studio for Mac,ASP.NET Web Development and Mobile Development with Xamarine.Forms Workloads installed in your computer. Here for my article have installed Visual Studio 2019 latest version and used .NET Core 3.0 SDK,
Installing Mobile Blazor Binding Template
** **After Installing the prerequistes you are ready to work with Mobile Blazor Binding, but for working with Mobile Blazor Binding we need to template to be installed for this open your command prompt.
Click Windows Start: Type CMD and press enter in the command prompt.
In the command prompt enter the below code to install the Microsoft MobileBlazorBindings Templates
We need to run the below code in CMD or from the shell
dotnet new -i Microsoft.MobileBlazorBindings.Templates::0.1.173-beta
wait for few sec for the template to be installed.
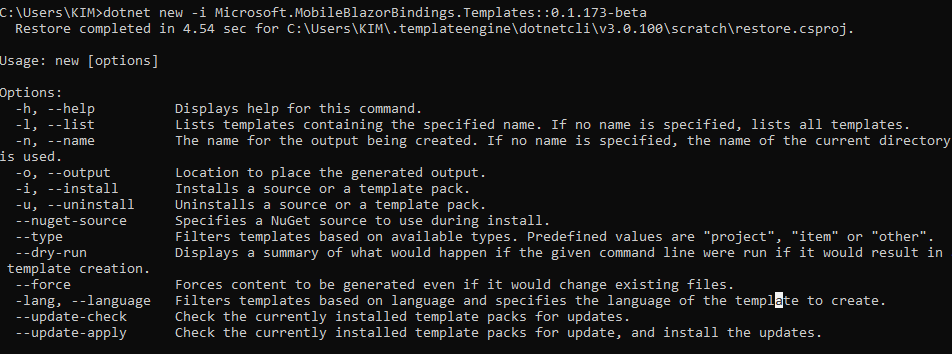
Now we have installed the Mobile Blazor Binding Template and its time for us to create our first Mobile Blazor Binding application.
Code part
Creating Mobile Blazor Binding Applicatoin
Click Windows Start: Type CMD and press enter in the command prompt.
From the Command prompt go to your Drive and Folder in where you want to create the applicaiotn.
Here I have created folder under D:> Drive and I will create my project under the Android/Blazor Folder.
For creating the Project in the command prompt run the below command ,
dotnet new mobileblazorbindings -o ShanuMobile
Note that ShanuMobile is the projectName ,You can add your needed project name over there.
Mobile Blazor Binding Solution Structure:
When we create the Mobile Blazor Binding Blazor application we can see by default 3 project will be added in our solution. In solution we can find 3 projects as
1) ** ** Blazor Project
The Blazor project where we design our page UI and do all business logic for mobile application development using Blazor. Note for the UI design part we will be using the same Xamarin.Forms UI controls in our Razor pages.In our code part we can see more in detail about adding new page creating our own Game using Blazor code.
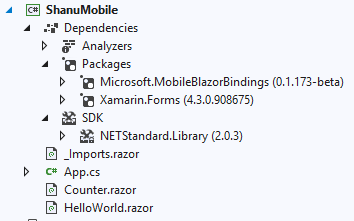
Here we have created the project name as “ShanuMobile” has been created as the Blazor project and in this project, we can see the Microsoift.MobileBlazorBinding and Xamarin.Forms Packages has been added by default.Also the Blazor project contains the files as
· Imports.razor
The Import.razor file has the default needed import of Xamarin.Forums and MobileBlazorBindings to create native mobile app for Android and IOS using the Xamarin.Forms with Blazor code.
· App.cs
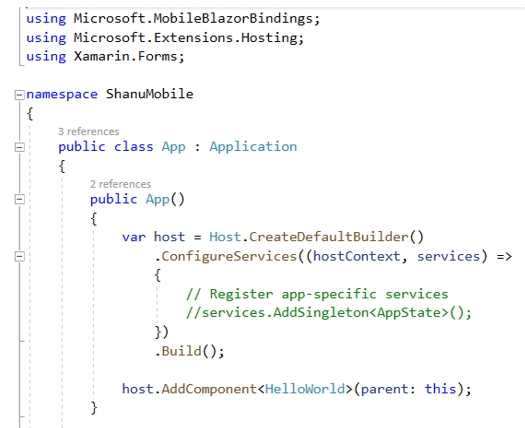
In the App.cs class we will give the default razor page to be loaded, here in the below code we can see as HellowWorldRazor page has been added to show by default.
· Counter.Razor
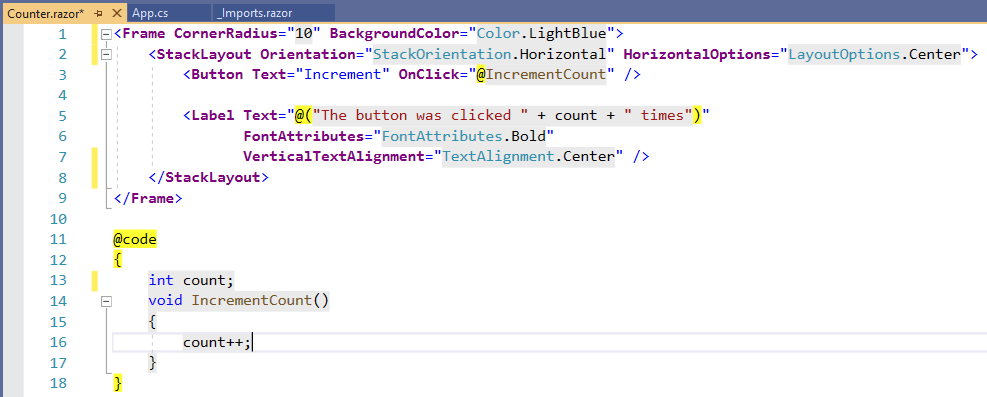
By default we can see the Counter.Razor page has been added .Here in this page we can see the Xamarin.Forums UI controls has been used example like StaclkLayout also we can see the Blazor code functions has been added to perform the increment in the button click event.
· HellowWorld.Razor
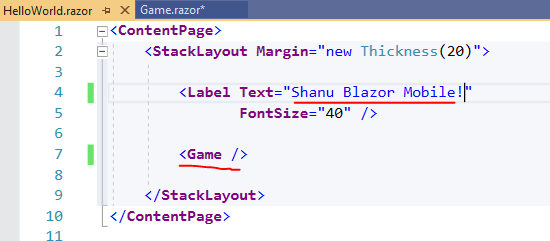
In the HellowWorld razor page we can see as the page was made as the ContentPage and this page will be loaded first and added the Counter page inside the content page of Helloworld to perform the Increment functions.

1) Android Project
We can also see the Android project has been added in our solution and this project is used for building and running the Blazor application in Android Emulator or on the Android Device.
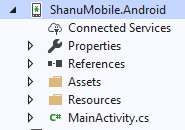
Here we have created the project name as “ShanuMobile” and the Android project was been created by default as ShanuMobile.Android.
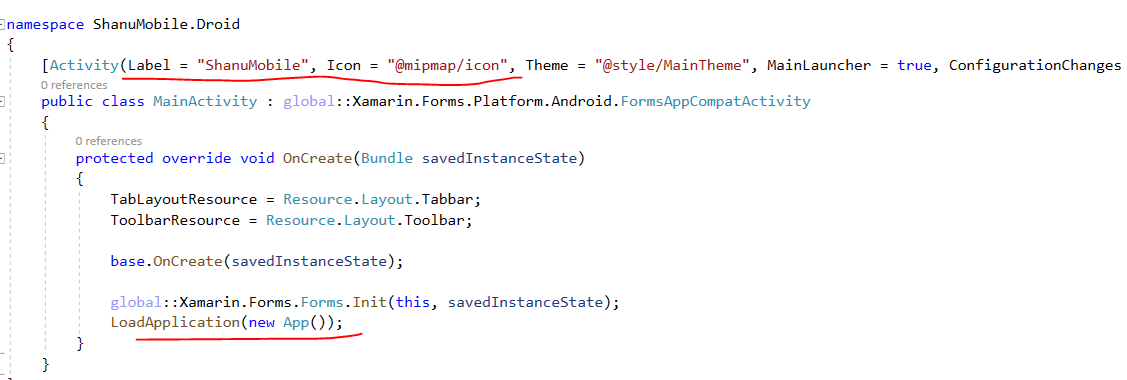
Here we don’t have much part to deal with as we will be adding our Balzor App in MainActivity to run our mobile application in the Android, We can also add the App display Name in Label here by default the project name has been added in the Label ,You can change it if need also we can change the ocon for the app from the MainActivity.In order to run our Blazor app in Android mobile Device or in Emulator then set the Android project as Startup Project.
1) IOS Project
We can also see the IOS project has been added in our solution and this project is used for building and running the Blazor application in IOS Simulator or on the IOS Device.
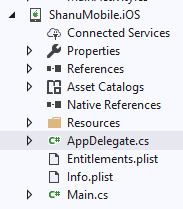
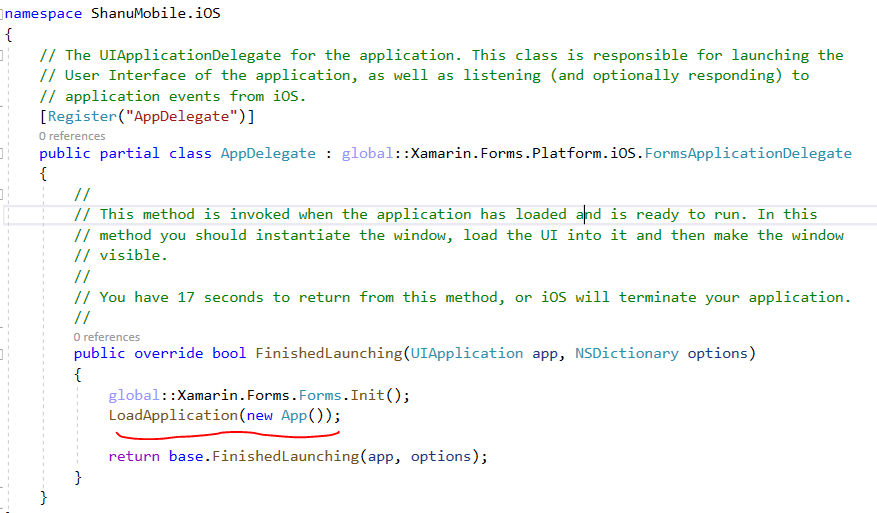
Here we don’t have much part to deal with as we will be adding our Balzor App in AppDelegate to run our mobile application in the IOS.In order to run our Blazor app in IOS mobile Device or in Simulator then set the IOS project as Startup Project.
Run the Blazor APP in Android:
Now we can see the Counter Demo in Android Device or in the Android Emulator for this first Set the Android project as Startup Project.For this right click the Android project and click on “Set as Startup Project”. You can run the application in the Android connected Device via USB or by the installed Android Emulator.
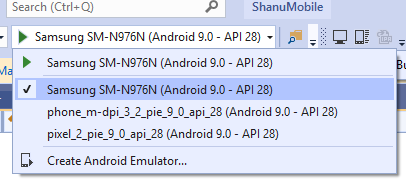
Here I have connected my Samsung Galaxy Not 10 mobile via USB and selected my mobile device to run the Blazor Mobile Applicatoin.You can connect to your Android device or select or Install Android Emulator to run in the emulator.
Once selected our Android Device run the application and wait for few second ,We can see our mobile application will be running in our connected Android mobile device.
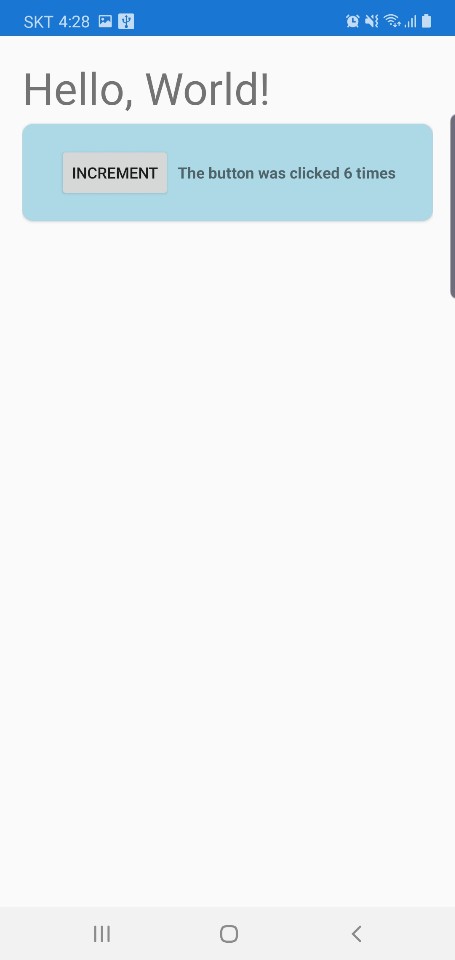
Find My Name Mobile Game Creation using Blazor
What is Find My Name Puzzle Game
Find My Name Puzzle Game is a quiz game where the user needs to select my total character of name from the Hidden Character. I have a set of 12 characters, for example “ABSDEHGZNXCU”. In this total character my name character “SHANU” has been added. Whenever the user clicks on a New Puzzle Game button, I will shuffle all the characters and made 12 buttons with the “?” symbol for all the characters and in button click event we will pass the character from 12 char as array from 0 to11 for each button stating from the button 1 to 12 .
The rule is simple as the user will have only 5 chance and within these 5 chances, he/she need to find my name as “SHANU” each button will have one character with in the “ABSDEHGZNXCU”. The first button will have the first character and second button will have the second character like this up to 12 buttons will have one character from 1 to 12. The tricky thing is when ever the user clicks on the start game, we will shuffle the 2 characters arrangements and bind randomly the character to buttons. The button will not show the hidden character and the button will have the text as “?” The user needs to find exactly my name as “Shanu” from the 5 attempts. If he found means He/She won the Game else Loss the Game. There is no limit as user can try any no of time and play the game. This is kind of Puzzle fun game.
In this game we will also use the Xamarin.Essentials for using the Text to Speech functionality in order use speech functionality in Game Start and Won/Loss message announcement.By adding the speech functionality the game will be more interactive and fun to play by the end users.
Step 1: Game.Razor page Add:
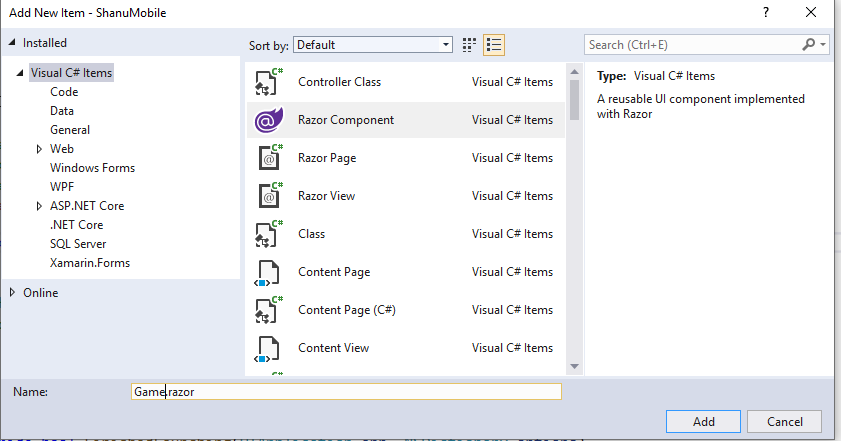
Right click the Blazor Project and click on Add New Item and select the Razor Componentand give the name as Game.razor and click Add.
Step 2: Adding Xamarin.Essentials package to the Blazor Project
For using the Text to speech functionality in our Mobile Game App we need to install the Xamarin.Essentials packages to the blazor project for this right click on the Blazor project and click on Manage NUGet Packages .
Select Browse and search for the Xamarin Essentials and click on the Install. Wait for few second for the packages install on your project.
Step 3: Game Design Part coding
Now open the Game.Razor page and replace the code with below code for our mobile game design.
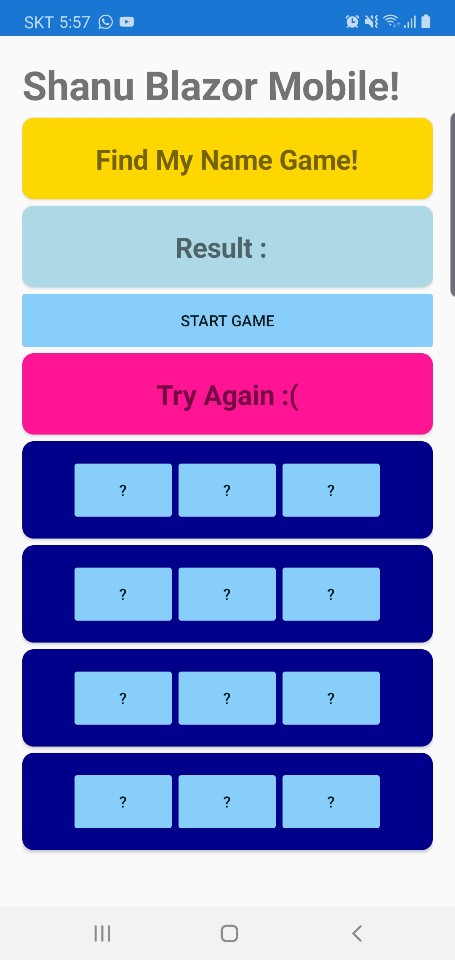
Here in the below code first we add the Game Title as “Find My Name Game” in label, Next In the label we display the return result values from the blazor code part of the game. , Next we add the Start Game button which calles the ShowButton Method from the code to shuffle the puzzle string and bind the result to buttons and to use the Text to speech functionality. Next, we add one more label to show the final result message as the user Won or Lost the game.And finnaly we check for the New game and display 12 buttons to play the game and in each button click we call the Find Result by passing parameter as character Array from 0 to 11 for each button starting from 1 to 12.In the Find Result method we check for the result and announce the result using text to speech also display the message as Won or Loss to the user.
<Frame CornerRadius="10" BackgroundColor="Color.Gold">

    <StackLayout Orientation="StackOrientation.Horizontal" HorizontalOptions="LayoutOptions.Center">
        <Label Text="Find My Name Game!"
               FontAttributes="FontAttributes.Bold"
               VerticalTextAlignment="TextAlignment.Center" FontSize="25" />
    </StackLayout>

</Frame>

<Frame CornerRadius="10" BackgroundColor="Color.LightBlue">

    <StackLayout Orientation="StackOrientation.Horizontal" HorizontalOptions="LayoutOptions.Center">
        <Label Text="Result : "
               FontAttributes="FontAttributes.Bold"
               VerticalTextAlignment="TextAlignment.Center" FontSize="25" />

        <Label Text="@results"
               FontAttributes="FontAttributes.Bold"
               VerticalTextAlignment="TextAlignment.Center" FontSize="25" />

    </StackLayout>

</Frame>

<Button Text="Start Game" OnClick="@showButtons" BackgroundColor="Color.LightSkyBlue" />


<Frame CornerRadius="10" BackgroundColor="Color.DeepPink">

    <StackLayout Orientation="StackOrientation.Horizontal" HorizontalOptions="LayoutOptions.Center">

        <Label Text="@messages"
               FontAttributes="FontAttributes.Bold"
               VerticalTextAlignment="TextAlignment.Center" FontSize="25" />

    </StackLayout>

</Frame>

@if (findmyNameChar.Length > 0)
{

    <Frame CornerRadius="10" BackgroundColor="Color.DarkBlue">
        <StackLayout Orientation="StackOrientation.Horizontal" HorizontalOptions="LayoutOptions.Center">
            <Button Text="?" BackgroundColor="Color.LightSkyBlue" OnClick="() => findResult(findmyNameChar[0].ToString())" />

            <Button Text="?" BackgroundColor="Color.LightSkyBlue" OnClick="() => findResult(findmyNameChar[1].ToString())" />

            <Button Text="?" BackgroundColor="Color.LightSkyBlue" OnClick="() => findResult(findmyNameChar[2].ToString())" />
        </StackLayout>
    </Frame>


    <Frame CornerRadius="10" BackgroundColor="Color.DarkBlue">
        <StackLayout Orientation="StackOrientation.Horizontal" HorizontalOptions="LayoutOptions.Center">
            <Button Text="?" BackgroundColor="Color.LightSkyBlue" OnClick="() => findResult(findmyNameChar[3].ToString())" />

            <Button Text="?" BackgroundColor="Color.LightSkyBlue" OnClick="() => findResult(findmyNameChar[4].ToString())" />

            <Button Text="?" BackgroundColor="Color.LightSkyBlue" OnClick="() => findResult(findmyNameChar[5].ToString())" />
        </StackLayout>
    </Frame>


    <Frame CornerRadius="10" BackgroundColor="Color.DarkBlue">
        <StackLayout Orientation="StackOrientation.Horizontal" HorizontalOptions="LayoutOptions.Center">
            <Button Text="?" BackgroundColor="Color.LightSkyBlue" OnClick="() => findResult(findmyNameChar[6].ToString())" />

            <Button Text="?" BackgroundColor="Color.LightSkyBlue" OnClick="() => findResult(findmyNameChar[7].ToString())" />

            <Button Text="?" BackgroundColor="Color.LightSkyBlue" OnClick="() => findResult(findmyNameChar[8].ToString())" />
        </StackLayout>
    </Frame>


    <Frame CornerRadius="10" BackgroundColor="Color.DarkBlue">
        <StackLayout Orientation="StackOrientation.Horizontal" HorizontalOptions="LayoutOptions.Center">
            <Button Text="?" BackgroundColor="Color.LightSkyBlue" OnClick="() => findResult(findmyNameChar[9].ToString())" />

            <Button Text="?" BackgroundColor="Color.LightSkyBlue" OnClick="() => findResult(findmyNameChar[10].ToString())" />

            <Button Text="?" BackgroundColor="Color.LightSkyBlue" OnClick="() => findResult(findmyNameChar[11].ToString())" />
        </StackLayout>
    </Frame>

}
Step 4: Game Design Part coding
Now open the Game.Razor page and replace the code with below code for our mobile game design.
First declared all the needed variables and in the ShowButtons Method we shuffle the namePuzzle randomly during each call and stored in the FinmyNameChar.Also clear all the values for first time game start.
Also using the Xamarin.Essentials.TextToSpeech.SpeakAsync we send the text as the "Five Chance to find Shanu" to convert the text to speech and make it as the announcement for the user as the game is going to start.Each time the user clicks on the Start game method this function will be called and the speech announcement will be made.
In the findResult method will be called from the 12 buttons which has the “?” and send the parameter as the findmyNameChar[0] array value start from0 to 11 to the function and check the logic for find the name as “Shanu” also check for 5 attempts and finally display the result to the users.
@code {

    int CharCount = 0; // To check and maintain the user click on each button


    int findvalue = 5; // To check the reault count which is less then the find value here I have used 9 so the user can check there name trail only for 9 times.

    string namePuzzle = "ABSDEHGZNXCU";

    string findmyNameChar = "";
    string tofind = "SHANU";
    string results = "";
    string messages = "";

    void showButtons()
    {
        // to shuffle the character and reorder the characters for new Puzzle Game start

        Random rnd = new  Random();

        findmyNameChar = new  string(namePuzzle.ToCharArray().
                       OrderBy(s => (rnd.Next(2) % 2) == 0).ToArray());

        results = "";
        CharCount = 0;
        messages = "Start Your Game";

        Xamarin.Essentials.TextToSpeech.SpeakAsync("Five Chance to find Shanu").ContinueWith((t) =>
    {
}, TaskScheduler.FromCurrentSynchronizationContext());


    }

    private void  findResult(string  puzzleChar)
    {
        CharCount = CharCount + 1;
        if (CharCount <= findvalue)
        {

            results = results + puzzleChar;
            if (CharCount >= tofind.Length)
            {
                if (results == tofind)
                {
                    messages = "You Won :)";
                    Xamarin.Essentials.TextToSpeech.SpeakAsync("Wow You Won").ContinueWith((t) =>
                      {
                    }, TaskScheduler.FromCurrentSynchronizationContext());


                }
                else
                {

                    messages = "You Loss :(";
                    Xamarin.Essentials.TextToSpeech.SpeakAsync("Sorry You Loss").ContinueWith((t) =>
                     {
                    }, TaskScheduler.FromCurrentSynchronizationContext());
                }
            }
        }
        else
        {
            results = "";
            CharCount = 0;
            messages = "Try Again :(";
        }
    }
}
Step 5: Add the Game.razor page to the main Content page
In the HelloWorld we add the Game razor page in content page to load the game also we change the Title from the Hello World to “Shanu Blazor Mobile!”
Step 6: Run the Application in Android Device or in Emulator
Here we have used the Samsung Galaxy Not 10 Android app to run my game.You can run in any Android Device on your installed Android emulator.
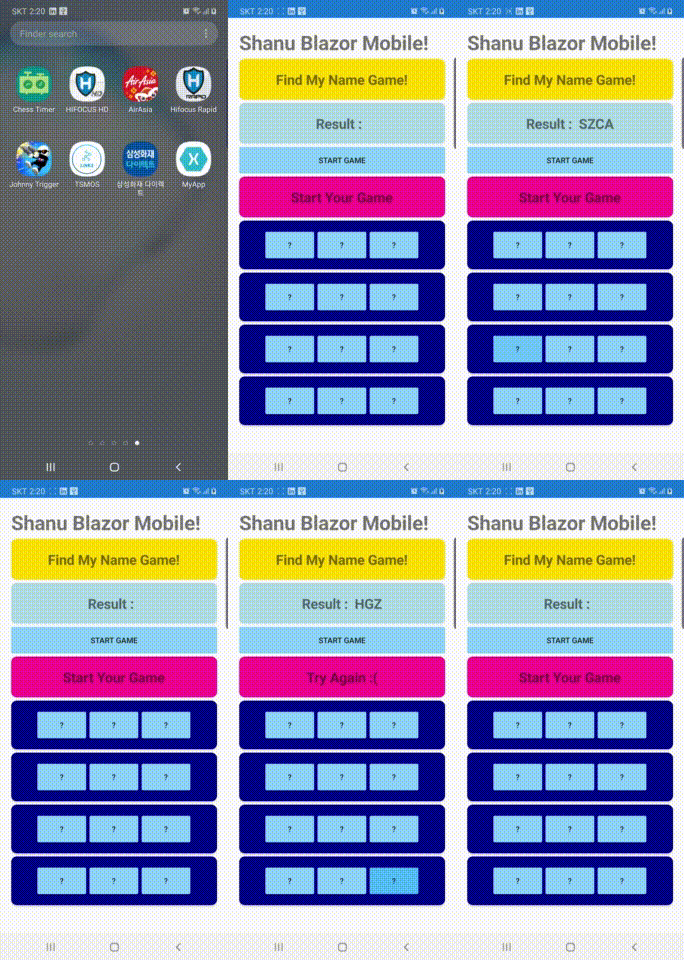
Conclusion
Mobile Blazor Bindings is a experimental release and not for the production use. But for now it will be good place for getting started and work with Mobile Blazor Bindings for developing native mobile app using the Blazor. This is really a needed one for all the Web Developer as well the C# lovers who are not much familiar with Native app development even not much familiar with Xamarin. We as the C# lovers will always love to work with this kind of native mobile application development that too with Blazor means its like and cake with more honey for us.lets wait for the production release till that lets experiment more with Mobile Blazor Bindings.
See Also
- Announcing Experimental Mobile Blazor Bindings
- All you need to know on Blazor app and create ASP.NET Core Blazor CRUD App using VS 2019, .NET Core 3 , Web API
- ASP.NET Core Blazor CRUD using Entity Framework and Web API
- ASP.NET Core Blazor Filtering and Sorting using Entity Framework and Web API
- ASP.NET Core Blazor Master Detail Grid with Filtering and Sorting using EF and Web API
- Visual Studio 2019 RC: Getting Started (Part 1)
