Note
Access to this page requires authorization. You can try signing in or changing directories.
Access to this page requires authorization. You can try changing directories.
Here in this article – we will learn that how we can upload multiple files from the local directory to SharePoint online document library using PowerShell CSOM.
Introduction
Many times while we handle multiple files - we will be in a situation that we need to upload many business documents to SharePoint online library. If these number of documents are more, its very difficult to upload these files manually and if at all we upload these manually this will take lot of human efforts. So if we use this technique - user just has to configure the source directory location and target site's library location, this will be taken care automatically thru this automation with respect to any number of files. By that time user can utilize his/her time in some other activities. So lets start how this can be implemented.
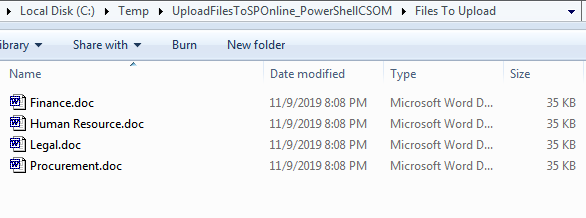
Verify that we have some files in the local directory
Below are the list of files – located in my local directory which I am going to upload to SharePoint online document library using the PowerShell coding.
Verify that no files are available in SharePoint online document library before executing the script
We have a test document library in SharePoint online named as "TestDocumentLibrary" and we can see that this library is empty.
PowerShell CSOM Script to upload multiple files
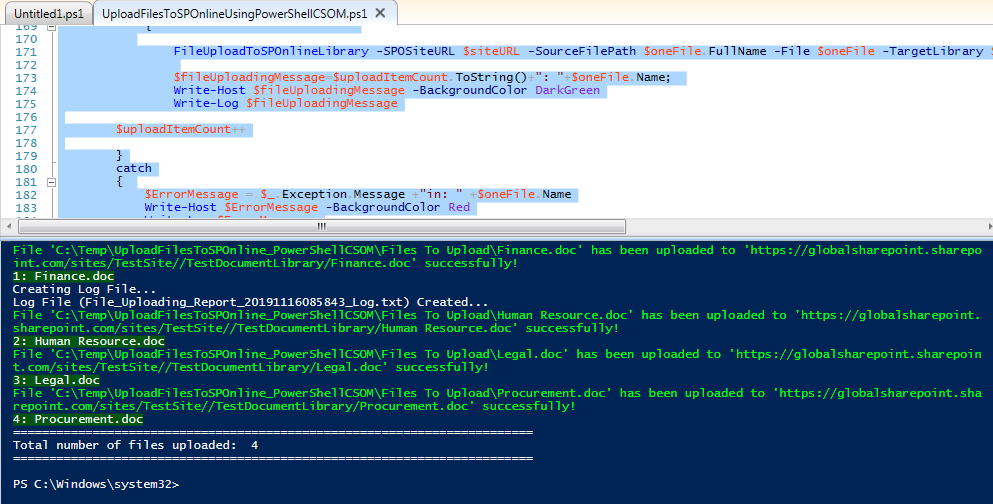
Now we will execute the below PowerShell script to upload the files:
001.#Load SharePoint CSOM Assemblies
002.#Add-Type -Path "C:\Program Files\Common Files\Microsoft Shared\Web Server Extensions\16\ISAPI\Microsoft.SharePoint.Client.dll"
003.#Add-Type -Path "C:\Program Files\Common Files\Microsoft Shared\Web Server Extensions\16\ISAPI\Microsoft.SharePoint.Client.Runtime.dll"
004.cls
005.$fileName = "File_Uploading_Report"
006.#'yyyyMMddhhmm   yyyyMMdd
007.$enddate = (Get-Date).tostring("yyyyMMddhhmmss")
008.#$filename =  $enddate + '_VMReport.doc'
009.$logFileName = $fileName +"_"+ $enddate+"_Log.txt"
010.$invocation = (Get-Variable MyInvocation).Value
011.$directoryPath = Split-Path $invocation.MyCommand.Path
012.$directoryPathForLog=$directoryPath+"\"+"LogFiles"
013.if(!(Test-Path -path $directoryPathForLog))
014.        {
015.            New-Item -ItemType directory -Path $directoryPathForLog
016.            #Write-Host "Please Provide Proper Log Path" -ForegroundColor Red
017.        }
018.
019.#$logPath = $directoryPath + "\" + $logFileName
020.$logPath = $directoryPathForLog + "\" + $logFileName
021.$isLogFileCreated = $False
022.
023.#DLL location
024.$directoryPathForDLL=$directoryPath+"\"+"Dependency Files"
025.if(!(Test-Path -path $directoryPathForDLL))
026.        {
027.            New-Item -ItemType directory -Path $directoryPathForDLL
028.            #Write-Host "Please Provide Proper Log Path" -ForegroundColor Red
029.        }
030.#DLL location
031.$clientDLL=$directoryPathForDLL+"\"+"Microsoft.SharePoint.Client.dll"
032.$clientDLLRuntime=$directoryPathForDLL+"\"+"Microsoft.SharePoint.Client.dll"
033.
034.Add-Type -Path $clientDLL
035.Add-Type -Path $clientDLLRuntime
036.
037.
038.#Files to upload location
039.$directoryPathForFileToUploadLocation=$directoryPath+"\"+"Files To Upload"
040.if(!(Test-Path -path $directoryPathForFileToUploadLocation))
041.        {
042.            New-Item -ItemType directory -Path $directoryPathForFileToUploadLocation
043.            #Write-Host "Please Provide Proper Log Path" -ForegroundColor Red
044.        }
045.
046.#Files to upload location ends here.
047.
048.function Write-Log([string]$logMsg)
049.{
050.    if(!$isLogFileCreated){
051.        Write-Host "Creating Log File..."
052.        if(!(Test-Path -path $directoryPath))
053.        {
054.            Write-Host "Please Provide Proper Log Path" -ForegroundColor Red
055.        }
056.        else
057.        {
058.            $script:isLogFileCreated = $True
059.            Write-Host "Log File ($logFileName) Created..."
060.            [string]$logMessage = [System.String]::Format("[$(Get-Date)] - {0}", $logMsg)
061.            Add-Content -Path $logPath -Value $logMessage
062.        }
063.    }
064.    else
065.    {
066.        [string]$logMessage = [System.String]::Format("[$(Get-Date)] - {0}", $logMsg)
067.        Add-Content -Path $logPath -Value $logMessage
068.    }
069.}
070.
071.#The below function will upload the file from local directory to SharePoint Online library.
072.Function FileUploadToSPOnlineLibrary()
073.{
074.    param
075.    (
076.        [Parameter(Mandatory=$true)] [string] $SPOSiteURL,
077.        [Parameter(Mandatory=$true)] [string] $SourceFilePath,
078.        [Parameter(Mandatory=$true)] [string] $File,
079.        [Parameter(Mandatory=$true)] [string] $TargetLibrary,
080.        [Parameter(Mandatory=$true)] [string] $UserName,
081.        [Parameter(Mandatory=$true)] [string] $Password
082.    )
083.
084.    Try
085.    {
086.
087.        $securePassword= $Password | ConvertTo-SecureString -AsPlainText -Force
088.        #Setup the Context
089.        $ctx = New-Object Microsoft.SharePoint.Client.ClientContext($SPOSiteURL)
090.        $ctx.Credentials = New-Object Microsoft.SharePoint.Client.SharePointOnlineCredentials($UserName, $securePassword)
091.
092.        $list = $ctx.Web.Lists.GetByTitle($TargetLibrary)
093.        $ctx.Load($list)
094.        $ctx.ExecuteQuery()
095.        $tarGetFilePath=$siteURL+"/"+"$TargetLibrary"+"/"+$File
096.
097.        $fileOpenStream = New-Object IO.FileStream($SourceFilePath, [System.IO.FileMode]::Open)
098.        $fileCreationInfo = New-Object Microsoft.SharePoint.Client.FileCreationInformation
099.        $fileCreationInfo.Overwrite = $true
100.        $fileCreationInfo.ContentStream = $fileOpenStream
101.        $fileCreationInfo.URL = $File
102.        $uploadFileInfo = $list.RootFolder.Files.Add($FileCreationInfo)
103.        $ctx.Load($uploadFileInfo)
104.        $ctx.ExecuteQuery()
105.
106.        Write-host -f Green "File '$SourceFilePath' has been uploaded to '$tarGetFilePath' successfully!"
107.    }
108.    Catch
109.    {
110.
111.            $ErrorMessage = $_.Exception.Message +"in  uploading File!: " +$tarGetFilePath
112.            Write-Host $ErrorMessage -BackgroundColor Red
113.            Write-Log $ErrorMessage
114.
115.
116.    }
117.}
118.
119.#Variables
120.$siteURL="https://globalsharepoint.sharepoint.com/sites/TestSite/"
121.$listName="TestDocumentLibrary"
122.$fromDate="2019-10-28"
123.$toDate="2019-11-09"
124.$filesFolderLoaction=$directoryPathForFileToUploadLocation;
125.$userName = "YourSPOAccount@YourTenantDomain.com"
126.$password = "YourPassWord"
127.$securePassword= $password | ConvertTo-SecureString -AsPlainText -Force
128.#Variables ends here.
129.
130.$filesCollectionInSourceDirectory=Get-ChildItem $filesFolderLoaction -File
131.$uploadItemCount=1;
132.    #Extract the each file item from the folder.
133.    ForEach($oneFile in $filesCollectionInSourceDirectory)
134.    {
135.
136.            try
137.            {
138.
139.                FileUploadToSPOnlineLibrary -SPOSiteURL $siteURL -SourceFilePath $oneFile.FullName -File $oneFile -TargetLibrary $listName -UserName $UserName -Password $Password
140.
141.                $fileUploadingMessage=$uploadItemCount.ToString()+": "+$oneFile.Name;
142.                Write-Host $fileUploadingMessage -BackgroundColor DarkGreen
143.                Write-Log $fileUploadingMessage
144.
145.        $uploadItemCount++
146.
147.        }
148.        catch
149.        {
150.            $ErrorMessage = $_.Exception.Message +"in: " +$oneFile.Name
151.            Write-Host $ErrorMessage -BackgroundColor Red
152.            Write-Log $ErrorMessage
153.
154.        }
155.
156.    }
157.    Write-Host "========================================================================"
158.    Write-Host "Total number of  files uploaded: " $filesCollectionInSourceDirectory.Count
159.    Write-Host "========================================================================"
Execute the above script successfully like below:
Verify that the files we have seen in step 1 have been uploaded to SPO Document library
Revisit the SharePoint online “TestDocumentLibrary” which was empty just before executing the script, we can see that all four files have been uploaded:
Prerequisites to execute this script
We need to place the below two DLLs in the script directory “Dependency Files” folder as like below:
Pass the parameter into the script
Change the value of the variable in the variables section like below:
01.#Variables
02.$siteURL="Site URL"
03.$listName="Document Library Name"
04.$filesFolderLoaction=$directoryPathForFileToUploadLocation;
05.#Pass the local  directory path where  files are located.
06.#Example:"C:\Temp\Files To Upload"
07.$userName = "YourSPOAccount@YourTenantDomain.com"
08.$password = "YourPassWord"
09.$securePassword= $password | ConvertTo-SecureString -AsPlainText -Force
10.#Variables ends here.
Use case of the files upload automation script
The use case of this automation would be in many scenarios - to name a few like - when we have got to do thousands of files to upload in SharePoint online library, if we do this manually it will take lot of times and efforts, so we can run this script which will complete very quickly without human interaction. And the other use case could be when we deal with multiple integrated applications and some data flow happens one application to another through the shared drive, then we can use of this - let's say periodically thousands of invoice files are coming to the shared drive from other ERP applications and these need to be uploaded to the SharePoint online automatically then this will be the optimal choice.
Summary : What we had here?
Thus in this article - we have learned that how we can automatically upload multiple files using PowerShell automation script and also we have seen the use cases where this could be useful.


