Note
Access to this page requires authorization. You can try signing in or changing directories.
Access to this page requires authorization. You can try changing directories.
Introduction
In this post, we will go through on how to deploy a logic app that sends emails to our mail account. The deployment includes several triggers and actions that we can use when creating a logic app. The basic purpose of this post is to understand when and how we can take the advantage this Microsoft service gave us.
Demo Case
The demo case of this post is quite simple, we build a logic app which in the first step to use a Twitter trigger for a specific user, e.g @ch9, this trigger send the message to a Service Bus queue, then we use a Parse JSON action to parse the Properties from the Service Bus and sends it in a mail account using the Send email (GMAIL) action.
Building The Logic App
In the following steps we will start the Logic App building.
Prerequisites
Before we further proceed with the demo we MUST have applied the following prerequisites.
- A valid Azure Subscription
- An active Twitter account
- An Azure Service Bus Namespace with a Queue
- A valid mail account (In this demo we use a gmail account)
Step 1. Create The Logic App
From the Marketplace in Azure Portal search the text "Logic App" and click Create.
On the Logic App create blade fill out all the necessary fields as the image below shows and click the button Create.
| Setting | Value |
| Name | Type the Logic App name |
| Subscription | Select an Azure valid subscription |
| Resource group | Select an existing or Create a new resource group |
| Location | Select a Location for the Logic App |
| Log Analytics | Enable this setting to send the Logic App events to log analytics service for better monitoring |
| Log Analytics Workspace | Select an existing or Create a new Log analytics workspace |
Step 2. Add Trigger [When a new tweet is posted]
On the design canvas find the trigger [When a new tweet is posted], type in the Search text the terms that we want to get, set the interval and frequency parameters and add a valid twitter account on the connection parameter,
and click the button Save.
Step 3. Add Service Bus Action [Send message]
At the next step we Add the service bus [Send message] action. Select the twittermessages (queue) and in the properties parameter add the following JSON code.
{
  "Text": @{triggerBody()?['TweetText']},
  "Tweet ID": @{triggerBody()?['TweetId']}
}
Step 4. Add Service Bus Trigger [When a message is received in a queue (auto-complete)]
Next, we add the service bus Trigger [When a message is received in a queue (auto-complete)], and we select the valid queue in Queue name field.
Step 5. Add Data Operations Parse JSON
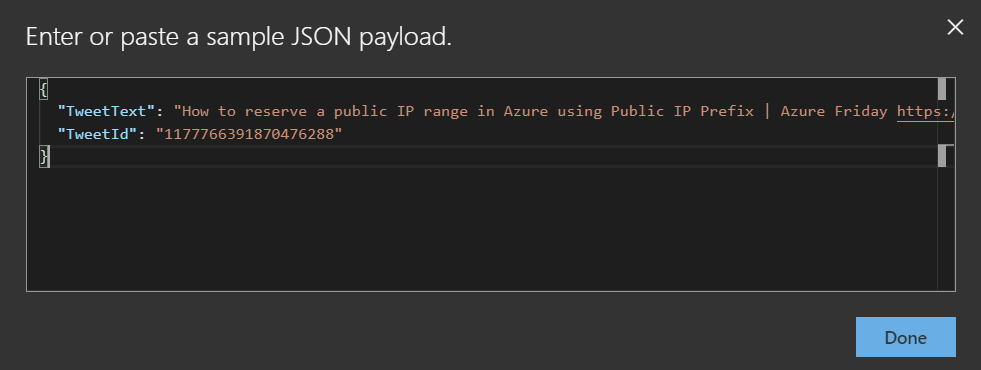
What we have to do next is to convert the message from service bus to JSON format because, when the message comes from a service bus it has base64 encoding. For that reason we Add the Data Operation Action (Parse JSON). In the content we add the service bus properties and then we click the button Use sample payload to generate schema, and we paste a sample to generate automatically the JSON schema.
Step 6. Add Send email (gmail)
The final step of this simple logic app is to add the Send email (gmail) action. Type an email address in the To field, in the body select the Tweet Text dynamic context and type a Subject for the email.
By completing the Logic App design in the Resource Group we are able to see 3 API Connections (gmail, twitter, servicebus), 1 Logic App (MyLogicApp), and 1 Service Bus with a queue (logicappdemosb1 - twittermessages ), as the image below shows.
Logic App Code View
In the following format code block, we can see the Logic Apps code view. This is another way by which someone can make changes in a Logic App.
{
    "$connections": {
        "value": {
            "gmail": {
                "connectionId": "/subscriptions/########-####-####-###-#############/resourceGroups/LogicAppDemoProjectRG/providers/Microsoft.Web/connections/gmail",
                "connectionName": "gmail",
                "id": "/subscriptions/########-####-####-###-#############/providers/Microsoft.Web/locations/northeurope/managedApis/gmail"
            },
            "servicebus": {
                "connectionId": "/subscriptions/########-####-####-###-#############/resourceGroups/LogicAppDemoProjectRG/providers/Microsoft.Web/connections/servicebus",
                "connectionName": "servicebus",
                "id": "/subscriptions/########-####-####-###-#############/providers/Microsoft.Web/locations/northeurope/managedApis/servicebus"
            },
            "twitter": {
                "connectionId": "/subscriptions/########-####-####-###-#############/resourceGroups/LogicAppDemoProjectRG/providers/Microsoft.Web/connections/twitter",
                "connectionName": "twitter",
                "id": "/subscriptions/########-####-####-###-#############/providers/Microsoft.Web/locations/northeurope/managedApis/twitter"
            }
        }
    },
    "definition": {
        "$schema": "https://schema.management.azure.com/providers/Microsoft.Logic/schemas/2016-06-01/workflowdefinition.json#",
        "actions": {
            "Parse_JSON": {
                "inputs": {
                    "content": "@body('When_a_message_is_received_in_a_queue_(auto-complete)')?['Properties']",
                    "schema": {
                        "properties": {
                            "TweetId": {
                                "type": "string"
                            },
                            "TweetText": {
                                "type": "string"
                            }
                        },
                        "type": "object"
                    }
                },
                "runAfter": {
                    "When_a_message_is_received_in_a_queue_(auto-complete)": [
                        "Succeeded"
                    ]
                },
                "type": "ParseJson"
            },
            "Send_email": {
                "inputs": {
                    "body": {
                        "To": "youremail@gmail.com"
                    },
                    "host": {
                        "connection": {
                            "name": "@parameters('$connections')['gmail']['connectionId']"
                        }
                    },
                    "method": "post",
                    "path": "/Mail"
                },
                "runAfter": {
                    "Parse_JSON": [
                        "Succeeded"
                    ]
                },
                "type": "ApiConnection"
            },
            "Send_message": {
                "inputs": {
                    "body": {
                        "Properties": {
                            "Text": "@triggerBody()?['TweetText']",
                            "Tweet ID": "@triggerBody()?['TweetId']"
                        }
                    },
                    "host": {
                        "connection": {
                            "name": "@parameters('$connections')['servicebus']['connectionId']"
                        }
                    },
                    "method": "post",
                    "path": "/@{encodeURIComponent(encodeURIComponent('twittermessages'))}/messages",
                    "queries": {
                        "systemProperties": "None"
                    }
                },
                "runAfter": {},
                "type": "ApiConnection"
            },
            "When_a_message_is_received_in_a_queue_(auto-complete)": {
                "inputs": {
                    "host": {
                        "connection": {
                            "name": "@parameters('$connections')['servicebus']['connectionId']"
                        }
                    },
                    "method": "get",
                    "path": "/@{encodeURIComponent(encodeURIComponent('twittermessages'))}/messages/head",
                    "queries": {
                        "queueType": "Main"
                    }
                },
                "runAfter": {
                    "Send_message": [
                        "Succeeded"
                    ]
                },
                "type": "ApiConnection"
            }
        },
        "contentVersion": "1.0.0.0",
        "outputs": {},
        "parameters": {
            "$connections": {
                "defaultValue": {},
                "type": "Object"
            }
        },
        "triggers": {
            "When_a_new_tweet_is_posted": {
                "inputs": {
                    "host": {
                        "connection": {
                            "name": "@parameters('$connections')['twitter']['connectionId']"
                        }
                    },
                    "method": "get",
                    "path": "/onnewtweet",
                    "queries": {
                        "searchQuery": "'@ch9'"
                    }
                },
                "recurrence": {
                    "frequency": "Minute",
                    "interval": 3
                },
                "splitOn": "@triggerBody()?['value']",
                "type": "ApiConnection"
            }
        }
    }
}
Test The Logic App
Once the trigger is activated we receive the following email.
Monitor The Logic App
We can monitor the logic app in several ways :
1. Check Run History
From the Overview menu, we can see the summary at the right blade and the Logic App run history.
2. Monitoring
At the left main blade we can see the 4 more tools to check the performance, and setup alerts.
Summary
To sum up, Azure Logic Apps is a service that offers to devs a powerful "tool" to develop apps without having to write code. This flow sample is pretty easy for someone and if we want we can modify all the steps and add new or move those that already exist.


