SharePoint Framework SPFx: Enabling Field Customizer on existing column in list
Introduction
Field Customizer is a type of SPFx extensions, which allows us to define a custom display style for a field or column. While we can display custom styles using column formatting, we cannot execute any client code within a column formatter. SPFX Field customizers can be used to execute client code for a column when it is being rendered.
The Need
When we develop a custom SPFx field customizer using the default project (created with yeoman) there is always a Field (SharePoint Column) which also gets provisioned and the custom Field Customizer is added to this field. This may not be ideal in most of the cases. There could be use cases, where we want to develop a custom field customizer for an existing column and do not want the custom field in the SPFx solution to be added. What if we could package only the Field Customizer, without the Field (SharePoint Column) and then add the Field Customizer to the column we want? Yes, it can be done. In this article, I will try to build a custom field customizer and then add it to an existing field.
What are we going to build?
Let's build a field customizer, which expects the field or column value to be a valid fabric icon class name and actually display the fabric icon. This could result in something like below.
Creating an SPFx solution with only the Field Customizer
Follow the steps below to create a new SPFx solution.
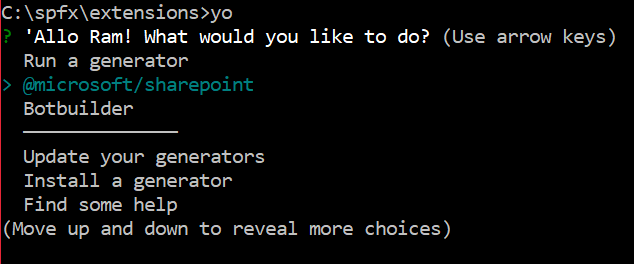
Run yeoman using yo, and choose @microsoft sharepoint generator

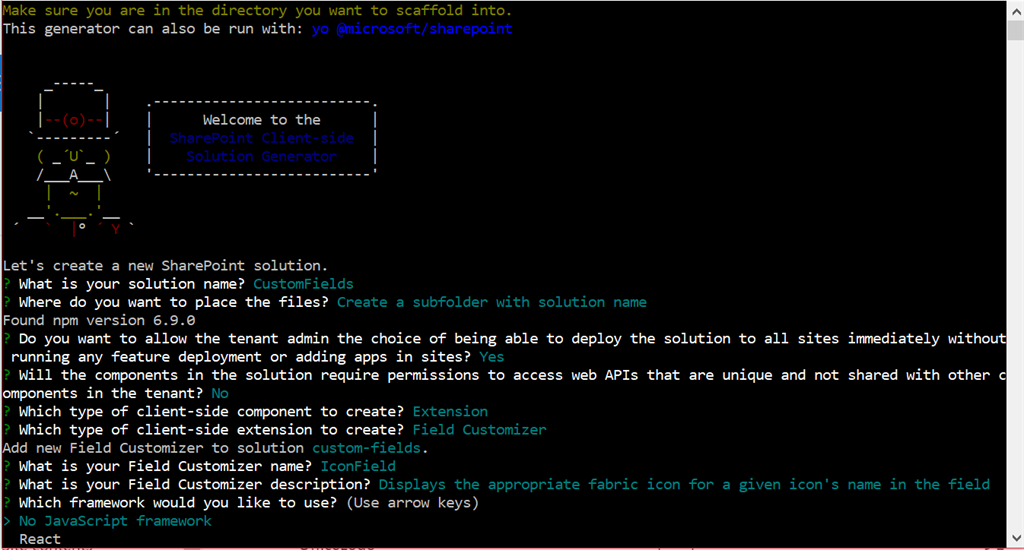
Provide the necessary details for the project, as explained below,

For the question, Do you want to allow the tenant admin the choice of being able to deploy the solution to all sites immediately without running any feature deployment or adding apps in sites?, choose Y, if you want the field customizer to be available across all the site collections.
For, Will the components in the solution require permissions to access web APIs that are unique and not shared with other components in the tenant?. Select N as we are not going to use any APIs
Which type of client-side component to create? - Choose extension
Which type of client-side extension to create? - Choose Field Customizer
Provide a name and description for the Field Customizer
Choose 'No JavaScript framework' for Which framework would you like to use?
With this, our SPFx solution should be created.
Open the solution using Visual Studio Code, by running the following commands.
cd CustomFields
code .
Remove the unwanted features and assets
By default, the SPFx solution has the following components added, some of which are not needed.
*A Field Customizer - *We can keep this in the solution
Feature - A custom feature will be added to the solution, which installs the SharePoint asset (i.e., a Field/Column). We do not need this file, as we are not going to use the custom field. This can be removed. Go to the 'package-solution.json' file in the config folder and remove the features property.

The package-solution.json should look like below after removing the feature property,
{
  "$schema": "https://developer.microsoft.com/json-schemas/spfx-build/package-solution.schema.json",
  "solution": {
    "name": "custom-fields-client-side-solution",
    "id": "e79c695a-0221-4b46-b05a-2dac7f667e7d",
    "version": "1.0.0.0",
    "includeClientSideAssets": true,
    "skipFeatureDeployment": true,
    "isDomainIsolated": false
  },
  "paths": {
    "zippedPackage": "solution/custom-fields.sppkg"
  }
}
Custom Field - A custom field is provisioned which will have the ClientSideComponentId set to the Field Customizer. As we are trying to install the Field customizer on an existing field, we do not need this custom field to be created. This can also be removed. Under the sharePoint/assets folder, delete the elements.xml file
Rendering the Field Customizer
We will use office-ui-fabric-core to show fabric icons based on the field's value. Follow these steps, to make the field customizer work.
In the command window, execute the following command to install office-ui-fabric-core
npm install office-ui-fabric-core --saveOpen the 'IconFieldFieldCustomizer.module.scss' file (name could be different based on what you have named you field customizer), and remove all the contents of this file and paste the below code
@import '~office-ui-fabric-core/dist/sass/Fabric.scss';

.FabricIconer {

  font-size: 20px;

  @include ms-Icon;
  // Modifiers: Each of the icons.
  @include ms-icon-classes($ms-icon-map);
}
Open 'IconFieldFieldCustomizer.ts' file (name could be different based on what you have named you field customizer), and update the onRenderCell with the following code.
public onRenderCell(event: IFieldCustomizerCellEventParameters): void {
  // Use this method to perform your custom cell rendering.
  const iconName = `ms-Icon--${event.fieldValue}`;
  const text: string = `<i class="${styles['ms-Icon']} ${styles[iconName]}" aria-hidden="true"></i>`;

  event.domElement.innerHTML = text;

  event.domElement.classList.add(styles.FabricIconer);
}
With this our SPFx solution is ready. It now has only the Field Customizer and the Feature and Custom Field definition are removed.
Test if the Field Customizer is working
We will test this against as exisitng list and a column, so if you dont have a list already use the following PnP Powershell to create a list which will have 2 columns - Title and ProductIcon
$siteUrl = "https://<your-tenant-name>.sharepoint.com/sites/Internal"
$listTitle = "Products"
$fieldTitle = "ProductIcon"
Connect-PnPOnline -Url $siteUrl
New-PnPList -Title $listTitle
$list = Get-PnPList -Identity $listTitle
$fld = Add-PnPField -List $list -DisplayName $fieldTitle -InternalName $fieldTitle -Type Text -AddToDefaultView
Now open the serve.json file in the config folder and provide the SharePoint list URL and the Internal Name of the field which we want for testing.
Run the following command, which opens the browser with the debug files loaded.
gulp serve
In the browser, click on 'Load debug files', make some entries in the list (Title - Mail, ProductIcon = Mail) and you should see the appropriate office fabric icon in the field customizer. Now that our field customizer is working, let's see how to package and install this field customizer in an existing SharePoint List's column.
Package and Install on an existing column
Execute the below commands to SPFx package the solution
gulp clean
gulp build
gulp bundle --ship
gulp package-solution --ship
Once the package is created execute the following in the PnP Powershell window (assuming you have already connected to the SharePoint and logged in using Connect-PnPOnline)
Add-PnPApp -Path .\custom-fields.sppkg -Publish -SkipFeatureDeployment
This cmdlet adds the SPFx solution to the App Catalog and also publishes the package. The parameter -SkipFeatureDeployment is used so that the package is deployed across the tenant. I have done this so that I can use the Field Customizer across all the site collections.
We can use below PnP Powershell to associate the Field Customizer to an existing list column
$list = Get-PnPList -Identity $listTitle
$fld = Get-PnPField -List $list -Identity $fieldTitle
$fld.ClientSideComponentId = "0407eb29-728c-47c3-9f9b-bb1d2e04c4cc"
$fld.Update()
Invoke-PnPQuery
A Field Customizer can be linked to a field by setting its 'ClientSideComponentId' property with the GUID of the Field Customizer. The GUID of the field customizer can be found in the 'IconFieldFieldCustomizer.manifest.json' file in the src/extensions/ folder.
Summary
Using this approach, we can remove the unwanted fields from getting provisioned and also use the same Field Customizer across multiple existing columns. The same solution can be used for columns in all lists across the site or tenant depending on how the solution is scoped and deployed.

