Azure Networking: Learn About Load-Balancers
Overview
In this post, we will talk about Azure Load-Balancer, what is it and what offers to the Azure deployments.
What Azure Load-Balancer is?
Azure Load-Balancer offers high availability, high throughput and low latency for applications or services. Azure Load-Balancer could be Public or Internal and it offers two kinds of SKUs Basic and Standard.
Load-Balancing (Public - Internal)
Public Load-Balancer
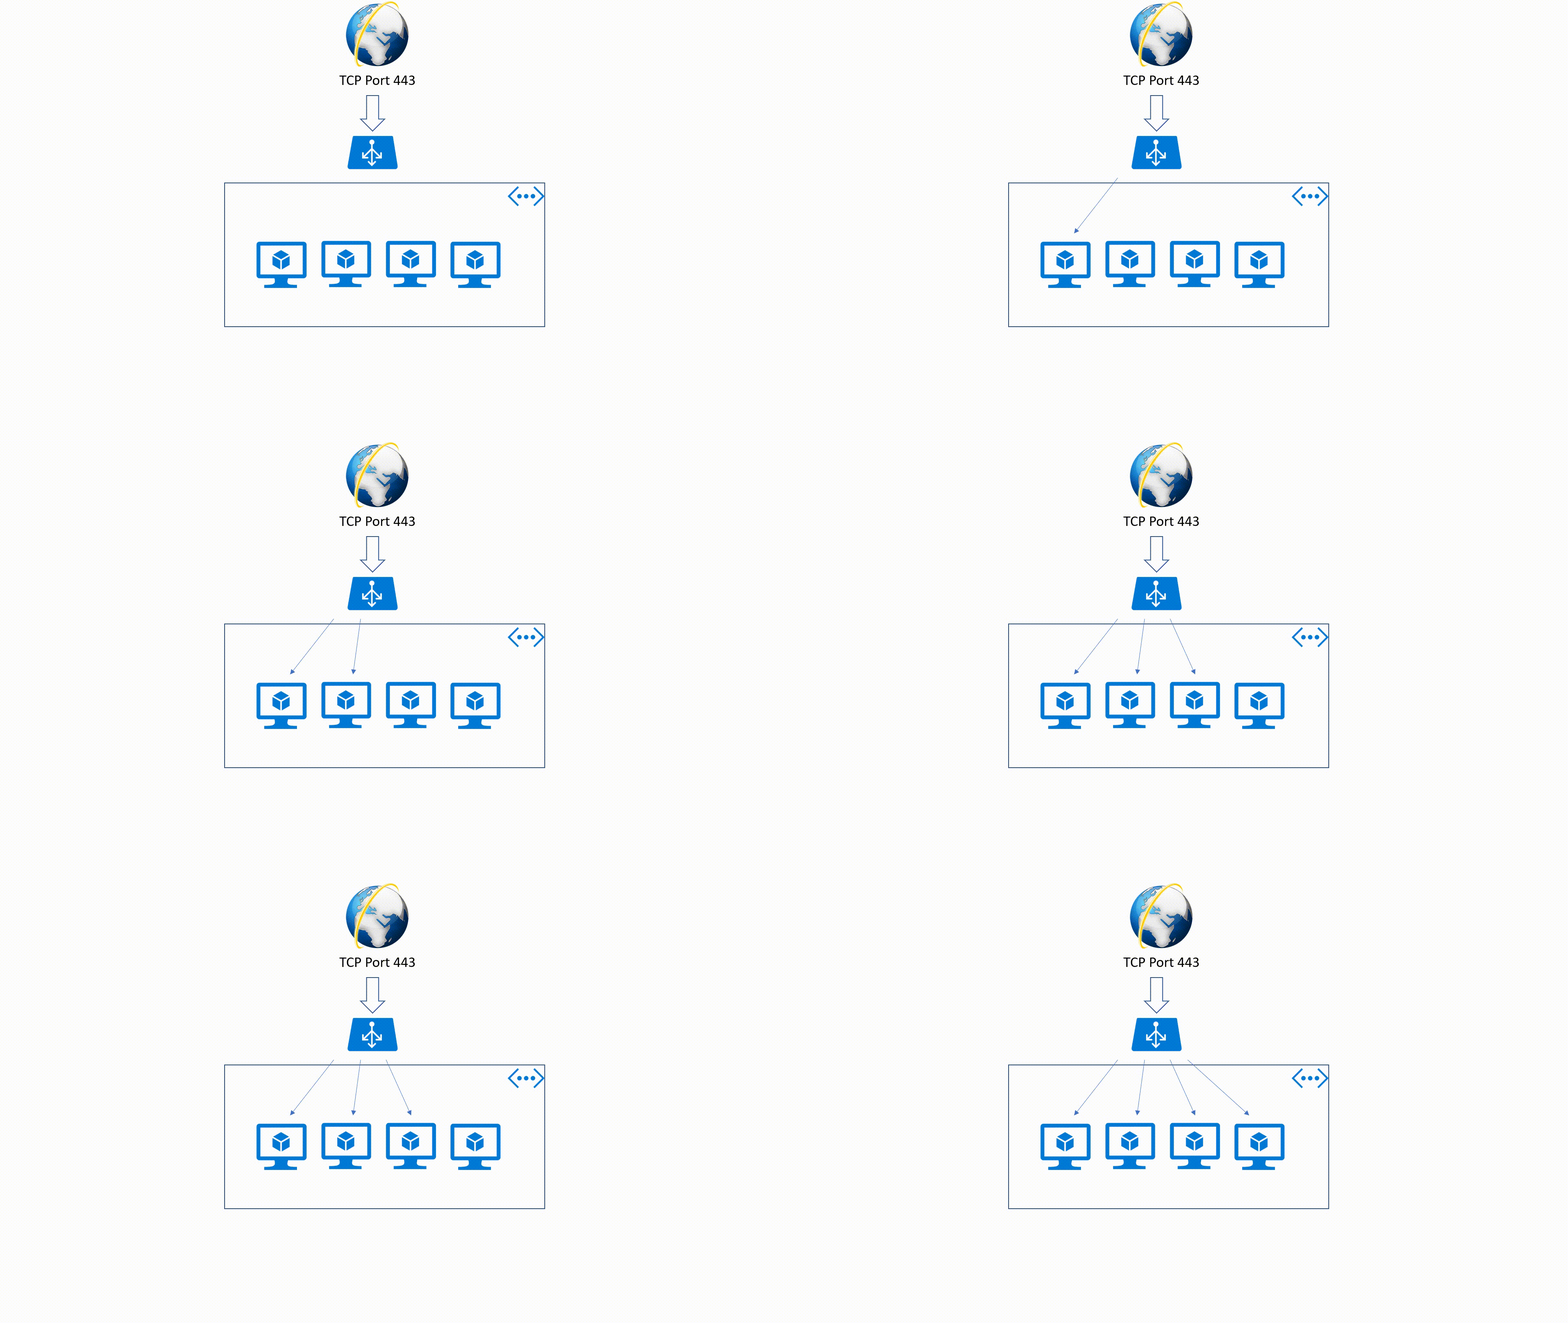
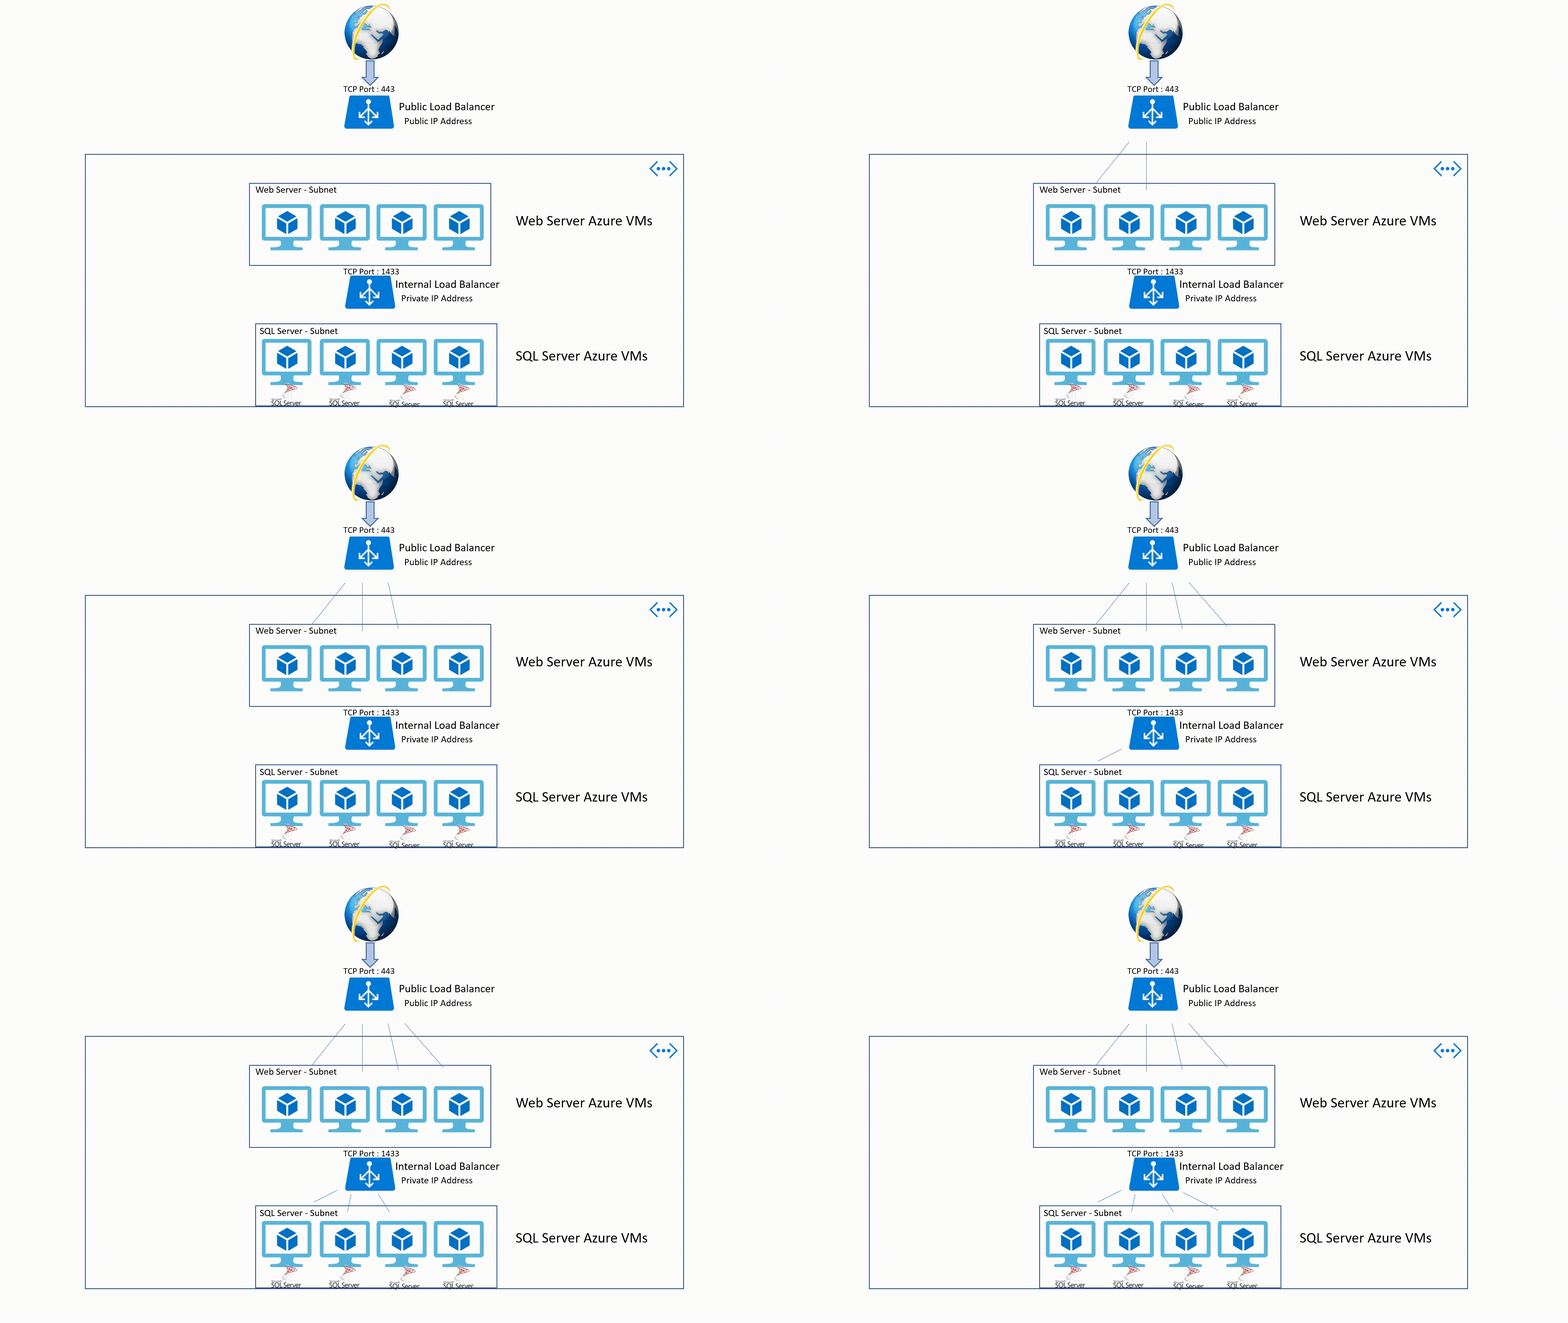
This is an OSI Layer 4 service (Transport Layer). It's an Internet-facing service which use a Public IP Address (PIP) to accept one or more internet requests and load balance these requests between two or more Identically configured Virtual Machines.
Internal Load - Balancer
It's also a Layer 4 service but it applies within an Azure Virtual Network. This means that traffic will be directed to the resources that are in the virtual network. Internal Load - Balancer traffic is not exposed to the public internet but only in the VNet.
Azure Load - Balancer SKUs
There are two available SKUs for Load - Balancer the Basic and the Standard SKU. At the table below we can find what those two SKUs offer.
| Basic SKU | Standard SKU | |
| Backend pool size | Supports up to 100 instances | Supports up to 1000 instances |
| Backend pool endpoints | VMs in a single Availability Set or VM Scale Set | Any VM in a single VNet, plus VMs, Availability Sets, and VM Scale Sets |
| Health probes | TCP, HTTP | TCP, HTTP, HTTPS |
| Health probe down behavior | TCP connections stay alive on instance probe down. All TCP conns terminate on all probes are down. | TCP connections stay alive on instance probe down and on all probes down |
| Availability zones | Not available | zone-redundant and zonal frontends for inbound and outbound |
| Diagnostics | Azure log analytics for public LB only, SNAT exhaustion alert, backend pool health count | Azure monitor, multi-dimensional metrics including byte and packet counters, health probe status, connection attempts (TCP SYN), outbound connection health (SNAT successful and failed flows), active data plane measurements |
| HA ports | Not available | Internal Load Balancer |
| Secure by default | Open by default NSG optional | Public IP, Public LB endpoints, Internal LB endpoints are closed to inbound flows unless whitelisted by an NSG |
| Outbound connections | Single frontend, selected at random when multiple frontends are present. When only internal Load Balancer is serving a virtual machine, availability set, or virtual machine scale set, default SNAT is used. | We can explicitly define pool-based outbound NAT with outbound rules. Use multiple frontends with per load balancing rule opt-out. An outbound scenario must be explicitly created for the VM, availability set, VM scale set to use outbound connectivity. Virtual Network Service Endpoints can be reached without defining outbound connectivity and don't count towards data processed. Any public IP addresses, including Azure PaaS services not available as VNet Service Endpoints, must be reached via outbound connectivity and count towards data processed. When only an internal Load Balancer is serving a virtual machine, availability set, or virtual machine scale set, outbound connections via default SNAT aren't available; use outbound rules instead. Outbound SNAT programming is transport protocol specific based on protocol of the inbound load balancing rule. |
| Outbound rules | Not available | Declarative outbound NAT configuration, using public IP addresses or public IP prefixes or both, configurable outbound idle timeout (4-120 minutes), custom SNAT port allocation |
| TCP reset on idle | Not available | Enable TCP Reset on idle timeout on any rule |
| Multiple frontends | Inbound only | Inbound and outbound |
| Management operations | 60 - 90 sec | Most operations < 30 sec |
| SLA | Not applicable | 99.99% for data path with two healthy VMs |
| Pricing | No charge | Charged based on number of rules, data processed inbound and outbound associated with the resource |
More details for Azure Load - Balancer SKU comparison we can find in this MS document.
Azure Load-Balancer Distribution Modes
We will talk for two Azure LB distribution modes, Hash based mode and Source IP affinity mode.
Hash based distribution mode
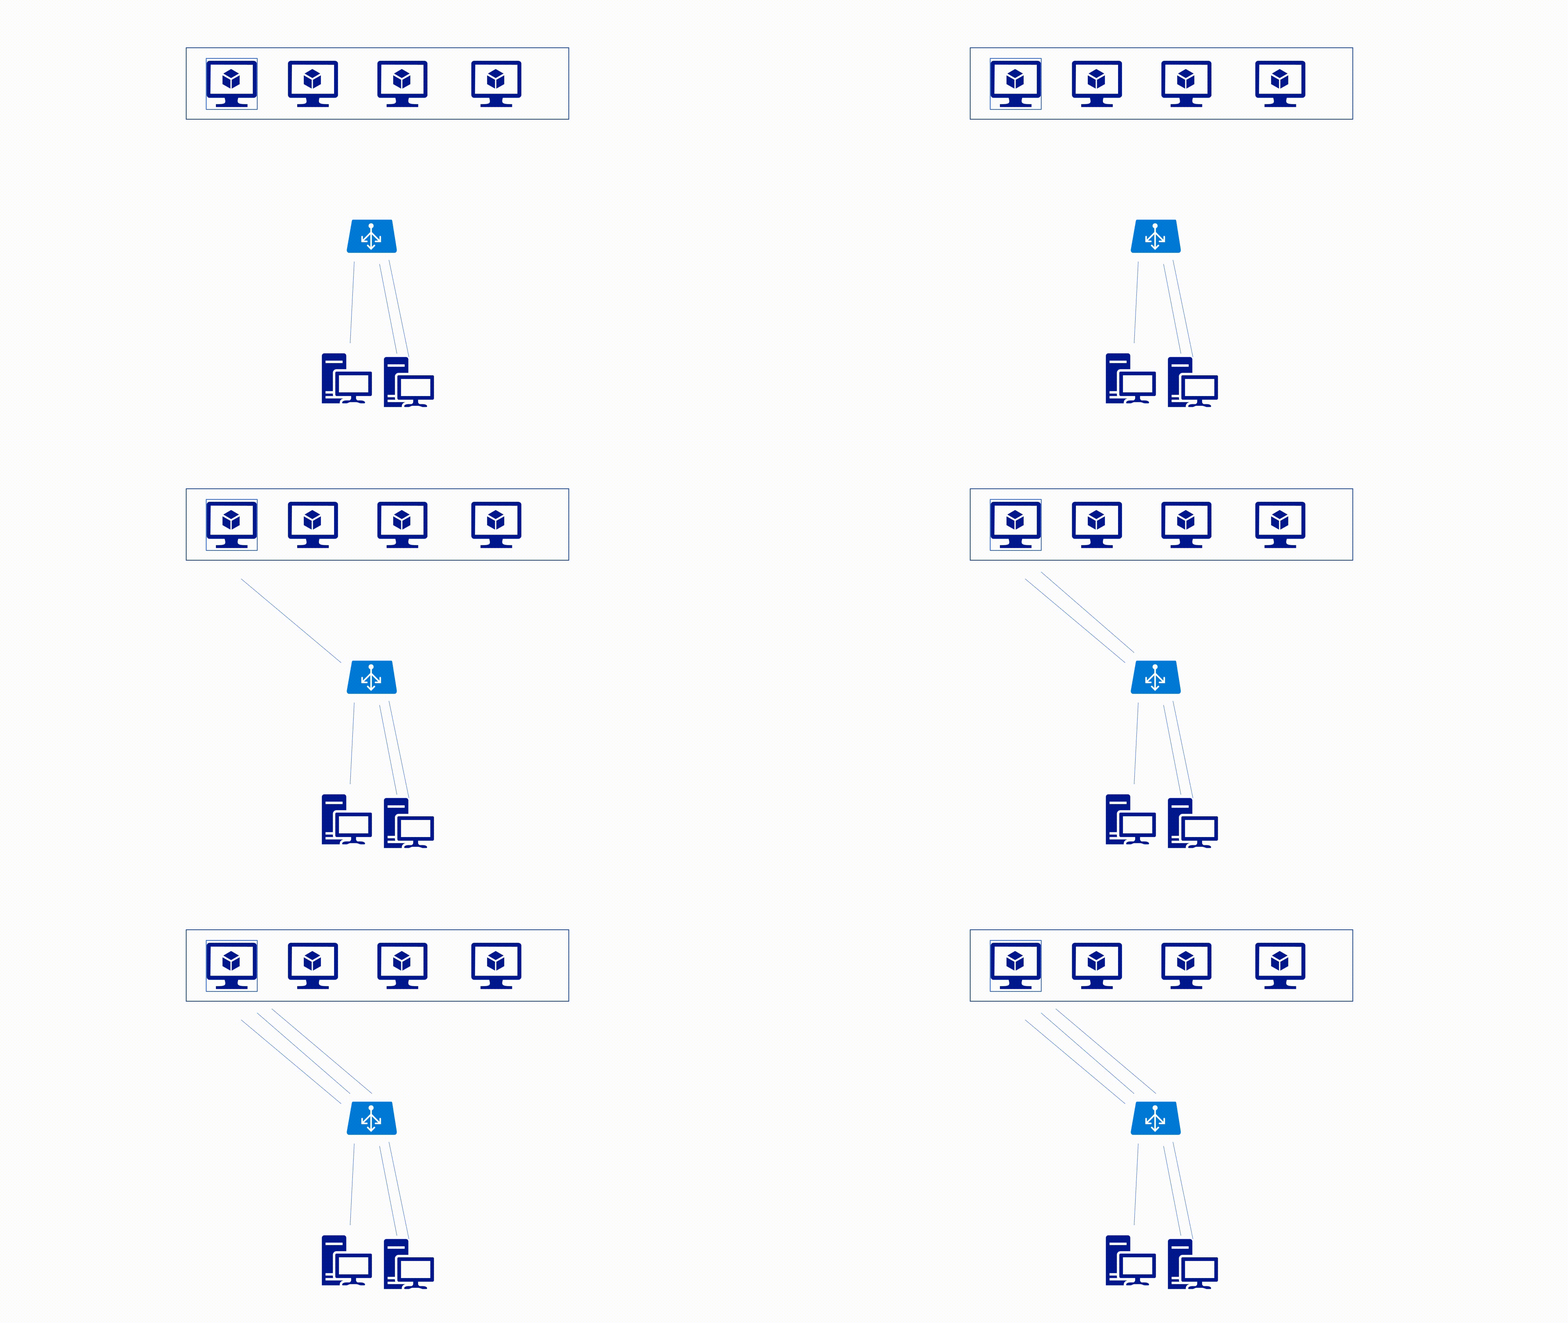
This is a 5-tuple hash depending on the Source IP, Source Port, Destination IP, Destination Port, and Protocol Type. The hash is a piece of computed information that is not easy to get reverse engineered. This mode works until one of the five dependencies change. If for example, a port gets changed also the hash will change, and that means that the traffic will move to another endpoint.
5-Tuple hash
- Source IP
- Source Port
- Destination IP
- Destination Port
- Protocol Type
Source IP affinity mode
This mode uses a 2-tuple (Source IP, Destination IP) or 3-tuple(Source IP, Destination IP, Protocol Type) hash to map traffic. In this case, even if the Port changes the hash is the same, and the traffic doesn't move to another endpoint.
2-Tuple hash or 3-Tuple hash
- Source IP
- Destination IP
- Protocol Type
 |
Create Azure Load-Balancer
For the demo purposes, in an existing Resource Group, we are going to create a Load-Balancer for two App Servers.
Step1: Add New resource (Load Balancer)
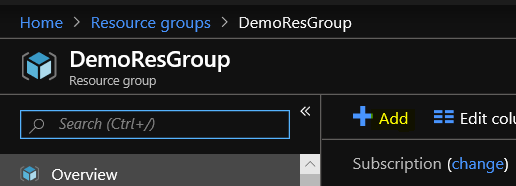
From the Resource group left main blade, click Overview and select + Add.
Step 2: Search for the resource (Load Balancer)
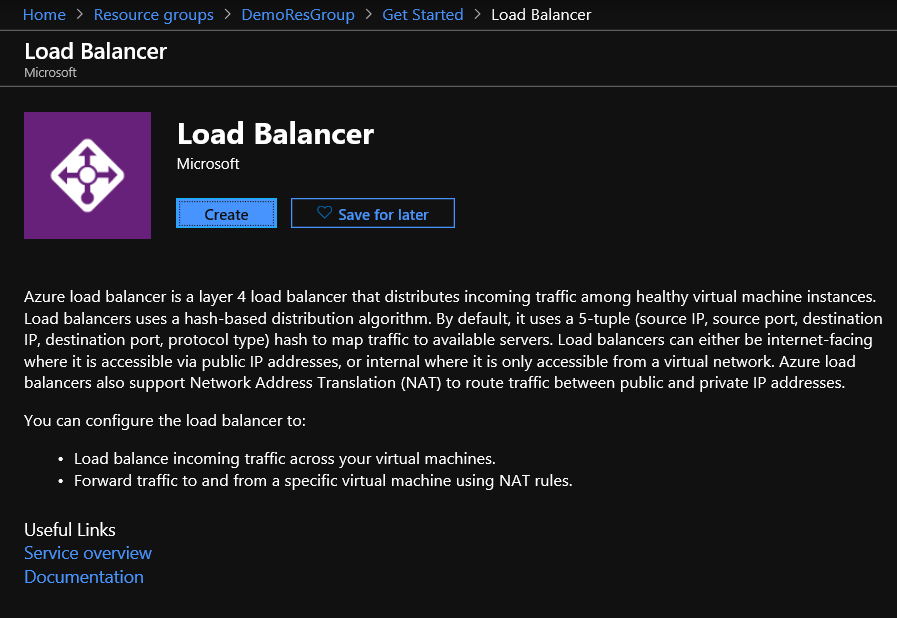
Search for the service by typing "Load Balancer", and hit Enter.
Step 3: Begin creation
Select Create, to begin the deploy procedure.
Step 4: Configure tab "Basics"
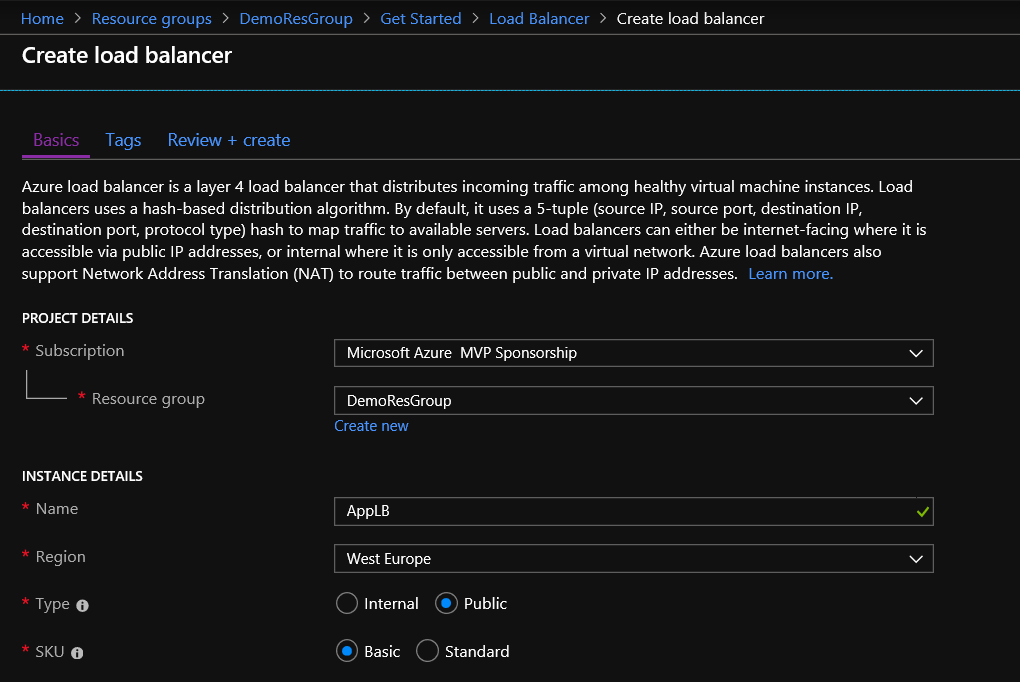
In the "Basics" tab, we must configure the PROJECT DETAILS, INSTANCE DETAILS, and PUBLIC ADDRESS.
| Setting | Value | |
| PROJECT DETAILS | ||
| Subscription | Create a New or Select a valid subscription | |
| Resource group | Select an existing or Create a New Resource group | |
| INSTANCE DETAILS | ||
| Name | Type a Name for the Load Balancer | |
| Region | Select a region for the Load Balancer | |
| Type | Select between Internal or Public LB | |
| SKU | Select between Basic or Standard | |
| PUBLIC IP ADDRESS | ||
| Public IP address | Select to Create New or Select an existing Public IP address | |
| Public IP address name | If we Select to Create a New address, we must type the name | |
| Assignment | Select between Dynamic or Static Public IP address | |
| Add a public IPv6 address | This is an optional setting, to add an IPv6 address on the LB | |
Configure The Load-Balancer
At the following steps, we will configure the Load-Balancer settings.
Step 1: Frontend IP configuration
From the Load Balancer left main blade select Settings - Frontend IP configuration and click + Add.
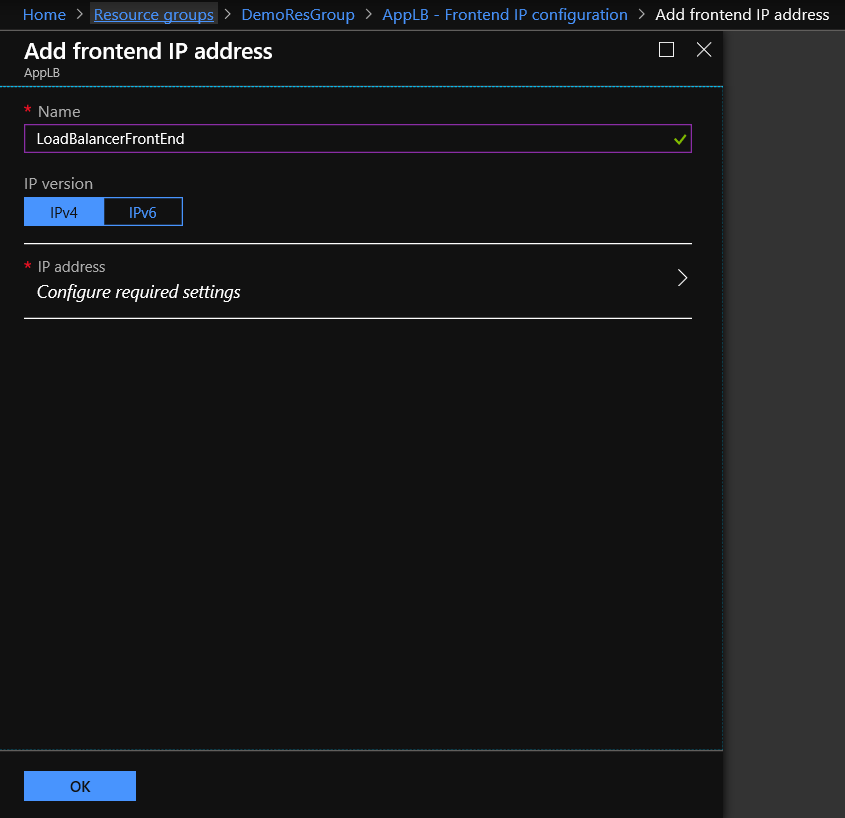
In the Add frontend IP address blade, type the Name of the LB Public IP and click OK.
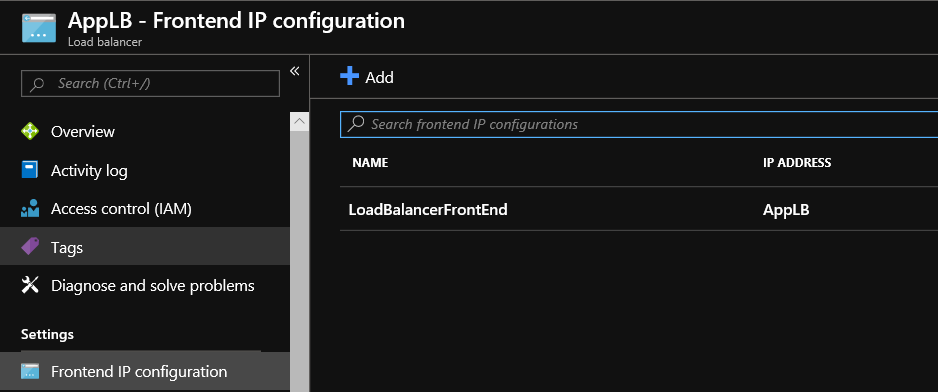
Few seconds later we are able to see the Load Balancer's Frontend IP.
Step 2: Backend Pools Configuration
At the next step, we configure the backend pools, these are the VMs with the Application Server installed that we need to load balance the traffic from the internet.
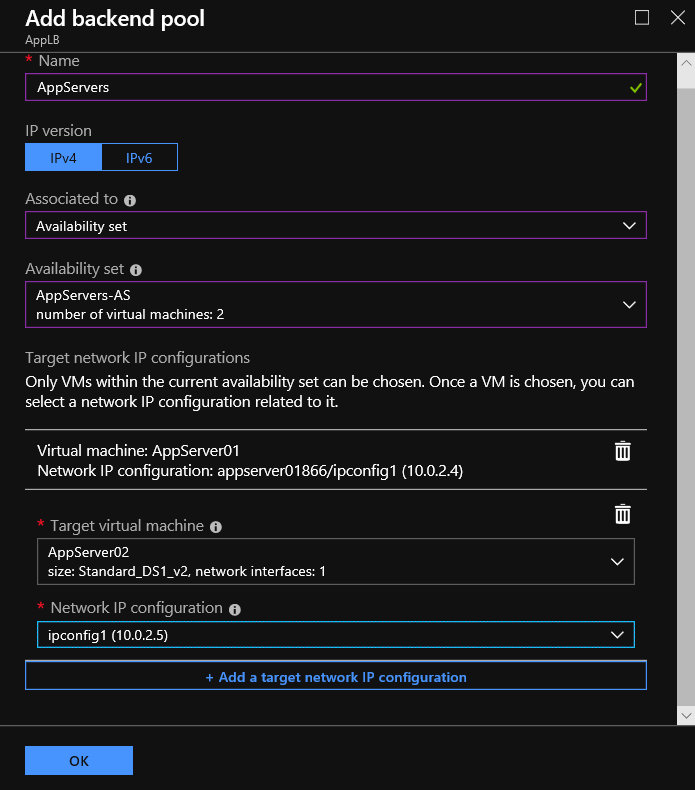
To configure this we select Settings - Backend pools and click + Add.
| Setting | Value |
| Name | Type the name of the Backend pool |
| Associated to | Choose to use the LB with Availability Set, Single VMs, or VM Scale Set |
| *** For the demo purposes we select Availability Set, and we have to configure few more settings | |
| Target network IP configurations | |
| Target virtual machine | Select the VM that uses the LB. ** The VM must be in the same location with the LB |
| Network IP configuration | The network IP configuration, which will be associated with the backend pool |
When the Backend pool deployed we able to see a view like the following image.
Step 3: Health Probe Configuration
At 3rd step, we are ready to configure the health probe. Health probe helps us to detect failures at applications run in the backend pools.
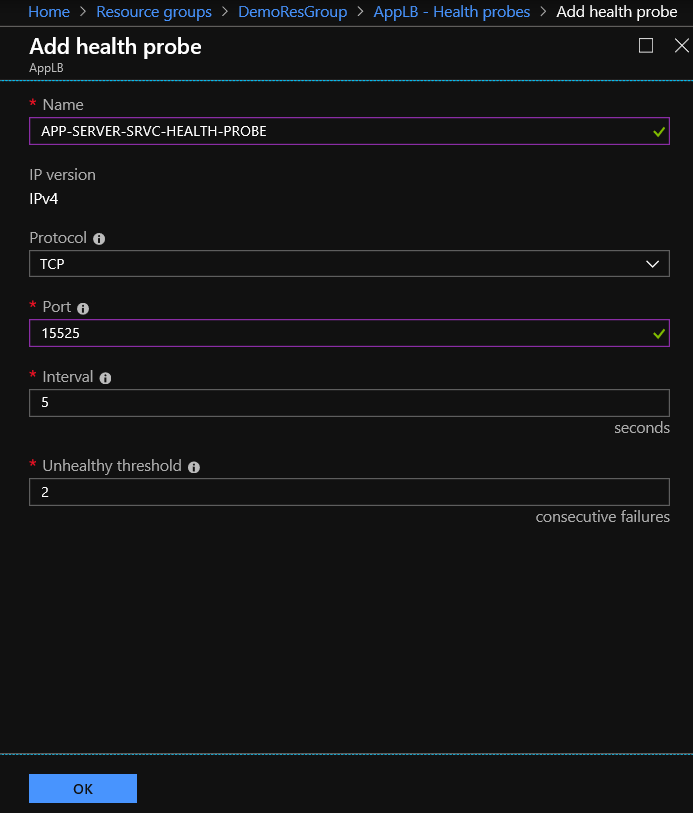
It's quite easy to configure a LB health probe, we select Settings - Health probes and click + Add. At the Add health probe form we need to type a Name, select Protocol (TCP or UDP), type the port number for the health probe and click OK.
After a few seconds, we are able to see the Load-Balancers health probe.
Step 4: Load Balancing Rule Configuration
At the final step, we will Add a load balancing rule for the Load-Balancer. Actually, this rule determines how the Load-Balancer handle the requests. We can read more details in this post.
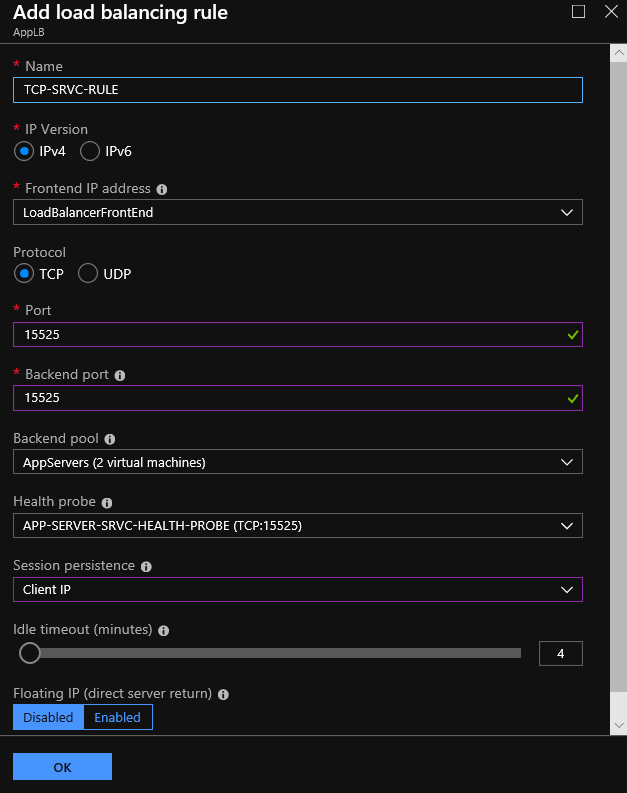
To Add a new Load Balancing rule, from the Settings - Load balancing rules, select +Add.
| Setting | Value |
| Name | Type a name for the Load balancing rule |
| IP version | Select the IP version, between IPv4 / IPv6 |
| Frontend IP address | Select the Frontend IP address, that the clients communicate with the Load-Balancer |
| Protocol | Select the IP Protocol, between TCP / UDP |
| Port | Type the Port number, that the load balancing rule applies |
| Backend port | Type the Port which the traffic will route to the VM |
| Backend pool | Select the Backend pool with the VMs that the Load balancing rule traffic will apply |
| Health probe | Select the Health probe that will check how healthy is the load balanced traffic |
| Session Persistence | Select the Session Persistence to use for the Load balancing rule, between None, Client IP, Client IP and Protocol |
| Idle timeout(minutes) | Type the Idle timeout for the Load balancing rule. Timeout keeps a connection open without relying on clients to send keep-alive messages |
| Floating IP (direct server return) | This setting is recommended for SQL Always-On Availability Group Listener |
When configuration completes, we are able to see the Load balancing rule, as the image below shows.
Conclusion
A Load-Balancer can be software or hardware, MS Azure offers this as a service that provides all the capabilities. This is important because, depending on the needs of each infrastructure, the cost can be zero or it can behave at a typical cost based on needs.
See Also
- What is Azure Load Balancer?
- Create Load Balancer From The Azure Portal
- Pricing
- Load Balancer Configuration
- Configure port forwarding in Azure Load Balancer using the portal
- Configure load balancing and outbound rules in Standard Load Balancer using Azure CLI
- Configure TCP idle timeout settings for Azure Load Balancer
- Configure the distribution mode for Azure Load Balancer
- Configure High Availability Ports for an internal load balancer
