Azure Speech Services and Windows 10: Transcribe video, make custom voices and subtitles
Making a custom voice is easier than you think! This article describes how to implement "speech to text" and "text to speech" services for FREE! To transcribe audio, generate text captioning, and with very little effort you can create your own custom voice, which sounds very much like the real person! Everything you need has been uploaded to GitHub showing detailed implementation of these services.
Introduction
This project came from wanting to transcribe the video, from a presentation given to my London Azure Developer Meetup group, last November (2018).
The presenter was Martin Woodward, Microsoft Principal Group Program Manager for DevOps.
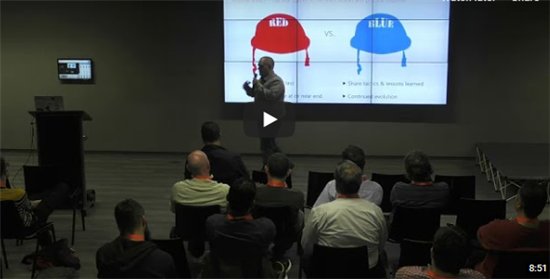
I hope you also enjoy watching the full series of clips linked from the image below:
From just 8 minutes of curated audio snippets, I can build a custom voice of Martin Woodward.
Click here, to hear an example (wav file)
Very recognizable, from less than 8 minutes worth of training data!
You can even get "recognizable" results, from less than a minute's worth of audio from friends, family, or from a video of your favorite celebrity!
- This project shows how to use the free tier of Azure's Speech Service, to transcribe speech to text.
- You then curate the snippets and feed them back into Azure's Custom Voice Service, to generate a surprisingly similar sounding voice!
- Also, this shows how to feed text back in, to generate your own audio files using the custom voice!
- Finally, this also shows how to export that "timed text" as a subtitle file, to feed back into your original video.
Try it yourself, download from Github
The tool shown here is **uploaded to GitHub **- so try this yourself!
Note
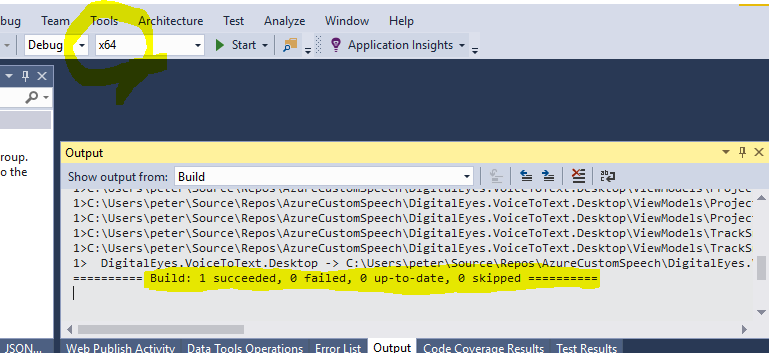
If you just want to download the code and run, first please read the section below about "Any CPU not supported"
All you need is:
You'll have to flash some plastic for the actual Azure subscription. But there are no tricks, or hidden costs as long as you stick to free tier services, as used below . You get a number (currently 5) of free hours each month. That's video processing hours, not real-time hours. Similar free limits relate to data size and concurrency, but I was able to make this project run lots of tests in the process and finally transcribe my 1 hour video - all within that free allowance.
If you just use free services and resources, your monthly bill WILL be zero!
Speech To Text Service
The Speech Service in Azure is the world's leading AI tool, for translating voice recordings to text. To see Speech To Text (STT) in action right now, click here for Microsoft's demonstration page, which will transcribe what you say into your mic.
Firstly, we need to feed an audio file into the service. In real-time, it returns a very good guess at what was said. Azure Speech Service recognition is driven by artificial intelligence. Correcting itself as it goes, to present what was most likely to have been said.
At the time of writing, the Speech Service only accepts WAV format audio files. The full details can be found here.
So in my demo project, I'm using NAudio, which can extract a WAV file from a variety of media formats, including mp3, m4a, mp4, and many others.

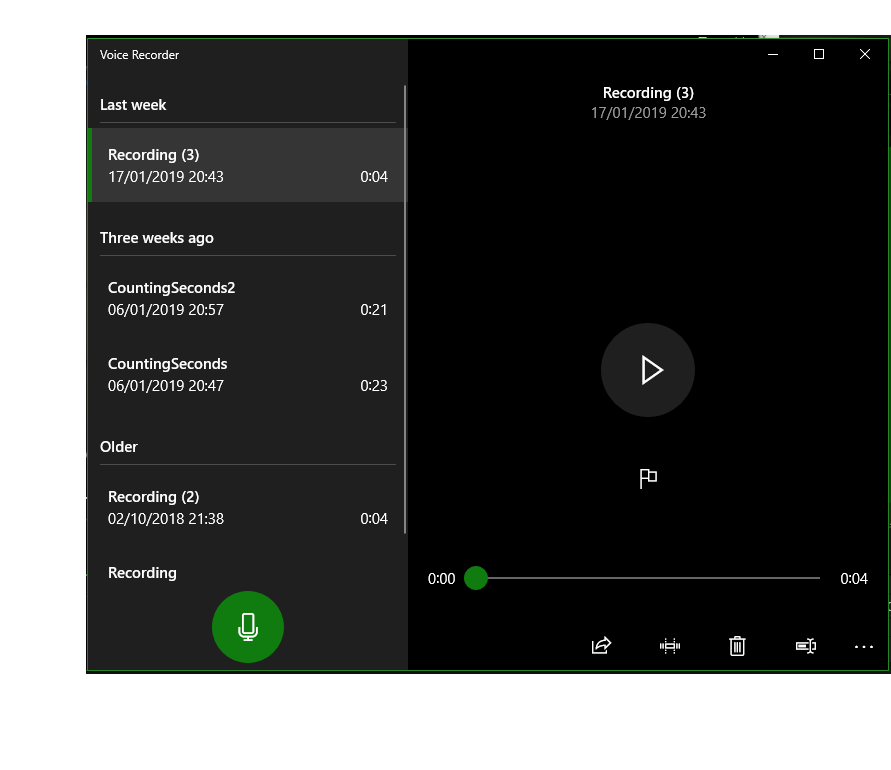
The "m4a" audio format is produced from your baked-in Windows 10 "Voice Recorder" app. Which means you don't need any other software to try this at home. You can record unscripted audio with family and friends. Then let the service transcribe the script from the audio. Then simply feed that back in, to reproduce their voice!
When you want to use the Speech To Text Service., you choose which service endpoint to use - "Standard" recognition, or "Custom Acoustic" recognition. First, we will use the default endpoint. See the video below, which shows a good transcription, but not perfect...
(Should say "Pete's" not "peace")
So the hypothesis here is that if we feed these transcriptions BACK INTO THE SERVICE and train our own "custom acoustics" service, does that significantly improve the recognition? Are the results more accurate when you transcribe the audio a second time, through your new custom endpoint?
Yes it did! Using a small number of tidied transcriptions to make a custom acoustic endpoint, gave significantly better recognition!
You can also use several other features and services to start receiving** almost perfect results thereafter**!
How it works
While the service is working through your audio file, you'll get a frequent stream of events returned. Many each second potentially, for each word transcribed, plus corrections as it goes. Recognized speech chunks are snipped off like a sausage factory, every 20 seconds. Then it starts throwing back the next 20 seconds.
Watch the 1 minute video below, transcribing 42 seconds of audio.
See how the service can transcribe at TWICE the speed of your audio!
At the end of each block of "Recognizing" events, you'll get a "Recognized" event, with the "best guess" for that chunk. With punctuation and a final buff included. Much better than the "live feedback" version. Recognition event arguments include the SpeechRecognitionResult, which contains Duration, OffsetInTicks and the [transcribed so far] Text properties. The main event properties are explained below.
SpeechRecognitionResult.Text Property
First you get "Recognizing" events, which have a quick in-flight guess text, for example, "go to the Microsoft dot com website". After each 20 second cycle, you get the "Recognized" event, where text will be "Go to the microsoft.com website."
SpeechRecognitionResult.Duration Property
This is the length of just the CURRENT recognition cycle, so far. Not the whole input audio. Also, there is no direct relation to word timings. Transcription guesses change constantly, as the AI learns the sentence and returns the most likely phrase that it thinks was said. This means the time that each word was actually said is not obtainable from the results. I have made a good crack at deriving these timings from when events come in and what changes are in the new results. Te screenshot of a snippet above shows how it has placed the words roughly in the right places, making it easy to group into phrases.
SpeechRecognitionResult.OffsetInTicks Property
This is the time offset for the whole 20 second recognition chunk currently being worked on. This helps you stitch them all back together again afterwards.
SpeechRecognitionResultExtensions.Best Method
It is worth also noting this extension method, which will give a best guess return for a result. Note that although it shows as a parameter-less method of the SpeechRecognitionResult, you actually have to pass the result object INTO this static method, as a parameter.
Custom Voice Creation
Once you have the transcription from an audio track, you could just feed that raw translated text back into the service, it works fine. In theory, if that's what the word "sounded" like to the service, it would be a good start for forming any other words too.
Click for demo wav file generated from just 42 seconds of audio, with raw (error-riddled) transcribed text to match.
For best results though, a little clean-up and curation of the text goes a long way. So, you need to position and edit the text, to match the audio as closely as you can.
Watch the full video!
Here is an end to end demonstration of this "curation" stage. This shows the full process of curating the utterances into short clips.
See how simple it is, when you have custom tools ;)
| View |
When you've curated a good number of matching audio snippets, you can now make your own custom voice. I'm using a check flag for the "TextParts" within each 20 second snippet. Shown below, only the "ticked as OK" (green) TextParts from the snippets will be used.

Prepare The Training Dataset
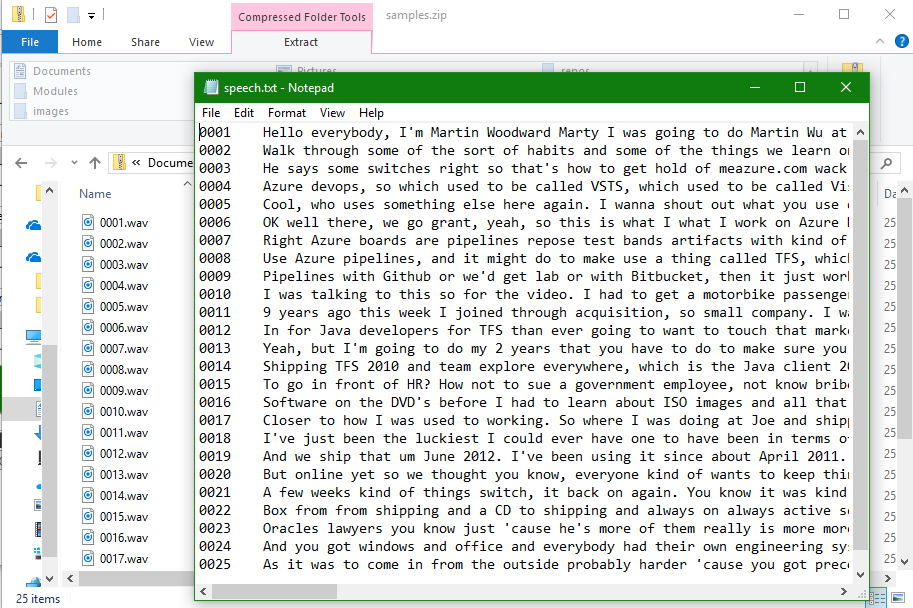
Audio snippets need to be numbered sequentially, reduced to the required Custom voice format and zipped up into a single file. You must also prepare the transcription file, which accompanies the zip upload. This plain text file lists the audio filenames, with the spoken text. One per line.
Don't worry, the demo project I've dropped on GitHub does all that for you too!
File format shown above is for the Custom Voice service. That service does not want file extension on the end of the file name.
However, the acoustic dataset we need to train for better recognition DOES expect the fill filename "0001.wav".
These differences are all built into the demo project and you get asked which kind of export you want, depending on if you are training an acoustic dataset for recognition, or a custom voice for audio generation.
Once the files are prepared, you create a new project in the Speech Service and upload the files. This step can be automated, but I've not bothered, as it is so easy, and made even simpler with this demo project. It prepares all the files, including adding 200 milliseconds of silence at the start and end, as the service requires. It then opens the export folder, for you to copy the path into the open file dialog, for uploading text and zip files to the service. Read more here for the format and procedure which this demo project simplifies for you.
Copied from that docs page (so check the source in case it changes) are the [training data] audio file requirements, shown below:
Property             Value

File format             RIFF (.wav)
Sampling rate           at least 16,000 Hz
Sample format           PCM, 16-bit
File name               Numeric, with .wav extension
Archive format          .zip
Maximum archive size    200 MB
Note: If you use the REST service, instead of the SDK, you can also upload OGG format audio.
Check my code on GitHub, to see how your audio is reduced to a one channel 16 bit wav file, padded both ends with 200ms silence. Plus how to combine them into a single zip file. That is all done for you when you run the project.
To access your service dashboard for both Speech and Voice, go to https://customvoice.ai/ However, you may find yourself in the wrong region and no subscriptions showing. If so, scroll down and select your region from the list. You should end up at a url like https://xxxxxxxxxx.cris.ai/ - where xxxxxxxxxx is your chosen region, for example "northeurope".
Upload example, with fail demonstration
This next clip shows the process, starting from the docs landing page. This shows what to expect when a file is not in the correct format. When this is the issue, you get no error information. This indicates, however, that it is a format error. As the file cannot even be parsed correctly.
It is a similar process as for Custom Speech, described below.
Making a Custom Voice
As well as the recognition/translation/transcription services above, You can also generate speech from your own trained voices. This is called Text To Speech (TTS), using a generic or Custom Voice. You can do all this still with the free tier, for generous amount of free use each month. Even the paid levels are excellent.
Within this article's demo project, endpoints are saved as EndpointConfig objects, so you can keep track of them and choose from a drop-down. Whether you want to generate speech from the standard voices, or from a custom voice which you have trained. There is a large range of "voices" you can choose from, which you define using SSML. Read this excellent quick start guide to learn more.
The third tab of the demo project shows how to send a request and receive the generated media file back. This uses the REST service, to upload the text and pull back the audio file. The code I give you automates the creation of sound bytes, zips them up and collates into the "index" text file, which are required for this service.
This manual step is just like the Custom Acoustic Dataset service, mentioned above. However, there is a slight difference in text file format, also explained above. Use this demo project to generate those files and upload them to the service via the web dashboard.
Once you've gone through the steps of creating a custom voice, and you have a custom voice endpoint, you can test it in the web portal. The short clip below shows a test using the web tools.
Making It Sound More Realistic
To significantly improve the timing and pronunciation of your custom voice, you can use Speech Synthesis Markup Language (SSML). This markup language allows you to carefully construct how the voice is generated and what it says.
You can dictate the speed and pitch of the voice, as well as pauses. You also have phonetic pronunciation tags. These allow you to say exactly what you want. Read more about SSML and phonetics here.
<speak version="1.0" xmlns="https://www.w3.org/2001/10/synthesis" xml:lang="en-US">
  <p>
  <s>My name is Martin and I'm OK. I sleep all night and work all day!</s>
  <s>Well that's just grand, because we're all SAYFE as <phoneme  alphabet="ipa" ph="ˈhaʊzɪz!">houses</phoneme></s>
  </p>
  <p>
  <s>So let's get crackin shall we?</s>
  </p>
  <p>
  <s>Ship it!!</s>
  <s>Ship it!!</s>
  <s>Ship it!!</s>
  <s>Job done</s>
  </p>
  <p>
  <s>Just in time for tea!</s>
  <s>That's just smashing that is!</s>
  </p>
</speak>
An Important SSML Implementation Note
There is a small but crucial detail that you should know at this point. When you want to use SSML to generate speech with your own Custom Voice endpoint, you need to specify the voice. This is because SSML requires a "voice" attribute, which defines the custom sound, usually one of the standard voices as shown below:
<speak version='1.0' xmlns='http://www.w3.org/2001/10/synthesis' xml:lang='en-US'>  <voice name='Microsoft Server Speech Text to Speech Voice (en-US, ZiraRUS)'>blah blah blah</voice>
</speak>
You need to use the name of your custom voice here, the name you gave it when you create the endpoint.
The name attribute for the endpoint (shown being created below) would be "Martin Test", instead of the highlighted text above.
<speak version='1.0' xmlns='http://www.w3.org/2001/10/synthesis' xml:lang='en-US'>
 <voice name='Martin Test'>blah blah blah</voice>
</speak>
Creating an endpoint for generating your own speech from text:
Generate Subtitles
Now that you have a set of curated, time-boxed utterances, you can export them as subtitles (captioning) - for feeding back into an original video!
Since starting this article, I added a fourth tab to the toolbox. You can generate a TTML or SRT formatted file.
Timed Text Markup Language
Below is an example of the TTML that is generated:
      <    tt xml:lang="en" xmlns="http://www.w3.org/ns/ttml" xmlns:tts="http://www.w3.org/ns/ttml#styling">
                  <      head      >
                   <      styling      >
                    <      style xml:id="s1" tts:fontFamily="SansSerif" tts:fontWeight="bold" tts:fontStyle="normal" tts:textDecoration="none" tts:color="white" tts:backgroundColor="black"/>
                   </      styling      >
                   <      layout      >
                    <      region xml:id="rBottom" tts:origin="20% 70%" tts:extent="60% 30%"/>
                   </      layout      >
                  </      head      >
                  <      body      >
                   <      div xml:lang="en">
                    <      p begin="00:00:00.2800000" end="00:00:01.2800000" style="s1" region="rBottom">Hello everybody!</p>
                    <      p begin="00:00:01.7900000" end="00:00:02.9300000" style="s1" region="rBottom">I'm Martin Woodward.</p>
                    <      p begin="00:00:02.9900000" end="00:00:09.0100000" style="s1" region="rBottom">Marti.. I was gonna do martinWO@microsoft.com, but Pete's ruined that forever fer me now, so...</p>
                    <      p begin="00:00:09.2000000" end="00:00:12.6500000" style="s1" region="rBottom">If you haven't, don't know what that means, then go.. go look it his LinkedIn.</p>
                    <      p begin="00:00:12.9600000" end="00:00:17.4500000" style="s1" region="rBottom">@martinwoodward on Twitter, if you wanna send some abuse for me being late, that'd be great!</p>
                    <      p begin="00:00:17.6400000" end="00:00:22.5000000" style="s1" region="rBottom">And then we'll get cracking! So what I was going to do tonight was kinda talk through</p>
                    <      p begin="00:00:22.6100000" end="00:00:26.0200000" style="s1" region="rBottom">some of the sort of habits and some of the things we learnt on our team</p>
                    <      p begin="00:00:26.1400000" end="00:00:29.4000000" style="s1" region="rBottom">as we became.. as we sort of did our journey towards DevOps.</p>
                    <      p begin="00:00:29.6500000" end="00:00:34.0300000" style="s1" region="rBottom">DevOps is never.. it's a destination you're never going to get to, you know I mean?</p>
                    <      p begin="00:00:34.0800000" end="00:00:37.7700000" style="s1" region="rBottom">It's a journey were going to be on forever, and we're going to get better at, as we go.</p>
                    <      p begin="00:00:37.9000000" end="00:00:41.0400000" style="s1" region="rBottom">But we'll talk about that more as we get started. So let's get cracking!</p>
                   </      div      >
                  </      body      >
      </    tt    >
* SubRip Subtitle*
In contrast to the formal tagged approach of TTML, here is the export for the SRT format. This works with video editing applications like Camtasia.
1
00:00:00,280 --> 00:00:01,280
Hello everybody!

2
00:00:01,790 --> 00:00:02,930
I'm Martin Woodward.

3
00:00:02,990 --> 00:00:09,010
Marti.. I was going to do martinWO@microsoft.com, but Pete's ruined that forever for me now so...

4
00:00:09,200 --> 00:00:12,650
If you haven't, don't know what that means, then go... go look it his LinkedIn.

5
00:00:12,960 --> 00:00:17,450
@martinwoodward on twitter, if you wana send some abuse for me being late, that'd be great!

6
00:00:17,640 --> 00:00:21,700
And then we'll get cracking! So what I was going to do tonight was just kinda talk through

7
00:00:22,610 --> 00:00:26,020
some of the sort of habits and some of the things we learnt on our team

8
00:00:26,140 --> 00:00:29,400
as we became, as we sort of did our journey towards DevOps.

9
00:00:29,650 --> 00:00:34,030
DevOps is never... it's a destination you're never going to get to, you know I mean?

10
00:00:34,080 --> 00:00:37,770
It's a journey were going to be on forever, and we'll going to get better at, as we go.

11
00:00:37,900 --> 00:00:41,040
But we'll talk about that more as we get started. So let's get cracking!
TTML for your Windows 10 Films & TV app
The clip below shows importing the above TTML script, into a matching clip from the original footage.
This can all be done with your free Windows10 baked-in "Films & TV" app!
SSML and SRT are just two common formats for subtitles, although there are a great many more.
If you're new to all this, the GitHub demo code should help you learn how to implement your own file formats.
"Any CPU" Not Supported
If you download the project and just run it, you'll probably get the following error message:
This simply means you have to change that drop-down to x64 or x86 configuration.
If neither are listed, click the "configuration manager" option, shown below:
Then select active solution platforms and "<NEW...>" as shown below:
Finally, type in your choice of platform as "x64" or "x86" and "copy the settings from Any CPU". No changes are needed.
Then you should find it in the drop-down and the project should compile.
PM me on social media, if you have any problems.
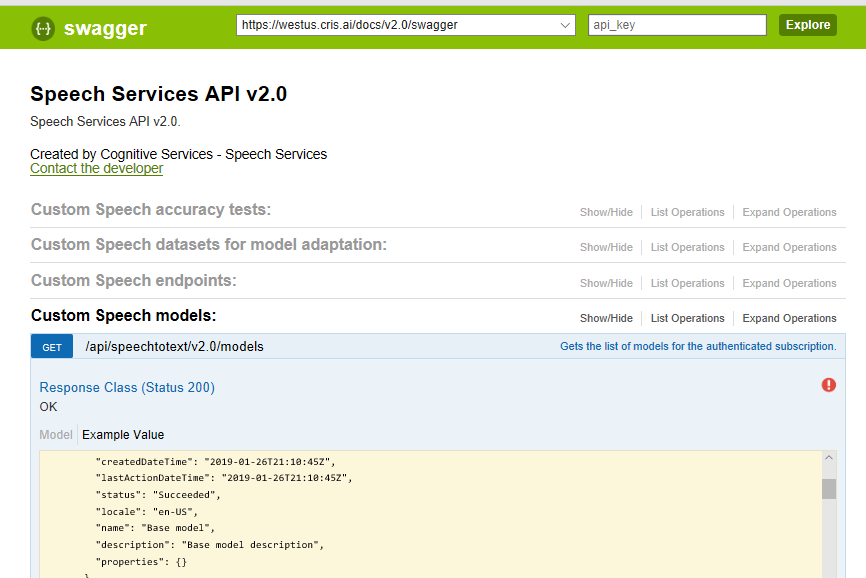
Test Services Directly Via Swagger
This article is long enough already, so if you want to explore the many other features of Speech Services, you can do so via the Swagger page for your service region.
Each operation has a section, where you can learn the methods and parameters.
There is also a form for each where you can test the service call, against your own subscription.
**Important notes: **
**
**1. You must select the correct service "region" where your subscription is created. Above shows the default "westus" service.
- Notice the "api key" textbox in the green header above and the red exclamation icon below. Enter your key or click the icon to log in. Then you can use the actual service methods directly against your own subscription data.
The Swagger page uses the same REST endpoints that the code uses. There is no more risk or difference from using the web page or code.
So, once you have some data uploaded to the service, go ahead and play with the other features via Swagger, before you code it up!
What is a Microsoft "IT Implementer"?
As a Microsoft IT Implementer, I give this work to you, in the hope that it helps others to implement such a cool and free technology. We're here to help demystify today's top technology. To debunk the myths that may deter others, to deep dive and demonstrate. Below are some other links for this Custom Voice project.
- This article announcement on Microsoft Azure Developer blog
- The initial announcement on LinkedIn
- The Twitter announcement, with stamp of "like" from Martin
- Microsoft IT Implementer home page
See Also
- Try for yourself: Download this project from GitHub
- Get the tools to build your own apps for free, with Visual Studio Community and VS Code
- Microsoft Cognitive Custom Speech Service
- Cognitive Services: Speech to Text & Demo (STT)
- How to customize a Voice Font (digitized voice)
- All the insights and revelations from Microsoft and their ways of working, from Martin Woodward
- More about Timed Text Markup Language
- Everything else is here (SDK for Microsoft.CognitiveServices.Speech Namespace)
- Alternatively, get more flexibility with the REST service
- Swagger link - for playground page to test the service directly.
- Dive deeper into DevOps by following Martin Woodward on Twitter
