Azure Active Directory: Introduction to Managed Identities for Azure Resources
 Note Note |
| Managed identities for Azure resources was previously known as Managed Services Identities (MSI), and still there are many articles and references which use the term MSI. |
Introduction
Security is one of the biggest concerns for any organization, and with the advent of Cloud Computing and Hybrid Infrastructure; Security is probably the biggest concern. A breach is security and compliance can impact organizations reputation, business and it can also invoke legal issues.
Managing credentials, keys, and secrets is an important aspect of security. Azure provides a managed service called Key Vault, where we can securely store our credentials, keys, secrets, but how to manage authentication to access the key vault?
If we look at Microsoft Server line of products like Windows Server, Exchange Server, SQL Server, SharePoint Server; Microsoft has leveraged Active Directory to centrally manage authentication and access for all Microsoft products and services.
Microsoft has taken the same approach in Cloud. They have leveraged Azure Active Directory to manage authentication and access for many Azure Services. Today, many Azure services support Azure AD authentication and the list is increasing.
Managed Identities
There is an important difference between standard Azure AD authentication and Managed Identity feature. Managed Identity feature only helps Azure resources and services to be authenticated by Azure AD, and thereafter by another Azure Service which supports Azure AD authentication.
**
Managed identities are a special type of service principals, which are designed (restricted) to work only with Azure resources. When the Managed Identity is deleted, the corresponding Service Principle is automatically removed from Azure AD.
**
To understand it's practical use, consider a scenario. An application which is running in Azure VM needs to access a secret which is stored in Azure Key Vault. Now, in order to retrieve that secret from Key Vault, first the VM needs to authenticate to Key Vault and access the secret. How that will be done ? Using Managed Identity.
Using Managed Identity, Azure VM would authenticate to Azure Key Vault (through Azure AD), and retrieve the secret stored in Key Vault. The secret is then used by the application to access other resource, which may or may not be in Azure.
The advantages of this approach are:
- One time configuration. Once configured, everything is managed by Azure.
- You do not need to type credential, or hard coded credential in the code.
- It is a free feature of Azure AD, so no additional cost involved.
Types of Managed Identities
System Assigned Identities
When we register the resource (Ex: Azure VM) with Azure AD, a System Assigned Managed Identity is automatically created in Azure AD.
- It has 1:1 relationship with that Azure Resource (Ex: Azure VM).
- We cannot see it in Azure AD Blade.
- The lifecycle of the identity is same as the lifecycle of the resource. Once we delete the resource (ex: Azure VM), the system assigned managed identity is deleted automatically from Azure AD.
- System assigned identity cannot be shared between more than one resource.
User Assigned Identities
This type of identity has to be created manually in Azure AD.
- This is a standalone identity, and does not have 1:1 relationship with any Azure Resource.
- A single resource (e.g. Virtual Machine) can utilize multiple user assigned managed identities. Similarly, a single user assigned managed identity can be shared across multiple resources (e.g. Virtual Machine).
- We can see it in Azure AD Blade.
- The lifecycle of the identity is not tied up with any Azure Resource. We have to manage and delete this identity manually.
In General, System Assigned Identities are most preferred and recommended approach, because the entire life cycle of the identity would be managed by Azure. Unless there is some specific requirement (like using same managed identity for multiple Azure resources), we should avoid using User Assigned Identity.
Managed Identities: How it Works
When we create a managed identity (System or user), two things happen under the hood:
- Within Azure AD : A service principal is created in Azure AD. The Service Principal represents the identity of the resource (Ex: Azure VM) in Azure.
- Within the Resource : Azure Resource Manager updates the Azure Instance Metadata Service identity endpoint with the service principal client ID and certificate. Using this, the resource would authenticate to Azure AD without using any credential, and Azure AD would identify the resource through the Service Principal.
Now that the resource is registered with Azure AD and has got a Service Principal, you can assign permission, so that this resource can access other Azure Services (Ex: Key Vault).
To access other Azure Services, the resource first needs to authenticate to Azure AD and get a token. The token is a JSON Web Token (JWT). When it presents that token to other Azure Services that supports Azure AD authentication, access is granted or denied based on the permission configured. The permission is configured for the Service Principal.
Generic approach
There are many use cases and scenarios where we can use managed identities, but all these cases follow the same high level approach, which is as follows:
- Register the Resource (which needs access) to Azure AD and create a Service Principal. It could be System Assigned or User Assigned.
- Check whether the Service (which you want to access) supports Azure AD Authentication. For that, refer this Microsoft link.
- If the service supports Azure AD Authentication, configure permission / access policy and grant appropriate access to the resource. Refer this article to get details of built in roles for Azure resources.
- Now, the Resource will first send a request to Azure AD and get a token.
 Please Note
The exact cmdlet for sending request to Azure AD would vary depending on the Azure Service which you have to access. For example, if you have to access Azure Key Vault, you will send a Key Vault token request from Azure AD. If you are planning to access Azure Storage, you send Azure Resource Manager token request to Azure AD. - Once the resource will get the token from Azure AD, it will send the request to the Azure Service , along with this token.
- The Azure Service (Ex: Key Vault, Storage Account, Resource Group) will validate the token, check access policy / permission and accordingly grant / deny the access.
Now that we have got the basic understanding on how it works, let's discuss two common scenarios.
Scenario 1: Azure Windows VM to Access Azure Key Vault
We have a VM name “SubhroJMPServer”. We want it to access Azure Key Vault to retrieve some credential. But in order to retrieve the credential, the VM needs to authenticate itself to Azure Key Vault. We will leverage Managed Service Identity for this authentication.
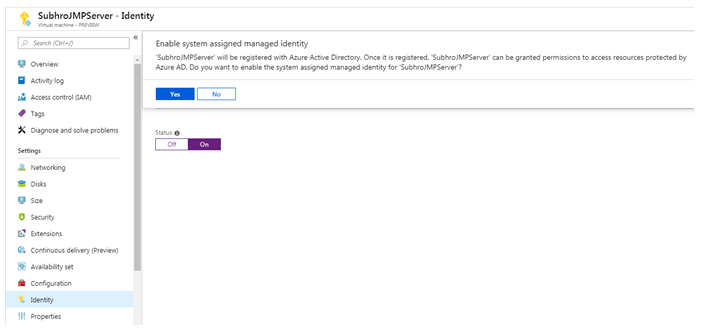
Step 1: Register the VM with Azure AD
In the VM Blade, go to “Identity”, and enable “System assigned Identity”.
Once done, you can see an “Object ID” assigned to the resource, and a confirmation that it is now registered to Azure AD.
Step 2: Configure Key Vault Permission
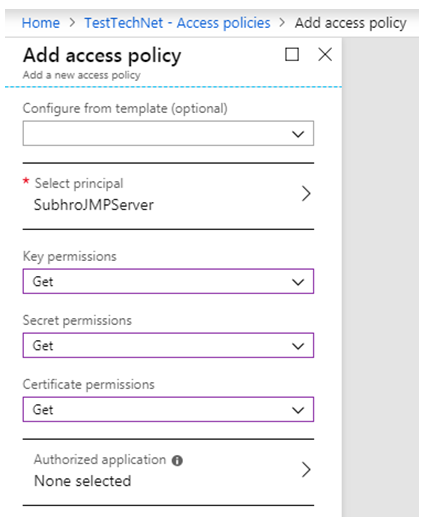
In the key vault, go to “Access Policies” and create a new Access Policy.
- • Select the Azure VM Service Principal.
- • Select appropriate permissions (Ex: Get) for key, Secret and Certificate, whichever is applicable.
In this case, we just need to retrieve the credential from key vault, do we are selecting “Get” permission for Keys, Secrets and Certificates.
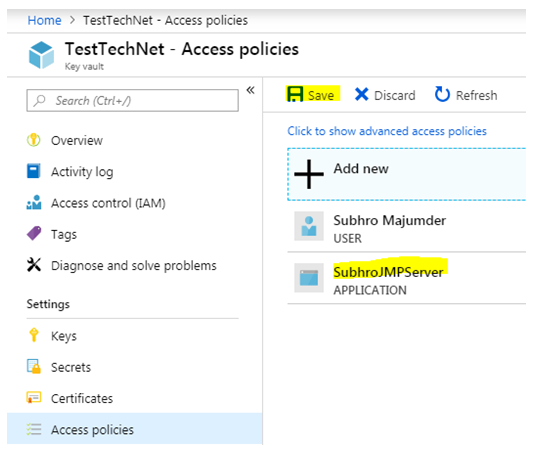
Once done, save the access policy.
- • You should now see the new policy in the Access Policy blade.
- • Save the new access policy to commit it.
 Note Note |
| Please do not use the “Access Control (IAM)” blade for this purpose. The purpose of “Access Control (IAM)” is to configure access for the entire key vault. To configure access for keys, secrets, certificates within the key vault, always use “Access Policies” section. |
For more details on Key Vault Access Policy, please use this link.
Step 3: Create a Secret
Now, go to Key Vault > Secret > and create a new secret.
Step 4: Retrieve the Secret
Now, we will try to access the secrets from the VM, for which we have granted GET access.
We will use a PowerShell cmdlet Invoke-WebRequest, which is used to send HTTP / HTTPs queries to a web page or web service. This command parses the response and returns collections of links, images, and other significant HTML elements.
Send Authentication Request to Azure AD
Send a request to Azure AD and store the response in a variable. The response is a JSON formatted string, which contains the token that we have to extract.
$response = Invoke-WebRequest -Uri 'http://169.254.169.254/metadata/identity/oauth2/token?api-version=2018-02-01&resource=https%3A%2F%2Fvault.azure.net' -Method GET -Headers @{Metadata="true"}
Just use the command as it is, without changing anything. You might be wondering how it is using generic parameters, as it needs to connect to Azure AD tenant to get the token. Here, we are using the feature Azure Instance Metadata service. Remember, the address 169.254.169.254 is a well-known non routable IP, which works only when it is being used within an Azure VM.
Extract the Token
We have to convert the JSON formatted string to a JSON object, and extract the token from the object. The extracted token is stored in $KeyVaultToken variable.
$content = $response.Content | ConvertFrom-Json
$KeyVaultToken = $content.access_token
Send Request to Key Vault and retrieve the key
Now send a web request to Azure Key Vault, using the Invoke-WebRequest command. The request should contain the Key Vault URL followed by the secret name.
The generic format is:
(Invoke-WebRequest -Uri https://<your-key-vault-URL>/secrets/<secret-name>?api-version=2016-10-01 -Method GET -Headers @{Authorization="Bearer $KeyVaultToken"}).content
In our case, it will be like this:
(Invoke-WebRequest -Uri https:// testtechnet.vault.azure.net/secrets/TestTechNetSecret?api-version=2016-10-01 -Method GET -Headers @{Authorization="Bearer $KeyVaultToken"}).content
Once you send this request to Key Vault, the Key vault will validate the token and check it’s access policy for the Key, which we are trying to retrieve. Since we have already granted this VM (Service Principal) to the get this key, the Key vault will supply the key value.
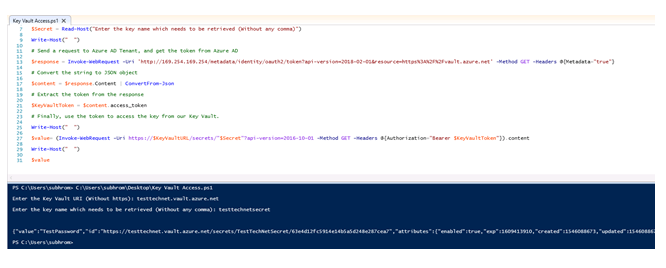
In my case, I have created a PowerShell script using above cmdlets
Below, highlighted a portion of the output, where you can see that it has retrieved the secret from Key Vault.
So this is how, the VM has successfully authenticated to Azure AD, received a token, submitted the token to Key Vault and retrieved the token. Now any code running within this VM can use this secret wherever required, without directly hardcoding the secret within the code.
Scenario 2: Azure VM to connect Azure Blob Storage
In this case, we will connect to Azure Blob Storage within an Azure VM, and will upload a Blob.
As we are aware, accessing Blob storage requires Access Keys. In this case, we will use Azure AD Authentication to retrieve the access key from the Storage Account and use that access key to get further access to the Storage Account.
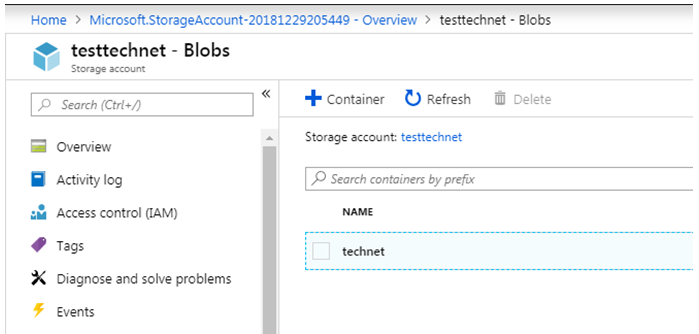
We have created a General Purpose V2 Storage Account, and within that we have created a Blob container named “technet”. At present, the blob container is empty.
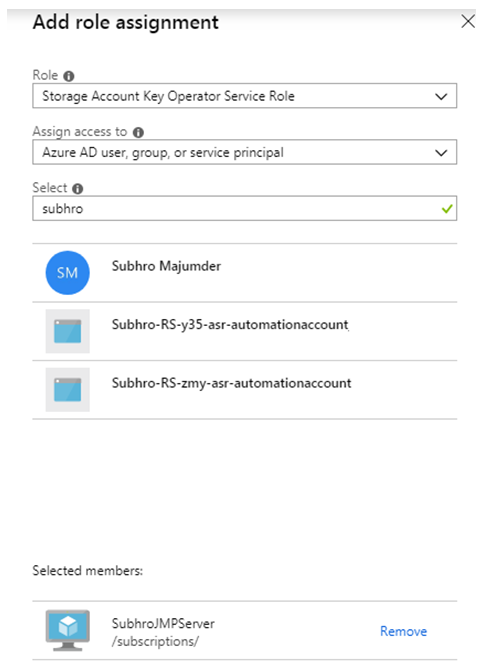
Now, go to storage account access control, and grant access to the VM. The role assignment should be Storage Account Key Operation Service Role. Under this role, the VM would be able to retrieve the Storage Access Key.
Once done, save the access policy.
The permission is configured and now it’s time to access the resource.
First, the VM needs to send an authentication request to Azure AD and get a token.
$response = Invoke-WebRequest -Uri 'http://169.254.169.254/metadata/identity/oauth2/token?api-version=2018-02-01&resource=https%3A%2F%2Fmanagement.azure.com%2F' -Method GET -Headers @{Metadata="true"}
$content = $response.Content | ConvertFrom-Json
$ArmToken = $content.access_token
So we have retrieved the token and stored it within the $ArmToken variable.
Now, we will use this to retrieve Storage Access Key. For that, we need to send an authentication request to the Storage Account.
The generic format would be as follows:
$keysResponse = Invoke-WebRequest -Uri https://management.azure.com/subscriptions/\<SUBSCRIPTION-ID>/resourceGroups/<RESOURCE-GROUP>/providers/Microsoft.Storage/storageAccounts/<STORAGE-ACCOUNT>/listKeys/?api-version=2016-12-01 -Method POST -Headers @{Authorization="Bearer $ARMToken"}
You have to replace above command with Subscription ID, Resource Group and Storage Account name.
Now, we have to extract the access key from the $keyresponse value, which we wil do by using below two cmdlets :
$keysContent = $keysResponse.Content | ConvertFrom-Json
$key = $keysContent.keys[0].value
$key contains the access key, which we are going to use in the next step.
I have created another PowerShell script, which takes the Subscription ID, RG name and Storage account name as input, and directly provides the access key.
Now that we have got the access key, let’s try to upload a file to the blob storage using the access key.
At this stage, you have to ensure that we have PowerShell module installed for Azure Storage, if not we have to install it using the cmdlet Install-Module Azure.Storage
Create a text file which you are going to upload.
Use below two cmdlets :
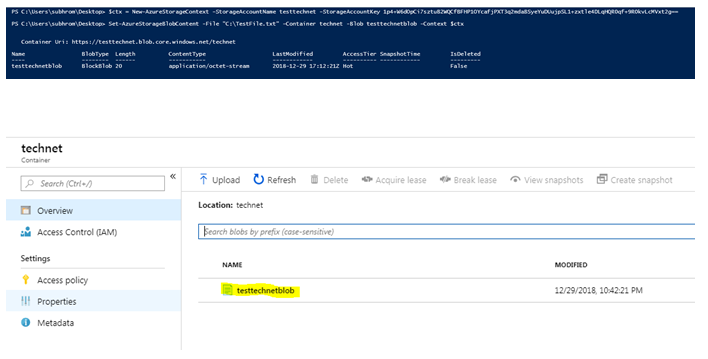
- $ctx = New-AzureStorageContext -StorageAccountName <STORAGE-ACCOUNT> -StorageAccountKey $key
- Set-AzureStorageBlobContent -File test.txt -Container <CONTAINER-NAME> -Blob testblob -Context $ctx
As you can see, the file has been successfully uploaded to the blob, under the container “testtechnet”.
This is how we have accessed the Storage Account using the access key, which we have retrieved using the token issued by Azure AD.
You can also refer this article for more details.
Summary
Managed Identity Service is the Microsoft recommended authentication method for Azure resources. We have discussed two scenarios in this article, but Managed Identities support many other scenarios.
Microsoft has published documentation for all kind of possible scenarios, which you can access from this link.
Other possible scenarios for your reference:
Resource |
Need to Access (Azure Service) |
System Managed Identity |
Azure Windows VM |
Azure Key Vault |
Supported |
Azure Windows VM |
Azure Storage (Using SAS) |
Supported |
Azure Windows VM |
Azure Storage(Using Access Key) |
Supported |
Azure Windows VM |
Azure Resource Manager |
Supported |
Azure Windows VM |
Azure SQL |
Supported |
Azure Windows VM |
Azure Data Lake Store |
Supported |
Azure Linux VM |
Azure Key Vault |
Supported |
Azure Linux VM |
Azure Storage (Using SAS) |
Supported |
Azure Linux VM |
Azure Storage(Using Access Key) |
Supported |
Azure Linux VM |
Azure Resource Manager |
Supported |
Azure Linux VM |
Azure Data Lake Store |
Supported |
Azure App Service |
Other Azure Resources |
Supported |
Azure Function |
Other Azure Resources |
Supported |
Azure Logic Apps |
Other Azure Resources |
Supported |
Azure Service Bus |
Other Azure Resources |
Supported |
Azure Event Hubs |
Other Azure Resources |
Supported |
Azure API Management |
Other Azure Resources |
Supported |
Azure Container Instances |
Other Azure Resources |
Supported |
|
| User Managed Identity is not supported for all services, and currently in preview for many services. |
References
- What is managed identities for Azure resources?
- Tutorial: Use a Windows VM system-assigned managed identity to access Azure Key Vault
- How to use managed identities for App Service and Azure Functions
- Services that support managed identities for Azure resources
- Keep credentials out of code: Introducing Azure AD Managed Service Identity
- Built-in roles for Azure resources
If you like this article, check out my other articles and scripts here.
