Exchange 2016: Cipher lockdown with IISCrypto 2.0
This article covers experimenting with Cipher Suite lock down and closing holes in SSL.
Here are a list of items that we went through:
- IIS Crypto check and configure.
- SSL Labs website check.
- SSL Certificate check and validations.
- Strict Transport Security - IIS
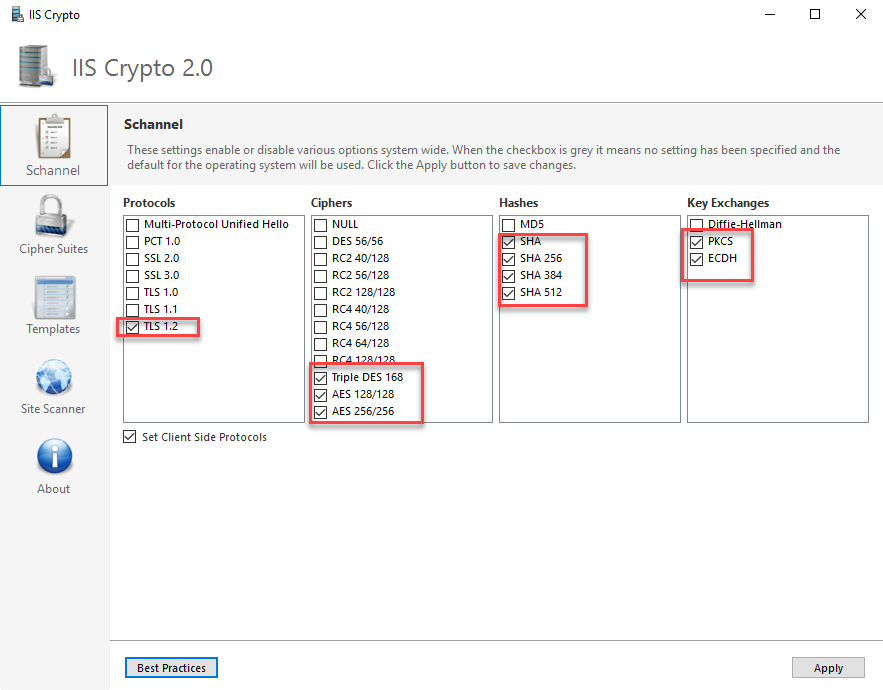
Firstly, I downloaded IIS Crypto 2.0 from Nartac Software and did the updated the following on Schannel:
Protocols: I only have TLS 1.2 enabled.
Ciphers: The last 3 were selected.
Hashes: I took out MD5 due to the attack on it.
Key Exchanges: Diffie-Hellman gets quite alot of bad reviews when doing SSL checks so it was unticked.
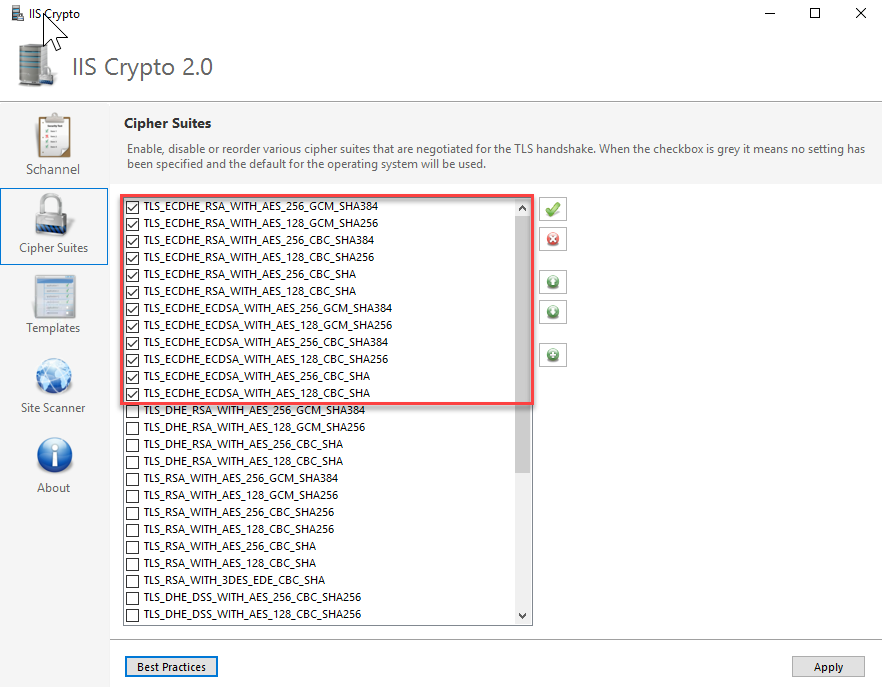
I applied the config and moved onto the Cipher Suites option as shown below:
As you can see above, only TLS_ECDHE was selected.
Once the changes were applied, the Exchange server was rebooted. No errors on login.
The following tests were done on Exchange and the client:
- Tested existing client connection, no error connecting to Exchange 2016.
- Created a new profile, no error.
- Migrated a mailbox and then logged into the profile, no error.
- Tested mailflow, both internally and externally.
- Tested autodiscover, no errors received.
- Ran tests on the Microsoft Test Connectivity site, no errors either.
The next part of the exercise was to check SSL Labs for any errors. You can head over to there site and run a check against your url and see what it reports. Once you enter in the url it does a check and scores you on your ciphers, ssl certificate etc. here is a sample below, any errors shown you can address:
https://www.collaborationpro.com/wp-content/uploads/2018/12/IISCrypto3.png
Last think we going to look at is Strict Transport Security in IIS.
This HTTP response headers allows a host to tell the user agent to enforce SSL on their site without depending on things like 301 redirects.
Here are the steps to enable it:
https://www.collaborationpro.com/wp-content/uploads/2018/12/IIS.png
Launch IIS and then click on default Web Site, one it shows all the options then double click on HTTP Response headers as shown above.
https://www.collaborationpro.com/wp-content/uploads/2018/12/IIS1.png
It will bring up the window above once you have double clicked the icon in the previous step, click the add button.
https://www.collaborationpro.com/wp-content/uploads/2018/12/IIS2.png
Name: strict-transport-security
**Value: **max-age=31536000; includeSubdomains
Once entered in, click OK.
https://www.collaborationpro.com/wp-content/uploads/2018/12/IIS4.png
As shown above, the response header is now added.
Earlier in the article, you noticed we received an A for the URL, with the above in-place now, we reached an A+ as shown below with a green bar indicating we have it enabled.
https://www.collaborationpro.com/wp-content/uploads/2018/12/IIS5.png

