Note
Access to this page requires authorization. You can try signing in or changing directories.
Access to this page requires authorization. You can try changing directories.
Introduction
In this post, we will talk about the Azure Bot and QnA Maker service. To create an Azure Bot we must use the Bot Framework, with this framework developers are able to build intelligent bots to interact with users in multiple ways, like text, Skype, Slack, O365 etc.
Azure Bot Connectors
Τhe Bot connectors are similar to logic apps connectors, and allow users to exchange messages. There are many channels that the bot service can send messages, for example, Facebook, Skype, Slack, MS Teams, Cortana, Twilio, Skype for Business etc.
Azure Bot Service
This is a service that gives the ability to deploy chat bots which interact with humans. The Azure Bot service uses Microsoft Bot Framework for the deployments. We can use different program languages like C#, Node.js.
Create a Bot Service
In the following steps, we will create an Azure Bot using the Azure Portal.
Search For Web App Bot
First, search for {Bot} service like the image below and Select [Web App Bot].
Deploy Web App Bot
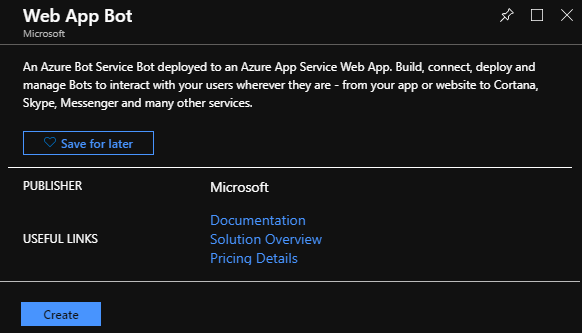
Click Create to begin Web App Bot Service deployment.
Web App Bot (Bot Service)
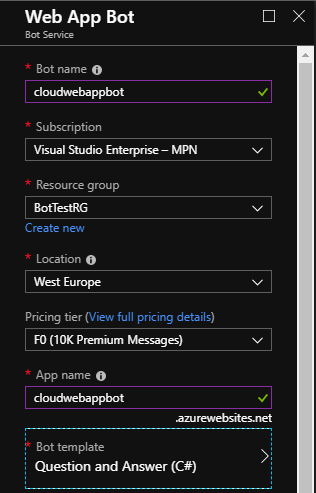
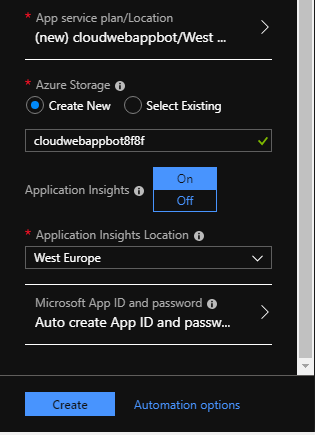
Fill in all the fields in the Web App Bot deployment blade and click the Create button.
| Setting | Value |
| Bot name | Type the Bot name |
| Subscription | Select a valid Azure Subscription |
| Resource group | Select an existing or create a new Resource Group |
| Location | Select a location for the Resource Group |
| Pricing tier | Select a pricing tier, more details in this link. |
| App name | Type a unique name for the Azure bot |
| Bot template | Choose a bot template,actually we have two options between C# or Node.js |
| Hosting Plan | Select the hosting plan for the service |
| Azure Storage | Select an existing or create a new storage account for the table storage that the bot needs. |
| Application Insights | Set On or Off the Application Insights service |
| Application Insights Location | If the previous setting is On the we must select a location, that the logs stored |
| Microsoft App ID and password | Create manually or automatically Microsoft App ID and password for the bot service |
Bot templates
At the following table, we can see the templates for Azure bot service,on both C# and Node.js program languages.
Note
The SDK version for the templates is v3. SDK v4 is not yet available for the Question and Answer bot.
C#, Node.js Language
On the following table we can see the Bot templates and the details for each.
| Name | Details |
| Basic | A bot with a single dialog that echoes back the user input |
| Form | A bot that shows how to collect input from a user using a guided conversation using FormFlow |
| Language understanding | A bot that shows how to handle natural language using the Cognitive Services LUIS API |
| Question and Answer | A bot that distills information into conversational, easy-to-navigate answers |
| Proactive | A bot that shows how to use Azure Functions to trigger events in Azure bots |
QnA Maker
QnA Maker is an API service which allows users to create Knowledgebase using questions and answers. This goal can be achieved by using different sources.
In the following steps, we create an Azure Service for the QnA knowledge base.
Create a QnA service in MS Azure
Select Create a QnA service, to create the KB that the Web App Bot use. [https://www.qnamaker.ai/]
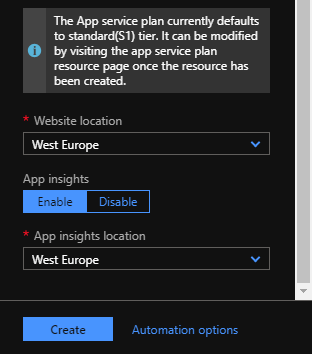
Next, we need to fill in all the necessary values and select Create.
| Setting | Value |
| Name | Type the QnA name |
| Subscription | Select a valid Azure Subscription |
| Management pricing tier | Select a pricing tier for the QnA cognitive service. Check for more details in this link |
| Location | Select the QnA service location |
| Resource group | Select a location for the Resource Group |
| Searching pricing tier | Select a Search pricing tier, view full pricing details in this link |
| Search location | Select the Search service location |
| App name | Type a Name the app service |
| Website location | Select location for the Website |
| App insights | Set Enable or Disable the Application Insights service |
| App insights location | If the previous setting is Enable, the we must select a location, that the logs stored |
Connect QnA service to KB
At the second step select the Azure service options as the image below shows.
| Setting | Value |
| Microsoft Azure Directory ID | Select an Azure Directory |
| Azure subscription name | Select the subscription |
| Azure QnA service | Select the Azure QnA Service, which deployed in step 1 |
Name the KB
Type a name for the Knowledge Base KB
Populate the KB
The fourth step is to populate the KB. There are several ways to populate a KB like URL and file.
Data Sources for QnA Maker Content
At the table below we can find the source and content type that QnA Maker support.
| Source Type | Content Type |
| URL | FAQs (Flat, with sections or with a topics homepage) |
| PDF / DOC | FAQs, Product Manual, Brochures, Paper, Flyer Policy, Support guide, Structured QnA, etc. |
| Excel | Structured QnA file (including RTF, HTML support) |
| TXT / TSV | Structured QnA file |
Create the KB
At last step we only need to select the [Create your KB] button.
Knowledge Base
After the KB is created we can see the pair of questions and answers, from the link we provided to the KB.
The next step is to select [Save and train] and when it finishes, click [--> Test] to test
Now, we must publish the KB to the QnA Maker service. This can be done by selecting the **PUBLISH **menu, and click the button [Publish].
Configure Web App Bot To Use the KB
Configure the App Settings
From the Web App Bot main blade, select Bot management - Application Settings
The settings for the Web App Bot, are available from the QnA Maker portal {https://www.qnamaker.ai}. At the image below we can see the sample from this post demo.
We need the first three parameters which are QnAKnowledgebaseid, QnAEndpointHostName, and QnAAuthKey.
These parameters must be added at the Web App Bot Application Settings.
From the main Web App Bot main blade, App Service Settings > Application Settings.
| Setting | Value |
| QnAAuthKey | EndpointKey 12345678-ee18-548d-8402-9457615e9447 |
| QnAEndpointHostName | https://qnaname.azurewebsites.net/qnamaker |
| QnAAuthKey | b6d34ea4-d8e3-4d07-e0342-h6c81c0854c17 |
Connect The Azure Bot To Skype
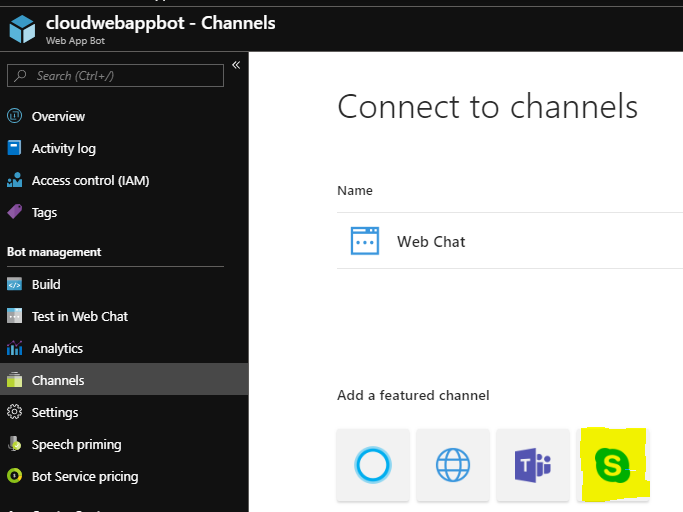
From the Web App Bot main blade, Bot management - Channels, select Skype
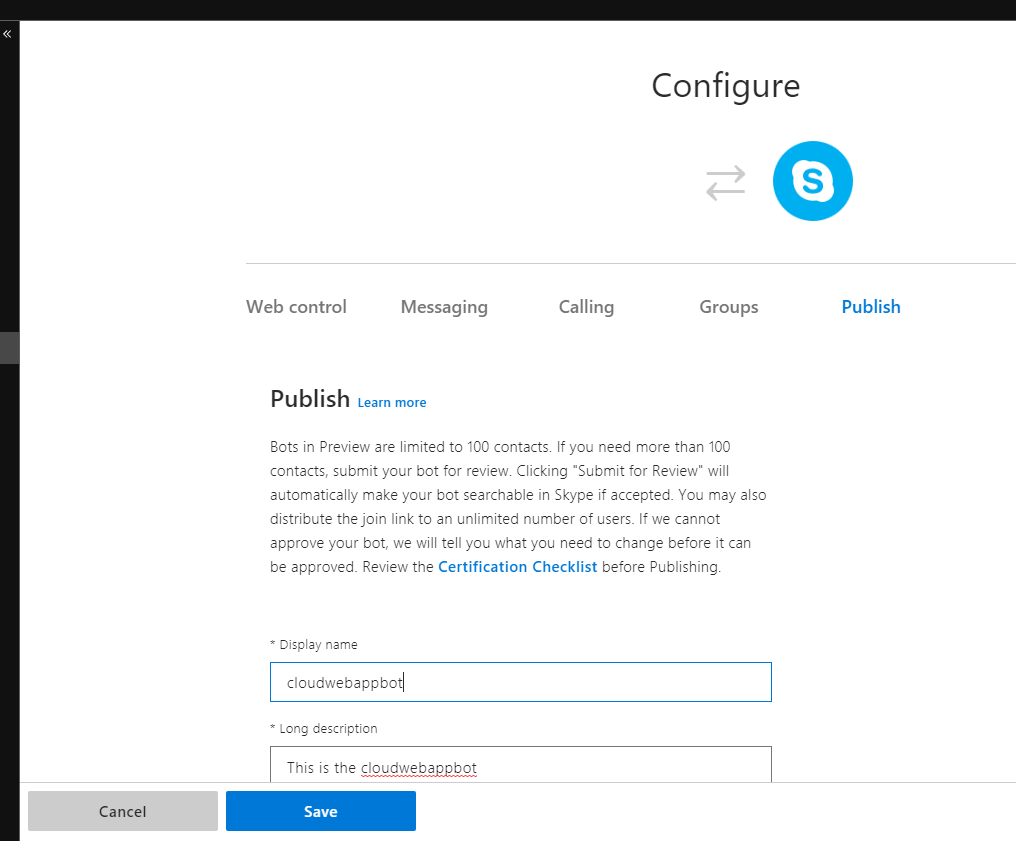
Select the Publish menu, and click Save.
A new pop-up message comes up about Term of Service, mark the checkbox that you Agree on that and select the button Agree.
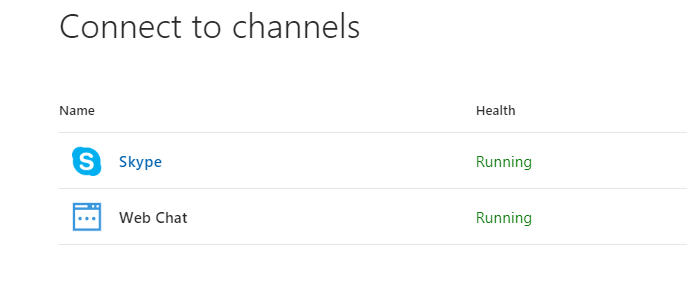
After previous steps when we open the Channels menu we able to select the Skype channel,
Add the cloudwebappbot to Skype contacts. And now we are in the position to ask the bot and it will answer to us.
The next image shows the question from a human and the answer from the bot.
Build Azure Web App Bot on Visual Studio IDE
Previously we saw how we can deploy an Azure Web App Bot with the 'easy' way in this point we will see the steps for the 'hard' way?
No! It is not as difficult as it looks in the first look. We just need to follow a couple of steps and if we are familiar with programming then Bot Framework development should be a piece of cake.
Download The Code
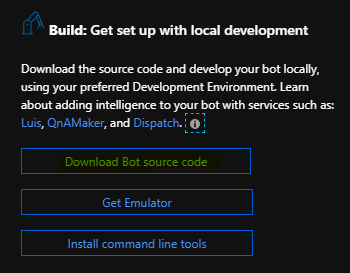
From the Overview, blade and select the Build: image.
Next step is to click Download Bot source code, as the image below shows.
Web Config configuration
The following code shows how to set up the web app configuration file.
We need to add the following <add key> tags :
- <add key="AzureWebJobsStorage" value=""/>
- <add key="QnAAuthKey" value=""/>
- <add key="QnAEndpointHostName" value=""/>
- <add key="QnAKnowledgebaseId" value=""/>
<configuration>
 <configSections>
 <!-- For more information on Entity Framework configuration, visit http://go.microsoft.com/fwlink/?LinkID=237468-->
 <section name="entityFramework" type="System.Data.Entity.Internal.ConfigFile.EntityFrameworkSection, EntityFramework, Version=6.0.0.0, Culture=neutral, PublicKeyToken=b77a5c561934e089" requirePermission="false" />
 </configSections>
 <appSettings>
 <!-- update these with your Microsoft App Id and your Microsoft App Password-->
 <add key="MicrosoftAppId" value="123456789-1234-5678-1122-aabbccddeefff" />
 <add key="MicrosoftAppPassword" value="XXXXXXXXXXX" />
 <add key="AzureWebJobsStorage" value="DefaultEndpointsProtocol=https;AccountName=accountname;AccountKey=xxxxxxxxxxxxxxxxxxxxxxxxxxxxxxxxxxxxxxxxxxxxxxxxxxxxxxxxxxxxxxxxxxxxxxxxxxxxxxxx==;"/>
 <add key="QnAAuthKey" value="EndpointKey xxxxxxxxxxxxxxxxxxxxxxxxxxxxxxxxxxxxxx"/>
 <add key="QnAEndpointHostName" value="https://xxxxxxx.azurewebsites.net/qnamaker"/>
 <add key="QnAKnowledgebaseId" value="254845242-8790-3423-1122-aabbccddeefff"/>
 </appSettings>
The Bot Framework-Emulator
Download Emulator from GitHub
We can download the Bot Framework emulator from Github.
Configure the Bot Framework-Emulator
After setup is finished, the emulator opens and need to make some configurations to start working.
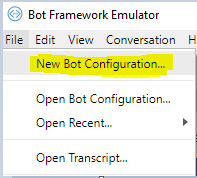
From the File menu, select New Bot Configuration...
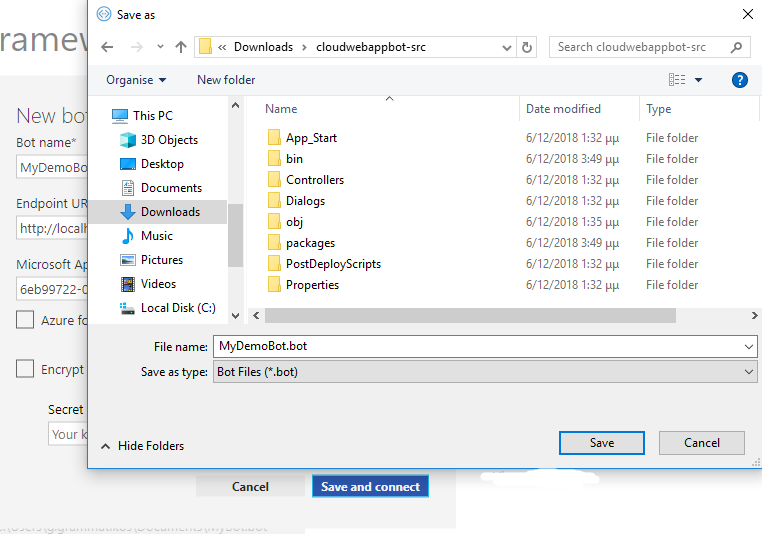
In the configuration form, fill in the required parameters.
| Parameter | Value |
| Bot name* | Type an Azure Bot Name |
| Endpoint URL* | Copy the URL from the Visual Studio and pasted by adding /API/messages |
| Microsoft App ID` | Copy and paste the Microsoft App ID from the VS app settings |
| Microsoft App password | Copy and paste the Microsoft App password from the VS app settings |
After we type all the necessary values in the Net bot configuration form, we click the button Save and connect
Deep Dive In The Code
In this example, we download the bot framework code from Azure. To test this code with the emulator we need to make a few changes in the code.
BasicQnAMakerDialog.cs file
Make all the necessary changes in the C# code as the following code blocks show.
      private async Task MessageReceivedAsync(IDialogContext context, IAwaitable<IMessageActivity> result)
      {
                 /* When MessageReceivedAsync is called, it's passed an IAwaitable<IMessageActivity>. To get the message,
                 *  await the result. */
                 var message = await result;

                 // Add Comment from the line 29 - 31
                 /*  var qnaAuthKey = GetSetting("QnAAuthKey");
                 var qnaKBId = Utils.GetAppSetting("QnAKnowledgebaseId");
                 var endpointHostName = Utils.GetAppSetting("QnAEndpointHostName");*/

                 // Add the code from the line 35 - 37
                 var qnaAuthKey = ConfigurationManager.AppSettings[      "QnAAuthKey"      ];
                 var qnaKBId = ConfigurationManager.AppSettings[      "QnAKnowledgebaseId"      ];
                 var endpointHostName = ConfigurationManager.AppSettings[      "QnAEndpointHostName"      ];


                 // QnA Subscription Key and KnowledgeBase Id null verification
                 if (!string.IsNullOrEmpty(qnaAuthKey) && !string.IsNullOrEmpty(qnaKBId))
                 {
                 // Forward to the appropriate Dialog based on whether the endpoint hostname is present
                 if (string.IsNullOrEmpty(endpointHostName))
                 await context.Forward(      new BasicQnAMakerPreviewDialog(), AfterAnswerAsync, message, CancellationToken.None);
                 else
                 await context.Forward(      new BasicQnAMakerDialog(), AfterAnswerAsync, message, CancellationToken.None);

                 }
                 else
                 {
                 await context.PostAsync(      "Please set QnAKnowledgebaseId, QnAAuthKey and QnAEndpointHostName (if applicable) in App Settings. Learn how to get them at               https://aka.ms/qnaabssetup.            "      );
                 }

      }
Make changes in the Dialog for QnAMaker Preview service
// Dialog for QnAMaker Preview service
 [Serializable]
 public class BasicQnAMakerPreviewDialog : QnAMakerDialog
 {

 static readonly string qnaAuthKey = ConfigurationManager.AppSettings["QnAAuthKey"];
 static readonly string qnaKBId = ConfigurationManager.AppSettings["QnAKnowledgebaseId"];
 static readonly string endpointHostName = ConfigurationManager.AppSettings["QnAEndpointHostName"];

 // Go to https://qnamaker.ai and feed data, train & publish your QnA Knowledgebase.
 // Parameters to QnAMakerService are:
 // Required: subscriptionKey, knowledgebaseId,
 // Optional: defaultMessage, scoreThreshold[Range 0.0 – 1.0]
 public BasicQnAMakerPreviewDialog() : base(new QnAMakerService(new QnAMakerAttribute(qnaAuthKey, qnaKBId, "No good match in FAQ.", 0.5, endpointHostName: endpointHostName)))
 { }
 }
Final changes must be made in the Dialog for QnAMaker GA service
// Dialog for QnAMaker GA service
 [Serializable]
 public class BasicQnAMakerDialog : QnAMakerDialog
 {
 static readonly string qnaAuthKey = ConfigurationManager.AppSettings["QnAAuthKey"];
 static readonly string qnaKBId = ConfigurationManager.AppSettings["QnAKnowledgebaseId"];
 static readonly string endpointHostName = ConfigurationManager.AppSettings["QnAEndpointHostName"];

 public BasicQnAMakerDialog() : base(new QnAMakerService(
 new QnAMakerAttribute
 (
 qnaAuthKey,
 qnaKBId,
 "No good match in FAQ.",
 0.5,
 1,
 endpointHostName
 )))
 {

 }
 }
}
Test the Web App Bot via the Bot Framework Emulator,
Conclusion
In this wiki post, we read how someone who wants to use the Azure Bot Service for the first time. can easily deploy an Azure Bot with QnA Maker service via the Azure Portal and how a dev can download the code locally and test the changes using the Azure Bot Framework Emulator.
See Also
- Azure Bot Service pricing
- Azure QnA Service pricing
- Bot Builder SDK in GitHub
- Enterprise Bot Template
- What is QnA Maker?
- How bots work


