Azure Site Recovery : Migrate Hyper-V Virtual Machine to Azure
Introduction
In this article, we will cover the steps which are required to failover and migrate one Hyper-V VM to Azure using Azure Site Recovery (ASR). This article assumes that you have basic understanding of Azure Site Recovery. I suggest to read my other article Azure Site Recovery: Introduction , before you start reading this article.
Important Facts and Support Matrix
- Azure Site Recovery uses the same underlying technology as Hyper-V replica, to replicate Hyper-V VMs.
- ASR Supports migration of VHD and VHDX. More Info
- Supports migration of Hyper-V Generation 1 and Generation 2 VMs. During failover, Site Recovery converts from generation 2 to generation 1. During failback the machine is converted back to generation 2.
- Supports migration of Dynamic Disks. The Operating System Disk must be basic.
- Before you migrate VM to Azure, you have to enable protection and replicate the VM to Azure. Only protected VMs can be migrated.
- To migrate Hyper-V VM to Azure, you have to initiate a Planned Failover . Once you run a planned failover, then source VMs are shut down to ensure no data loss.
- Before planning for the replication and migration, please check Microsoft Support Matrix to ensure that your scenario is supported by Microsoft. You need to ensure that the Operating System, Disk Type, Networking, NIC Teaming etc are supported for migration using ASR.
- Also, validate your service and application which is running on the top of the Hyper-V VM which you are planning to migrate. Make sure it is supported by ASR and check if there is any additional steps involved regarding migration. Example: Domain Controllers, Exchange Servers, SQL Always On Cluster nodes etc.
Architecture: Hyper-V to Azure Migration
As you might be aware, Hyper-V hosts and VMs can be managed by VMM (Virtual Machine Manager). However, deployment of VMM is not mandatory to manage Hyper-V Infrastructure.
If you want to replicate to a secondary datacenter, then Hyper-V VMs must be on Hyper-V host servers which are managed by VMM. But if you want to replicate to Azure, then you can replicate VMs with or without VMM clouds.
In both the cases (With or without VMM) , no agent installation is required on Hyper-V VMs for ASR to function.
In our lab environment, we have a Hyper-V Failover Cluster HVCluster1.subhro.com. This Cluster has following two nodes :
1) Node1.subhro.com
2) Node2.subhro.com

We also have two Hyper-V VMs :
TestVM: Running on Node1
TestVM1: Running on Node2
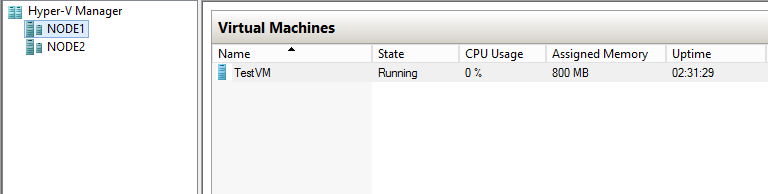
In this exercise, we will migrate TestVM to Azure using Azure Site Recovery.
Note: In case you would like to deploy a Hyper-V Failover Cluster like this, please refer my another article: Deployment of a Hyper-V Failover Cluster (Using PowerShell)
Create a Resource Group
First. we have to create a Resource Group in Azure which will contain Recovery Service Vault.
We have created a Storage Account name ASR-Subhro in South India region, which is closest to our on premises data center.
Name of The Storage Account: ASR-Subhro
Region: South India
Create a Recovery Service Vault
At first, we have to create a Recovery Services Vault (RSV). Here we have created a RSV named Subhro-HyperV-RSV.

Prepare Infrastructure
Select a Replication Goal
Once the Recovery Services Vault has been created, we have to select below parameters:
1) Source: Where our workload is hosted, and on which Platform.
2) Target: Where we would like to replicate
In this case, our workload is hosted on premise, and platform is Hyper-V.
Destination (DR Location) would be Azure, South India region.
Also, we are not using any VMM Server to manage our Hyper-V environment, so we would select “No” in that option.

For this test environment, we are skipping the Deployment planning by marking it “ I will do it later”.
However, for large scale production migration it is always recommended to go through the deployment planner.

Prepare Source
The objective of this step is to establish connectivity with source, which in this case are Hyper-V Nodes.
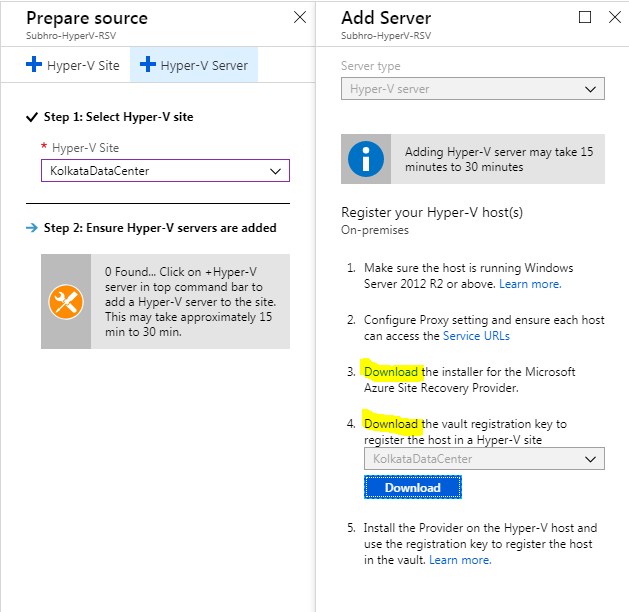
First, create a logical Hyper-V site by clicking +Hyper-V Site button. You can name it as per your actual Host Location.
In this case, we are naming it as KolkataDataCenter. All the nodes that we will add in next step will be part of this Hyper-V Site.

Now, download below two components:
1) Microsoft Azure Site Recovery Provider: Since our environment is not managed by VMM, we have to install it on each node that we are going to add.
2) Vault Registration Key File: This will be used during host registration to ASR (Recovery Services Vault).
At this stage, let’s logon to Hyper-V nodes one by one, first Node1 and then Node2.
First, install Azure Sire Recovery Provider for Hyper-V on Node1.
This software has below two prerequisites:
1) Microsoft KB 2962409 2) Microsoft .Net Framework 4.6.2 or above.
Once both these prerequisites are met, we can start installing the ASR Provider in each Hyper-V node, which we are going to register with ASR.
As you can see in the below figure, we have started installing ASR Provider.

Once ASR setup is complete, click Register button, because now we have to register this Hyper-V host to the Azure Recovery Services Vault that we have created earlier.

During Registration, we have to provide the key file which we have downloaded. Using the key file. the installation wizard will locate the recovery Service Vault where the Hyper-V host needs to be registered.
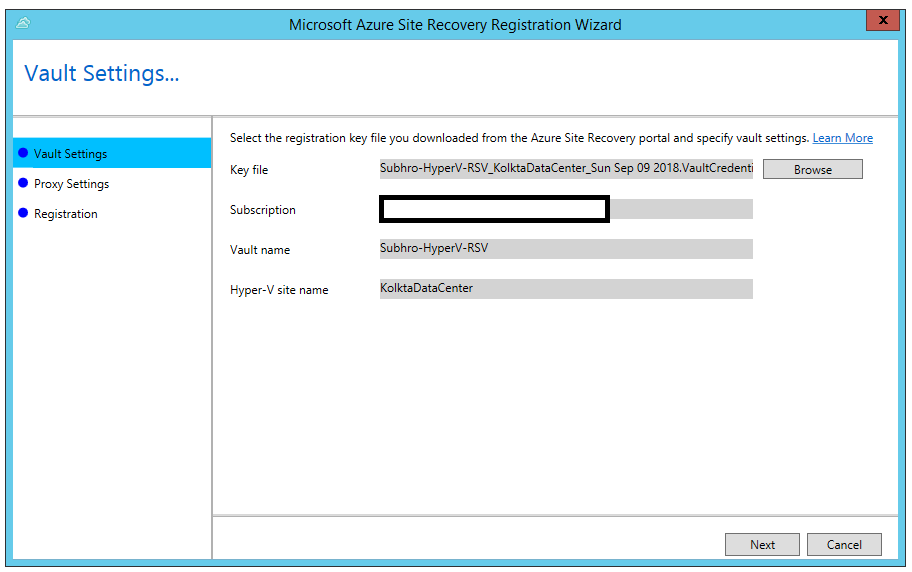
Based on your environment, select whether to use a Proxy server or not, to connect to ASR.


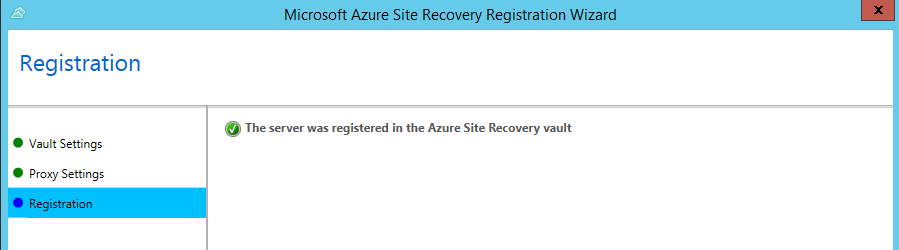
So now, Node1 has been successfully registered in ASR.
Follow same steps for Node2, and register Node2 with ASR.
Please Note: If the Hyper-V nodes were already registered to any Recovery Service Vault, and you are trying to re-register it with another recovery Service Vault, you might get an error message. Please refer this article to check how to deregister a Hyper-V VM from a Recovery Service Vault.
After registering these nodes to ASR, if you open the Certificate MMC from these nodes and check Personal (Computer) key store, you will find that few certificates have been installed.

You will also observe that below services have been configured in each Hyper-V node, which has been registered with ASR.

Now, let’s come back to ASR blade and refresh it. It should list Node1 and Node 2 which have just been registered.

Click OK. It’s now time to prepare the target environment.
Set up Target Environment
As we know, the Target location is Azure.
In this section, we have to select the appropriate Azure subscription.
Also, ASR would verify that there is at least compatible Storage Account and at least one Azure VNET exists. We do not need to elect any Storage Account and VNET at this stage and that will be done later.
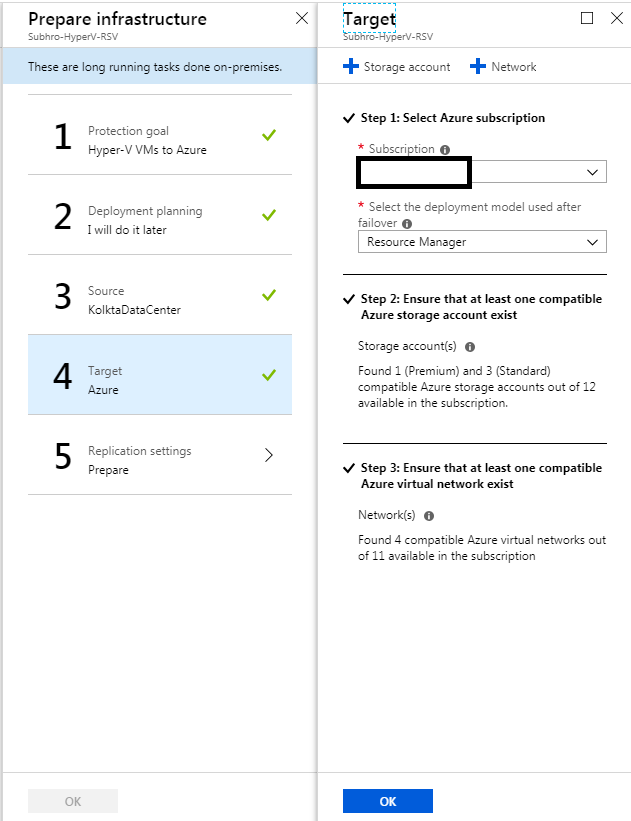
Click OK.
So the preparation of target Infrastructure is complete.
Now that the Source and Target Infrastructure is ready, we have to define Replication Policy.
Setup Replication Policy
We should configure Replication Policy based on the RPO of the application / Service which is hosted on the Replicated VMs.
If the RPO of a critical application is very low, then we should configure copy frequency and retention hours accordingly to meet the RPO value.
Also, we are selecting Immediately under Initial replication start time, which means replication would start immediately after we enable it.


Once Replication Policy has been configured, we get a final screen of the Prepare Infrastructure section. Click ok, and our ASR Infrastructure is now ready.
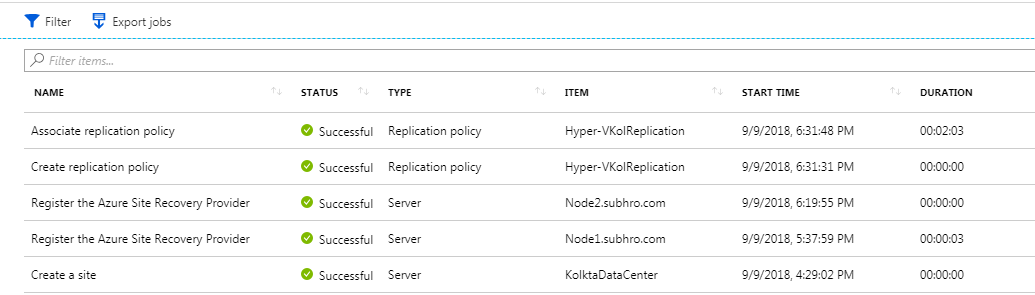
So, we have prepared the Infrastructure had here is a summary of activity that we have just performed:
Enable Replication
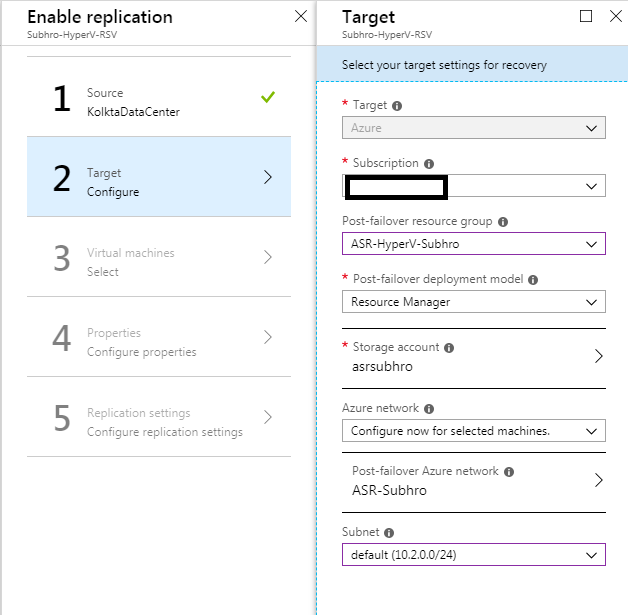
Now that the Source and Target environment has been configured, we have to enable replication.
Select On-premises as the source, and select the Source location, which in this case is KolkataDataCenter.

In the Target screen, select below parameters:
• Azure Subscription
• Post Failover Resource Group
• Deployment Model : Must be Resource Manager
• Post Failover Storage Account : Create a new Storage Account if not created earlier
• Post Failover Azure Network : Create a new VNET if not created earlier
Now, select the Hyper-V VMs which you want to replicate. You can select multiple VMs at a time. In this case, we are selecting only one VM.
This list will populate all VMs which are hosted on the Hyper-V hosts which we have registered with ASR.
If a VMM is present, then the list will populate all the VMs which are managed by VMM.

In the next section, we need to select OS type, OS Disk and Disks which are to replicate to Azure.
By default all disks of a selected VM would be replicated, but we can exclude specific disks here.
The maximum disk size supported by ASR is 4 TB. Hyper-V Dynamic Disk is supported, but OS disk type must be basic.

In the last section, select the Replication Policy which we have selected earlier.

Finally, once all parameters are defined, click Enable Replication.
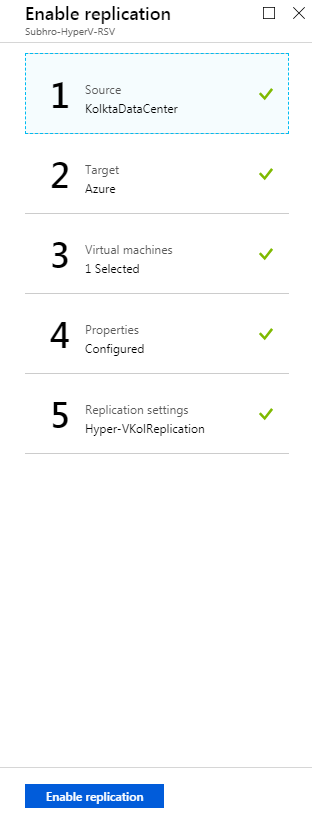
As we have selected Immediately under Initial replication start time in the Replication Policy, so replication would start immediately after we click Enable Replication.
Check Replication
We can now go to Replicated Item blade and check replication status.
We will notice that the replication has already been started and it is running.

If we click on the VM name , we can also see the logical view of ASR protection which is as follows :

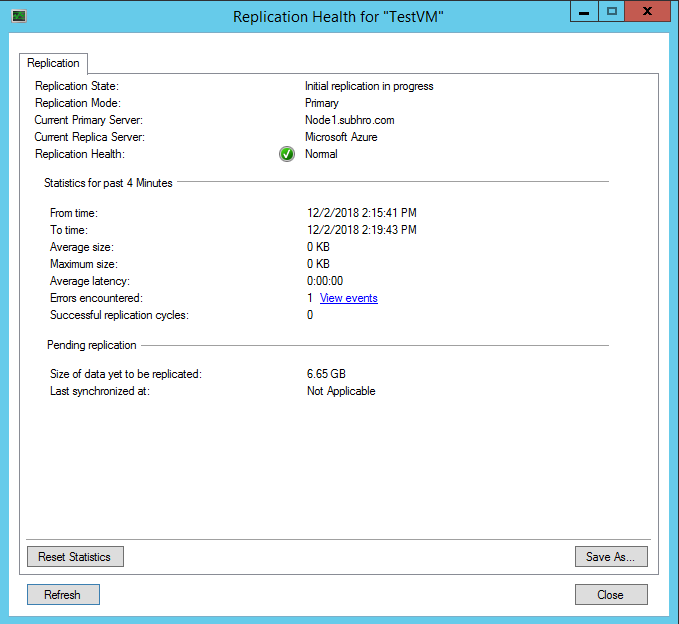
We can also view the replication status from Hyper-V console.
Also, we observe that replication is happening while the server is up and running.
Also, replication will continue even if we shut down the VM during replication. off course, we would not shut down the Hyper-V host during replication.
We also observed that based on the current VM configuration, Azure has selected Basic_A1 type of instance in target.
It has also assigned a unique VM ID, and Resource ID.

How much time it would take to finish the primary replication depends on many factors.
As there is a large amount of data being replicated during the initial replication, we should keep on monitoring the first replication status.
The below screenshot indicates that here is some connectivity issue between Hyper-V site and Azure Storage Account. In this case, it was a temporary connectivity issue which resolved automatically.

Once initial replication completes successfully, the VM status is marked as Protected.
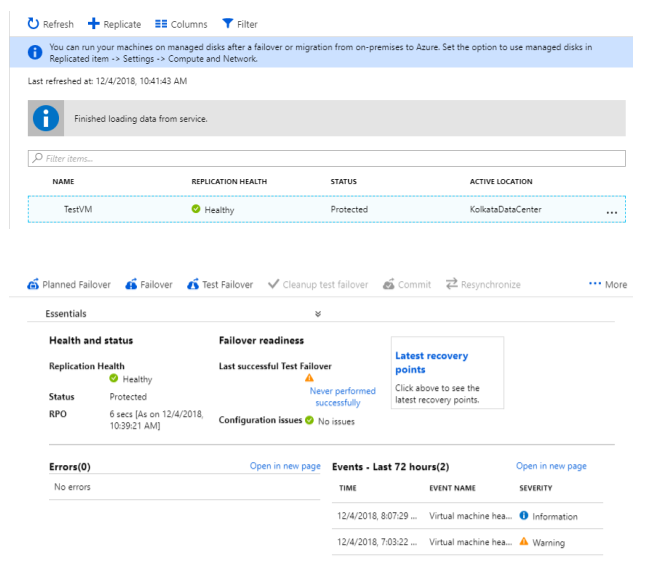
As the copy frequency is 5 minutes, a recovery point is created in every 5 minutes. This means, the RPO value is 5 minutes.

Perform a Test Failover
Before initiating the actual failover, let’s perform a test failover.
Microsoft recommends that for Test Failover, we should use a different network (VNET) other than the Production Failover VNET.
So let’s create a new VNET “Test-Failover-ASR-VNET” in South India Region, under the Resource Group ASR-Subhro.
Let’s put the subnet name as “Test-Failover-ASR-VNET-Subnet”.

Now we can proceed for Test Failover.
In the Recovery Service Vault, click on Replicated Item and Click on VM Name, in this case TestVM.
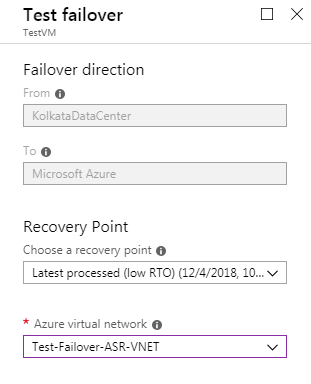
Click on Test Failover.

Select the Recovery Point. Generally, you should select the latest recovery point to achieve lowest RPO, and therefore minimum data loss. However, you can select older recovery points as well by selecting Custom option.
Select the VNET which we have just created for Test Failover, and click OK.
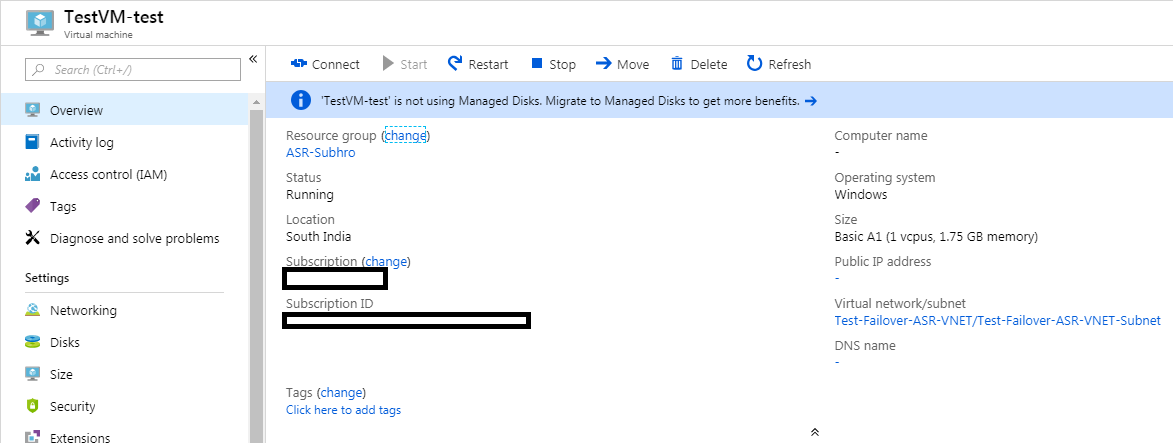
Once the Test Failover is completed, you can see that a VM has been created by ASR using the latest disk backup (Recovery Point).
Few Observations
• The naming convention of that VM would be -test. The word “-test” indicates that it has been deployed by ASR during Test Failover.
• The original Hyper-V VM would NOT be shut down during test failover, so there would not be any production impact of test failover and you can perform it any time without taking any downtime from business.
• The VM has not been assigned any Computer name, Public IP and DNS name. If you want to connect the VM, you need to assign these resources manually.
• By default, the VM state is running.
Once you are satisfied with the test failover, you can go back to ASR console and click Cleanup Test Failover, which will delete the VM which has just been created by Test Failover.
Once done, you can verify from console that everything is green and as per the expectation.

Perform Actual Failover / Migration
Before you start actual failover, please ensure that Test Failover is successful, and you are able to login to the Azure VM Post Test Failover. Once you are fully satisfied with the result of Test Failover, then only you should plan for actual Failover or migration.
As this is a planned migration, please take downtime from Business, as the source VM would be shut down during migration.
Before you initiate Failover
Before you initiate Failover, you must take following steps :
• For Windows VM, ensure RDP is allowed so that you can connect the VM post migration / failover. Remote Desktop Protocol (RDP) must be enabled on the source VM and the user performing the conversion must be able to log on to the VM.
• If the Hyper-V is using statically configured IP addresses, please change it to DHCP before initiating the failover.
• You should consider merging all Hyper-V Checkpoints (Snapshots) before migration.
• Make sure the operating system SAN policy is set to OnlineAll
• Make sure there are no Windows updates pending on the VM when you trigger a failover. Windows update might start when you fail over, and you won't be able to log onto the VM until the update completes.
For more details please refer this page.
Now it’s time to initiate the actual failover, and permanently migrate the Hyper-V VM to Azure. In the previous console, click Failover.
Notice that it is not asking for destination network, because it has created a VNET beforehand during replication configuration, and it will deploy the VM there.
Select “Shut down virtual machine and synchronize the latest data”. This option will sync any latest data before shutting down the source VM, which has been generated after latest recovery point. This is to ensure Zero data loss.
In case you do not select this option or the synchronization attempt fails, the new VM would be created using the latest recovery point. Any data which is generated in the source VM after that would be lost.
Click OK.

Warning: DO NOT cancel a failover in progress.
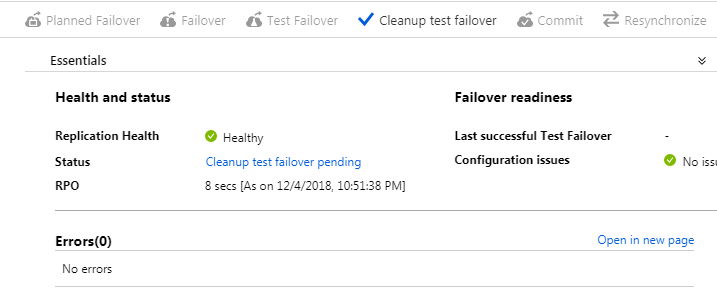
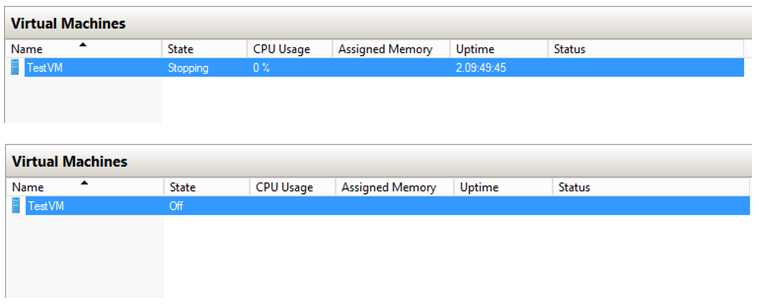
As soon as the failover starts, you will notice that the source Hyper-V VM goes to stopping state. However, it will synchronize latest data before stopping the VM as we have selected that option.
We can see that Failover has been completed successfully, without any error.

The new VM has been created with the same name as the original Hyper-V VM. However, you have to assign Computer name, Public IP address and DNS name manually.

Also, there is no Network Security Group attached with this VM NIC, and we have to create and attach one NSG manually, and allow inbound TCP port 3389, so that we can RDP the Windows Server.
Complete the Migration
Once you are able to login to the Azure VM successfully, return to ASR console and click Complete Migration.
As stated by Microsoft, the Complete Migration does following things:
• Finishes the migration process, stops replication for the Azure VM, and stops Site Recovery billing for the VM.
• This step cleans up the replication data. It doesn't delete the migrated VMs.

Once completed, you will observe that the replication has been disabled for this VM. So that completes the entire migration process.

Post Migration Activities in Azure and on-premises
Post migration activities depend on your environment, but at a high level you have to take care of following things :
1) Perform necessary changes in the DNS Host / CNAME records.
2) Perform necessary changes in the application / database connectivity settings.
3) Uninstall Azure Site Recovery Provider.
4) Install Azure VM agent.
Microsoft has published a guideline for this, which is available here.
Finally, arrange a User / Business Acceptance Testing (UAT) and get a signoff that the application / service / server has been migrated as per the expectation and services are back to normal.
For future protection of the newly migrated VM in Azure, please consider Backup,DR, Encryption Patching and Monitoring.
Once the migrated VM is up and running in Azure, after a certain amount of time you can consider decommissioning the Hyper-V VM.
Summary
We have performed a lots of steps in this article, so lets summarize what we have done :
High level steps |
Explanation |
Create a Resource Group |
We have created all ASR related resources within this Resource Group. |
Create a Recovery Service Vault |
This is a vault which holds all ASR related configuration and data. |
Prepare Infrastructure |
1) Select Replication Source and Destination 2) Create Source Data Center 3) Download ASR Provider and install in each Hyper-V node 4) Register each Hyper-V node 5) Setup Target Infrastructure (Azure) |
Setup Replication Policy |
Enable Replication: Select source data center, add VMs to replicate, select disks to Replicate Select Target: Identify Target subscription, Resource Group, Storage Account , VNET and subnet |
Enable Replication |
If selected Immediately, then replication will start as soon as it is enabled. |
Check Replication |
Monitor first replication, and once it is completed, the VM status would be "Protected". |
Test Failover |
1) Does not shut down source server 2) Helpful for assessment, before initiating actual failover. 3) Should be failed-over on a separate Azure VNET, different than the VNET reserved for actual failover. |
Initiate actual failover / migration |
1) Source VM would be shut down automatically. 2) Take downtime from business. |
Complete Failover / migration |
Disables Replication for the VM which has been migrated. |
Perform post migration steps on-premises and in Azure |
1) Perform required modification on the DNS Host and CNAME Record, to point to new server. 2) Remove / transfer any other dependency of the Hyper-V VM 3) Properly decommission Hyper-V VM. |