C#: Working with SMTP email (Part 2)
Introduction
This article demonstrates how to construct email messages with SMTP classes using C# and is a continuation of part one of this series, C#: Working with SMTP email (Part 1). The basic facts are there are many developers who struggle with sending email messages from their .NET solutions were they tend not to write their code in a sterile environment e.g. unit test methods against classes responsible for sending email messages. Instead a developer will write code, try the methods for sending email messages inside of their application and struggle with common issues like the message does not send and there are no error messages or there are error messages which are difficult to figure out. What is presented are techniques to validate both settings for sending messages and methods to test sending email messages in unit test.
Client setup
When setting up for sending email messages the following are important considerations.
- If working in a company/corporate environment where they control outgoing email (and may have their own servers) discuss with the engineering team your intentions. Otherwise your operations may be blocked by various settings and/or when sending mass email messages there may be a threshold that limits sending mass email messages.
- If not working in a company or corporate and using popular email such as gmail, Comcast or other provider such as Amazon you'll need to learn what their settings are and if there needs to be settings to allow sending email via code. For instance, just setting up setting for the SMTP class for gmail usually is not enough, instead see the following instructions and note they may change in the future.
- In the unit test project app.config file there are settings for gmail and comcast to learn from for setting up message sending and are gone over in part one of this series.
Preparing to use SMTP in your application
- Read the following article, part one of this series for setting up a SMTP class instance.
- Get a decent understanding of System.Net.Mail namespace.
- Before writing any code if you have never written unit test then start with the following lesson. In the attached solution for this article everything is executed in unit test methods rather than in a user interface. Decoupling from a user interface concentrates testing the email operations and leaves nothing to chance with conflicts from a user interface. This also means these methods will function in any environment that the .Net.Mail namespace works with.
- Implement some form of logging when testing email operations. In the attached solution a simple logging class is used which writes a text file. To monitor the log use a text editor that listens for changes such as NotePad ++. Execute a test method with NotePad ++ open to see if a message operation failed or was successful as demonstrated in the attached solution.
- Keep your email program open e.g. Microsoft Outlook so when messages sent from code come through you can validate they appear as sent. Of course a email program may be web-based such as gmail, comcast etc.
- Plan on sending a good deal of time testing as in most cases there are issues with sending, formatting of messages, ensuring attachments are valid plus if images are embedded they appear and look as expected.
GMail setting
When sending email messages using a GMail account be sure to turn on "Less secure apps access" using the following link
https://myaccount.google.com/lesssecureapps
08/2022 the above is not available anymore.

There is a running thread on Stack Overflow as Google changes settings over time.
Base setup for sending email message
- Create an instance of MailMessage.
- Setup the From property. This is the entity sending the message.
- Setup the To property. This is the entity to whom the message is intended to receive.
- Set the Body property. This is the mail contents. If the content is HTML then set IsBodyHtml property to true.
- Create an instance of SmtpClient class.
- Set the Port and Host.
- Invoke the Send method to send.
- See the following example for an idea of the above setup/send. The code presented with this article goes farther then that example.
The above steps are for an environment with no restrictions, usually more is need to be done which is shown in the code samples supplied with this article.
Sending email to a physical file
The first step to validate everything is setup properly is to send test email messages to a physical file. This is demonstrated in the unit test project by creating a folder beneath bin\debug using a Post-build event found under project properties, Build Events tab.
if not exist $(TargetDir)\MailDrop mkdir $(TargetDir)\MailDrop
Note there is no hard coded path as that would fail on any computer other than the author's computer unless the project was installed in the same physical location as the author's location.
Note the property setting from app.config for specifiedPickupDirectory (in web apps this would be web.config and may need to consider transformations to where this goes e.g. in main section only or in debug with different setting than production), it points to the folder created in the command above for build events.
<system.net>
  <mailSettings>
    <smtp  from="Someone@comcast.net">
      <network
        host="smtp.comcast.net"
        port="587"
        enableSsl="true"
        userName="MissComcast"
        password=""
        defaultCredentials="true" />

      <!--
        where to create emails for testing, could be a different folder then the one in smtp_1
        but if so the Post Build event need to have another macro for that folder.
      -->
      <specifiedPickupDirectory pickupDirectoryLocation="MailDrop"/>

    </smtp>
  </mailSettings>
</system.net>
Couple this with a class from part one, MailConfiguration which reads specifiedPickupDirectory the following provides all the code to send an email to the MailDrop folder.
public void  UsePickupFolderExample(
    string pConfig,
    int identifier,
    MailFriendly pFromAddress,
    MailFriendly pToAddress,
    bool userPickupFolder = true, [CallerMemberName]string name = "")
{
    var ops = new  DataOperations();
    var data = ops.Read(identifier);

    var mc = new  MailConfiguration(pConfig);
    var mail = new  MailMessage
    {
        From = CreateFriendltAddress(pFromAddress),
        Subject = $"Sent from test: '{name}'"
    };

    mail.To.Add(CreateFriendltAddress(pToAddress));
    mail.IsBodyHtml = true;

    mail.AlternateViews.PlainTextView(data.TextMessage);
    mail.AlternateViews.HTmlView(data.HtmlMessage);

    using (var smtp = new SmtpClient(mc.Host, mc.Port))
    {
        smtp.Credentials = new  NetworkCredential(mc.UserName, mc.Password);

        if (userPickupFolder)
        {
            smtp.DeliveryMethod = SmtpDeliveryMethod.SpecifiedPickupDirectory;
            smtp.PickupDirectoryLocation = mc.PickupFolder;
        }

        smtp.EnableSsl = !userPickupFolder;
        smtp.Send(mail);
    }

}

Please note the following two lines of code use language extension methods to setup the message body. Extension methods are used in this case to keep the code above clean and easy to read along with reusability in other methods sending messages and also for other projects as these extension methods are portable.
data.TextMessage is a string read from SQL-Server for plain text message if the receiver does not accept html messages while data.HtmlMesage is a string containing html read from a SQL-Server database. The idea for reading messages from a database is when you need to send canned messages while other times you might construct messages freeform or use of a template.
mail.AlternateViews.PlainTextView(data.TextMessage);
mail.AlternateViews.HTmlView(data.HtmlMessage);
Source for the extension methods
public static  void HTmlView(this AlternateViewCollection sender, string message)
{
    sender.Add(AlternateView.CreateAlternateViewFromString(message, null, "text/html"));
}
public static  void PlainTextView(this AlternateViewCollection sender, string message)
{
    sender.Add(AlternateView.CreateAlternateViewFromString(message, null, "text/plain"));
}
The following class contains data from a backend database which in turn feeds data class above
namespace MailLibrary
{
    /// <summary>
    /// Represents a record from SQL-Server database table
    /// </summary>
    public class  CannedMessages
    {
        /// <summary>
        /// Primary key
        /// </summary>
        public int  id { get; set; }
        /// <summary>
        /// Description of record
        /// </summary>
        public string  Description { get; set; }
        /// <summary>
        /// HTML formatted for mail message
        /// </summary>
        public string  HtmlMessage { get; set; }
        /// <summary>
        /// Plain text for mail message
        /// </summary>
        public string  TextMessage { get; set; }

    }
}
Sending email messages to recipients
The following example actually sends an email, no setup for pickup folder.
public void  ExampleSend1(string  pConfig, string  pSendToo, int  identifier, [CallerMemberName]string name = "")
{
    var ops = new  DataOperations();
    var data = ops.Read(identifier);

    var mc = new  MailConfiguration(pConfig);
    var mail = new  MailMessage
    {
        From = new  MailAddress(mc.FromAddress),
        Subject = $"Sent from test: '{name}'"
    };

    mail.To.Add(pSendToo);
    mail.IsBodyHtml = true;

    mail.AlternateViews.PlainTextView(data.TextMessage);
    mail.AlternateViews.HTmlView(data.HtmlMessage);

    using (var smtp = new SmtpClient(mc.Host, mc.Port))
    {
        smtp.Credentials = new  NetworkCredential(mc.UserName, mc.Password);
        smtp.EnableSsl = mc.EnableSsl;
        smtp.Send(mail);
    }

}
If you end up writing a lot of unit test then when they are seen in your email program there should be an easy way to identify them. This is where the following parameter is for.
[CallerMemberName]string name = ""
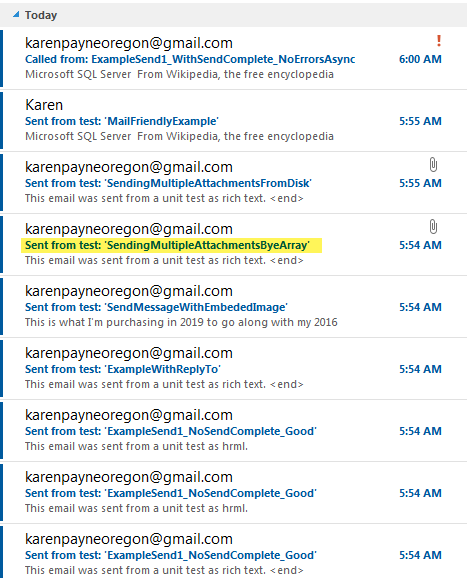
Here is a screenshot from Microsoft Outlook after running several test. Note each email message has the method name in the subject so it's easy to visually see if the email just sent was delivered. In this case the author used two email addresses of their own. When testing sending mass messages you will need to have real test email addresses which you create or your organization creates.

Troubleshooting
When messages are not being sent this is the time to utilize logging and or try/catch statements. In the source code, the class responsible for sending email messages has the following constructor. By default logging is disabled, set pUseLogging to true and pass a base file name in to activate logging.
/// <summary>
/// Init class for deciding to log or not.
/// </summary>
/// <param name="pUseLogging">True to log, false not to log to file</param>
/// <param name="pFileName">Log file name</param>
public Operations(bool pUseLogging = false, string pFileName = "")
{
    if (pUseLogging && !string.IsNullOrWhiteSpace(pFileName))
    {
        _writeToLog = true;
        _LogInfo = new FileInfo(pFileName);
    }
}
The following implements a try/catch with specific catches and logging.
try
{
    smtp.Send(mail);
}
catch (Exception generalException)
{
    switch (generalException)
    {
        case SmtpFailedRecipientsException _:
            {
                if (_writeToLog)
                {
                    WriteToLogFile("SmtpFailedRecipientsException", generalException.GetExceptionMessages());
                }
                break;
            }

        case SmtpException _:
        {
                if (_writeToLog)
                {
                    WriteToLogFile("General SmtpException", $"{generalException.GetExceptionMessages()}, Status code: {((SmtpException) generalException).StatusCode}");
                }
                break;
            }

        default:
            if (_writeToLog)
            {
                Logger.Start(_LogInfo);
                try
                {
                    // ReSharper disable once PossibleInvalidCastException
                    WriteToLogFile("General Exception", $"{generalException.GetExceptionMessages()}, Status code: {((SmtpException)generalException).StatusCode}");
                }
                finally
                {
                    Logger.ShutDown();
                }
            }

            break;
    }
}
Here is the source for WriteToLogFile which creates a new text file to log information to if it does not exists or appends to an existing log file.
private void WriteToLogFile(string pTitle, string pMessage)
{
    Logger.Start(_LogInfo);

    try
    {
        var log = new Logger(pTitle);
        log.Log("", pMessage);
    }
    finally
    {
        Logger.ShutDown();
    }
}
You can also subscribe to SendCompleted event of a SmtpClient object.
smtp.SendCompleted += Smtp_SendCompleted;
Implementation for SendCompleted.
private void Smtp_SendCompleted(object sender, System.ComponentModel.AsyncCompletedEventArgs e)
{

    if (e.Cancelled == false && e.Error == null)
    {
        WriteToLogFile("Sent","Mail sent");
    }
    else
    {
        WriteToLogFile("Sent", "Mail not sent");
    }
}
- Don't limit yourself to the above methods, if in a organization talk to their support team, they may have methods to monitor activity to see if there are issues you can't see in the above methods.
Validating email addresses
Many don't consider that an email address may be invalid at time of sending a message. There are many checks that can be done which is beyond the scope of this article but by using send complete you can determine if there are issues with one or more email addresses while your application is open, after closing the application the objects needed to detect an issue have been disposed of thus can not capture invalid email addresses.
Best to keep validation to what will be used via a free library known as EmailValidation.
Sending attachments
Attachments can be sent either from physical files or from memory.
Sending from physical files
- Determine where the files to send reside.
- Are there business rules to consider (in the code samples there are no constraints) for sending files. For example, all files for many customers may reside in one folder and that their company identifier is embedded so this means you need to filter out files by this identifier.
The following reads all files from a preset folder location and uses the MailMesage Attachment property to include the files into the current email.
public void SendMultipleAttachementsFromDisk(string pConfig, string pSendToo, int identifier, [CallerMemberName]string name = "")
{
    var files = Directory.GetFiles(Path.Combine(AppDomain.CurrentDomain.BaseDirectory,"Files1"));
    var ops = new DataOperations();
    var data = ops.Read(identifier);

    var mc = new MailConfiguration(pConfig);
    var mail = new MailMessage
    {
        From = new MailAddress(mc.FromAddress),
        Subject = $"Sent from test: '{name}'"
    };

    mail.To.Add(pSendToo);
    mail.IsBodyHtml = true;

    mail.AlternateViews.PlainTextView(data.TextMessage);
    mail.AlternateViews.HTmlView(data.HtmlMessage);

    foreach (var file in files)
    {
        mail.Attachments.Add(new Attachment(file));
    }

    using (var smtp = new SmtpClient(mc.Host, mc.Port))
    {
        smtp.Credentials = new NetworkCredential(mc.UserName, mc.Password);
        smtp.EnableSsl = mc.EnableSsl;
        smtp.Send(mail);
    }

}
Sending from memory
To assist with this the author has created a language extension method.
public static void AddFilesFromStream(this AttachmentCollection sender, string[] files)
{
    foreach (var file in files)
    {
        var ba = new AttachmentByteArray() { FullFilename = file };
        sender.Add(ba.Attachment);
    }
}
Which works with the following class which reads the file into a MemoryStream then uses the memory stream to add the Attachment to the AttachmentCollection.
/// <summary>
/// Add attachments from a folder were each file in the folder is added without
/// any conditions.
/// </summary>
/// <param name="pConfig">appropriate <see cref="MailConfiguration"/> item</param>
/// <param name="pSendToo">Valid email address to send message too</param>
/// <param name="identifier">SQL-Server table key</param>
/// <param name="name">Represents who called this method</param>
public void SendMultipleAttachementsFromByeArray(
    string pConfig,
    string pSendToo,
    int identifier,
    [CallerMemberName]string name = "")
{
    var files = Directory.GetFiles(Path.Combine(AppDomain.CurrentDomain.BaseDirectory, "Files1"));
    var ops = new DataOperations();
    var data = ops.Read(identifier);

    var mc = new MailConfiguration(pConfig);
    var mail = new MailMessage
    {
        From = new MailAddress(mc.FromAddress),
        Subject = $"Sent from test: '{name}'"
    };

    mail.To.Add(pSendToo);
    mail.IsBodyHtml = true;

    mail.AlternateViews.PlainTextView(data.TextMessage);
    mail.AlternateViews.HTmlView(data.HtmlMessage);
    mail.Attachments.AddFilesFromStream(files);

    using (var smtp = new SmtpClient(mc.Host, mc.Port))
    {
        smtp.Credentials = new NetworkCredential(mc.UserName, mc.Password);
        smtp.EnableSsl = mc.EnableSsl;
        smtp.Send(mail);
    }

}
Embedding images
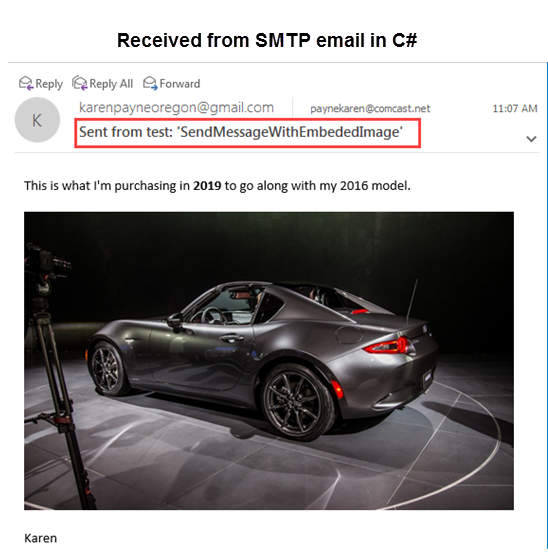
The key to embedding images is setting the image up with a cid. In this case the identifier is setup in a variable as it's used in two places.
/*
    *  This is the identifier for embeding an image into the email message.
    *  A variable is used because the identifier is needed into two areas,
    *  first in the AlternateView for HTML and secondly for the LinkedResource.
    */
var imageIdentifier = "Miata";
Note the identifier used in the body of the message.
var htmlMessage = AlternateView.CreateAlternateViewFromString(
    $"<p>This is what I'm purchasing in <b>2019</b> to go along with my 2016 model.</p><img src=cid:{imageIdentifier}><p>Karen</p>",
    null, "text/html");
The next step is to read the image and add it as a LinkedResource.
var fileName = $"{Path.Combine(AppDomain.CurrentDomain.BaseDirectory, "Images1")}\\2017Miata.jpg";
var miataImage = new LinkedResource(fileName, "image/jpeg") {ContentId = imageIdentifier };
mail.AlternateViews.Add(plainMessage);
mail.AlternateViews.Add(htmlMessage);
htmlMessage.LinkedResources.Add(miataImage);
Setting up the unit test project
- Open SQL-Server Management Studio or create a .SQL file in Visual Studio by adding a text file, change the extension to .SQL.
- Load script.sql from smtpUnitTest project under the folder Scripts.
- Run the scripts to create the database and table with data.
- In MailLibrary project, BaseSqlServerConnections change the property BasebaseServer from KARENS-PC to your server name or SQLEXPRESS.
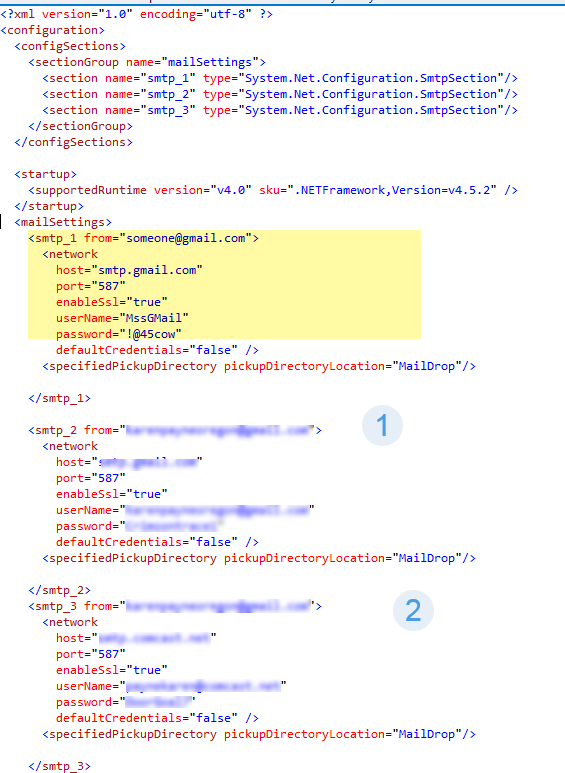
- Setup in app.config items 1 and 2 so they are valid email setting that will allowing sending and receiving email message which are used in all unit test methods which send email messages as shown in the image below. The highlighted settings are examples to what needs to be set in items 1 and 2.
Summary
This article will provide developers with basic to advance information to create email messages for their applications. There is more content to explore besides the information shown in this article. The best way to learn is to first follow the steps in the section “Setting up the unit test project”, build the solution, run the test methods. Once this is done explore the source code and as time permits run through each unit test method in debug mode to examine in real time what’s going on. Also examine the log file generated in bin\debug folder and the email generated for pickup folder under bin\debug\MailDrop folder.
Part three of the series will introduce:
- Fluent interfaces, Builder pattern and functional method chaining to create and send email messages.
- HTML Templates.
See also
C#: Working with SMTP email (Part 1)
C#: Create a simple SMTP email with HTML body


