VB.NET: Export from SQL-Server to Excel
Introduction
This article walks through setting up SQL-Server so that developers may export data in a SQL-Server table to a local Excel .xlsx file. To demonstrate performing an export from SQL-Server to Excel a Windows desktop forms project is used although the actual processes are within a class project suitable for any .NET solution except for .NET standard framework.
Configuring SQL-Server
- Open SSMS (SQL-Server Management Studio) which is free to download from Microsoft.
- Login (default is Windows authentication) to the server upon the user interface being shown.
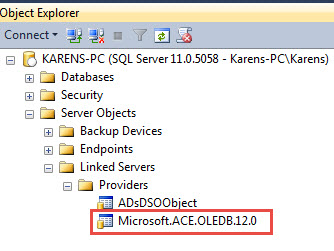
- Open the “Object Explorer” and traverse to the “Link Servers” node (figure 1)
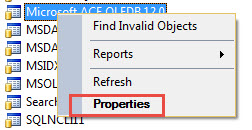
- Right click, select "Properties" (figure 2).
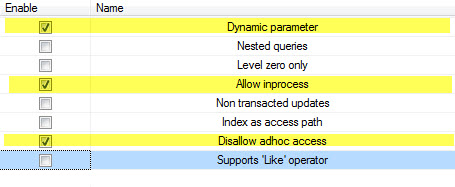
- Select/check the items shown below (figure 3).
Now select the Database node, right click, select Refresh. This should do it configuration.
Once the above is done, run the SQL_Script.sql located in the source code solution
Figure 3

Back in Visual Studio, from Solution Explorer, right click the solution node and select "Build". Run the front end project. There are two options, the first is to export all rows from a table while the second option does partial exports by country name where the resulting file is the country name.
Open the Bin\Debug folder and for each country processed/exported there will be an Excel file. Pressing the export all button will result in one Customers.xlsx file.
Breaking down code
At the core, there is an SQL INSERT statement with a SELECT statement within the INSERT statement. What makes the export perform is OPENROWSET.
The first parameter for OPENROWSET is the provider, in this case OleDb which if you have worked with OleDb to read data from Excel, the connection string is basically the same. In the connection string below pFileName is the name of the excel file.
OPENROWSET('Microsoft.ACE.OLEDB.12.0', 'Excel 12.0;Database={pFileName}'
pFileName is where data from SQL-Server table will be exported into. The entire command text is shown below where cmd is a SqlClient.SqlCommand with a SqlConnection.
cmd.CommandText = $"INSERT INTO OPENROWSET('Microsoft.ACE.OLEDB.12.0', 'Excel 12.0;Database={pFileName}','SELECT * " &
                    "FROM [Customers$]') SELECT CustomerIdentifier,CompanyName,ContactName,ContactTitle,[Address]," &
                    "City,Region,PostalCode,Country,Phone FROM Customers"
In your project, create a connection and command object, use the SQL above following by executing Command.ExecuteNonQuery which returns an int which represents in this case how many rows were exported.
Your method would be on the lines of the following (taken from the attached source code)
Public Function  ExportAllCustomersToExcel(pFileName As String, ByRef  pRowsExported As  Integer) As Boolean
    If Not  File.Exists(pFileName) Then
        ExceptionMessage = $"Not found{Environment.NewLine}{pFileName}"
        Return False
    End If

    Using cn As  New SqlConnection With {.ConnectionString = ConnectionString}
        Using cmd As  New SqlCommand With {.Connection = cn}

            cmd.CommandText = "INSERT INTO OPENROWSET('Microsoft.ACE.OLEDB.12.0'," &
                                $"'Excel 12.0;Database={pFileName}','SELECT * " &
                                "FROM [Customers$]') SELECT CustomerIdentifier," &
                                "CompanyName,ContactName,ContactTitle,[Address]," &
                                "City,Region,PostalCode,Country,Phone FROM Customers"

            cn.Open()

            Try

                pRowsExported = cmd.ExecuteNonQuery

                Return pRowsExported > 0

            Catch ex As Exception

                ExceptionMessage = ex.Message
                Return False

            End Try
        End Using
    End Using
End Function
When there is a need to export a subset of a table add a WHERE condition as shown below which is used to export customers in this case by country. Note the use of a named parameter for WHERE Country = @Country, always use parameters as this reduces chances of malformed values, especially strings and issues with SQL-Injection.
cmd.CommandText =
    "INSERT INTO OPENROWSET('Microsoft.ACE.OLEDB.12.0','Excel 12.0;" &
    $"Database={pFileName}'," &
    "'SELECT * FROM [Customers$]') SELECT CustomerIdentifier," &
    "CompanyName,ContactName," &
    "ContactTitle,[Address],City,Region,PostalCode,Country,Phone " &
    "FROM Customers WHERE Country = @Country"

cmd.Parameters.AddWithValue("@Country", pCountry)
How to use in your project
Construct a connection and command object, alter the SQL presented e.g.
cmd.CommandText = "INSERT INTO OPENROWSET('Microsoft.ACE.OLEDB.12.0'," &
                    $"'Excel 12.0;Database={pFileName}','SELECT * " &
                    "FROM [Products$]') SELECT Identifier," &
                    "Category,Name,Cost FROM SaleProducts"
In the above example data is exported from SalesProduct table for the current catalog setup via your connection object to SQL-Server into a file specified by pFileName with the fields listed.
Naming Excel sheets
Naming convention, name must be in square brackets with a dollar sign on the end of the sheet name. In the above code block the desire is to create a sheet name of Products, in code you write [Products$]. Not following this convention a runtime exception will be thrown.
Requirements
- SQL-Server or SQL-Express.
- Visual Studio 2017
Summary
In this article methods have been presented to export data from SQL-Server to a client machine using a simple INSERT construct in tangent with T-SQL OPENROWSET along with how to properly configuring SQL-Server to permit exporting. If the intent is to distribute code as provided here to another machine don’t forget to properly setup SQL-Server as per the section “Configure SQL-Server” above. If not configured properly expect an exception thrown as shown below.
The requested operation could not be performed because OLE DB provider "Microsoft.ACE.OLEDB.12.0" for linked server "(null)" does not support the required transaction interface.
Source code
Can be downloaded in the following GitHub repository which includes both VB.NET and C# code.


