SharePoint Framework (SPFx) webpart & extensions: Bootstrap integration
Introduction
BootStrap is the most popular HTML,CSS and JS framework for developing responsive, mobile first projects on the web and SharePoint Framework on the other hand is also introduced with the similar purpose of creating mobile first approach. In this article, it is explained on how we can Bootstrap with SPFx. Though Office UI Fabric has been used to serve the purpose of providing web components for SPFx, but if one has been using bootstrap for a while and want to utilize it can still go ahead with it for building a responsive SPFx webpart\extension.
Purpose
This article explains two different approaches to refer external javascript libraries like bootstrap with SPFx webpart and SPFx extensions. This part explains on how to refer the external libraries without bundling it with the package,i.e. directly referring it from Content Delivery Network(CDN). Further, the important step to be followed while referring Non AMD Module javascript framework like Bootstrap,Angular by marking it in externals is discussed. It is also discussed in the article on how to check whether the external javascript library that needs to referred is a Module or a Non-Module.
Integrate Bootstrap with SPFx webpart
Prerequisite
Kindly refer this article to know the prerequisite for creating SPFx webpart.
Getting Started
Create SharePoint Framework Solution
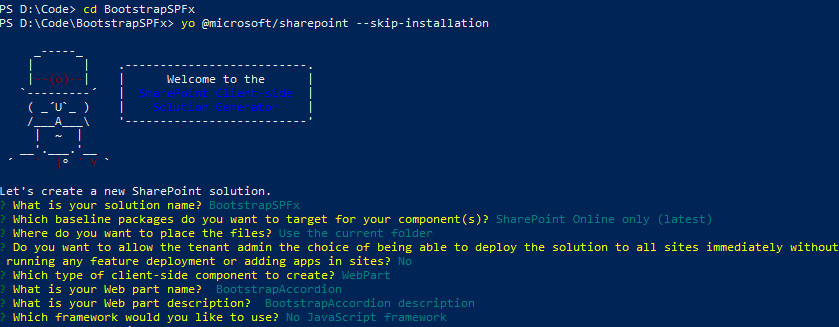
Step 1) Open Windows Powershell.
Step 2) Create a folder inside a directory by entering the below command, here for example
**md BootstrapSPFx **
Step 3) Go Inside the folder by entering the command
cd BootstrapSPFx
Step 4) Create a webpart by entering below command
yo @microsoft/sharepoint --skip-installation
Specify the following :
- Solution Name - BootstrapSPFx
- Target - SharePoint Online only
- File Location - Use the current folder
- Allow tenant admin to deploy the solution to all Site Immediately without running any feature deployment or adding apps in sites -** Yes**
- Which client -side component- Webpart
- WebpartName - BootstrapAccordion
- A description -
- Framework- No Javascript framework
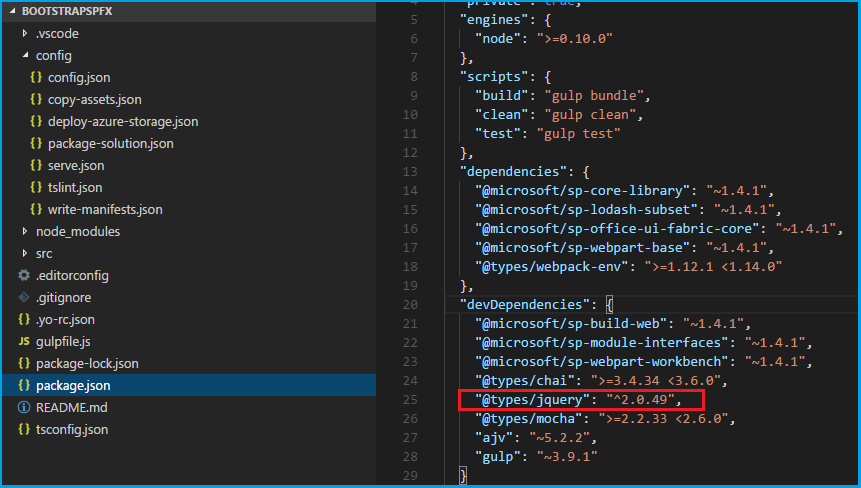
Step 5) Run the below command which include typings under devDependencies for project.
npm install --save @types/jquery@2 -D
Step 6) Open the project in Visual code by running the below command in windows powershell.
code .
changes should reflect package.json file. As highlighted in the below screen shot.
Refer bootstrap from externals
Step 7) As bootstrap is a non module unlike jquery which is a module, there is a specific pattern that needs to be followed in order to refer this file using external.
Navigate to Config.json under Config Folder. (Config > Config.json) and include replace the external node with the below one.
"externals": {
    "jquery": {
      "path": "https://ajax.googleapis.com/ajax/libs/jquery/3.3.1/jquery.min.js",
      "globalName": "jquery"
    },
    "bootstrap": {
      "path": "https://maxcdn.bootstrapcdn.com/bootstrap/3.3.7/js/bootstrap.min.js",
      "globalName": "bootstrap",
      "globalDependencies": ["jquery"]
    }
  },
Check if the javascript framework is Module or Non-Module.
In order to check if the framework you have selected is a module or a non-module, navigate to the site SharePoint Framework Script Check. Provide CDN path of the framework and click on "Analyze with SPCAF" now. This portal will show whether it is a module or Non-module along with the quality of the framework referred.
Step 8) Inside the BootstrapAccordionWebPart.ts file located under BOOSTRAPSPFX >src >webparts >bootstrapAccordion. Add the below lines of code.
import { SPComponentLoader } from '@microsoft/sp-loader';
import 'jquery';
require('bootstrap');
Here SPComponentLoader is utilized to load BootStrap CSS and jquery and bootstrap libraries is imported.
Step 9) Replace the render method with the below code.
public render(): void {
   let cssURL = "https://maxcdn.bootstrapcdn.com/bootstrap/3.3.7/css/bootstrap.min.css";
   SPComponentLoader.loadCss(cssURL);

   this.domElement.innerHTML = `
   <div>
   <h2>Accordion Example</h2>
   <p><strong>Note:</strong> The <strong>data-parent</strong> attribute makes sure that all collapsible elements under the specified parent will be closed when one of the collapsible item is shown.</p>
   <div class="panel-group" id="accordion">
     <div class="panel panel-default">
       <div class="panel-heading">
         <h4 class="panel-title">
           <a data-toggle="collapse" data-parent="#accordion" href="#collapse1">Collapsible Group 1</a>
         </h4>
       </div>
       <div id="collapse1" class="panel-collapse collapse in">
         <div class="panel-body">Lorem ipsum dolor sit amet, consectetur adipisicing elit,
         sed do eiusmod tempor incididunt ut labore et dolore magna aliqua. Ut enim ad minim veniam,
         quis nostrud exercitation ullamco laboris nisi ut aliquip ex ea commodo consequat.</div>
       </div>
     </div>
     <div class="panel panel-default">
       <div class="panel-heading">
         <h4 class="panel-title">
           <a data-toggle="collapse" data-parent="#accordion" href="#collapse2">Collapsible Group 2</a>
         </h4>
       </div>
       <div id="collapse2" class="panel-collapse collapse">
         <div class="panel-body">Lorem ipsum dolor sit amet, consectetur adipisicing elit,
         sed do eiusmod tempor incididunt ut labore et dolore magna aliqua. Ut enim ad minim veniam,
         quis nostrud exercitation ullamco laboris nisi ut aliquip ex ea commodo consequat.</div>
       </div>
     </div>
     <div class="panel panel-default">
       <div class="panel-heading">
         <h4 class="panel-title">
           <a data-toggle="collapse" data-parent="#accordion" href="#collapse3">Collapsible Group 3</a>
         </h4>
       </div>
       <div id="collapse3" class="panel-collapse collapse">
         <div class="panel-body">Lorem ipsum dolor sit amet, consectetur adipisicing elit,
         sed do eiusmod tempor incididunt ut labore et dolore magna aliqua. Ut enim ad minim veniam,
         quis nostrud exercitation ullamco laboris nisi ut aliquip ex ea commodo consequat.</div>
       </div>
     </div>
   </div>
 </div>`;
 }
Here, css file is loaded by the help of SPComponent loader and static html with bootstrap supporting class has been included to the inner-html to support accordion component.
Step 10) Run the below command in Windows powershell to serve the project in local host.
gulp serve
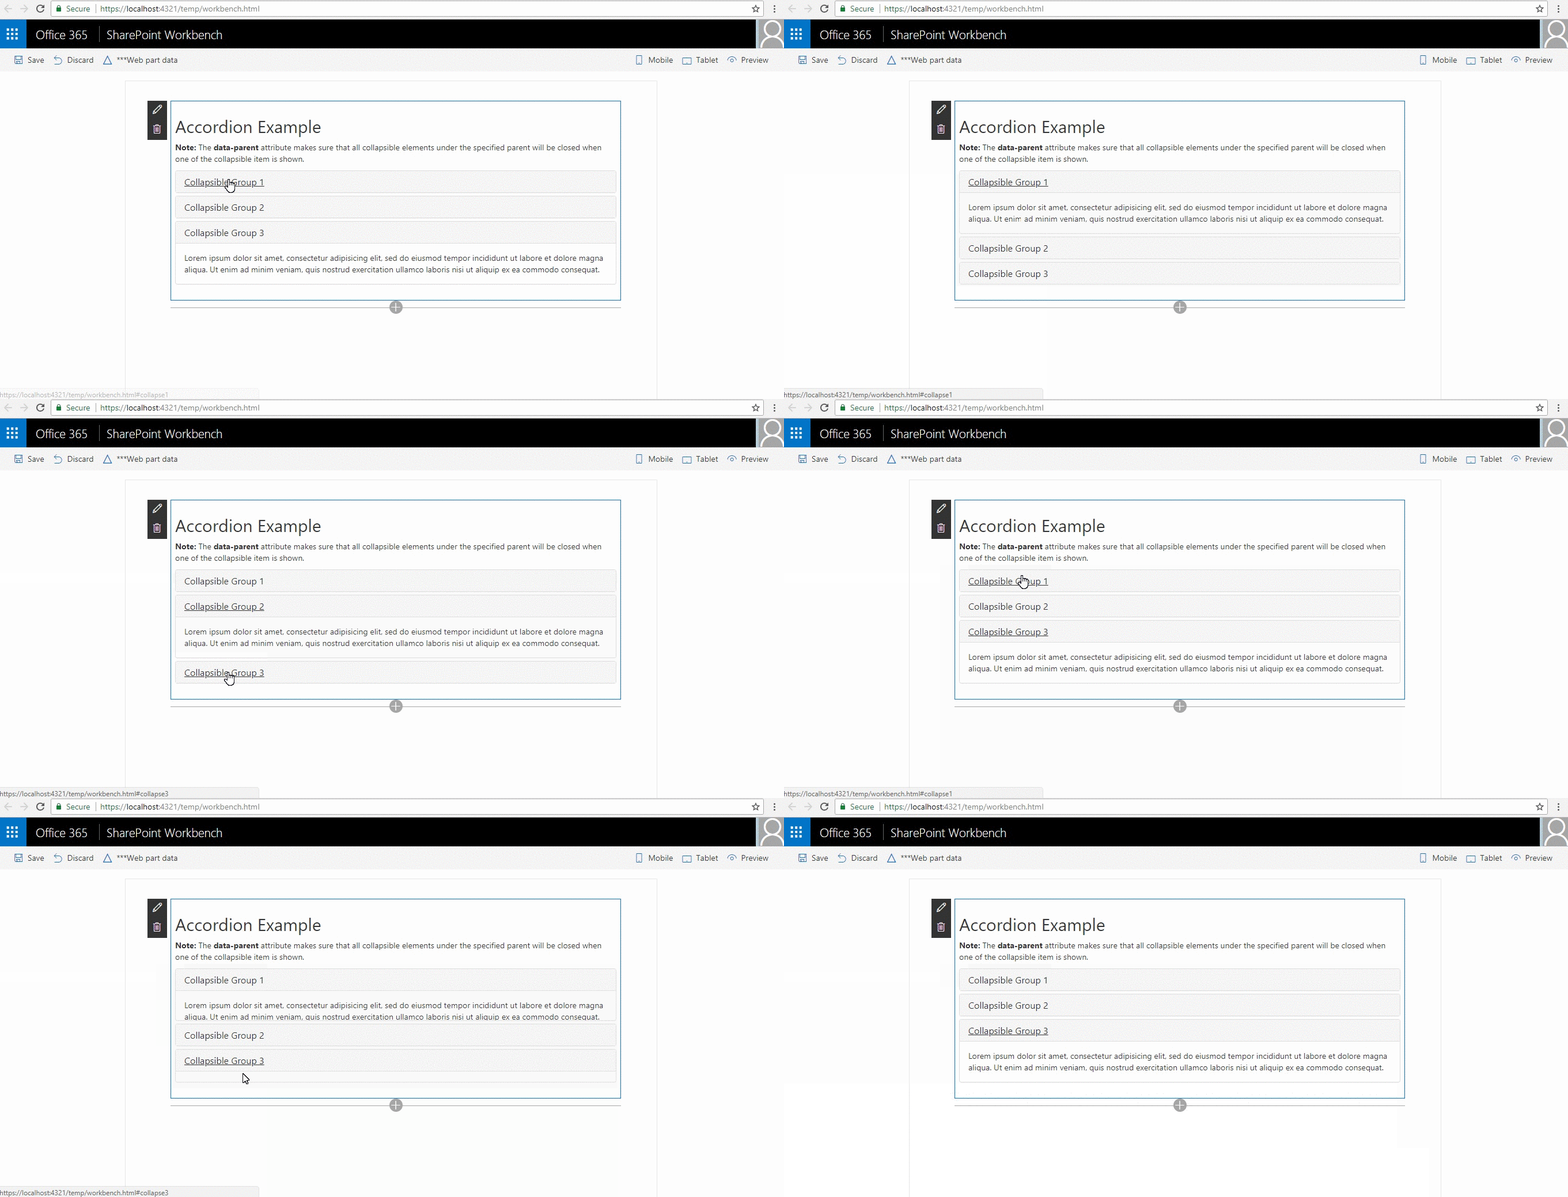
Step 11) Add webpart to the page, below accordion should appear as a result.
Since this is a sample on how to integrate Bootstrap with SPFx, inorder to package and deploy the solution,refer the below mentioned documentation.
/en-us/sharepoint/dev/spfx/web-parts/get-started/serve-your-web-part-in-a-sharepoint-page
Integrate Bootstrap with SPFx extensions
Step 1) In the windows powershell, go to previous project location and run the below command.
Add extension to existing project solution
yo @microsoft/sharepoint
Specify the following :
Which type of client-side component to create? Extension
- Which type of client-side extension to create? Application Customizer
- Add new Application Customizer to solution bootstrap-sp-fx.
- What is your Application Customizer name? BootstrapNavBar
- What is your Application Customizer description? BootstrapNavBar description
Using SPComponentLoader
Step 2) Include SPComponentLoader and replace import of BaseApplicationCustomizer with the below code.
export default class BootstrapNavBarApplicationCustomizer
  extends BaseApplicationCustomizer<IBootstrapNavBarApplicationCustomizerProperties> {

    // These have been added
    private _topPlaceholder: PlaceholderContent | undefined;
    private _bottomPlaceholder: PlaceholderContent | undefined;
    @override
    public onInit(): Promise<void> {
        Log.info(LOG_SOURCE, `Initialized ${strings.Title}`);
        let cssURL = "https://maxcdn.bootstrapcdn.com/bootstrap/3.3.7/css/bootstrap.min.css";
        SPComponentLoader.loadCss(cssURL);
        SPComponentLoader.loadScript('https://cdnjs.cloudflare.com/ajax/libs/jquery/3.3.1/jquery.min.js', {
        globalExportsName: 'jQuery'
      }).catch((error) => {
        console.log("jQuery loader error occurred");
      }).then(() => {
       return SPComponentLoader.loadScript("https://maxcdn.bootstrapcdn.com/bootstrap/3.3.7/js/bootstrap.min.js");
      });
        // Added to handle possible changes on the existence of placeholders.
        this.context.placeholderProvider.changedEvent.add(this, this._renderPlaceHolders);

        // Call render method for generating the HTML elements.
            this._renderPlaceHolders();
            return Promise.resolve<void>();
    }

    private _renderPlaceHolders(): void {

      console.log('BootstrapApplicationCustomizer._renderPlaceHolders()');
      console.log('Available placeholders: ',
    this.context.placeholderProvider.placeholderNames.map(name => PlaceholderName[name]).join(', '));

      // Handling the top placeholder
      if (!this._topPlaceholder) {
    this._topPlaceholder =
      this.context.placeholderProvider.tryCreateContent(
        PlaceholderName.Top,
        { onDispose: this._onDispose });

    // The extension should not assume that the expected placeholder is available.
    if (!this._topPlaceholder) {
      console.error('The expected placeholder (Top) was not found.');
      return;
    }

    if (this.properties) {
      let topString: string = this.properties.Top;
      if (!topString) {
        topString = '(Top property was not defined.)';
      }

      if (this._topPlaceholder.domElement) {
        this._topPlaceholder.domElement.innerHTML = `
        <nav class="navbar navbar-inverse">
        <div class="container-fluid">
          <div class="navbar-header">
            <button type="button" class="navbar-toggle" data-toggle="collapse" data-target="#myNavbar">
              <span class="icon-bar"></span>
              <span class="icon-bar"></span>
              <span class="icon-bar"></span>
            </button>
            <a class="navbar-brand" href="#">WebSiteName</a>
          </div>
          <div class="collapse navbar-collapse" id="myNavbar">
            <ul class="nav navbar-nav">
              <li class="active"><a href="#">Home</a></li>
              <li class="dropdown">
                <a class="dropdown-toggle" data-toggle="dropdown" href="#">Page 1 <span class="caret"></span></a>
                <ul class="dropdown-menu">
                  <li><a href="#">Page 1-1</a></li>
                  <li><a href="#">Page 1-2</a></li>
                  <li><a href="#">Page 1-3</a></li>
                </ul>
              </li>
              <li><a href="#">Page 2</a></li>
              <li><a href="#">Page 3</a></li>
            </ul>
            <ul class="nav navbar-nav navbar-right">
              <li><a href="#"><span class="glyphicon glyphicon-user"></span> Sign Up</a></li>
              <li><a href="#"><span class="glyphicon glyphicon-log-in"></span> Login</a></li>
            </ul>
          </div>
        </div>
      </nav>`;
      }
    }
      }
    }
    private _onDispose(): void {
      console.log('[BootstrapApplicationCustomizer._onDispose] Disposed custom top and bottom placeholders.');
    }
}
**Here during intialization of Application Customizer OnInit(), bootstrap dependent files are dynamically loaded using SPComponentLoader.
**
Step 3) Run the below command and open a SharePoint list in Modern Experience.
gulp serve --nobrowser
Step 4) Append below part of URL with the current URL in the browser and Click Go.
?loadSPFX=true&debugManifestsFile=https://localhost:4321/temp/manifests.js&customActions={"e34e3338-f6de-4864-924e-4a67b2d6032e":{"location":"ClientSideExtension.ApplicationCustomizer","properties":{}}}
Step 5) Select "Load debug scripts" in the dialog box. Following output should appear.
Conclusion
Thus, we learnt how to integrate Bootstrap with SPFx in two different ways. One using externals and the other using SPComponentLoader.
Download this Solution
This solution can be downloaded from technet gallery. https://gallery.technet.microsoft.com/Bootstrap-with-SPFx-bb977ab0


