SharePoint 2016: How To Configure Search Service Application Using PowerShell
In this article we will discuss how to provision Search Service Application for SharePoint 2016 using PowerShell
During this whole article I will guide you steps involved in provisioning Search Application along with the corresponding PowerShell Script
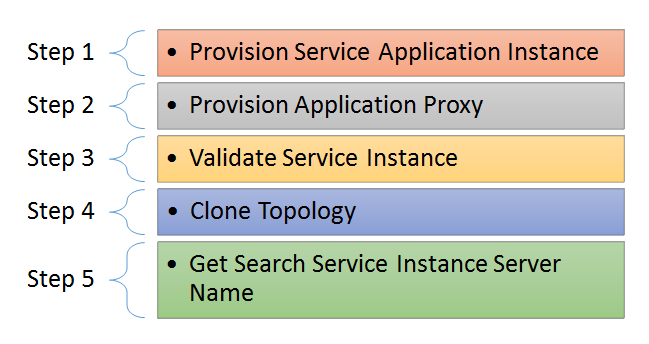
Here the steps that we will explore in the upcoming section-
https://howtodowithsharepoint.files.wordpress.com/2017/09/110.png?w=800
https://howtodowithsharepoint.files.wordpress.com/2017/09/26.png?w=800
https://howtodowithsharepoint.files.wordpress.com/2017/09/31.png?w=800
Though we can provision Search Application from Central Admin as well but the purpose here is to demonstrate the use of PowerShell commands required to provision Search Application so that’s what we will do.
First let’s go to Central Admin to ensure that there is no existing instance of Search Service Application has been provisioned earlier
Under Application Management -> Click on “Manage Service Applications”
https://howtodowithsharepoint.files.wordpress.com/2017/09/41.png?w=800
Here we can see what all Service Application Instances provisioned earlier and we can see there are none
https://howtodowithsharepoint.files.wordpress.com/2017/09/51.png?w=800
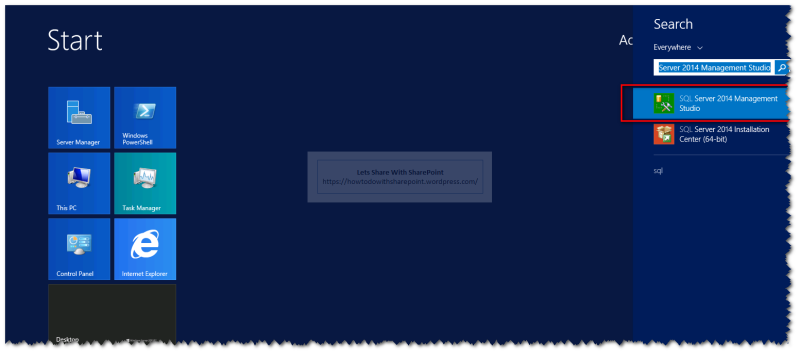
Now launch SharePoint Management Shell to run the required PowerShell commands
https://howtodowithsharepoint.files.wordpress.com/2017/09/61.png?w=800
We will run the PowerShell commands in the following order to make sure each Sub component provisioned as desired.
Step 1: Provision Service Application Instance
In this Step we will first provision Search Service Application using the following cmdlet-
$sa = New-SPEnterpriseSearchServiceApplication -Name "Search Service Application" -DatabaseName "SearchDB" –ApplicationPool "SecurityTokenServiceApplicationPool"
Make sure Application Pool should exists before we run this command else it will fail since this cmdlet wont’ add the Application Pool automatically
https://howtodowithsharepoint.files.wordpress.com/2017/09/71.png?w=800
Step 2: Provision Application Proxy
Then we need to provision Application Proxy by using following cmdlet referring the Service Application Instance provisioned in the previous step
New-SPEnterpriseSearchServiceApplicationProxy -Name "Search Service Application Proxy" -SearchApplication $sa
https://howtodowithsharepoint.files.wordpress.com/2017/09/81.png?w=800
Step 3: Validate Service Instance
Next step is to validate that the Service Instance is online and to do so we can use the following cmdlet
Get-SPEnterpriseSearchServiceInstance -local
https://howtodowithsharepoint.files.wordpress.com/2017/09/91.png?w=800
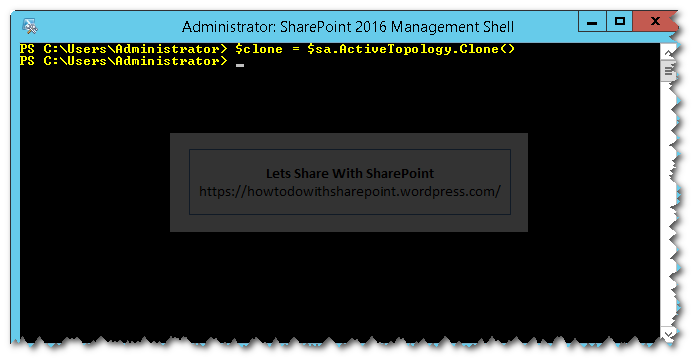
Step 4: Clone Topology
Next step is to clone the topology which is required in order to make any changes to the search topology in a search installation that has items in the search index
As per Microsoft recommendation around this we need to modify this new topology object, which is a clone of the active topology, by adding or removing search components. After we have made the changes to the clone topology object, we have to activate this clone to have this topology in action.
$clone = $sa.ActiveTopology.Clone()
https://howtodowithsharepoint.files.wordpress.com/2017/09/101.png?w=800
Step 5: Get Search Service Instance Server Name
This Server name is required in the upcoming steps to it is wise to make use of the following cmdlet to retrieve the server name
Get-SPEnterpriseSearchServiceInstance| Select Server
https://howtodowithsharepoint.files.wordpress.com/2017/09/111.png?w=800
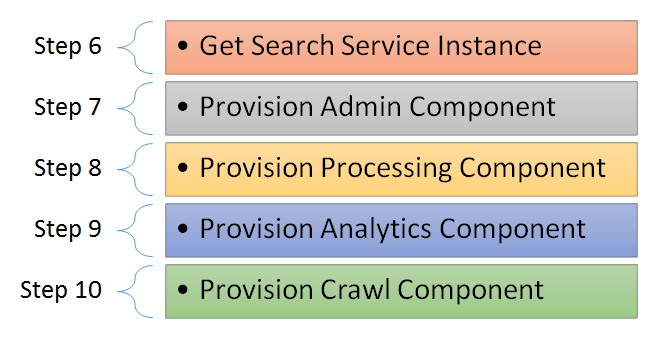
Step 6: Get Search Service Instance
Then we get handle over the search service instance running on the respective server using the following cmdlet
$si = Get-SPEnterpriseSearchServiceInstance | ?{$_.Server -match "SP-2016-Dev"}
This reference object will be used in the upcoming steps
https://howtodowithsharepoint.files.wordpress.com/2017/09/121.png?w=800
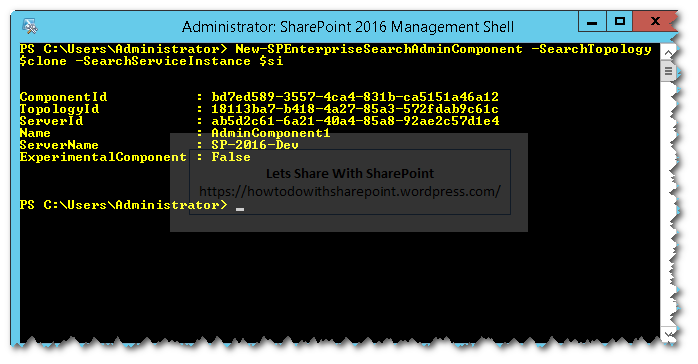
Step 7: Provision Admin Component
Next step is to provision a new Admin Component for the given topology and search service instance using the following cmdlet. This cmdlet is using reference to search service instance we get in the earlier steps
New-SPEnterpriseSearchAdminComponent -SearchTopology $clone -SearchServiceInstance $si
https://howtodowithsharepoint.files.wordpress.com/2017/09/131.png?w=800
Step 8: Provision Processing Component
Next step is to provision new content processing component for the given topology and search service instance using the following cmdlet
New-SPEnterpriseSearchContentProcessingComponent -SearchTopology $clone -SearchServiceInstance $si
https://howtodowithsharepoint.files.wordpress.com/2017/09/141.png?w=800
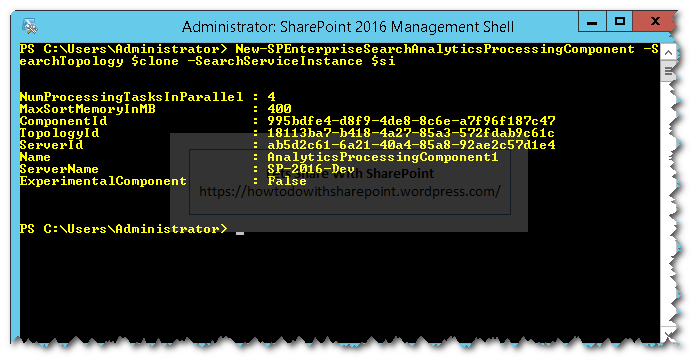
Step 9: Provision Analytics Component
Then we have to provision new analytics processing component for the given topology and search service instance using the following cmdlet
New-SPEnterpriseSearchAnalyticsProcessingComponent -SearchTopology $clone -SearchServiceInstance $si
https://howtodowithsharepoint.files.wordpress.com/2017/09/151.png?w=800
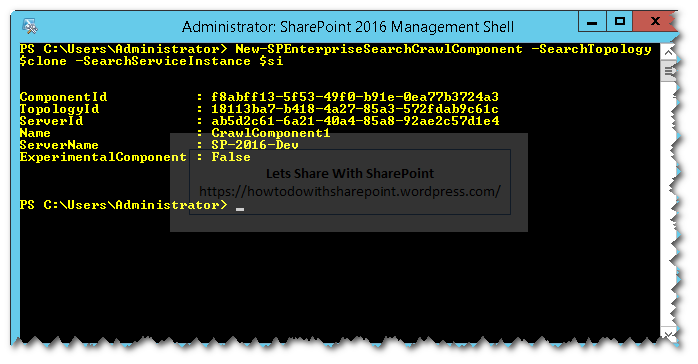
Step 10: Provision Crawl Component
Then we have to provision new crawl component for the given topology and search service instance using the following cmdlet
New-SPEnterpriseSearchCrawlComponent -SearchTopology $clone -SearchServiceInstance $si
https://howtodowithsharepoint.files.wordpress.com/2017/09/161.png?w=800
Step 11: Provision Index Component
Then we have to provision new index component for the given topology and search service instance using the following cmdlet
New-SPEnterpriseSearchIndexComponent -SearchTopology $clone -SearchServiceInstance $si -IndexPartition 0 -RootDirectory C:\SearchIndex\
RootDirectory: Specifies the root directory that will hold the index location for the new search index component. If we plan to isolate the index on dedicated discs in order to avoid I/O contention that may leads to performance degradation as it might be a risk that index filling up the OS disk and ruin the overall server performance.
https://howtodowithsharepoint.files.wordpress.com/2017/09/171.png?w=800
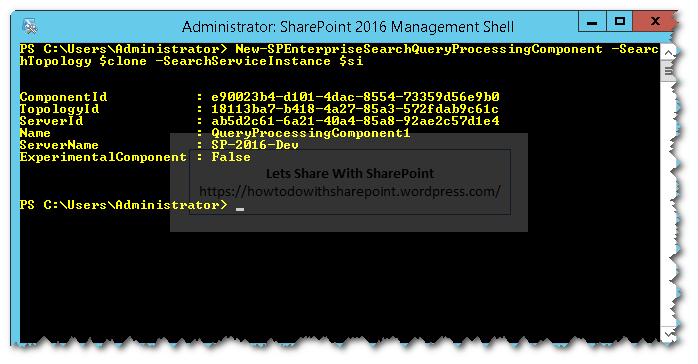
Step 12: Provision Query Component
And finally we have to provision new query processing component for the given topology and search service instance using the following cmdlet
New-SPEnterpriseSearchQueryProcessingComponent -SearchTopology $clone -SearchServiceInstance $si
https://howtodowithsharepoint.files.wordpress.com/2017/09/181.png?w=800
Step 13: Activate New Topology
Once all the components has been added to the new topology, activate it by using following cmdlet
$clone.Activate()
https://howtodowithsharepoint.files.wordpress.com/2017/09/191.png?w=800
Step 14: Clean Inactive Topologies
Finally we have to clean all the inactive topologies associated with a search service application. We can perform this clean by using the following the code using “Remove-SPEnterpriseSearchTopology” cmdlet
foreach($tp in (Get-SPEnterpriseSearchTopology -SearchApplication $sa | ?{$_.State -eq "Inactive"}))
{
   Remove-SPEnterpriseSearchTopology -Identity $tp -Confirm:$false
}
https://howtodowithsharepoint.files.wordpress.com/2017/09/201.png?w=800
Step 15: Change Default Content Access Account
And we can change the default content access account by using the following code
$sa = Get-SPEnterpriseSearchServiceApplication

$content = New-Object Microsoft.Office.Server.Search.Administration.Content($sa)

$content.SetDefaultGatheringAccount("<Enter User Name>", (ConvertTo-SecureString "<Enter Password>" -AsPlainText -Force))
https://howtodowithsharepoint.files.wordpress.com/2017/09/211.png?w=800
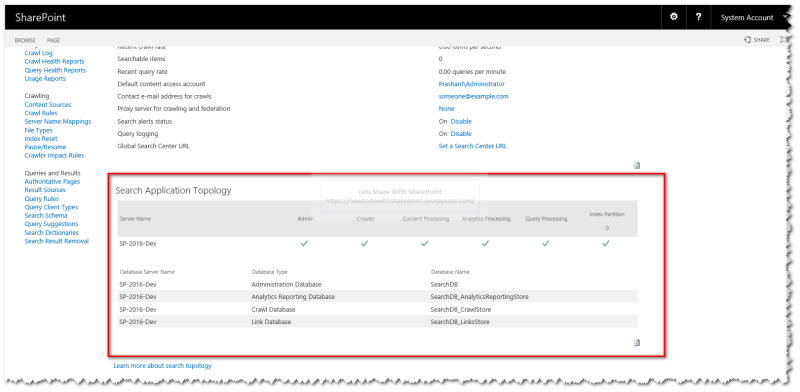
Now it is time to validate if search service application has been provisioned correctly.
Go to Central Admin -> Manage Service Applications
We can see a new Search Application has been provisioned successfully by clicking the Search Service Application Link
https://howtodowithsharepoint.files.wordpress.com/2017/09/221.png?w=800
And we can see all the component are provisioned and running as expected.
https://howtodowithsharepoint.files.wordpress.com/2017/09/231.png?w=800
Also we can validate the SQL Databases that has been provisioned during creating new search service applications as shown in the following screenshots
https://howtodowithsharepoint.files.wordpress.com/2017/09/241.png?w=800https://howtodowithsharepoint.files.wordpress.com/2017/09/251.png?w=800https://howtodowithsharepoint.files.wordpress.com/2017/09/261.png?w=800
Hope you find it helpful.