SharePoint Site Design and Site Script with Azure function, WebHook via MS Flow
Introduction & Overview
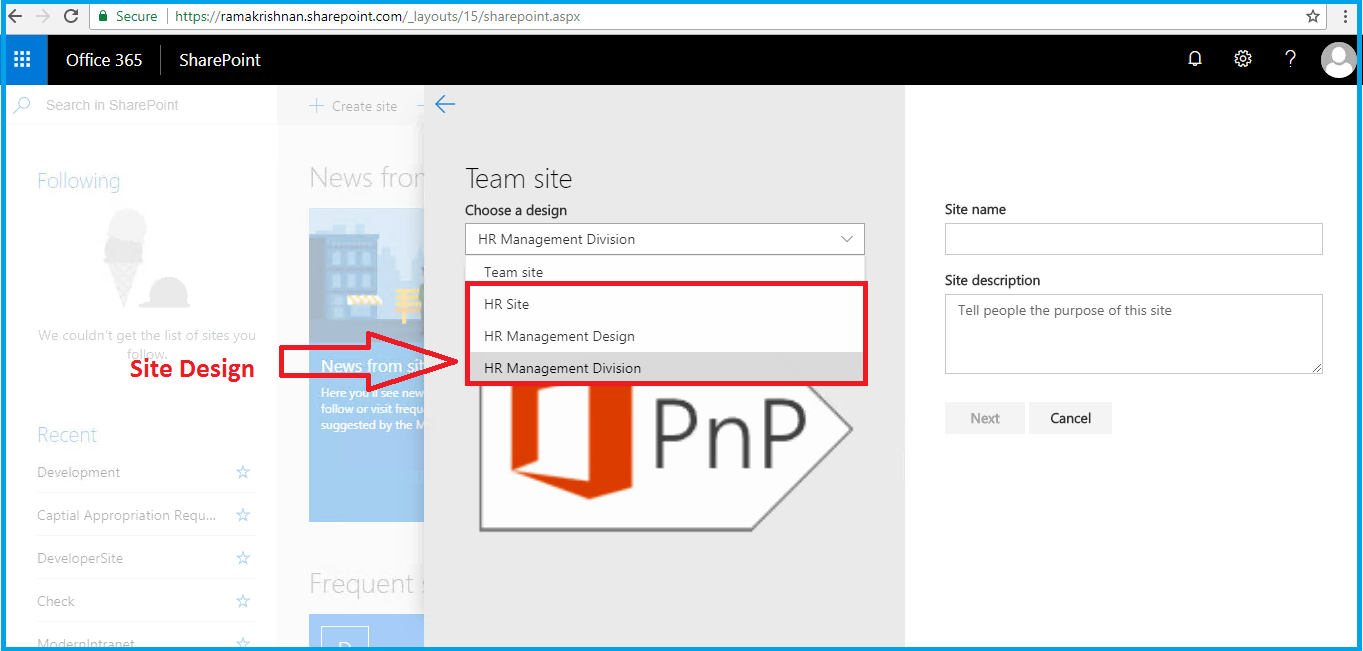
Site Design
SharePoint Site Design are a new technique which are exclusively introduced for SharePoint modern experience. Site designs are alternative approach for Remote Site Provisioning or Site Template, where one can customize the site by applying custom theme or list etc once the site is being created. Once Site Design is setup in the tenant, it provides an Out of the box approach of creating a site using the specified design\template. There are few limitation in Site Design functionality when compared with Remote Site Provisioning though which is explained further in this article.

The above picture represents the major functionalities for which site design can be utilized. Once site is created, certain action as specified in the site design are performed along with it. These action can be a trigger of MS Flow, creation of list or applying of custom theme .There are other functionalities which might be brought in over the period by Microsoft based on the feedback from customers all around.
Create Site Script & Site Design
Site Script is JSON Oriented in nature which provides a structured series of action for a Site Design.
There are two ways by which site designs can be applied to SharePoint Modern sites.
Via PowerShell
Before proceeding further, make sure that the latest version of SharePoint Online Management Shell is Installed.
Connect to SharePoint
by executing the below command in Windows Powershell or SharePoint Online Powershell as a Tenant Administrator.
Connect-SPOService -Url https://<<YourOrganizationName>-admin.sharepoint.com
Term actions
In the below JSON format, the term actions contain series of action and the term verb is type of action that needs to be performed.
for e.g create List or create field etc.
Copy the below code in clipboard and run the below command in Powershell.
$sitescript = Get-Clipboard -Raw Add-SPOSiteScript -Title "HR Management List" -Content $sitescript -Description "List for HR Management Tracker"
{
 "$schema": "schema.json",
 "actions": [
 {
 "verb": "createSPList",
 "listName": "HR Management",
 "templateType": 100,
 "subactions": [
 {
 "verb": "SetDescription",
 "description": "HR Tracking Mechanism"
 },
 {
 "verb": "addSPField",
 "fieldType": "Text",
 "displayName": "Employee Name",
 "isRequired": false,
 "addToDefaultView": true
 },
 {
 "verb": "addSPField",
 "fieldType": "Number",
 "displayName": "Experience",
 "addToDefaultView": true,
 "isRequired": true
 },
 {
 "verb": "addSPField",
 "fieldType": "User",
 "displayName": "Profile",
 "addToDefaultView": true,
 "isRequired": true
 },
 {
 "verb": "addSPField",
 "fieldType": "Note",
 "displayName": "Biography",
 "isRequired": false
 }
 ]
 }
 ],
 "bindata": { },
 "version": 1 }
This will provide an output as below.

Copy the ID generated in the output.
Replace ID
Run the below command replace the ID copied in the previous step.
Add-SPOSiteDesign -Title "HR Management Design" -WebTemplate "64" -SiteScripts "f86cc1d4-6ca9-4132-aac9-6a91e3a955cd" -Description "Stores HR Info in a list"

Via REST API
Using REST API is pretty straightforward approach. There are multiple ways to make a REST API call, this article provides one of the easiest ways to make a REST API call for easy understanding.
Login to any Classic SharePoint site where _spPageContextInfo variable can be utilized and open developer tool of the browser by pressing F12 or CTRL+SHIFT+I
Add the below code in the browser console. Basically, a common function is being utilized to perform all the necessary REST calls.
function RestRequest(url,params) {
 var req = new XMLHttpRequest();
 req.onreadystatechange = function ()
 {
 if (req.readyState != 4) // Loaded
 return;
 console.log(req.responseText);
 };

 // Prepend web URL to url and remove duplicated slashes.
 var webBasedUrl = (_spPageContextInfo.webServerRelativeUrl + "//" + url).replace(/\/{2,}/,"/");
 req.open("POST",webBasedUrl,true);
 req.setRequestHeader("Content-Type", "application/json;charset=utf-8");
 req.setRequestHeader("ACCEPT", "application/json; odata.metadata=minimal");
 req.setRequestHeader("x-requestdigest", _spPageContextInfo.formDigestValue);
 req.setRequestHeader("ODATA-VERSION","4.0");
 req.send(params ? JSON.stringify(params) : void 0);
}
Execute the function by running the below script. Again a simple site script having JSON definition with a section having a verb called applyTheme and a theme name. Considering that there is a custom theme named "HR Theme" available in the tenant. In order to create a custom theme using REST API, refer this documentation.
var site_script =
{
 "$schema": "schema.json",
 "actions": [
 {
 "verb": "applyTheme",
 "themeName": "HR Theme"
 }
 ],
 "bindata": { },
 "version": 1
};

RestRequest("/_api/Microsoft.Sharepoint.Utilities.WebTemplateExtensions.SiteScriptUtility.CreateSiteScript(Title=@title)?@title='HR theme script'", site_script);
This results in the below output once site script is created successfully. Copy\Note the Id which is the script id.


Run the below script in browser console, here make sure to replace the script id copied in the previous step and PreviewImageUrl to an actual image URL.
RestRequest("/_api/Microsoft.Sharepoint.Utilities.WebTemplateExtensions.SiteScriptUtility.CreateSiteDesign",{
 info:{
 Title:"HR Management Division",
 Description:"Creates customer list and applies standard theme",
 SiteScriptIds:["eeb7c0af-8c04-4204-bbc3-2aebc111be6e"],
 WebTemplate:"64",
 PreviewImageUrl: "https://ramakrishnan.sharepoint.com/SiteAssets/pnp.png",
 PreviewImageAltText: "HR site design theme"
 }
 });
On successful creation, the below output is received.

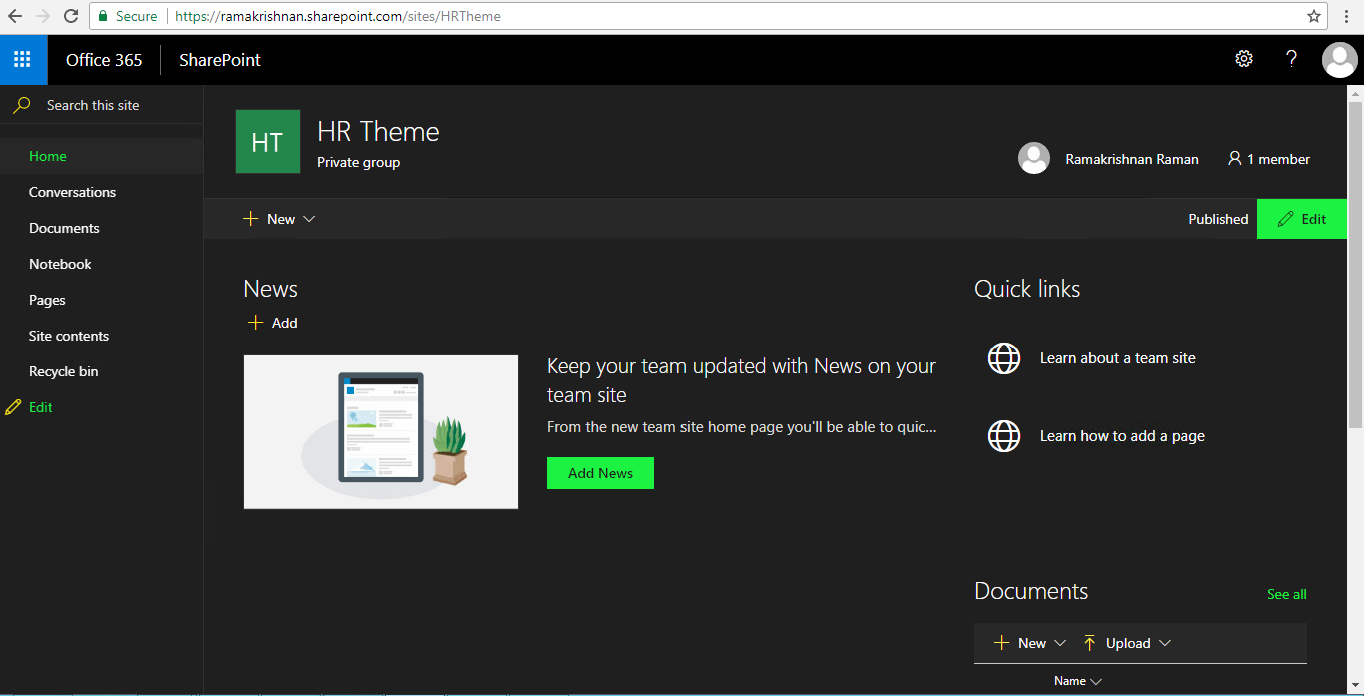
Site Design is created. This Site Design template is now available for the further creation of Modern Team or Communication site.
On selection and creation of a Site, a series of actions is called which is applying a theme in this scenario.

On clicking on View uploaded site and site reloads and presents the necessary changes (which is the theme in this case).
Site Design can be applied to an existing Modern Sites as well and is explained in an upcoming section.
Update Site Design
Site design can be applied to existing modern sites using REST API or Powershell.
Via PowerShell
Before proceeding further, make sure that the latest version of SharePoint Online Management Shell is Installed.
Connect to SharePoint
by executing the below command in Windows Powershell or SharePoint Online Powershell as a Tenant Administrator.
Connect-SPOService -Url https://<<YourOrganizationName>-admin.sharepoint.com
Run the below PowerShell command
Here the parameter WebTemplate value 64 stands for Team Site and 68 for Communication site
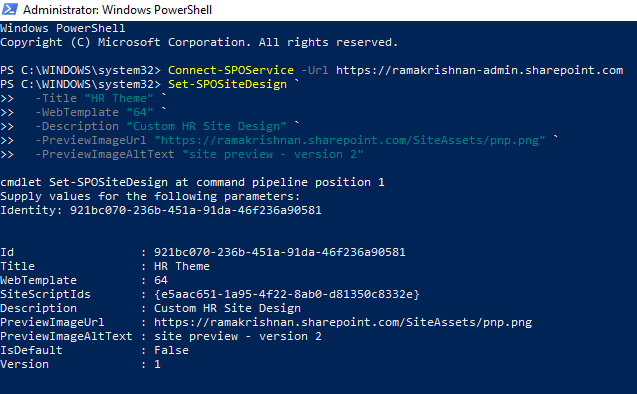
Set-SPOSiteDesign `
 -Title "HR Theme" `
 -WebTemplate "64" `
 -Description "Custom HR Site Design" `
 -PreviewImageUrl "https://ramakrishnan.sharepoint.com/SiteAssets/pnp.png" `
 -PreviewImageAltText "site preview - version 2"
Here the objective of above script is to change the description of the Site Design. On successful running of the script, the below output is received.
This can also be cross verified by opening the Create New site form. The specified description is displayed.

Via REST API
Login to any Classic SharePoint site
Where _spPageContextInfo variable can be utilized and open developer tool of the browser by pressing F12 or CTRL+SHIFT+I
Add the below code in the browser console.
Basically, a common function is being utilized to perform all the necessary REST calls. Again in the below script, we are trying the change the description of the Site Design.
function RestRequest(url,params) {
 var req = new XMLHttpRequest();
 req.onreadystatechange = function ()
 {
 if (req.readyState != 4) // Loaded
 return;
 console.log(req.responseText);
 };

 // Prepend web URL to url and remove duplicated slashes.
 var webBasedUrl = (_spPageContextInfo.webServerRelativeUrl + "//" + url).replace(/\/{2,}/,"/");
 req.open("POST",webBasedUrl,true);
 req.setRequestHeader("Content-Type", "application/json;charset=utf-8");
 req.setRequestHeader("ACCEPT", "application/json; odata.metadata=minimal");
 req.setRequestHeader("x-requestdigest", _spPageContextInfo.formDigestValue);
 req.setRequestHeader("ODATA-VERSION","4.0");
 req.send(params ? JSON.stringify(params) : void 0);
}

RestRequest("/_api/Microsoft.Sharepoint.Utilities.WebTemplateExtensions.SiteScriptUtility.UpdateSiteDesign",
 {updateInfo:{
 Id:"921bc070-236b-451a-91da-46f236a90581",
 Title:"HR Theme",
 Description:"Description Edited",
 SiteScriptIds:["f86cc1d4-6ca9-4132-aac9-6a91e3a955cd"],
 PreviewImageUrl:"https://ramakrishnan.sharepoint.com/siteassets/pnp.png",
 PreviewImageAltText:"HR Theme",
 WebTemplate:"64",
 Version: 7,
 IsDefault: false}});
On successfully running the script in browser console, a below output is logged as shown in the screenshot below.

Site Design in Action
As specified during the introduction of this article that Site Design is limited to few functionalities like applying themes, creating custom list etc. There are other ways to achieve complex functionalities. Below is an example on how complex task can be accomplished using MS Flow, Webhook & Azure function via Site Design.
In this scenario, a custom list is created using Client Side Object Model(CSOM c#) once the site design is applied. For simplicity, this example is considered as one can perform infinite number of tasks using CSOM like applying PnP Provisioning to setting up custom metadata navigation etc.
Below diagram explains on how this process works and how the functionality is achieved.
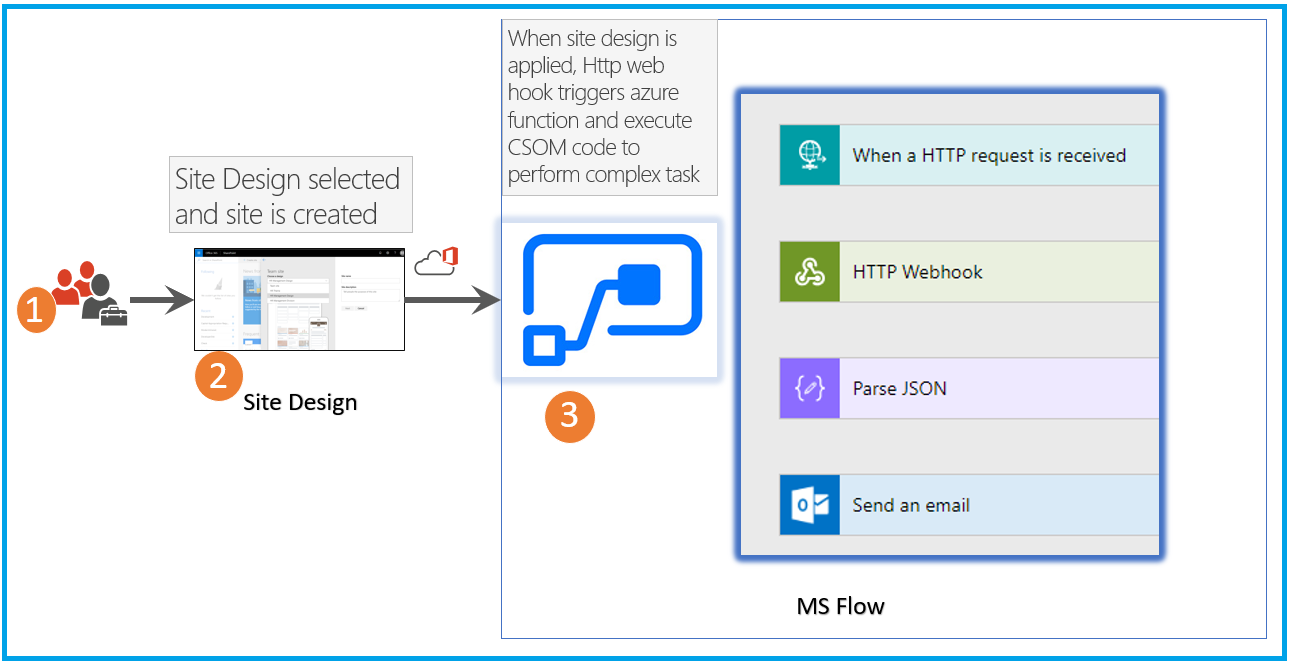
Below are the steps explained in detail.
- Site Collection is requested to be created and Site Design is applied
- Site design trigger a MS Flow using a trigger flow action.
- The flow which is triggered when a http request is received, a http webhook is utlilized which makes a post request to azure httptrigger function. This function contains a custom code( which is typical CSOM c#) that is used create a list. Once it is completed a email is being sent to account used to create client context.
Create Azure Function
Create Serverless Function App
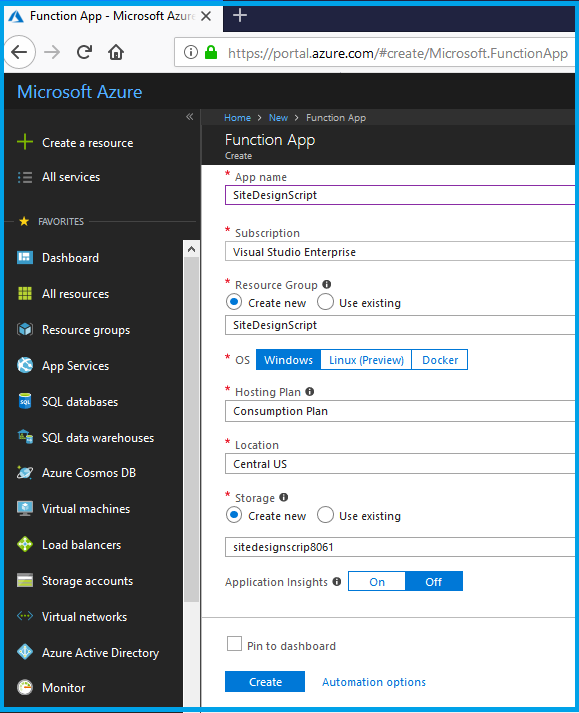
Login to Azure Portal and click on "Create a Resource". Select "Serverless Function App".

Provide a name to Azure function app and other details. Here it is "SiteDesignScript**"**. Click on Create. It will take a while to create a Azure Function App.
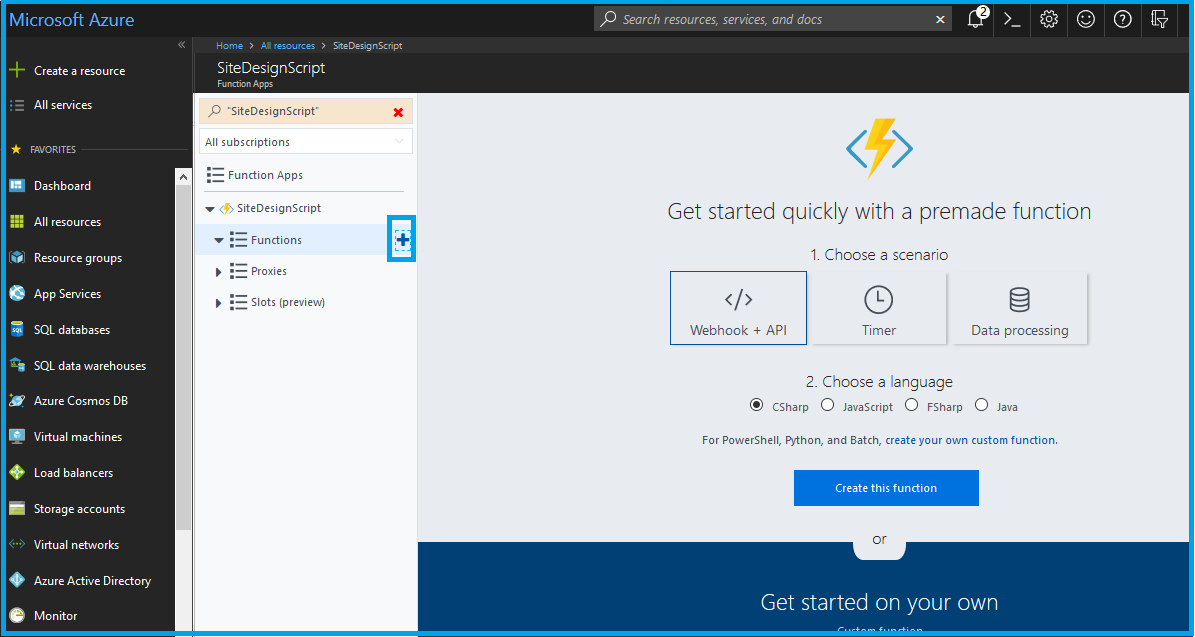
Create HttpTrigger Function
Open the Azure function app created. Click on the plus symbol, make sure Webhook + API is selected & Click on Create this function.
On successful creation of function, a default set of code should appear similar to the below screen shot.

Open Kudu & Add required dll files
Click on app again and select on Platform feature. Click on Advanced tools(kudu) under Development Tools. Refer the below screen shot

Step 5) Select CMD under Debug Console. Navigate to site->wwwroot->HttpTriggerCSharp1(function name). Create a folder and name it "bin". Refer below screen shot.

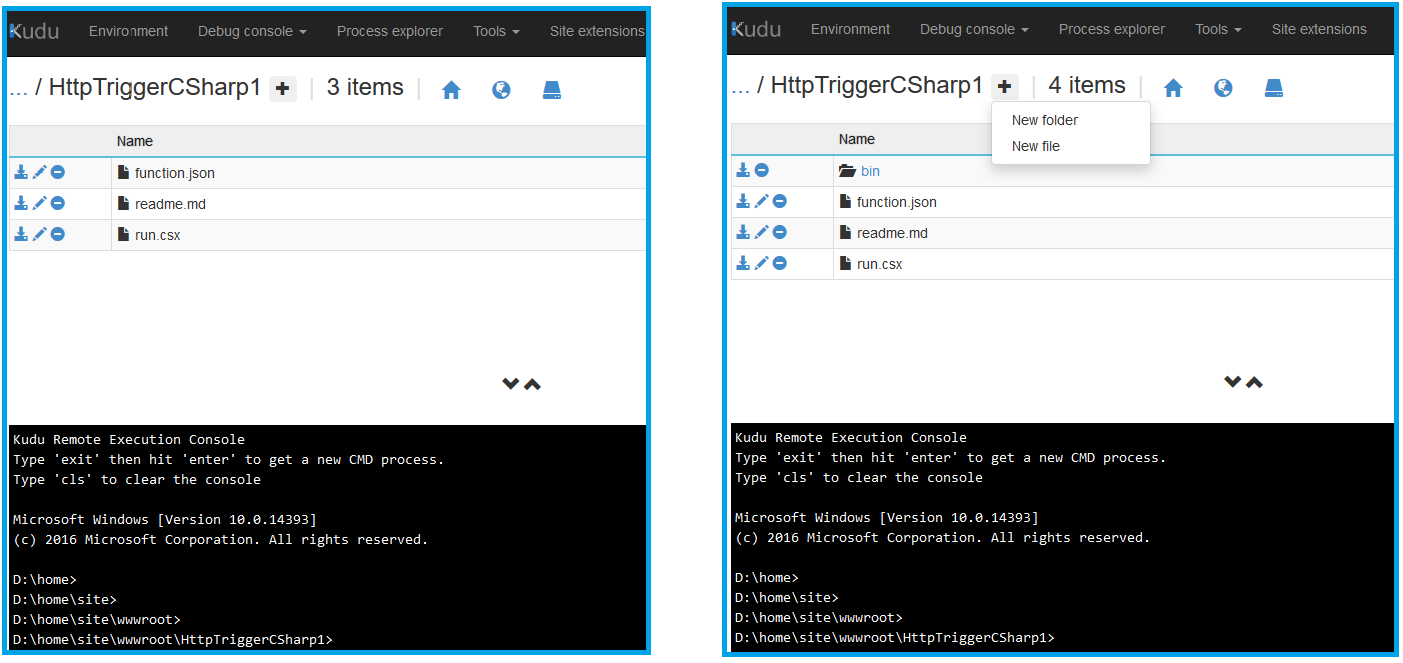
If SharePoint Online Client Components are not install in the system, then download it from here. Upload or Drag "Microsoft.SharePoint.Client.dll" & "Microsoft.SharePoint.Client.Runtime.dll" from C:\Program Files\Common Files\microsoft shared\Web Server Extensions\16\ISAPI in bin folder created in previous step.
Go back to portal & Click on the function created at Step 3.
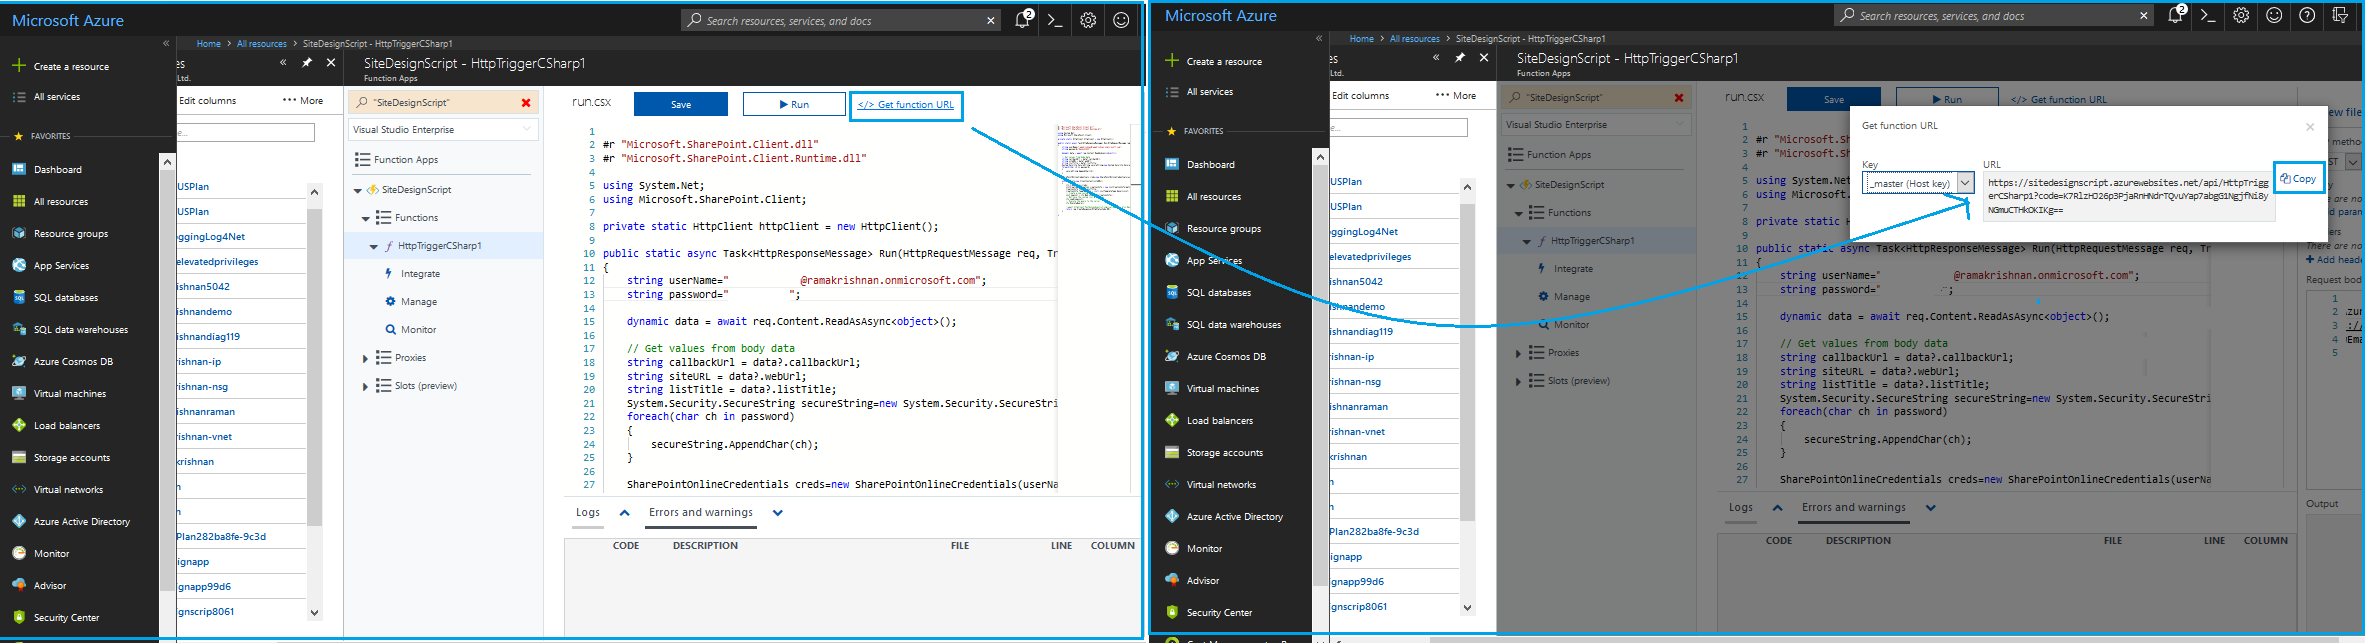
Copy & Replace the below code with the pre-defined one in run.csx file. Click Save.
#r "Microsoft.SharePoint.Client.dll"
#r "Microsoft.SharePoint.Client.Runtime.dll"

using System.Net;
using Microsoft.SharePoint.Client;

private static HttpClient httpClient = new HttpClient();

public static async Task<HttpResponseMessage> Run(HttpRequestMessage req, TraceWriter log)
{
 string userName="jsmith@ramakrishnan.onmicrosoft.com";
 string password="";

 dynamic data = await req.Content.ReadAsAsync<object>();

 // Get values from body data
 string callbackUrl = data?.callbackUrl;
 string siteURL = data?.webUrl;
 string listTitle = "New Custom List";
 System.Security.SecureString secureString=new System.Security.SecureString();
 foreach(char ch in password)
 {
 secureString.AppendChar(ch);
 }

 SharePointOnlineCredentials creds=new SharePointOnlineCredentials(userName, secureString);

 using(var ctx=new ClientContext(siteURL))
 {
 ctx.Credentials=creds;
 ListCreationInformation creationInfo = new ListCreationInformation();
 creationInfo.Title = listTitle;
 creationInfo.TemplateType = (int) ListTemplateType.GenericList;
 // Create a new custom list
 List newList = ctx.Web.Lists.Add(creationInfo);
 // Retrieve the custom list properties
 ctx.Load(newList);
 // Execute the query to the server.
 ctx.ExecuteQuery();

 await httpClient.PostAsJsonAsync<string>(callbackUrl, $"{{'OwnerEmail' : '{userName}'}}");
 return req.CreateResponse(HttpStatusCode.OK);
 }
}
Note: The above code is just an example, for production based scenario, store the Account credentials or the App Id\Secret in a secured location. Also, make sure the error handling is performed.
Here a callbackURL variable is used which waits for the client execute query operation to complete and send the value back to the URL assign.
Click on "Get Function URL" and copy\save it as it is required in upcoming steps.. Refer below screen shot.
Create Flow
Go to MS Flow site and select My Flow. Once selected, click on Create from blank. Refer below screen shot.

Click on Create from blank and search http. Select "Request-When a HTTP Request is received" under triggers. Refer below screen shot.

Copy the JSON from below & paste it inside Request Body JSON Schema.
{
 "type": "object",
 "properties": {
 "webUrl": {
 "type": "string"
 },
 "parameters": {
 "type": "object",
 "properties": {
 "event": {
 "type": "string"
 },
 "product": {
 "type": "string"
 }
 }
 }
 }
}
In the above code, webURL of the site collection a ListTitle of the list to be created in being passed along with the default parameters.
Click on New Step and then click on Add an action.
Search for WebHook and from the result select "HTTP - HTTP Webhook" under Action.

Enter the following details.
- Select POST Method
- Enter the URL copied in Step 9 of previous section(Create Azure function App)
- Enter JSON in the following format. where listCallbackUrl is an expression and webUrl is a Dynamic Content.
{
 "callbackUrl": listCallbackUrl,
 "webUrl":'webUrl'
}

Click on New step and Select Add an Action. search for JSON Parse. Include it. Refer below screen shot.
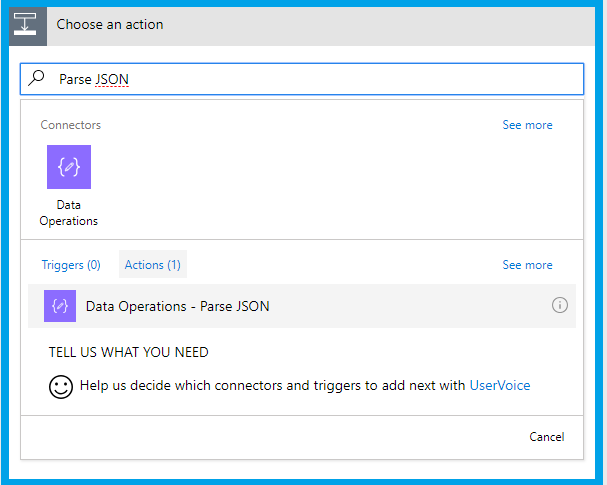
Add Body from dynamic content for Content parameter. Include below JSON for the schema field.
{
 "type": "object",
 "properties": {
 "OwnerEmail": {
 "type": "string"
 }
 }
}
Click on New step and Select Add an Action. search for Send Email. Include it. Refer below screen shot.
Enter the below values.
Select OwnerEmail from dynamic Content.
Enter subject and body as per the screen shot.

Save the flow. Go to the first action (When a Http request is received) and copy\save the Http Post URL.

Create Site Design to trigger MS Flow
Connect to SharePoint by executing the below command in Windows Powershell or SharePoint Online Powershell as a Tenant Administrator.
Connect-SPOService -Url https://<<YourOrganizationName>-admin.sharepoint.com
In the below JSON format, the term actions contain series of action and the term verb is type of action that needs to be performed.
for e.g triggerFlow here will trigger MS Flow when Site Design is applied in the site collection.
Copy the below code in clipboard and run the below command in Powershell. Note: Do not forget to add the url value copied in the previous section(Create Flow) in the site script.
$script = Get-Clipboard -Raw Add-SPOSiteScript -Title "Site Script MS Flow-Azure Function" -Content $script Get-SPOSiteScript
{
 "$schema": "schema.json",
 "actions": [
 {
 "verb": "triggerFlow",
 "url": "[paste the workflow trigger URL here]",
 "name": "Apply Template",
 "parameters": {
 "event":"",
 "product":""
 }
 }
 ],
 "bindata": {},
 "version": 1
 }
This will provide an output as below.
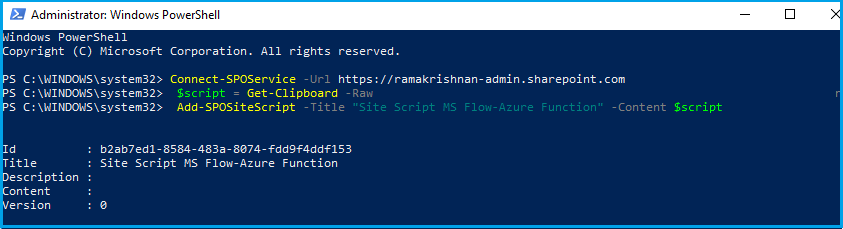
Copy the ID generated in the output.
Run the below command & replace the ID copied in the previous step.
Add-SPOSiteDesign -Title "SiteDesign with triggerFlow" -SiteScripts b2ab7ed1-8584-483a-8074-fdd9f4ddf153 -WebTemplate "64"

Test Site Design
Login to SharePoint and go to SharePoint site creation page. "https://<<yourdomain>>.sharepoint.com/_layouts/15/sharepoint.aspx". Click on Create Site. Select Team Site and choose "SiteDesign with triggerFlow"

Specify Site Name, Site Owner Name and Click on Finish. On the home page, a left panel displays the Flow completion progress bar and provide an option to view the changes performed by it. To see those changes, click on View Updated site which will reload the site.

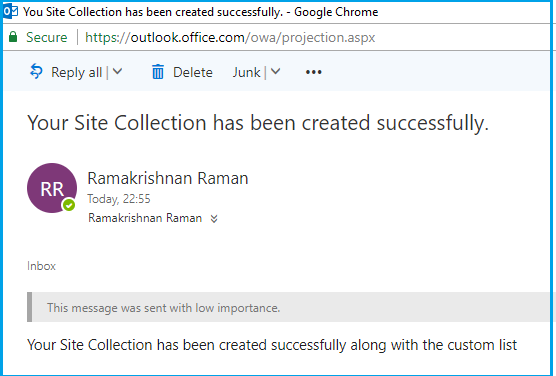
On successfully applied, a list "New Custom List" will be created and an email will be received by the person whose id was utilized to run the code in Azure function app.

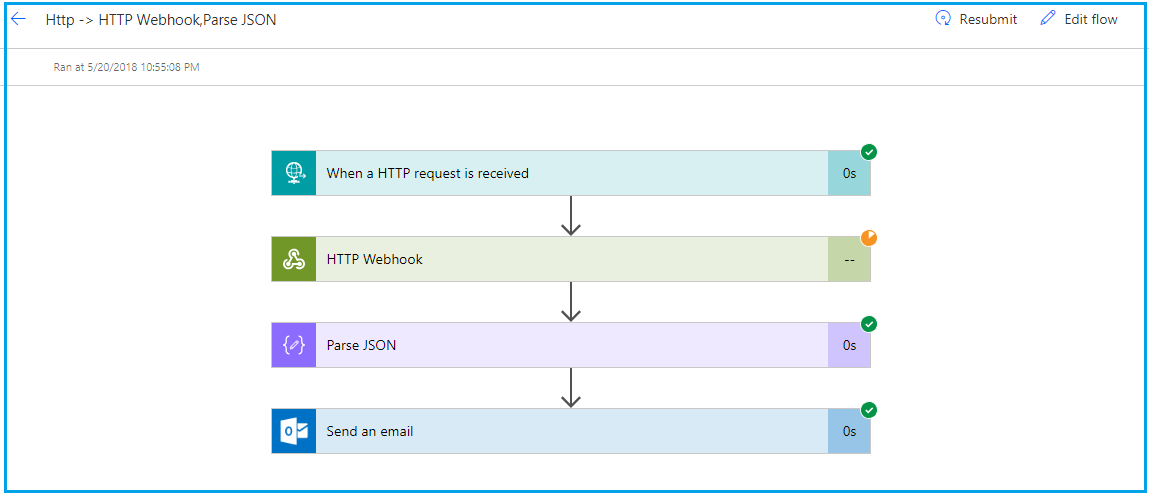
Status of the flow can be verified by logging to MS Flow site and select My flows. Click on the Flow created for this purpose. Under Run History section, select the one which ran after the site creation. Here status of each action can be checked and resubmitted again from the portal itself if required.
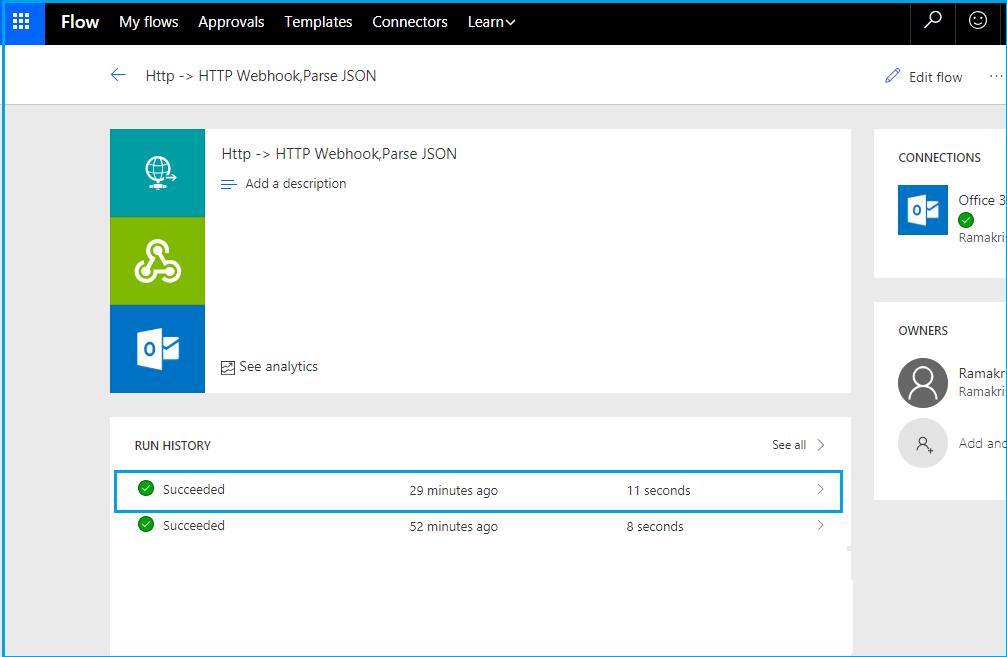
Here action can be expanded to see the actual values there were passed.
Conclusion
Site Design is still evolving and will continue to provide an alternative to Remote provisioning engine. Though Remote provisioning engine performs much complex tasks, in order to achieve them using site design, one can always create a Microsoft flow and add value to a storage queue. This can further be used to trigger a web job or Azure function which can then perform complex tasks or run the remote provisioning engine itself.