Azure Step-by-Step Guide: Extending AD DS to Azure using Site-to-Site VPN or Express Route
Introduction
Azure is a comprehensive set of cloud services that developers and IT professionals use to build, deploy and manage applications through our global network of datacenters. Integrated tools, DevOps and a marketplace support you in efficiently building anything from simple mobile apps to internet-scale solutions.
Microsoft Azure became a new infrastructure component of current traditional datacenter management. All customers are moving their on-premises Windows application server workloads to the Azure cloud to save the operating costs, scalability and quick deployment.
Active Directory is used to authenticate the user, computer, application, or other identities. Azure provides different options to host your identity in the cloud.
- AD DS in Azure joined to an on-premises forest
- AD DS in Azure with a separate forest
- Integrate your on-premises domains with Azure AD
- Azure Active Directory Domain Services
Traditional windows applications hosted on cloud needs Active Directory on the cloud for authentication and authorization. To reduce the latency caused by sending authentication and local authorization requests from the cloud back to AD DS running on-premises customers are extending their on-premises AD DS forest to the cloud by placing additional domain controllers in the Azure compartment.
In this post, we will be providing step by step instructions to extend on-premises AD DS forest to Azure using point to site VPN. The steps are similar for extending your forest using Site-to-Site VPN and Express Route. Because of the limited resources in the lab environment, we will be using point-to-site (P2S) for the demo.
Scenario
In this scenario, the customer already have an established AD DS forest on-premises. The AD DS forest is name azurelab.com. They are moving some traditional application server workloads to the Azure cloud. External users are accessing application servers hosted on Azure from the internet. The application servers are domain joined servers and using the AD DS as an identity source for authentication and authorization. To support the azure hosted application servers we are going to extend our on-premises AD DS forest azurelab.com to the cloud using point-to-site VPN. There will be two additional domain controllers placed in an Azure VNET for azurelab.com. They are also included within an availability set for improved fault tolerance.
Create an Azure Virtual Network (VNET)
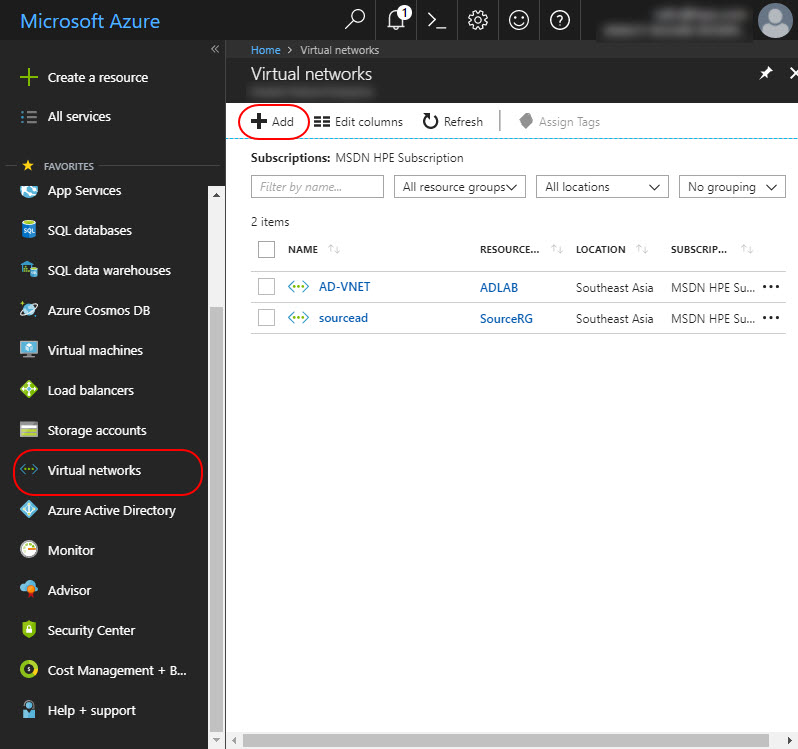
Log in to the Azure management portal – portal.azure.com. Choose Networks and then select Create a Virtual Network or click Add.
Select a name for your Virtual Network, create a larger address space and a subnet and select Create.
VNet Name: AzureP2S-VNET
Address space: 172.16.0.0/16
For this demo, we use only one address space. You can have more than one address space for your VNet.
Resource Group: AzureP2S-RG
Subnet name: AzureP2S-SNET-1
Subnet address range: 172.16.1.0/24
Subscription: If you have more than one subscription, verify that you are using the correct one.
Location: According to your region
Add a gateway subnet
Once the VNET is created, we need to create a gateway subnet for the virtual network. The gateway subnet contains the IP addresses that the virtual network gateway services use. You need to create a gateway subnet for your VNet in order to configure a virtual network gateway. All gateway subnets must be named 'GatewaySubnet' to work properly. Don't name your gateway subnet something else. And don't deploy VMs or anything else to the gateway subnet.
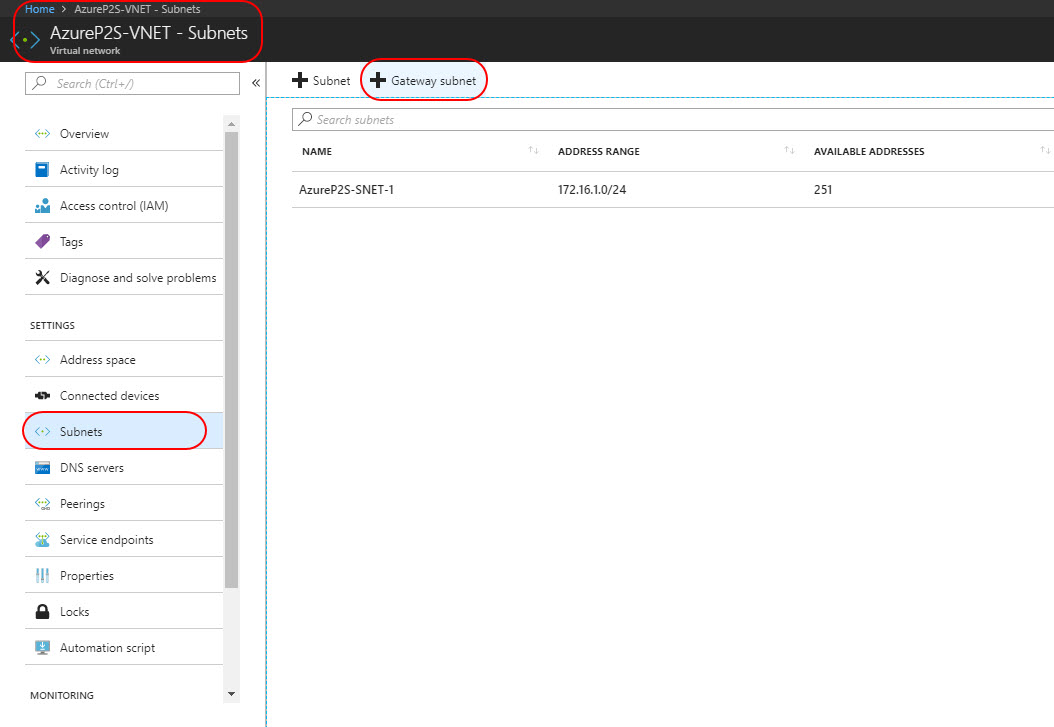
- In the Azure portal, navigate to the VNET we just created – AzureP2S-VNET.
- In the Settings section of your VNet page, click Subnets to expand the Subnets page.
- On the Subnets page, click Gateway subnet to open the Add subnet page.
The Name for your subnet is automatically filled in with the value 'GatewaySubnet'. This value is required in order for Azure to recognize the subnet as the gateway subnet. Adjust the auto-filled Address range values to match your configuration requirements, then click OK at the bottom of the page to create the subnet.
Create a virtual network gateway
In the Azure portal, on the left side, click All Services and navigate the Networking section and click Virtual network gateway.
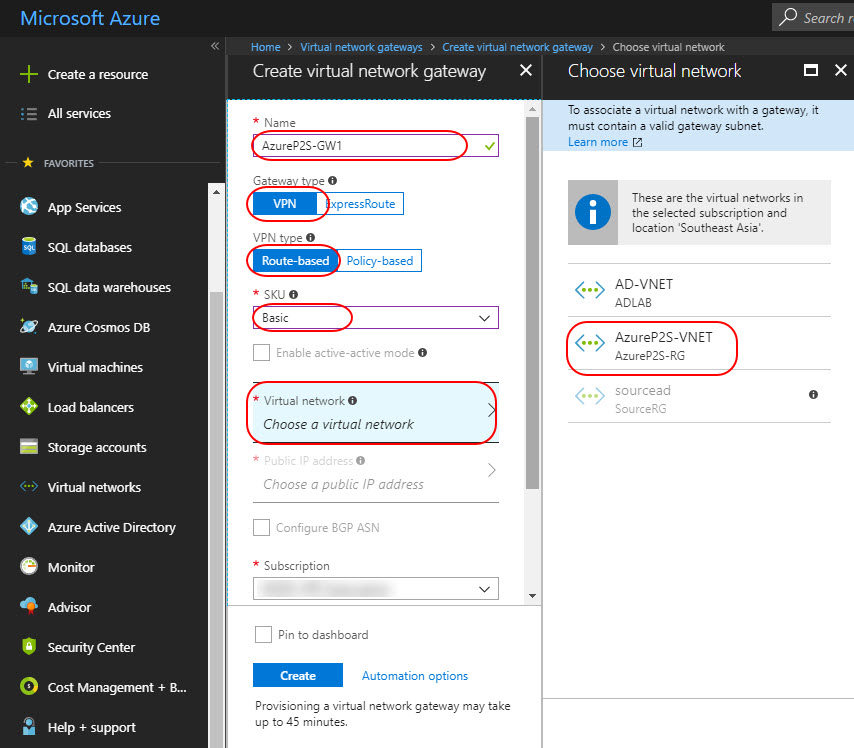
On the Create virtual network gateway page, fill in the values for your virtual network gateway.
- Name: Name your gateway. – AzureP2S-GW1
- Gateway type: Select VPN.
- VPN type: Select Route-based
- SKU: Select the gateway SKU from the dropdown.
- Virtual network: Choose the virtual network AzureP2S-VNET
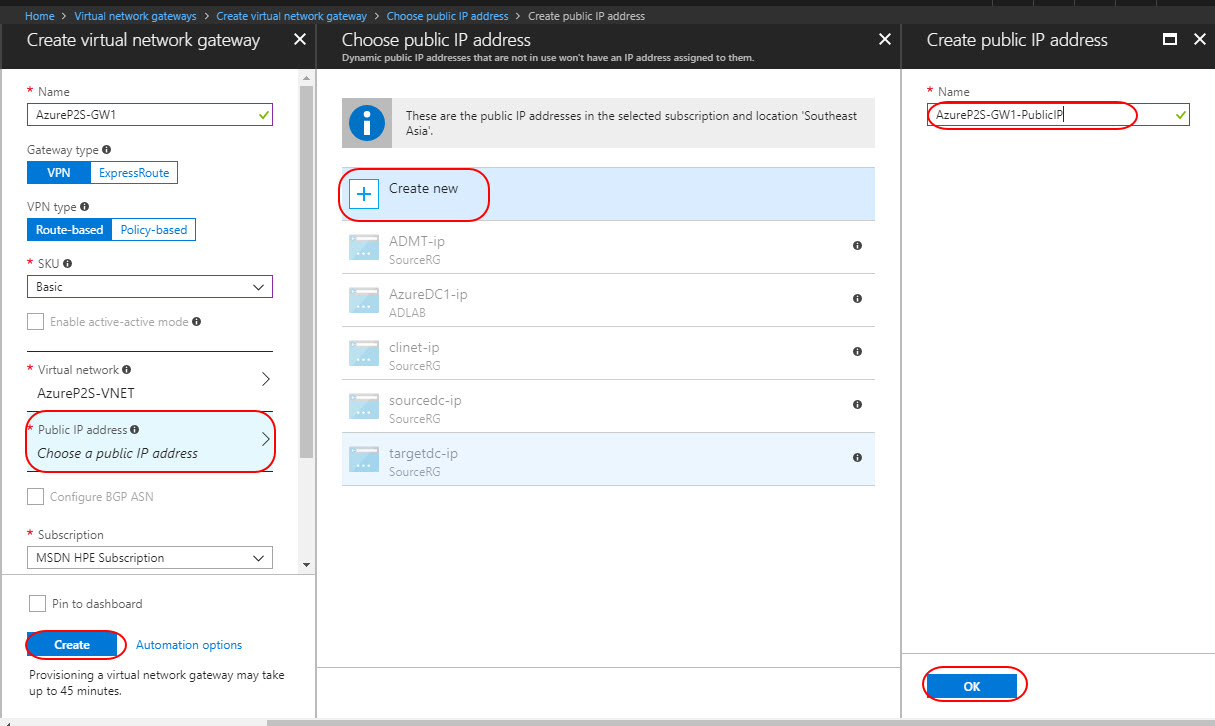
Public IP Address – Click Choose a Public IP address and select Create New and name it as AzureP2S-GW1-PublicIP and then Create.
Provisioning a virtual network gateway may take upto 45 minutes. This is because the VMs for the VPN gateway are being deployed to the GatewaySubnet and configured with the settings that you specified. The Gateway SKU that you select determines how powerful the VMs are. After the gateway is created, view the IP address that has been assigned to it by looking at the virtual network in the portal. The gateway appears as a connected device. You can click the connected device (your virtual network gateway) to view more information.
Generate certificates
Certificates are used by Azure to authenticate clients connecting to a VNet over a Point-to-Site VPN connection. You can either use Enterprise CA to issue certificates to a client or Self-Signed Certificates. In this demo, we have deployed an enterprise CA – RootCA.azurelab.com.
Obtain the .cer file for the root certificate
You need to export the root certificate in a Base-64 encoded X.509 .cer file.
Generate a client certificate
Each client computer that connects to a VNet using Point-to-Site must have a client certificate installed.
- If you are using an enterprise certificate solution, generate a client certificate with the common name value format 'name@yourdomain.com', rather than the 'domain name\username' format.
- Make sure the client certificate is based on the 'User' certificate template that has 'Client Authentication' as the first item in the use list
Generate self-signed root and client certificates
You can use a PowerShell command in Windows 10 or Windows Server 2016 to generate self-signed root and client certificates.
To Generate Self-Signed Root Certificate
$cert = New-SelfSignedCertificate -Type Custom -KeySpec Signature -Subject "CN=P2SRootCert" -KeyExportPolicy Exportable -HashAlgorithm sha256 -KeyLength 2048 -CertStoreLocation "Cert:\CurrentUser\My" -KeyUsageProperty Sign -KeyUsage CertSign
To Generate Self-Signed Client Certificate
New-SelfSignedCertificate -Type Custom -DnsName P2SChildCert -KeySpec Signature -Subject "CN=P2SChildCert" -KeyExportPolicy Exportable -HashAlgorithm sha256 -KeyLength 2048 -CertStoreLocation "Cert:\CurrentUser\My" -Signer $cert -TextExtension @("2.5.29.37={text}1.3.6.1.5.5.7.3.2")
One the root certificate is generated, export it as Base-64 encoded X.509 .cer file.
Add the client address pool
The client address pool is a range of private IP addresses that you specify. The clients that connect over a Point-to-Site VPN dynamically receive an IP address from this range. Use a private IP address range that does not overlap with the on-premises location that you connect from, or the VNet that you want to connect to.
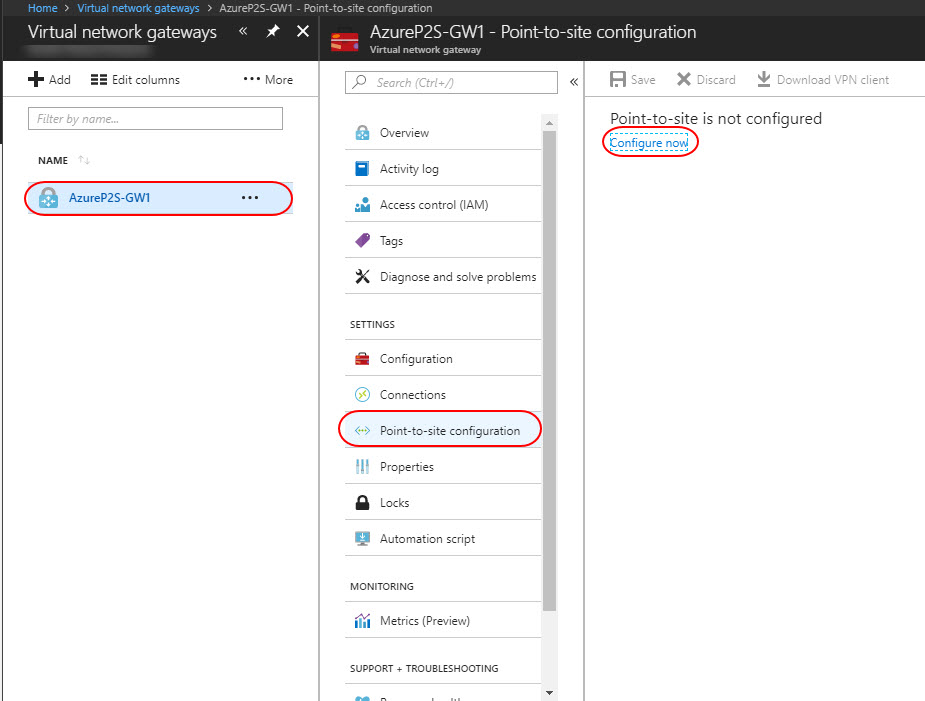
Select virtual network gateway AzureP2S-GW1, navigate to the Settings section of the virtual network gateway page. In the Settings section, click Point-to-site configuration.
Click Configure now to open the configuration page
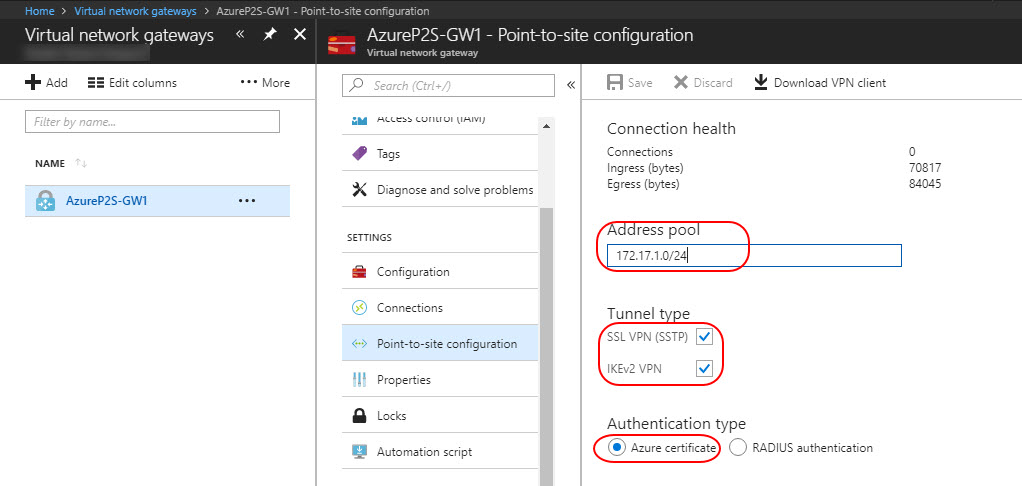
On the Point-to-site configuration page, in the Address pool box, add the private IP address range that you want to use. VPN clients dynamically receive an IP address from the range that you specify. Click Save to validate and save the setting.
Upload the root certificate public certificate data
Azure can use the root certificate to authenticate clients that have installed a client certificate generated from the trusted root certificate. Upload the public key information for the root certificate to Azure. You can add upto 20 root certificates to Azure.
Open the exported root certificate in Notepad. Copy only the following section as one continuous line:
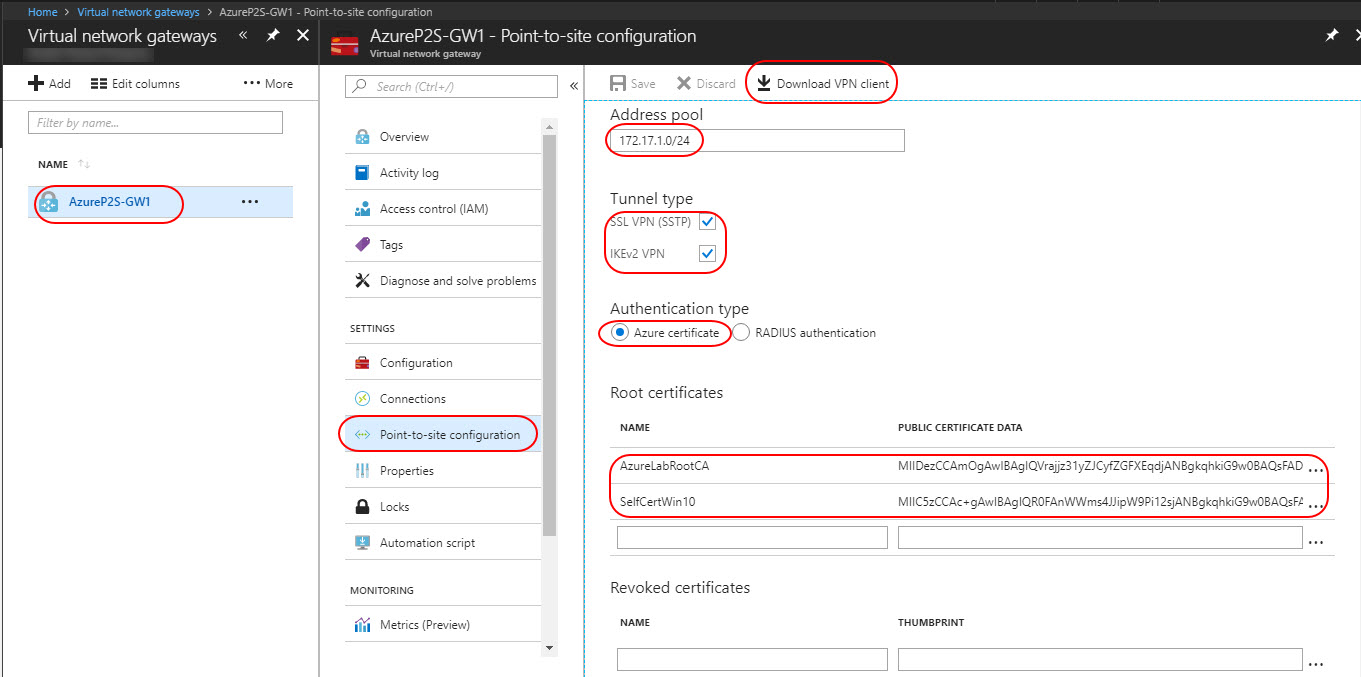
Select virtual network gateway AzureP2S-GW1, navigate to the Settings section of the virtual network gateway page. In the Settings section, click Point-to-site configuration. Under public certificate data paste the root certificate data and give a label name and click Save.
Generate the VPN client configuration package
Once the data is save the Download VPN Client option will be active. Use the option to download the VPN Client.
Create VMs to run the domain controller and DNS server roles
Once the virtual network is created, we can go ahead and create the base virtual machines which will be running as active directory domain controllers.
In the Azure portal, choose virtual machines Windows Server and then Windows Server 2016 Datacenter Image
Select the deployment model as Resource Manager and the select Create.
In the next screen enter the basic information for the virtual machine.
- Name – Type a single label name (such as AzureLabDC2).
- VM Disk Type – Select the disk type needed for this virtual machine.
- User Name & Password - Type the name of a user. This user will be a member of the local Administrators group on the VM. You will need this name to sign in to the VM for the first time. The built-in account named Administrator will not work.
- Resource Group – Select the resource group name we created during the VNET creation
- Location – Choose a location
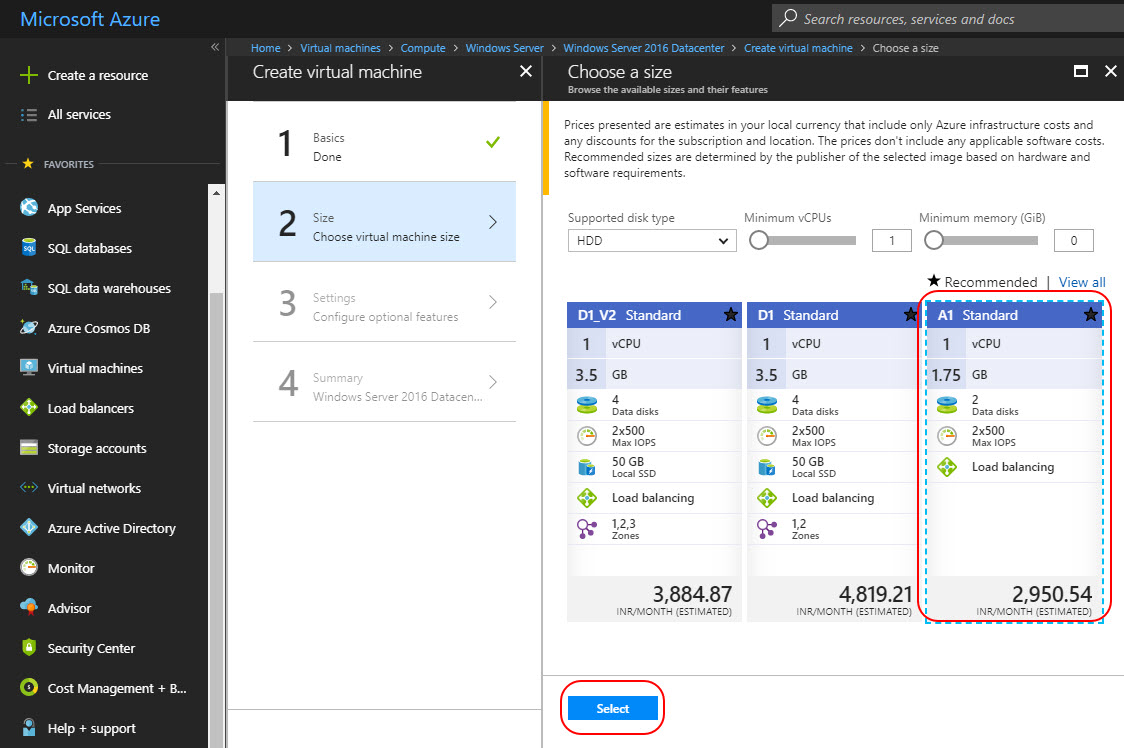
Click OK and in the next screen select a Virtual machine template based on your requirement
In the Settings page create availability set and other configurations and click OK
- Availability Set - To provide redundancy to your application, we recommend that you group two or more virtual machines in an availability set. This configuration ensures that during a planned or unplanned maintenance event, at least one virtual machine will be available and meet the 99.95% Azure SLA. The availability set of a virtual machine can't be changed after it is created.
- Storage - Enable this feature to have Azure automatically manage the availability of disks to provide data redundancy and fault tolerance
- Network – Choose the Virtual Network we created in the first step: AzureP2S-VNET
- Subnet – Choose the subnet AzureP2S-SNET-1
- Public IP Address – This is used to communicate to the virtual machine from internet
- Network Security Group – Set of firewall rules to control traffic to and from a virtual machine
Validate the settings in Summary page and click Create.
Attach a Disk to VM
Note
When you create a VM in Windows Azure you are provided with a temporary storage automatically. This temporary storage is “D:” on a Windows VM and it is “/dev/sdb1” on a Linux VM. This temporary storage must not be used to store data that you are not willing to lose.
Once the virtual machine is deployed, select the virtual machine and click Disks and then Add Data Disk and Create Disk
Enter the size as 10 GB and create and leave the Host Cache Preference set to None. Once the disk is created, click Save. The additional disk is needed to store the AD database, logs, and SYSVOL.
Prepare Data Disk
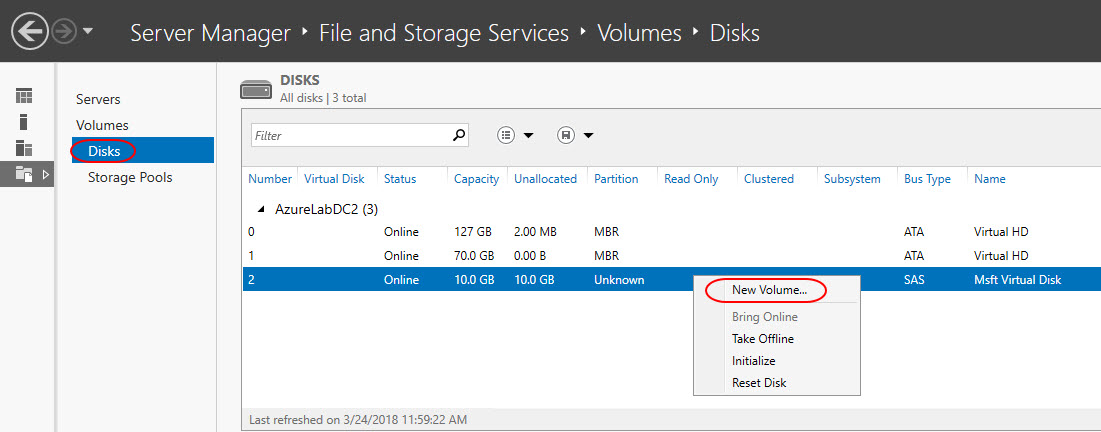
Login to the virtual machine and open Server Manager > File and Storage Services. Select Disks and right-click the 10 GB disk we created and New Volume.
Create a NTFS volume and choose Drive letter E:
Reserve a Static IP address
The domain control should have a static IP address configured.
Select your virtual machine AzureLabDC2, select Networking and click the Network Interface Name
On the network interface page, select IP configurations and click ipconfig1
Under Private IP address, settings change the assignment type to Static and click Save
Connect On-Premises Domain Controller to Azure
Note
Setting up Point to Site VPN from a domain controller is not recommended. It is recommended to use Site-to-Site VPN. For this demo, we're using a lab environment which lags a gateway device. So we're using point to site connection to demo.
Install the VPN connection package downloaded for AzureLabP2S-GW1 on the on-premises domain controller AzureLabDC1.
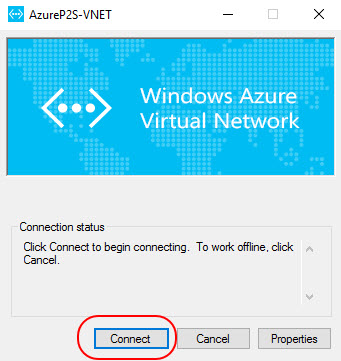
To connect to your VNet, on the client computer, navigate to VPN connections and locate the VPN connection AzureP2S-VNET and click Connect.
A pop-up message may appear that refers to using the certificate. Click **Continue **to use elevated privileges.
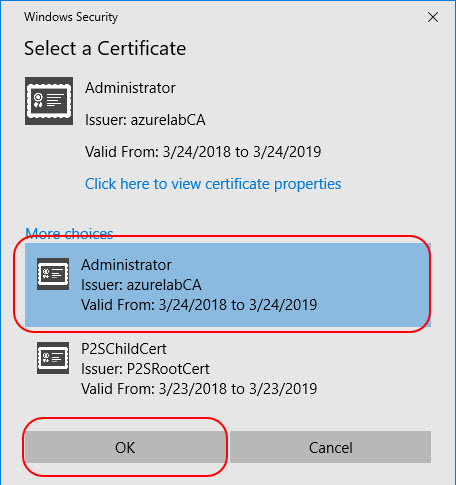
If you have multiple certificates installed on your User certificate personal store, it will prompt you to choose the right certificate. Once you click the certificate the connection will be established.
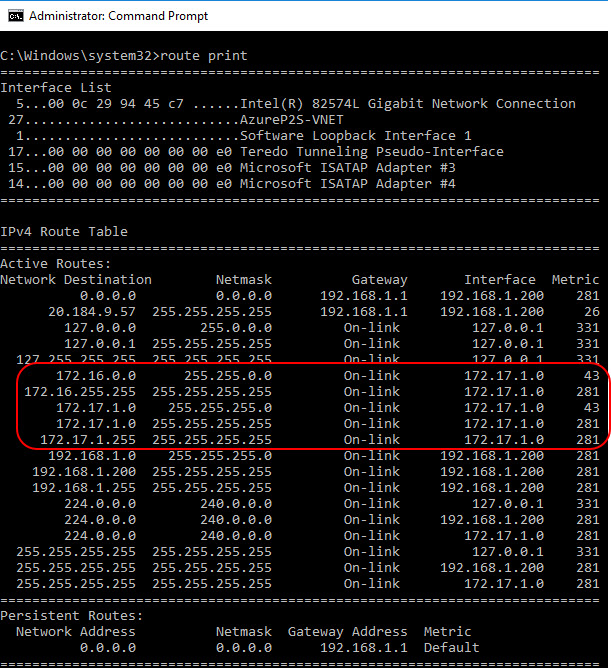
After connected, you can do an ipconfig to see the IP address allocated to the on-premise domain controller from the gateway client pool. In our case, 172.17.1.0 is allocated to the the on-premises domain controllers
You can do a route print to see the routes created by the AzureP2S-VNET VPN.
Configure Network Security Gateway to allow domain controller communication ports
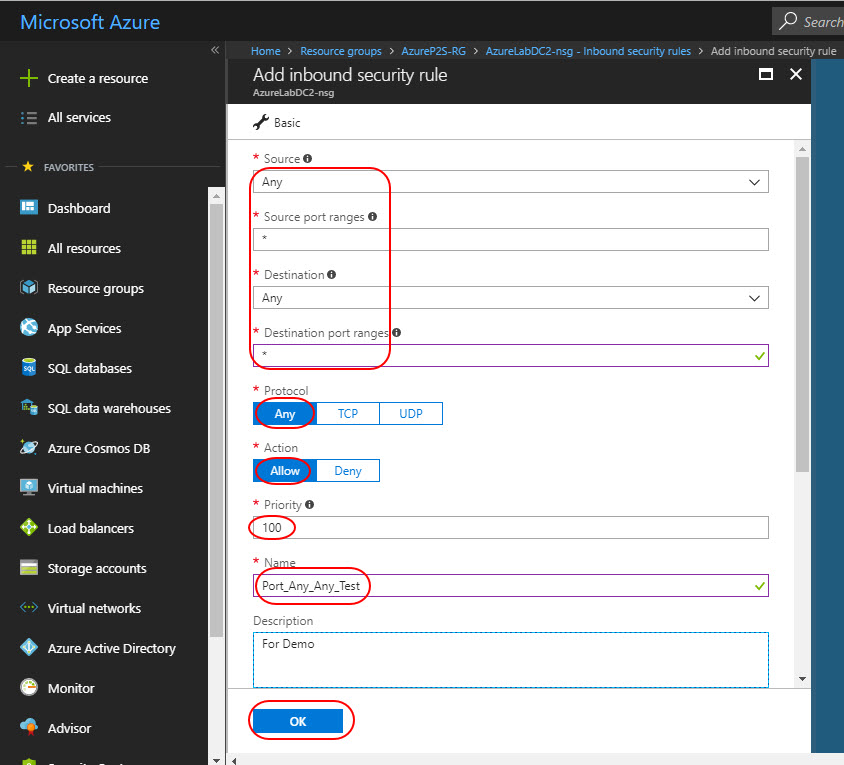
By default, Azure will only allow RDP port on the VM. The Active Directory subnet NSG requires rules to permit incoming traffic from on-premises. Domain controllers needs certain ports to establish the connection. So we need to create manual inbound and out bound rules to allow communication between on-premises and Azure hosted domain controllers.
For this demo, we're opening all ports between domain controllers. For detailed information on the ports used by AD DS, see Active Directory and Active Directory Domain Services Port Requirements.
Open the Azure Resource Group AzureP2S-RG --> AzureLabDC2-nsg --> Inbound Security Rules and click Add
You need to open specific ports for production deployment. Fill in your requirements and click OK. Use the same steps to create Outbound security rules.
Once NSG is configured with port rules, try to communicate with Azure hosted server and vice versa. If the connection is successful proceed with next steps.
Update the DNS server setting for the virtual network
Click Virtual Networks > double-click the virtual network AzureP2S-VNET > Configure > DNS servers, type the name and the IP of one of the on-premises domain controllers that runs the DC/DNS server role and click Save. In our demo, the on-premises domain controller assigned with an IP 172.17.1.0, so point the VNET DNS to 172.17.1.0.
Select the VM and click Restart to trigger the VM to configure DNS resolver settings with the IP address of the new DNS server. One the VM is up do a nslookup to verify the DNS name resolution to the on-premises domain controller and domain name.
Install Windows Server Active Directory
Use the same routine to install AD DS that you use on-premises to add Azure VM as an additional domain controller. For the Active Directory database, logs, and SYSVOL, change the default storage location from the operating system drive to the additional data disk that you attached to the VM.
After the DC installation finishes, connect to the VM again and log on to the DC using azurelab.com credentials.
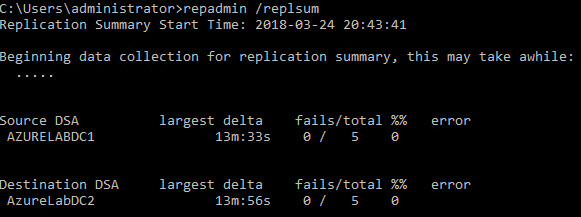
Perfrom the domain controller diagnostics to verify the ADDS service.
Conclusion
In production, you should either use Site-to-Site VPN or Express Route to establish the connectivity between on-premises and Azure Cloud.

