Error Logging in Provider hosted add-in using Log4Net
Introduction
During the development phase of SharePoint add-in, especially, while creating a provider hosted add-in for SharePoint, developers often look out for error logging techniques to capture the error and redirect users to an appropriate page. In this article, we will see how to log error for provider hosted add-in using Log4Net.
Objective
The objective of this article is to provide a detailed information to setup Log4Net in provider hosted add-in solution to help the developers to log information\error.
Getting Started
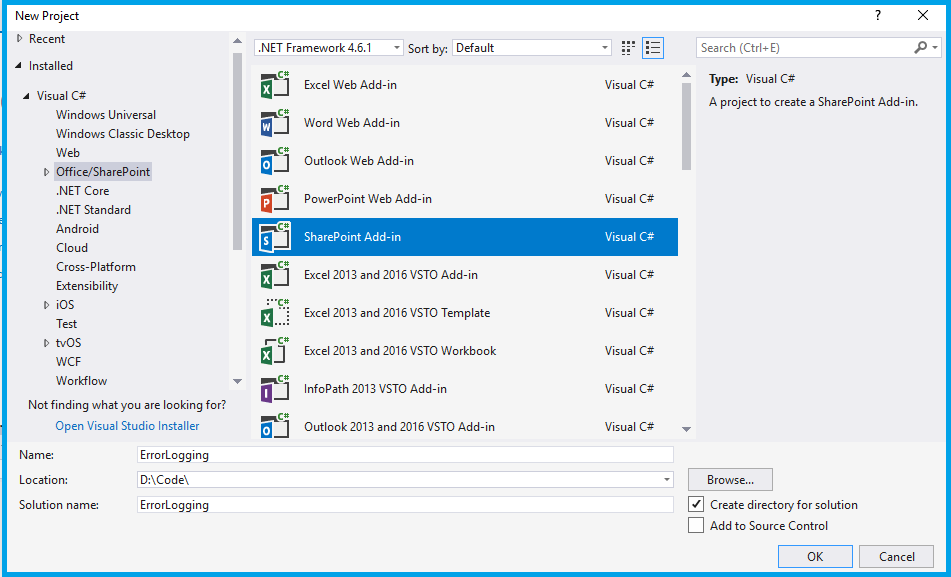
Step 1) Open Visual Studio and Select SharePoint Add-in Project. Specify Name and location for the project.
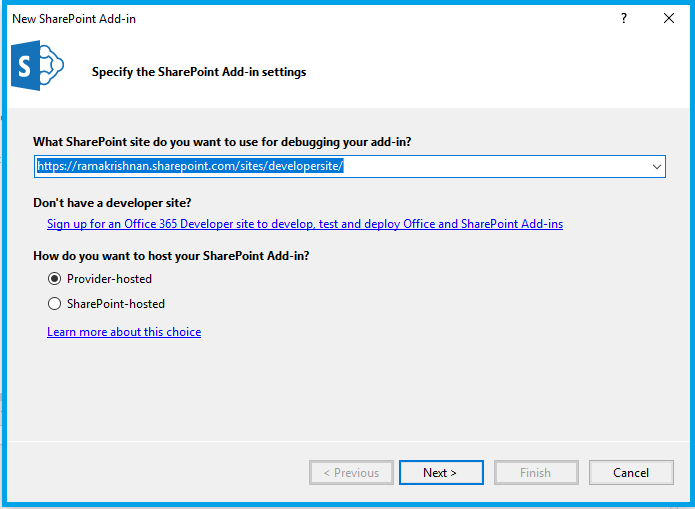
Step 2) Specify URL of your Site and Select provider hosted. Click Next.
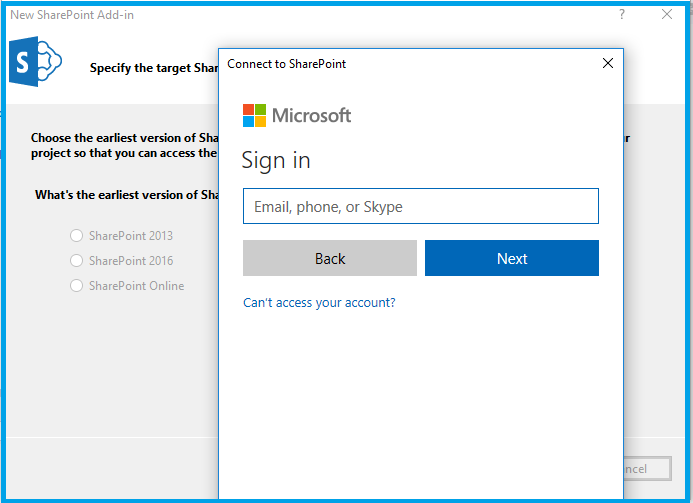
Step 3) Sign in to the portal.
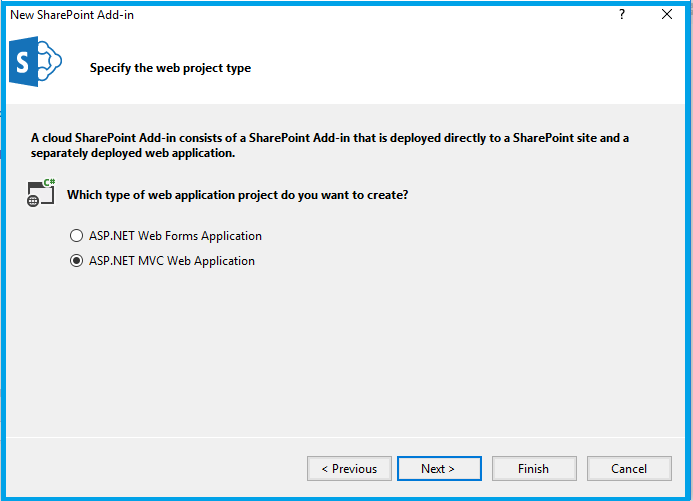
Step 4) Select the type of web application as "ASP.Net MVC Web Application". Click "Next".
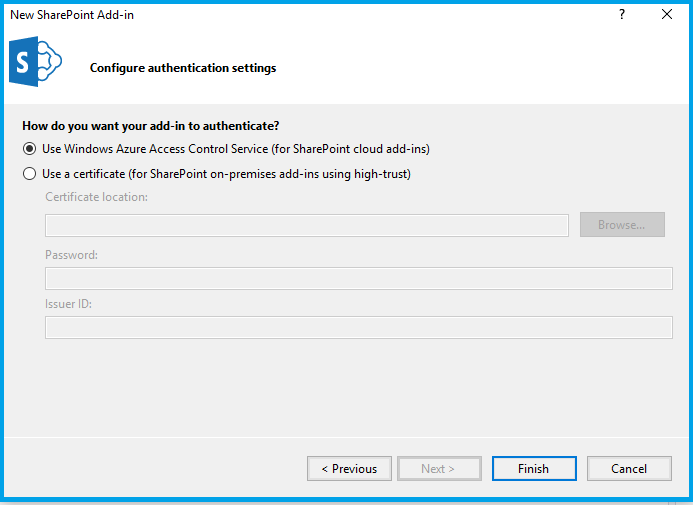
Step 5) Select "Use Windows Azure Access Control Services".
Step 6) Once the project is open in Visual Studio, click on Tool and select NuGet Package Manager -> Manage NuGet Packages for Solution
**  **
**
Install Log4Net from NuGet
Step 7) Under Browse tab, search for "Log4Net". Install it for WebProject. 
Step 8) Select OK, if a confirmation pop-up appears.
 Changes in Web.Config File
Step 9) Insert the below part inside Configuration XML tag.
<configSections>
   <section name="log4net" type="log4net.Config.Log4NetConfigurationSectionHandler, log4net" />
 </configSections>
 <log4net>
   <appender name="LogFileAppender" type="log4net.Appender.RollingFileAppender">
     <file type="log4net.Util.PatternString" value="D:\Home\LogFiles\ErrorLogging\log_.txt" />
     <lockingModel type="log4net.Appender.FileAppender+MinimalLock" />
     <rollingStyle value="Composite" />
     <datePattern value="dd-MM-yyyy" />
     <appendToFile value="true" />
     <!--<maxSizeRollBackups value="10" />-->
     <maximumFileSize value="5MB" />
     <staticLogFileName value="false" />
     <preserveLogFileNameExtension value="true" />
     <layout type="log4net.Layout.PatternLayout">
       <!--<param name="ConversionPattern" value="%d [%t] %-5p %c %m%n"/>-->
       <param name="ConversionPattern" value="%d [%t] %-5p %c %m%n %newline ########################################### %newline " />
     </layout>
   </appender>
   <root>
     <level value="ALL" />
     <appender-ref ref="LogFileAppender" />
   </root>
   <logger name="test">
     <level value="DEBUG"></level>
   </logger>
 </log4net>
The above code denotes the following :
- File tag contains the value of the Filepath, where the log files are generated
- datepattern includes specified date format value along with specified LogFile Name
- appendTo to set as true denotes that the logs are appended to the file instead of replacing it.
- maximumfilesize is allowed limit for the file size.
- staticLogFileName as false denotes that the file name will be dynamic i.e name may vary based on other values like datepattern.
Global Error Handling
As the name implies, Global error handling captures any unhandled error with the application. For this, few changes in Global.asax file is required.
Changes in Global.asax file
Step 10) Add the following code inside "Global.asax" file which captures all the unhandled exception inside the provider hosted add-in.
protected void  Application_Start()
      {
          AreaRegistration.RegisterAllAreas();
          FilterConfig.RegisterGlobalFilters(GlobalFilters.Filters);
          RouteConfig.RegisterRoutes(RouteTable.Routes);
          BundleConfig.RegisterBundles(BundleTable.Bundles);
          log4net.Config.XmlConfigurator.Configure(new FileInfo(Server.MapPath("~/Web.config")));
      }

protected void  Application_Error(object sender, EventArgs e)
      {
          Exception exception = Server.GetLastError();
          log4net.ILog logger = log4net.LogManager.GetLogger(typeof(MvcApplication));
          logger.Error("App_Error", exception);
          Server.ClearError();
          Response.Redirect("/home/error");
      }
Local Error Handling
Add a BaseController class file
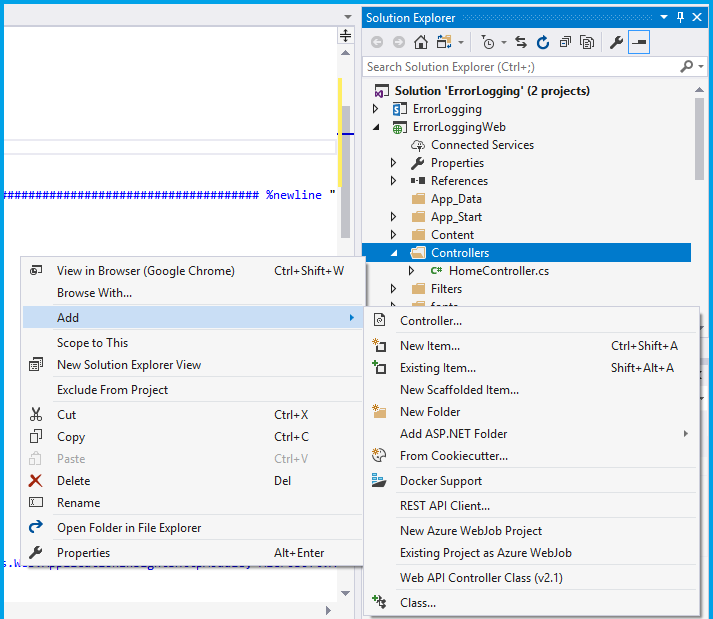
Step 11) Add a Controller class file inside Controller folder. Select Empty MVC 5 Controller - Empty and click on ADD.
Step 12) Name the file as "BaseController.cs"
Step 13) Add the below code inside "BaseController.cs" file, the below code declared a global "Ilog" interface which can be further utilized to log error.
internal static  readonly log4net.ILog logger = log4net.LogManager.GetLogger(typeof(BaseController));

#region Error handling
       protected override  void OnException(ExceptionContext filterContext)
       {
           // Make use of the exception later
           //this.Session["ErrorException"] = filterContext.Exception;
           Exception ex = filterContext.Exception;

           // Mark exception as handled
           filterContext.ExceptionHandled = true;

           //logger.Error(ex.ToString());

           // Redirect
           //filterContext.Result = this.RedirectToAction("Error", "Home");

           base.OnException(filterContext);
       }
       #endregion
Also, remove the default "Index" action result from "BaseController.cs" file.
Step 14) Decorate all the ActionResult with [HandleError] which handle exceptions thrown by ActionResult of "Home Controller". Refer the below code for example
[HandleError]
        [SharePointContextFilter]
        public ActionResult Index()
        {
            User spUser = null;

            var spContext = SharePointContextProvider.Current.GetSharePointContext(HttpContext);

            using (var clientContext = spContext.CreateUserClientContextForSPHost())
            {
                if (clientContext != null)
                {
                    spUser = clientContext.Web.CurrentUser;

                    clientContext.Load(spUser, user => user.Title);

                    clientContext.ExecuteQuery();

                    ViewBag.UserName = spUser.Title;

                    logger.Info(string.Concat("####### Custom Log Info #######", DateTime.Now.ToString()));

                }
            }

            return View();
        }
Also, Changes the inheritance of HomeController from Controller to BaseController.
public class HomeController : BaseController
Deploy Provider Hosted Add-in in Azure Web App
Create App Service in Azure
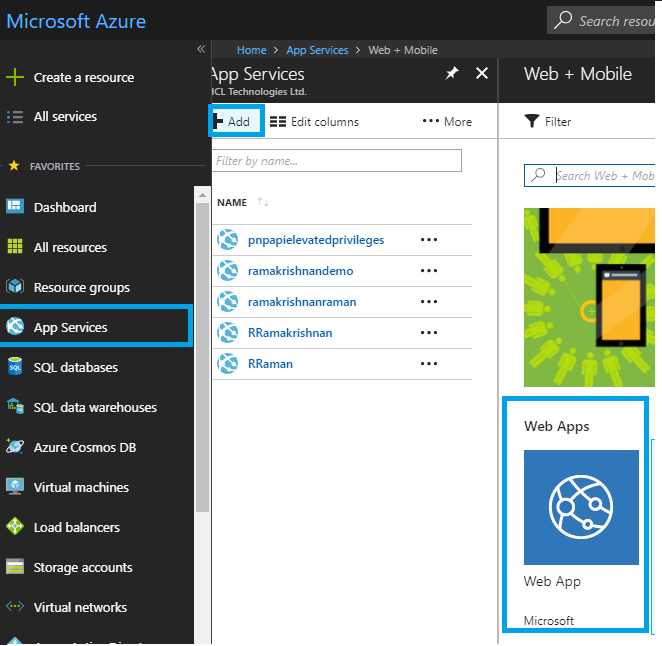
Step 15) Sign in to https://portal.azure.com/ and click on App Service and then click on Web App.
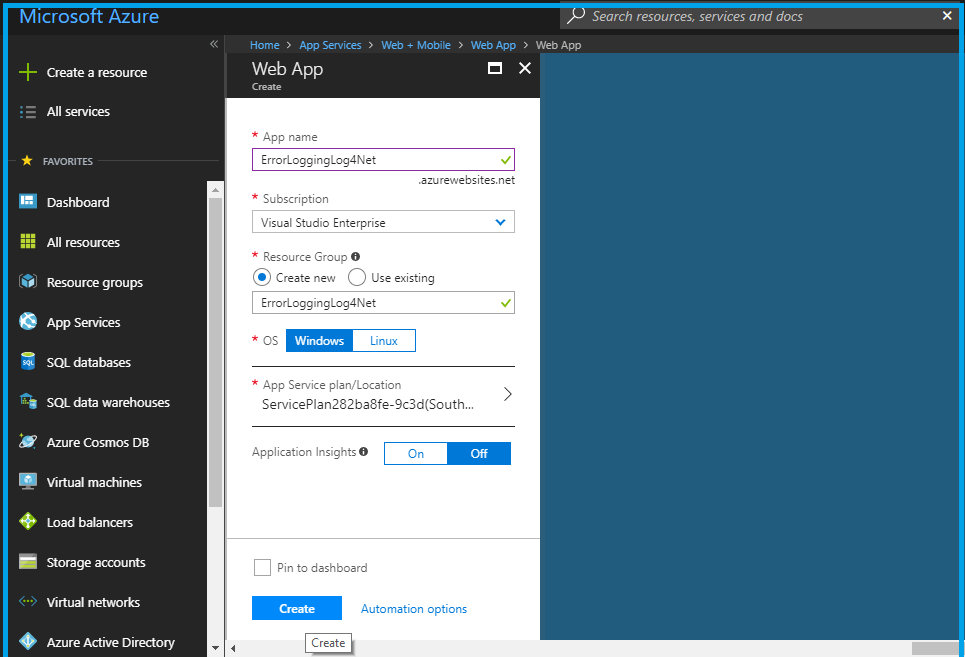
Step 16) Specify the Web App Name and click on Create.
Generate Client ID and Secret. Specfiy it in Web.Config and AppManifest.xml file
Step 17) Open AppregNew.aspx by navigation to site where provider hosted add-in needs to be deployed.
https://yourdomain.sharepoint.com/sites/_layouts/appregnew.aspx
Step 18) Generate Client ID & Secret. Specify a Title, domain & redirection URL which was created in Step 16.
Step 19) Open "Web.Config" file of provider hosted add-in web project and specify the "Client ID" & "Secret" generated in Step 19 in respecive xml tags.
Step 20) Open AppManifest.xml file of Provider hosted Add-in project and specify the Client ID generated in Step 19 in respecive xml tag.
Publish Add-in Web Project in Azure Web App
Step 21) Right click add-in web project and click on "Publish".
Step 22) Select existing and click on "Publish".
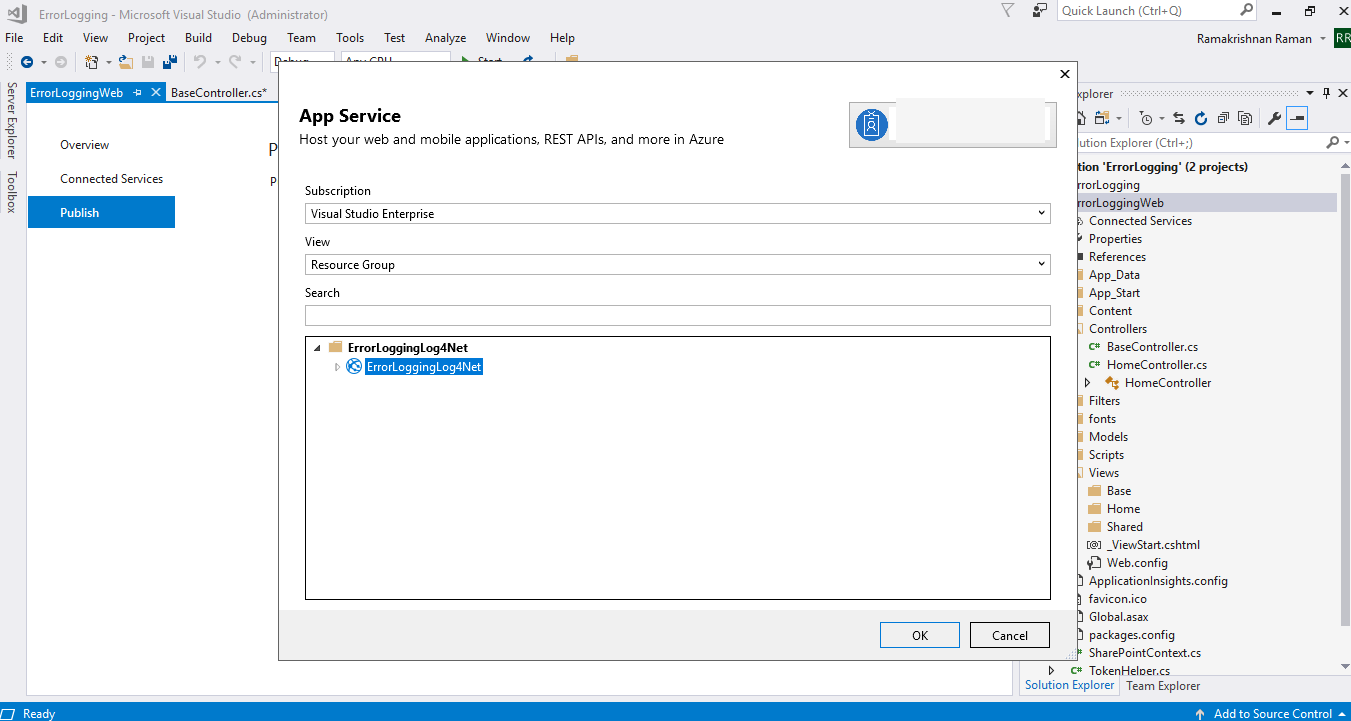
Step 23) Select the respective web app created in Step 16 and click on OK. This will then host add-in web project to Azure web app.
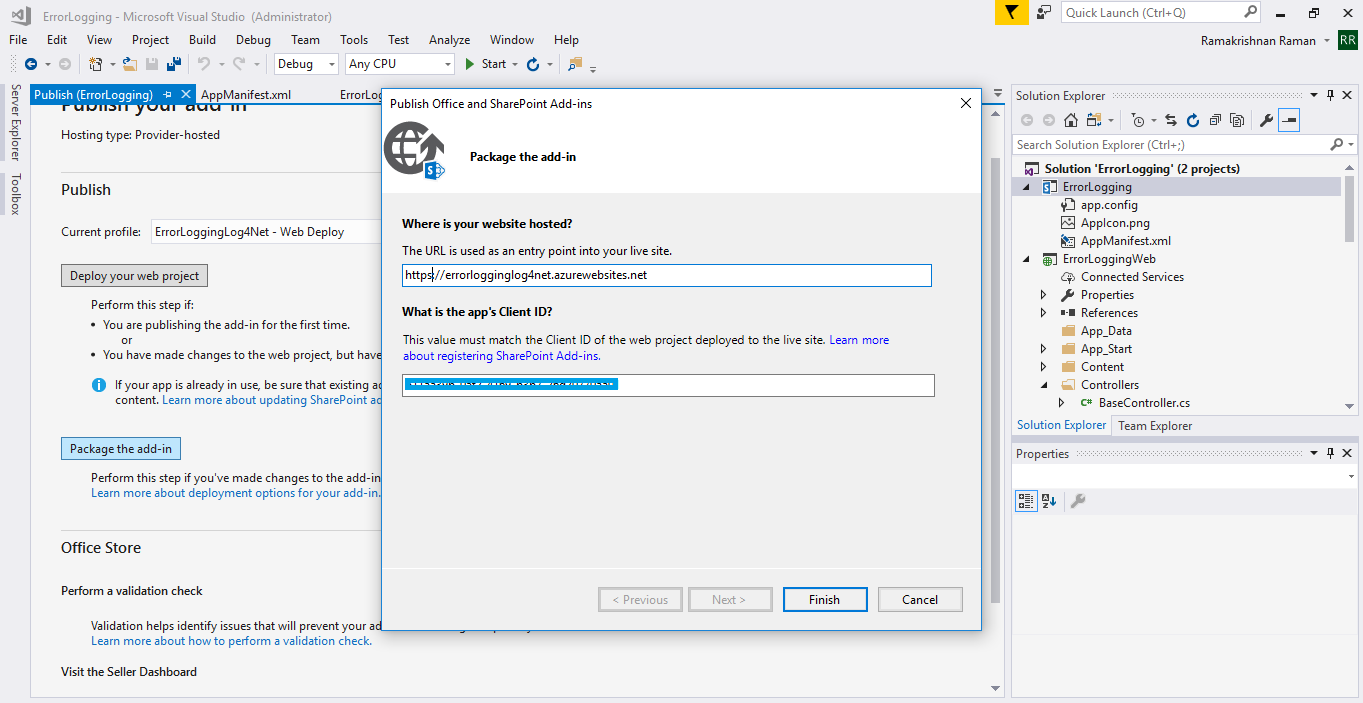
Step 24) Right click on Add-in project and click on "Package the add-in". Specify the Client ID generated in Step 16 and click on "Finish". This will generate the .app package.
Upload Add-in package in App Catalog
Step 25) Upload .app package created in previous step in the app catalog of tenant or site collection
Step 26) Open a Site Collection. Click on "Site Action" and click on "Add an App". Select the app and click on "Trust it".
Step 27) Once the Add-in is launched successfully. Switch to azure portal and navigate to https://*****.scm.azureebsites.net/DebugConsole/ where ***** is the name of the Web App. The reason for this is to open KUDU debug console of azure to read the Logs generated by Log4Net. For more information on KUDU read the following blog https://blogs.msdn.microsoft.com/benjaminperkins/2014/03/24/using-kudu-with-windows-azure-web-sites/
Step 28) Navigate to "LogFiles" folder and click on the plus symbol to create a new folder. Name it as "Errorlogging".
Step 29) Go back to SharePoint Online Site collection where the add-in added. Click on the Add-in from Site Contents.
Step 30) Now if we switch back to the Azure portal, a log file with current date is generated. Click on the download button.
Step 31) Log info from "Index" action result from "Home" controller is logged.
logger.Info(string.Concat("####### Custom Log Info #######", DateTime.Now.ToString()));
Conclusion
By following the above steps, LogNet can be used to handle errors in a SharePoint provider hosted add-in.
Download this solution
This solution can be downloaded from TechNet gallery - https://gallery.technet.microsoft.com/Error-HandlingLogging-in-1febff47
