Azure Bot Service To Slack Application: Channel Configuration
Introduction
This article explains how to configure Azure Bot Service to Slack Applications. So, before reading this article, please read our previous article related to Chat Bot with Azure Bot Service. Then, we will get a clear idea of how to create a Bot service in Azure.
Create a Web App Bot in Azure
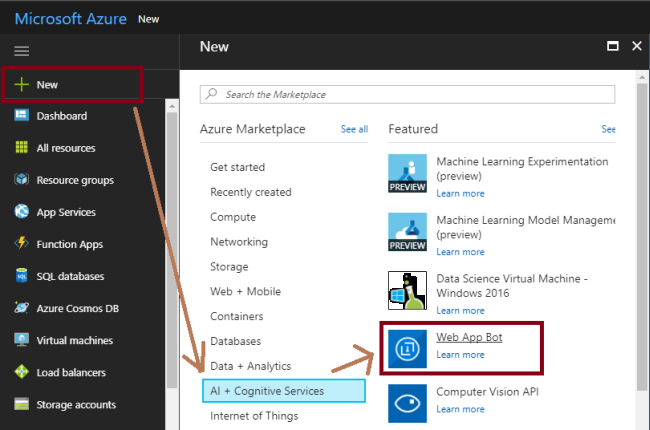
Click on "New" on the left side menu and it will open an Azure Marketplace. There, we can see the list of services. Click "AI + Cognitive Services" then click on the "Web App Bot" for our bot service app.
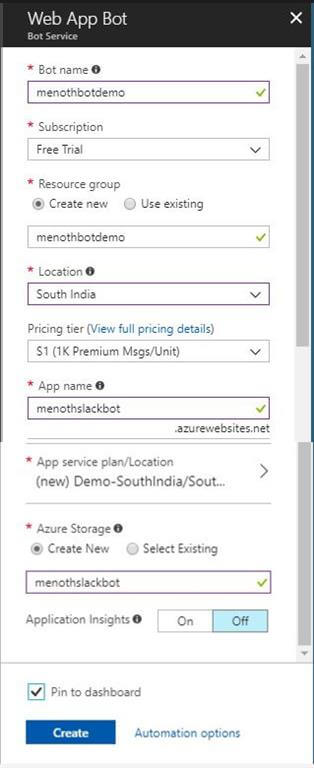
Bot Service
Fill the following details and add the location based on our client location or our Geolocation.
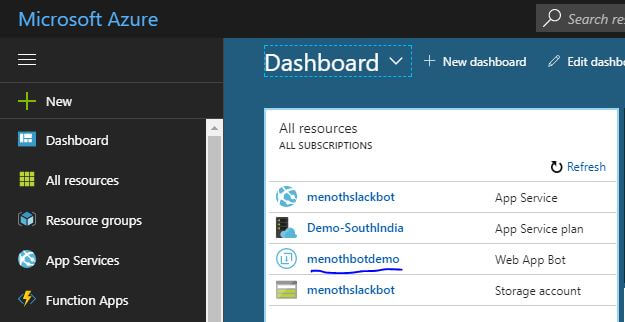
Once the build is successful, click on the "Dashboard" and we can see that the "menothbotdemo" bot is created in the All resources list. Bot is ready for use!
Create a Slack Application for our Bot
First, we need to create a workspace in Slack Account. Check the following link to create a Slack Account: New slack account.
Create an app and assign a Development Slack team or Slack Workspace
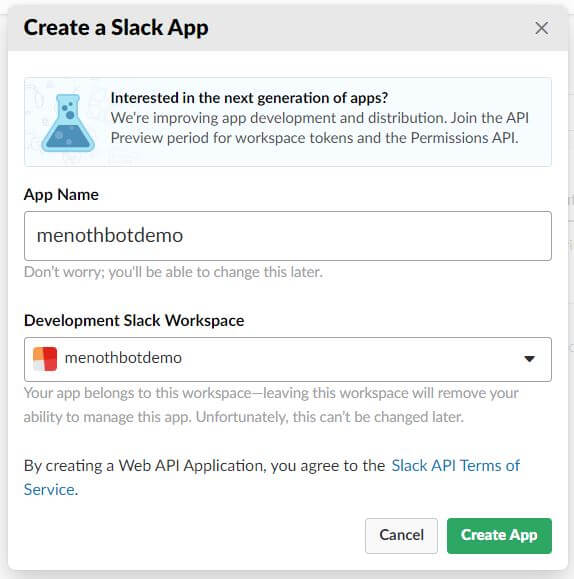
Click on the URL https://api.slack.com/apps. Then, click on the "Create New App" !!.
Once the Slack workspace is created, then only we can create a slack application under the Workspace. Now, we are going to create and assign our slack app name into the Workspace. We have given our App a name as "menothbotdemo".
Click on the "Create App" button. Then, Slack will create our app and generate a Client ID and Client Secret. We can use these IDs for channel configuration in Azure Web App bot.
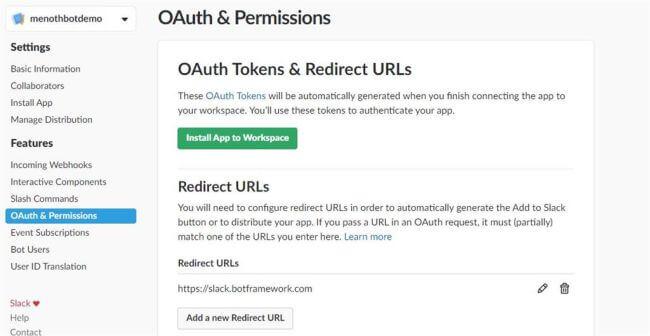
Add a new Redirect URL
Click on the "OAuth & Permission" tab in the left panel. Then, add the redirect URLs as "https://slack.botframework.com" and save it properly.
Create Bot Users
Click on the "Bot Users" tab in the left panel. Then, click on "Add a Bot User". In this section, we can give our bot "Display name". For example, we created our bot user's name as "menothbotdemo". If we want our bot to always show as Online, then click on the "On" button. After that, click "Add Bot User" button.

Event Subscriptions
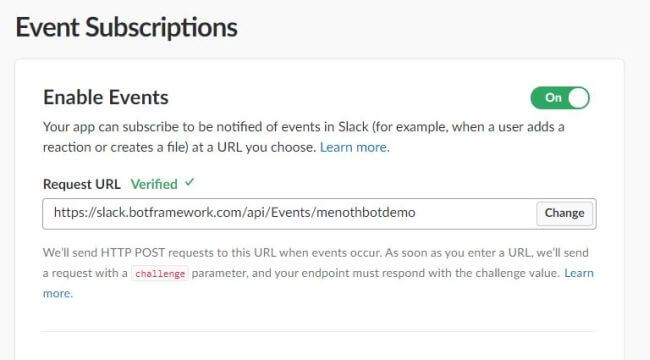
Select "Event Subscriptions" tab in the left panel.
Click Enable Events to On.
In the "Request URL" we need to add the following URL to our "Bot Handle Name": https://slack.botframework.com/api/Events/{bot handle name}
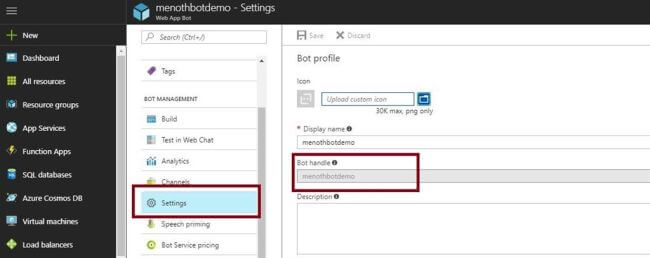
The "Bot Handle" name we will get inside the "Web App Bot ( we created our web app as "menothbotdemo")" Settings.
Finally, we can add the Request URL inside the Event Subscriptions.
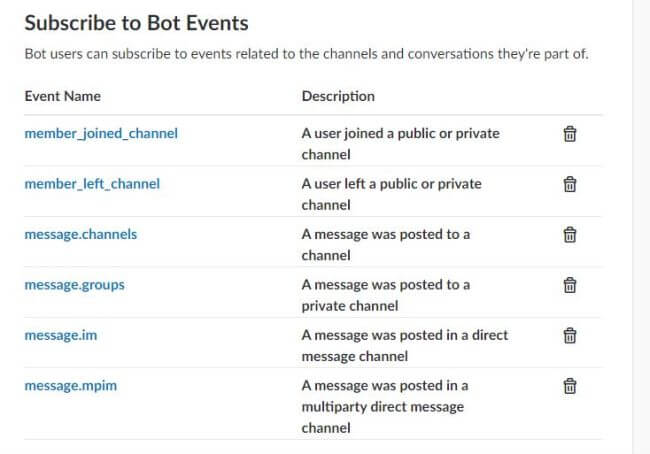
In Subscribe to Bot Events, click "Add Bot User Event".
In the list of events, click "Add Bot User Event" and select the following event name.
Click "Save Changes".
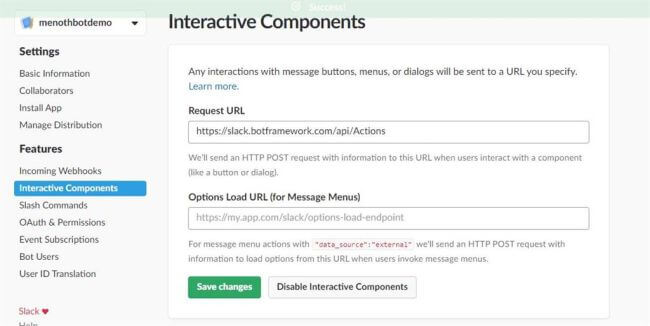
Configure Interactive Messages ( Optional )
- Select the "Interactive Components" tab and click "Enable Interactive Components".
- Enter https://slack.botframework.com/api/Actions as the request URL.
- Click the "Enable Interactive Messages" button, and then click the "Save Changes" button.
App Credentials
Select the "Basic Information" tab and then we will get the ClientID & Client Secret & Verification Token for our channel configuration in Azure Bot Service.

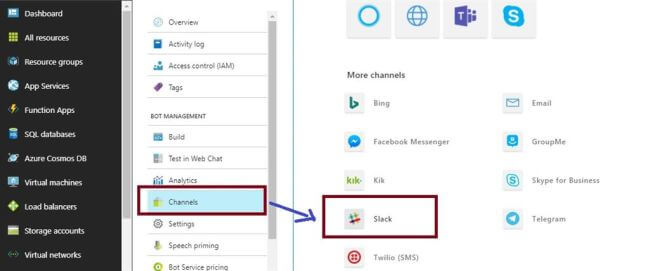
Channel Configuration
There is a very simple way to connect our bot service app to Slack in Azure. Just follow the following steps.
Click on the "Channels" menu on the left side option. Then, it will open a window with channel details where we can see "More channels" options. Then, select "Slack" in the channels list.
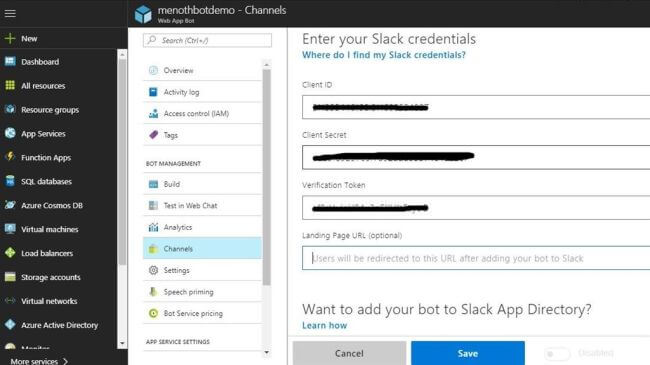
Add the following Slack App ( Already Created Slack App ) credentials into the Azure Slack configuration section.
- ClientID
- Client Secret
- Verification Token
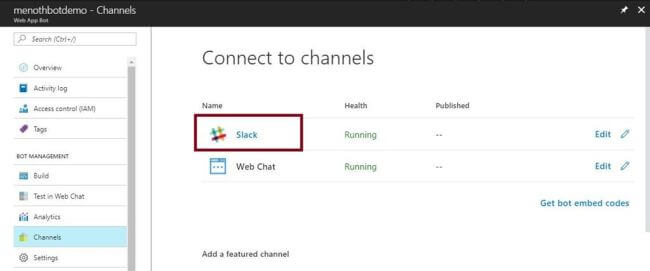
Once the configuration is done, we can see our Slack configured into the channel.
C# Code
We have done some changes in the default code in bot service.
using System;
using System.Threading.Tasks;

using Microsoft.Bot.Connector;
using Microsoft.Bot.Builder.Dialogs;
using System.Net.Http;


namespace Microsoft.Bot.Sample.SimpleEchoBot
{
 [Serializable]
 public class  EchoDialog : IDialog<object>
 {
 protected int  count = 1;

 public async Task StartAsync(IDialogContext context)
 {
 context.Wait(MessageReceivedAsync);
 }

 public async Task MessageReceivedAsync(IDialogContext context, IAwaitable<IMessageActivity> argument)
 {
 var message = await argument;

 &nb sp; if (message.Text == "reset")
 {
 PromptDialog.Confirm(
 context,
 AfterResetAsync,
 "Are you sure you want to reset the count?",
 "Didn't get that!",
 promptStyle: PromptStyle.Auto);
 }
 else if  (message.Text == "Hi")
 {
 await context.PostAsync($"{this.count++}: Slack Configured in Bot App !!");
 context.Wait(MessageReceivedAsync);
 }
 else
 {
 await context.PostAsync($"{this.count++}: You said {message.Text}");
 context.Wait(MessageReceivedAsync);
 }
 }

 public async Task AfterResetAsync(IDialogContext context, IAwaitable<bool> argument)
 {
 var confirm = await argument;
 if (confirm)
 {
 this.count = 1;
 await context.PostAsync("Reset count.");
 }
 else
 {
 await context.PostAsync("Did not reset count.");
 }
 context.Wait(MessageReceivedAsync);
 }

 }
}
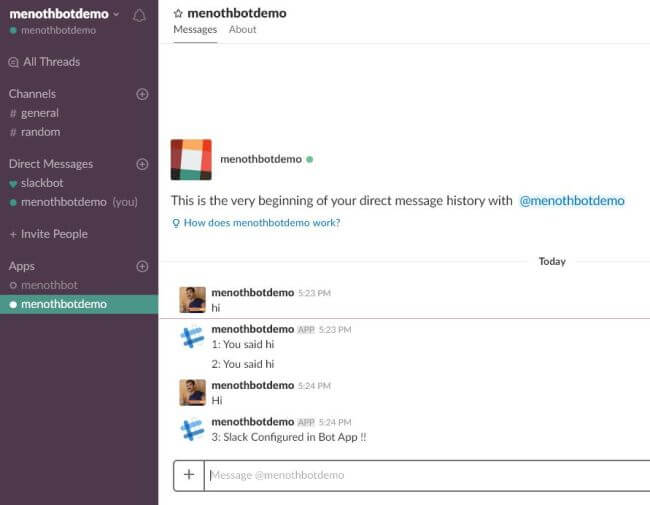
Output
Reference
Summary
We learned how to configure Azure Bot Service to Slack application. I hope this article is useful for all Azure beginners.
See Also
It's recommended to read more articles related to ASP.NET Core & Azure App Service.
- ASP.NET CORE 1.0: Getting Started
- ASP.NET Core 1.0: Project Layout
- ASP.NET Core 1.0: Middleware And Static files (Part 1)
- Middleware And Staticfiles In ASP.NET Core 1.0 - Part Two
- ASP.NET Core 1.0 Configuration: Aurelia Single Page Applications
- ASP.NET Core 1.0: Create An Aurelia Single Page Application
- Create Rest API Or Web API With ASP.NET Core 1.0
- ASP.NET Core 1.0: Adding A Configuration Source File
- Code First Migration - ASP.NET Core MVC With EntityFrameWork Core
- Building ASP.NET Core MVC Application Using EF Core and ASP.NET Core 1.0
- Send Email Using ASP.NET CORE 1.1 With MailKit In Visual Studio 2017
- ASP.NET Core And MVC Core: Session State
- Startup Page In ASP.NET Core
- Sending SMS Using ASP.NET Core With Twilio SMS API
- Create And Deploy An ASP.NET Core Web App In Azure
- Chat Bot with Azure Bot Service