Note
Access to this page requires authorization. You can try signing in or changing directories.
Access to this page requires authorization. You can try changing directories.
Introduction
In this tutorial, I will show you how to integrate Azure AD with AWS. This article has the vision to use your unique identity to log in with your AD user or Azure AD directly in the AWS console.
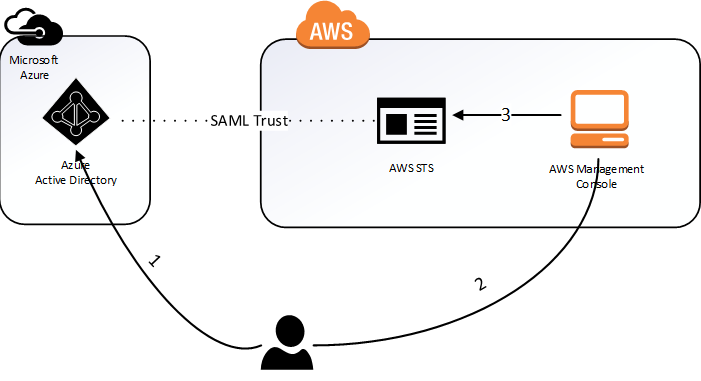
The SSO between the Azure AD and Amazon Web Service works in a different way. In this integration, we must create the user within the AWS console to merge between the accounts. This is the only point where we should be aware, remembering that is only a user creation that does not password.
Understanding the different AWS applications in the Azure AD application gallery
Use the information below to make a decision between using the AWS Single Sign-On and AWS Single-Account Access applications in the Azure AD application gallery.
AWS Single Sign-On
AWS Single Sign-On was added to the Azure AD application gallery in February 2021. It makes it easy to manage access centrally to multiple AWS accounts and AWS applications, with sign-in through Microsoft Azure AD. Federate Microsoft Azure AD with AWS SSO once, and use AWS SSO to manage permissions across all of your AWS accounts from one place. AWS SSO provisions permissions automatically and keeps them current as you update policies and access assignments. End users can authenticate with their Azure AD credentials to access the AWS Console, Command Line Interface, and AWS SSO integrated applications.
AWS Single-Account Access
AWS Single-Account Access has been used by customers over the past several years and enables you to federate Azure AD to a single AWS account and use Azure AD to manage access to AWS IAM roles. AWS IAM administrators define roles and policies in each AWS account. For each AWS account, Azure AD administrators federate to AWS IAM, assign users or groups to the account, and configure Azure AD to send assertions that authorize role access.
| Feature | AWS Single Sign-On | AWS Single-Account Access |
|---|---|---|
| Conditional access | Supports a single conditional access policy for all AWS accounts. | Supports a single conditional access policy for all accounts or custom policies per account |
| CLI access | Supported | Supported |
| Privileged Identity Management | Not yet supported | Not yet supported |
| Centralize account management | Centralize account management in AWS. | Centralize account management in Azure AD (will likely require an Azure AD enterprise application per account). |
| SAML certificate | Single certificate | Separate certificates per app / account |
AWS Single-Account Access architecture

You can configure multiple identifiers for multiple instances. For example:
With these values, Azure AD removes the value of #, and sends the correct value https://signin.aws.amazon.com/saml as the audience URL in the SAML token.
We recommend this approach for the following reasons:
- Each application provides you with a unique X509 certificate. Each instance of an AWS app instance can then have a different certificate expiry date, which can be managed on an individual AWS account basis. Overall certificate rollover is easier in this case.
- You can enable user provisioning with an AWS app in Azure AD, and then our service fetches all the roles from that AWS account. You don't have to manually add or update the AWS roles on the app.
- You can assign the app owner individually for the app. This person can manage the app directly in Azure AD.
Let's add the AWS app to the Microsoft Azure SaaS application Gallery.
Creating the Azure Portal application
In the Microsoft Azure portal, we go to "Azure Active Directory", then "Enterprise Applications" and click "All Applications".


Next click on "New Application".

Now search for "Amazon Web Services (AWS)" and select the application.

Next, we can change the name of the application to make it easier to know which client is integrated. After changing the name click on "Add" and wait for the application provisioning.

Ready the application is provisioned, now we go to the option of "Single Sign-On".

In Single "Sign-on" We will choose the option "SAML-based sign-on".

This step is very important because we have to add some parameters to work 100% integration with AWS.
Go to the "Show Advanced URL Settings" option, after expanding this option go to "Identifier" and add the following information "urn: Amazon: webservices".

In the following, we will add two attributes in "User attributes", for this Select "View and edit all other user attributes".

Now click on "Add Attribute".

Now add the following rules:
| Attribute name | Attribute value | Namespace |
| RoleSessionName | user.userprincipalname | https://aws.amazon.com/SAML/Attributes |
| Role | user.assignroles | https://aws.amazon.com/SAML/Attributes |
| SessionDuration | "provide a value between 900 seconds (15 minutes) to 43200 seconds (12 hours)" |
https://aws.amazon.com/SAML/Attributes |
*Remembering that the attributes respect the "case sensitive".


Now let's download the "XML metadata" certificate and save it to a secure location on our computer. A very important detail, change the "Signing Algorithm" to "SHA 1", by default it comes in "SHA 256" and does not work the integration. Next, we will be setting the certificate as active, then we will "Save".


Creating AWS Console
Ready the first part is set up, now we go to the AWS console. Let's look at the Identity and Access Management (IAM) option.

Now let's create an identity provider, go to "Identity provider" and click on "Create Provider".

Under "Create provider" Select the provider type "SAML", from a name to that provider and then upload the "XML metadata", then click "Next".

Then click on "Create".

Ready the identity provider was successfully created.

Now let's create a rule, go to "roles" and click on "Create Roles"

Now let's choose the trusted "SAML" identity.

Next, select the identity provider that was created and select the "Allow programmatic and AWS Management Console access" permission, then click "Next Permissions".

Now select the policy, in this case, I'm giving permission "Full".

Now a name for this access rule, then click "Create Role".

Ready the rule was created successfully.

Now we will create a user to make the connection between the Azure AD and AWS. Go to "user" and "ADD user".

Now let's give a name to the user, then select the type of Access "Programmatic access" and click and "Next Permissions".
Now we will associate the policy, select "Attach existing policies directly", then click on "Next Review" then "Create User".


Now we can download the file ". CSV "or we can see our user's Secret Access Key because we need that information. We will go back to the AD Azure to add this information to the roles provisioning.

Provisioning the application
Go to the Azure AD and select the application and select "Provisioning" by default it comes as manual, we will change to "Automatic", then we will add the following information in the fields "Clientsecret" and "Secret Token". After the information in the field click on "Test Connection" then click on "Save".

Ready communication between AWS and Azure AD is working.

Lastly in "Settings" go to "provisioning Status" leave it as "on" and click "Save". It takes a while to provision.

Now let's create a user without a password in the AWS console.

After creating the user we return to the application in the Azure portal, and we will add users who will have access to integration. Choose the user and assign the rule that was created within AWS.

Access operation
Ready the integration process is ready, we will access the "MyApps" from Microsoft, at URL: http://myapps.microsoft.com/. When accessing the application is available enough from one click, it will make our user's SSO inside the AWS console.

Ready we are accessing the AWS console via the federation between Azure AD and Amazon Web Services. How can we repair it does the reading of the role and the user.

Thank you and until the next post.