Skype For Business: Creating a customized Tenant Dial Plan
Creating a customized Tenant Dial Plan
This article is intended to be an easy, concise, straightforward and get-the-job-done guide.
We have the following multi-regions Microsoft CCEs setup in an environment.
Note: please note the phone numbers used here was redacted but the essence remains the same.
UK CCE with PSTN calling
UK site has the following three different telephone number ranges:
Phone Number |
Extensions |
+442063703001-3099 |
3001-3099 |
+442080969001-9099 |
9001-9099 |
+442096685001-5099 |
5001-5099 |
US CCE with PSTN calling
- US site has one telephone range:
Phone Number |
Extensions |
+15177887001-7099 |
7001-7099 |
SG (Singapore) CCE with PSTN calling
- SG site has one telephone range for production users and one dummy number range for a user group with 10 members.
Phone Number |
Extensions |
+6569134001-4099 |
4001-1099 |
+6569131001-1099 |
1001-1099 |
SFB Online Dial Plans
There are two types of SFB Online Dial Plans:
- Service Level Dial plan
- Tenant Level Dial Plan.
Service Level Dial Plan
A service scoped dial plan is defined for every country/region where the Office 365 Phone System is available. Each user is automatically assigned the service country dial plan that matches the Office 365 Usage Location assigned to the user. You can't change the service country dial plan.
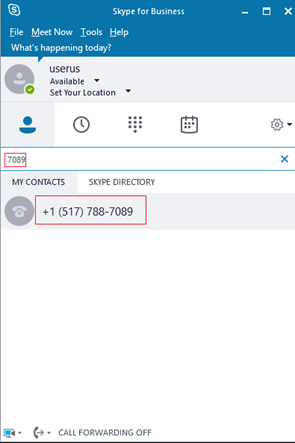
For example, once a user is assigned an SFB Online license with a location of US, the user’s service level dial plan is automatically assigned by Microsoft starts by +1 followed by the numbers/digits the user dialled as shown below.
Tenant Level Dial Plan
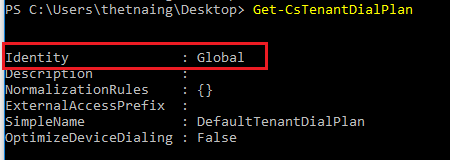
There is a default Tenant Level Dial Plan defined globally that can be assigned to all users in your organization, however, by default no user is assigned to it and no normalization rules in it.
You can also create a brand-new Tenant Level dial plan with your customized normalization rule(s) to apply to a certain user(s) only.
Basically, Tenant Level Dial Plan can be configured and applied at Global level (default global) or user(s) level (a manually created new) Tenant Level Dial Plan.
Always recommend leaving default Global level untouched and instead create a new TenantDial plan, add customized normalization rules in it and apply to all users or a certain user(s) based on your requirement(s), so that when you want to make changes, you change a specific Tenant Dial Plan.
Creating a customized Tenant Level
Going to create a new Tenant Level Dial Plan named “MyOrgTenantDialPlan” as follow.
PS C:\Windows\system32> New-CsTenantDialPlan -IdentityMyOrgTenantDialPlan
** ** Output
Identity : Tag:MyOrgTenantDialPlan Description : NormalizationRules : {}ExternalAccessPrefix: SimpleName : MyOrgTenantDialPlan OptimizeDeviceDialing : False |
UK office users used to call each other by last 4-digit extension numbers, like 3001 for Mike, so, we’ll have to add normalization rule(s) to meet your requirement(s).
SN |
Phone Number |
Extensions |
1 |
+442063703001-3099 |
3001-3099 |
2 |
+442080969001-9099 |
9001-9099 |
3 |
+442096685001-5099 |
5001-5099 |
UK 4-digit extension numbers
1. Create a normalization Rule
This rule dictates that digit starts with three followed by another three digits then add '+44206370 followed by the four digits extension number you dialled.
** **
$UKEXT=New-CsVoiceNormalizationRule -Parent MyOrgTenantDialPlan -Description 'UK Ext Dial startswith 3' -Pattern '^(3\d{3})$' -Translation '+44206370$1' -Name UKEXT -IsInternalExtension $true -InMemory
**2. ** Add above normalization rule to the Tenant Dial Plan, MyOrgTenantDialPlan, you created.
Set-CsTenantDialPlan -Identity MyOrgTenantDialPlan -NormalizationRules @{add=$UKEXT} Once it’s done, you will see a newly added Tenant Dial Plan, MyOrgTenantDialPlan with 1 normalization rule.
Output
PS C:\Users\thetnaing\Desktop> Get-CsTenantDialPlan Identity : Global Description : NormalizationRules : {} ExternalAccessPrefix : SimpleName : DefaultTenantDialPlan OptimizeDeviceDialing: False Identity: Tag:MyOrgTenantDialPlan Description:NormalizationRules : {Description=UK Ext Dial startswith 3;Pattern=^(3\d{3})$;Translation=+44206370$1;Name=UKEXT;IsInternalExtension=True} ExternalAccessPrefix : SimpleName: MyOrgTenantDialPlan OptimizeDeviceDialing : False |
3. Assign a Tenant Dial Plan to a user(s).
The next step is to assign the Tenant Dial Plan with normalization rule we added to one or more of the users based on our requirements, in this case, assigning to userus@thetmez.onmicrosoft.com
Grant-CsTenantDialPlan -Identity userus@thetmez.onmicrosoft.com -PolicyName MyOrgTenantDialPlan
Check which Tenant Level Dial Plan a user is assigned to.
PS C:\Users\thetnaing\Desktop> Get-CsOnlineUser -Identity userus | fl *dial*
OnlineDialinConferencingPolicy : ServiceAllowed
DialPlan : US
TenantDialPlan : MyOrgTenantDialPlan
OnlineDialOutPolicy :
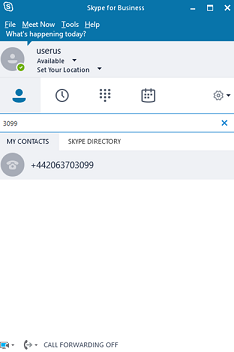
Testing the Tenant Dial Plan created. So, if an SFB user types a four-digit extension number starts with three should see the extension he dialled automatically normalized and show the correct and complete telephone number as below.
Since the user usage’s location is the UK, +44 is automatically prepended. The normalization rule we added above is working now.
Add four-digits extension dialling for US office.
Phone Number |
Extensions |
+15177887001-7099 |
7001-7099 |
1. Create a normalization Rule
This rule dictates that digit starts with seven followed by another three digits then add '+1517788’ followed by the four digits extension number you dialled.
** **
$USEXT=New-CsVoiceNormalizationRule -Parent MyOrgTenantDialPlan -Description 'US Ext Dial startswith 7' -Pattern '^(7\d{3})$' -Translatio
n '+1517788$1' -Name USEXT -IsInternalExtension $true -InMemory
**2. ** Add above normalization rule to the Tenant Dial Plan, MyOrgTenantDialPlan, you created.
Set-CsTenantDialPlan -Identity MyOrgTenantDialPlan -NormalizationRules @{add=$USEXT
Test it - it may take 5-10 minutes before newly added normalization rules kicks in.
Modification and Deletion Normalization Rule(s)
After you added more normalization rules, there is a time you may need to delete or modify it.
To modify or delete a normalization rule, you must first know the “Rule Name” you used to create it.
When you use “get-cstenantdialplan” command, you will see a list of Dial Plans you created with briefed normalization rules, however, you will not see complete normalization rules, rule name, descriptions, etc. to see all information in detail, run the following command
PS C:\Users\thetnaing\Desktop> get-CsTenantDialPlan -Identity MyOrgTenantDialPlan | format-list -Property *
XsAnyElements :
XsAnyAttributes :
PSComputerName : admin3a.online.lync.com
RunspaceId : 05359b57-1b4d-488e-86c4-ea5de2b593c7
PSShowComputerName : False
Description :
NormalizationRules : {Description=UK Ext Dial startswith 3;Pattern=^(3\d{3})$;Translation=+44206370$1;Name=UKEXT;IsInternalExtension=True, Description=UK Ext Dial starts with 9;Pattern=^(9\d{3})$;Translation=+44208096$1;Name=UKEXT9;IsInternalExtension=True, Description=US Ext Dial startswith
7;Pattern=^(7\d{3})$;Translation=+1517788$1;Name=USEXT;IsInternalExtension=True}
ExternalAccessPrefix :
SimpleName : MyOrgTenantDialPlan
OptimizeDeviceDialing : False
Key : [{urn:schema:Microsoft.Rtc.Management.Policy.Voice.2008}TenantDialPlan,Tenant{402a12e5-4cfa-49be-af37-230401839a47},Tag]
ScopeClass : Tag
Anchor : (3) MyOrgTenantDialPlan
Identity : Tag:MyOrgTenantDialPlan
TypedIdentity : Tag:MyOrgTenantDialPlan
Element : <TenantDialPlan xmlns="urn:schema:Microsoft.Rtc.Management.Policy.Voice.2008" Name="MyOrgTenantDialPlan" OptimizeDeviceDialing="false">
<NormalizationRules>
<Rule Name="UKEXT" IsInternalExtension="true">
<Description>UK Ext Dial startswith 3</Description>
<Pattern>^(3\d{3})$</Pattern>
<Translation>+44206370$1</Translation>
</Rule>
As highlighted in yellow, “UKEXT” is the rule name. You want to change, for example;
Current Setting
Name="MyOrgTenantDialPlan" OptimizeDeviceDialing="false">
<NormalizationRules>
<Rule Name="UKEXT" IsInternalExtension="true">
<Description>UK Ext Dial startswith 3</Description>
<Pattern>^(3\d{3})$</Pattern>
<Translation>+44206370$1</Translation>
</Rule>
Change to:
Description to: UK London Office Extension 4
Pattern to: ^(4\d{3})$
Translation: +44206380$1
How to change/modify/edit
Run it on the SFB Online PowerShell after logging in.
- $UKEXT=New-CsVoiceNormalizationRule -Parent MyOrgTenantDialPlan -Description 'UK London Office Extension 4' -Pattern '^(4\d{3})$' -Transl
ation '+44206380$1' -Name UKEXT -IsInternalExtension $true -InMemory
- Set-CsTenantDialPlan -Identity MyOrgTenantDialPlan -NormalizationRules $UKEXT
Verification
get-CsTenantDialPlan -Identity MyOrgTenantDialPlan | format-list -Property *
Deletion
Deleting only one or more normalization from a specific Tenant Dial Plan(s), in our case, MyOrgTenantDialPlan.
Run this to find out what’s the name of your Tenant Dial Plan and which rule(s) you need to delete.
- get-CsTenantDialPlan -Identity MyOrgTenantDialPlan | format-list -Property *
To delete, find out the Rule name like mentioned in previous steps and use “remove” as follow.
Set-CsTenantDialPlan -Identity MyOrgTenantDialPlan -NormalizationRules @{remove=$UKEXT}
Adding normalization rules to a specific Tenant Level Dial Plan(s)
You may have one or more Tenant Level Dial Plan, based on your requirements, you will need to add one or more normalization rules to an existing Tenant Level Dial Plan, for example, you require users to dial “00” if they need to call oversea numbers followed by country code and area code.
For example, to call Japan, you need to dial “0081xx-xxxx-xxxx”
- $IntlCall=New-CsVoiceNormalizationRule -Parent MyOrgTenantDialPlan -Description 'international call using 00' -Pattern '^00(\d+)$' -Translation '+$1' -Name IntlCall -IsInternalExtension $false -InMemory
- Set-CsTenantDialPlan -Identity MyOrgTenantDialPlan -NormalizationRules @{add=$IntlCall}
Please note that we added the new normalization rule to the Tenant Dial Plan, MyOrgTenantDialPlan. In this case, you will need to change the name of the Tenant Dial Plan you want to add additional normalization rule(s) to.


