Hyper-V: Deployment of Failover Cluster Using PowerShell
In this article, we will discuss how to deploy a Hyper-V Failover Cluster from scratch. This article will also cover the deployment of an iSCSI server. We will use PowerShell for the entire deployment.
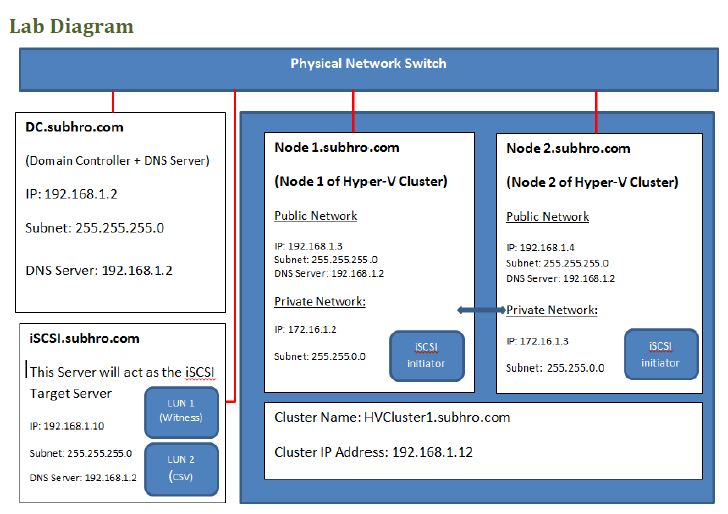
Lab Environment
- One Domain Controller with DNS Server Role (IP: 192.168.1.2): This server is the Domain Controller and DNS Server for the domain subhro.com. All the other servers are member of the subhro.com domain.
- Hyper V Node 1 (IP: 192.168.1.3): This server acts as node 1 of Hyper-V Cluster
- Hyper V Node 2 (IP: 192.168.1.4): This server acts as node 2 of Hyper-V Cluster
- iSCSCI Target Server (IP: 192.168.1.10): This server acts as iSCSI target for Node 1 and Node 2. We will expose two LUNs (Witness Disk and Cluster Shared Volume) through this iSCSI target.
Please Note
- All these four servers are connected through a common network.
- Operating System of these four servers is Windows Server 2012 R2 datacenter Edition.
- Cluster Name: HVCluster1.subhro.com
- Cluster IP address: 192.168.1.12
Overview of Steps
For the ease of understanding, we have divided the entire deployment into eight major sections. In each section, we will perform a certain configuration (like creating a cluster, creating an iSCSI target, etc). Each section is further divided into multiple steps to achieve the desired configuration.
Section 1 to Section 6 will cover the creation of Hyper-V failover cluster, and we will use PowerShell for the entire configuration.
Section 7 will cover the creation of Virtual Machine, and we will do it in graphical mode for ease of understanding.
Section 8 will be the final section, where we will test the cluster configuration and will failover a virtual machine.
Overview of Sections
Section 1: Install Failover Cluster and Hyper-V Roles in Node 1 & Node 2.
Section 2: Install iSCSI Role in the iSCSI server and configure it as an iSCSI target.
Section 3: Create Virtual Switch in Hyper-V.
Section 5: Create a new Cluster.
Section 6: Create Cluster Shared Volume (CSV).
Section 7: Create a Highly Available Virtual Machine.
Section 8: Test Failover of Virtual Machine between two nodes.
Section 1: Install Failover Cluster and Hyper-V Roles in Node 1 & Node 2
Step 1: Install Failover Cluster Role in Node 1 and Node 2
- Open PowerShell.
- Type the command:
Install-WindowsFeature –Name Failover-Clustering –IncludeManagementTools
The Failover clustering role will be installed on Node 1.
Now execute the same command at Node 2.

Step 2: Install Hyper-V Role in Node 1 and Node 2
- Open PowerShell.
- Type the Command:
** **Install-WindowsFeature –Name Hyper-V -IncludeManagementTools –Restart
* *So at this stage, Failover Cluster and Hyper-V roles are installed in Node 1 and Node 2.
Section 2: Install iSCSI Role in the iSCSI server and configure it as iSCSI target
Step 1: Install iSCSI Role
- Open PowerShell.
- Type the Command:
** **Add-WindowsFeature FS-iSCSITarget-Server

Step2: Create a LUN (Virtual Disk) by executing the below command in PowerShell
New-IscsiVirtualDisk c:\Storage\LUN1.VHDX –size 1GB

Step 3: Specify which iSCSI initiators will be allowed to connect to this iSCSI target.
In this case, we need to specify the initiator IDs of Node 1 and Node 2.
- To get the Initiator ID
a) Login to Node 1 and open PowerShell.
b) Start “Microsoft iSCSI Initiator” service.
c) Give the command:
* (Get-InitiatorPort).NodeAddress*
*d) * You will get the initiator ID. Copy and paste it into Notepad for future use.
*e) * Now, perform steps a-d on node2, and save the initiator ID in the Notepad.
Node 1 Initiator ID: iqn.1991-05.com.microsoft:node1.subhro.com
Node 2 Initiator ID: iqn.1991-05.com.microsoft:node2.subhro.com

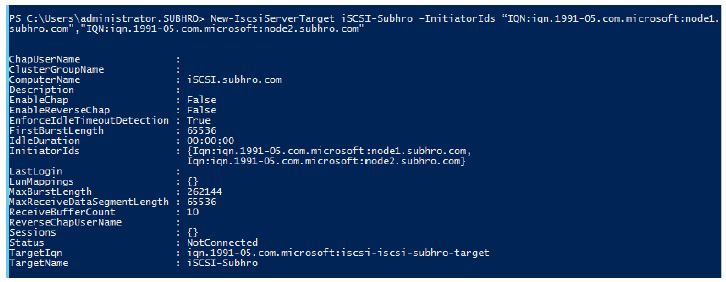
- Once you have got the initiator ID, login to the iSCSI Server and type below commands in powershell :
New-IscsiServerTarget iSCSI-Subhro –InitiatorIds “IQN:iqn.1991-05.com.microsoft:node1.subhro.com","IQN:iqn.1991-05.com.microsoft:node2.subhro.com"
**
Step 4: Assign the newly created LUN (VHD file) to the iSCSI target, so that it is available in the target.**
*Add-IscsiVirtualDiskTargetMapping iSCSI-Subhro c:\Storage\Lun1.VHDX
*

So, we have set up the iSCSI target, associated a LUN and allowed Node 1 and Node 2 to connect to the iSCSI target.
Step 5: log on to Node 1 and Node 2 and establish the connection.
Connecting to a new iSCSI Target is a two-step process.
- First an iSCSI Target Portal is established using the New-iSCSITargetPortal cmdlet
- Then a connection is established using the Connect-iSCSITarget cmdlet.
Node 1:
- New-iSCSITargetPortal –TargetPortalAddress iSCSI.subhro.com
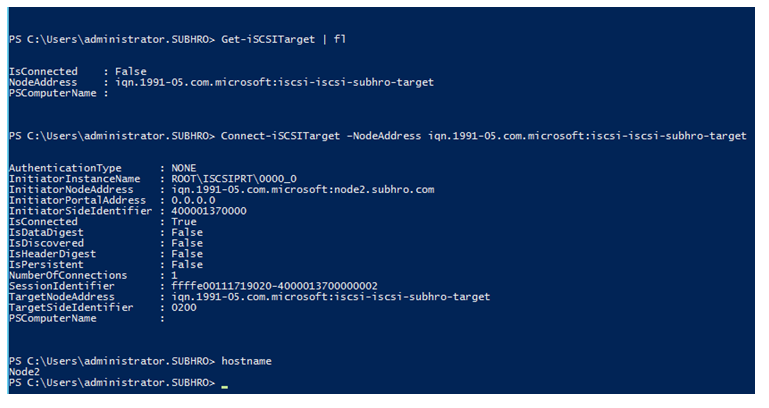
- Get-iSCSITarget | fl
- Connect-iSCSITarget –NodeAddress iqn.1991-05.com.microsoft:iscsi-iscsi-subhro-target


Once the connection is established between the iSCSI initiator (Node 1) and iSCSI target, the target will present the 1 GB LUN to Node 1. At Node 1, it will appear as a 1 GB disk in the Disk Management console.
We have to make the disk online, format the disk, and assign a drive letter. In this case, we have formatted the disk and assigned a drive letter E.

At Node 2:

Section 3: Creation of Virtual Switch
Now, we need to create Hyper-V virtual switch on both Node 1 and Node 2.This virtual switch will provide the highly available virtual machine with access to the physical network.
The below command will create a Virtual switch named “VMExternalSwitch” in each node, and it will bind that Virtual switch with the Ethernet adapter named “Public”.
The switch “AllowManagementOS 1” will allow the management OS to access the virtual switch.
Node 1
- New-VMSwitch "VMExternalSwitch" –NetAdapterName "Public" -AllowManagementOS 1

Node 2
- New-VMSwitch "VMExternalSwitch" –NetAdapterName "Public" -AllowManagementOS 1

Once you finish the above steps. You should see the new Virtual Switch in the Hyper-V Console in both the nodes.

Section 4: Validate the Cluster configuration
Before creating the new cluster, please run cluster validation wizard on both nodes and ensure that both the nodes are ready to support the cluster.
Run this command from any of the nodes:
Test-Cluster Node1,Node2
The result will be something like the below screen. You can go to the mentioned location and check the detailed validation report.

Section 5: Create the new Cluster
Step 1: Create Cluster from Node 1
a) Log on to Node 1
b) Execute the following command:
New-Cluster -Name HVCluster1 -Node node1 -StaticAddress 192.168.1.12 –IgnoreNetwork 172.16.1.0/16

So the cluster “HVCluster1” has been created and at present Node1 is the only node of that cluster.
Step 2: Add Node 2 in the cluster.
From Node 1, run the following command:
* Add-ClusterNode -Name Node2*
* Note: If you face any issue to add Node 2, please validate that the cluster service at Node 2 is disabled.

*
Step 3: Add the Quorum (Witness) disk in the cluster, and change the quorum model to “Node and Disk Majority”.

Once these steps are completed, the cluster configuration is complete.

Section 6: Create Cluster Shared Volume
Step 1: Login to the iSCSI Server and perform below operations
a) a) Create a new LUN named LUN 2 of 10 GB size.
b) b) Add LUN 2 in iSCSI Target

Step 2: Log in to Node 1 and Node 2 and validate the newly created LUN is visible from both the nodes as a 10 GB Disk.

Step 3: Format the disk from Node 1 and give volume label as “CSV1” (You can give any volume label).
Step 4: Now execute below command from power shell (Node 1)
- Get-ClusterAvailableDisk | Add-ClusterDisk
- Add-ClusterSharedVolume –Name "Cluster Disk 2"
*
*
*
*
*
*
Now the Hyper-V Failover Cluster is ready with a Cluster Shared Volume (CSV). Now we will create a VM, install OS and will test the planned and unplanned failover.
Section 7: Create a Highly Available Virtual Machine
Step 1: Start the New Virtual Machine creation wizard
- In Failover Cluster Manager, select or specify the cluster that you want. Ensure that the console tree under the cluster is expanded.
- Click Roles.
- In the Actions pane, click Virtual Machines, and then click New Virtual Machine. The New Virtual Machine Wizard appears. Click Next.

Step 2: Specify which node will own the new VM.

Step 3: Specify Name and location of the new VM
Please Note: The VHDX file of the VM must be stored within the CSV, in order to support Failover.

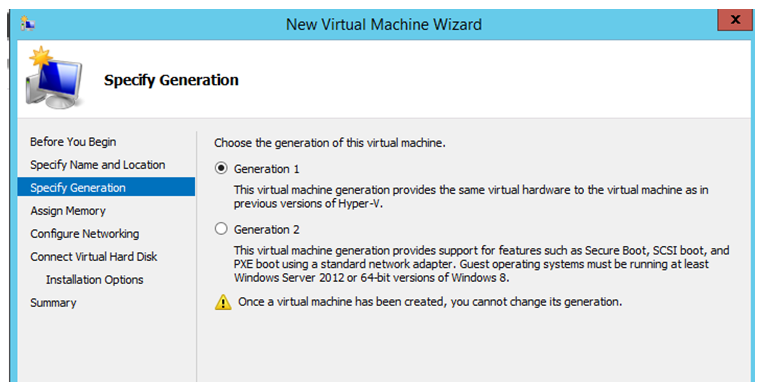
Step 4: Select Virtual Machine Generation
Step 5: Assign Memory

Step 6: Configure Networking

Step 7: Connect Virtual Disk
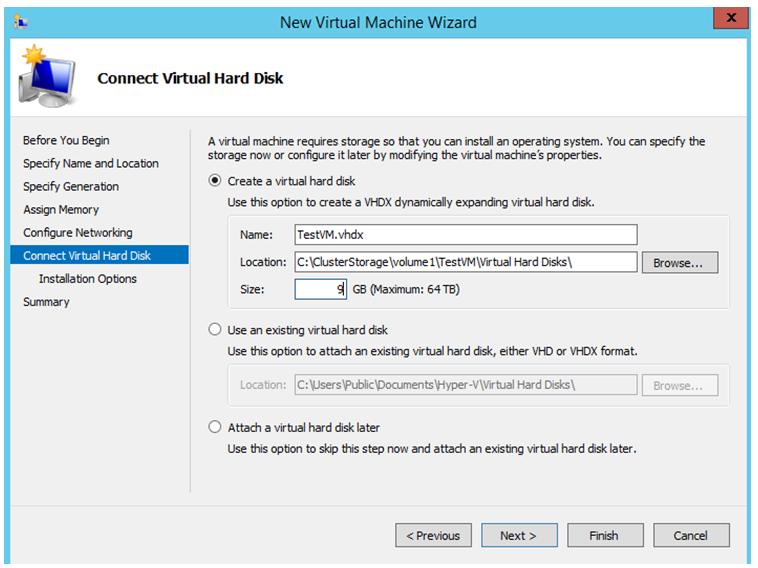
Step 8: Select Installation Option and click Finish.

Once all these above mentioned steps are successfully completed, the new VM will be created.

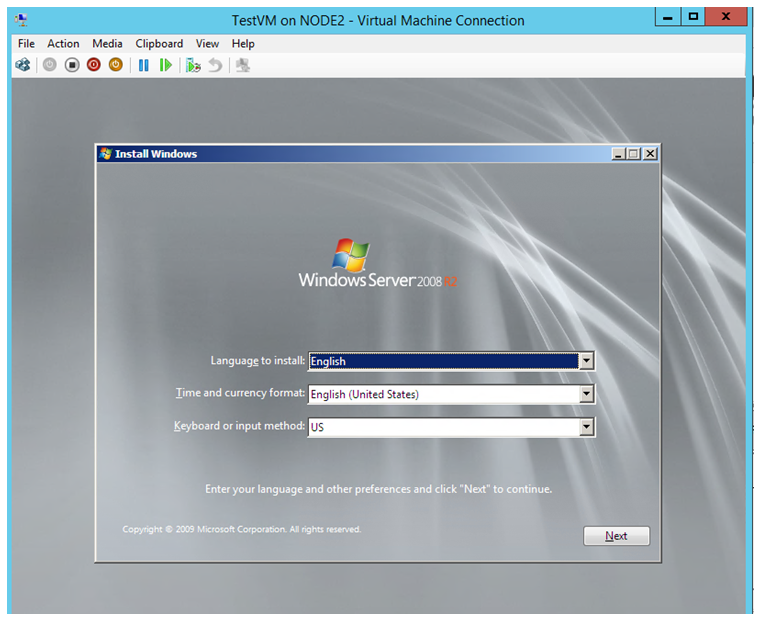
**Step 9: Install Guest OS **

Section 8: Test Failover of Virtual Machine between two nodes
Now the Hyper-V failover cluster is ready and we have a test VM to test the failover. We will perform two types of failover here, a planned failover and an unplanned failover.
A. Planned Failover
To test a planned failover, we will move the Test Vm to another node. At present, Node 2 is owning the TestVM, so we will move it to Node 1.
Step 1: Login to Node 1 or Node 2 an open powershell
Step 2: Execute the below command
Move-ClusterVirtualMachineRole -Name "TestVM" –Node Node1

So the virtual machine “TestVM” has been successfully moved to Node 1.
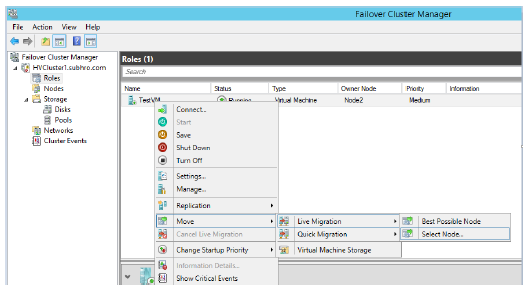
You can also accomplish same thing graphically by performing below steps:
1. Open Failover Cluster Manager from Node 1 or Node 2.
2. Go to Roles > Select Virtual Machine and right Click > Move > Live Migration.
3. Migrate the VM to best possible node or any specific node.
B. Unplanned Failover
To test an unplanned faiover, stop cluster service on the active node (Where the test VM is currently hosted) and check whether the TestVM will migrate to the other node.
1. Stop Cluster service on the active node, which is now hosting the test VM. In this case, it is Node 1
To stop the cluster
Stop-ClusterNode –Name Node 1
2. Ensure TestVM has been moved to Node2

Summary
In this article, we have performed below steps :
- Installed Hyper-V roles and Failover Cluster roles in two servers, which are part of the subhro.com domain.
- Installed iSCSI Role in the iSCSI server and configure it as iSCSI target.
- Created Virtual Switch in Hyper-V.
- Created a new Cluster “HVCluster1.subhro.com”. Also configured witness disk for the cluster.
- Created Cluster Shared Volume (CSV).
- Created a Highly Available Virtual Machine named “TestVM”.
- Tested failover of the VM “TestVM” between Node 1 and Node2. We have tested both planned and unplanned failover.
References
- https://technet.microsoft.com/en-us/library/jj863389.aspx#BKMK_step9
- http://blogs.msdn.com/b/clustering/archive/2012/04/06/10291601.aspx
- https://technet.microsoft.com/library/hh846766#BKMK_Step1
- http://blogs.msdn.com/b/clustering/archive/2012/05/01/10299698.aspx
- http://blogs.technet.com/b/keithmayer/archive/2013/03/12/speaking-iscsi-with-windows-server-2012-and-hyper-v.aspx