SQL Azure Data Sync - Add a SQL Server Database to a Sync Group

A synchronization group is two or more databases that are logically grouped together for the purpose of synchronizing specified tables, columns and rows common to each. A sync group must have at least one database in addition to the SQL Azure hub database. The additional databases may include SQL Server databases.
This article walks you through how to add a SQL Server member database to the sync group.
| Important! This wiki topic may be obsolete. This wiki topic is no longer updated by Microsoft. We moved the content to the MSDN Library where we keep it current. To find the latest version of this topic on MSDN click here. |
Prerequisites
Prior to using the information in this article you should have
Provisioned a SQL Azure Data Sync server - SQL Azure Data Sync Provision a SQL Azure Data Sync Server
Named the sync group - SQL Azure Data Sync Name the Sync Group
See the article SQL Azure Data Sync Create a Sync Group for the flow of all the steps to create a sync group.
Add a SQL Server Member Database
Every sync group must have a hub database and at least one additional database. This database may be either a SQL Azure or a SQL Server database. If your synchronization topology requires a SQL Server database in addition to the hub follow these steps for each SQL Server database you need to add to the sync group.
| Warning: SQL Server Data Sync permits you to register the same database with multiple agents. However, when you add databases to a sync group you should never add the same database more than once, even if it is registered with different agents. Doing so can result in a synchronization loop. |
Click the add SQL Server database icon.
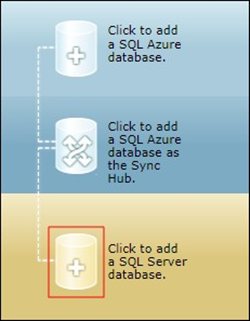
Figure 1: Add a SQL Server Member DatabaseThe Add Database to the Sync Group screen has two options.
Option 1: Select from existing sync member databases
Click the Select from the existing sync member databases radio button. (Figure 2:1)
Select the agent from the dropdown. (Figure 2:2)
Select the database from the dropdown. (Figure 2:3)
Select the synchronization direction for this database. (Figure 2:4)
There are three options:
Bi-Directional
Data is shared from the member database to the hub and then propagated back out to the member database.Sync from the Hub
The database receives updates from the Hub. It does not send changes to the Hub.Sync to the Hub
The database sends updates to the Hub. Changes written to the Hub by other databases are not written out to this database.
For more information on synchronization direction see the article [[]].
Click Finish. (Figure 2:5)
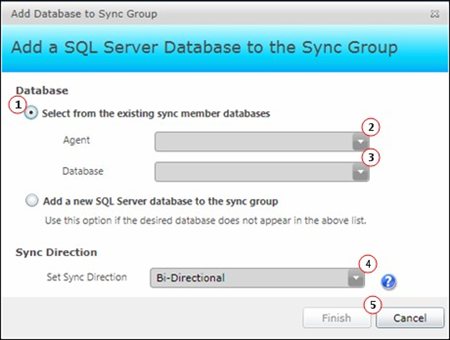
Figure 2 - Add a registered SQL Server Database to a Sync Group
Option 2: Add a new SQL Server database to the sync group
Click the Add a new SQL Server database to the sync group radio button. (Figure 3:1)
This action changes the Finish button to a Next button.Select the synchronization direction for this database. (Figure 3:2)
There are three options:
Bi-Directional
Data is shared from the member database to the hub and then propagated back out to the member database.Sync from the Hub
The database receives updates from the Hub. It does not send changes to the Hub.Sync to the Hub
The database sends updates to the Hub. Changes written to the Hub by other databases are not written out to this database.
For more information on synchronization direction see the article [[]].
Click Next. (Figure 3:3)
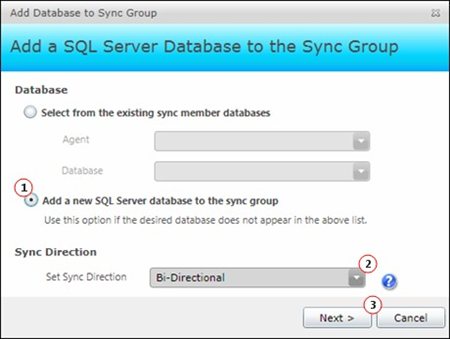
Figure 3 - Add a SQL Server Database to a Sync Group
The Add a New SQL Server Database screen also has two options.
Option 1: Install a new Agent
You need to install a new agent only if the SQL Server instance that hosts the database you want to add to the sync group does not have an installed agent.
Click the Install a new Agent radio button. (Figure 4:1)
Click Next. (Figure 4:2)
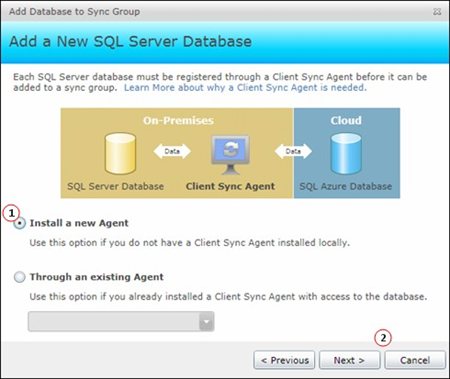
Figure 4: Add a new SQL Server Database - Install a new AgentFollow the instructions at Install an Agent to install a new agent.
Follow the instructions at Register a SQL Server Database with the Agent.
Option 2: Through an existing Agent
Click the Through an existing Agent radio button. (Figure 5:1)
Select the agent from the dropdown. (Figure 5:2)
Click Next. (Figure 5:3)
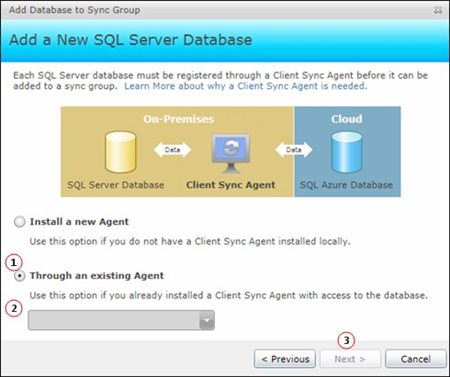
Figure 5: Add a new SQL Server Database - Through an existing AgentFollow the instructions on the Add Database to the Sync Group screen. (Figure 6)
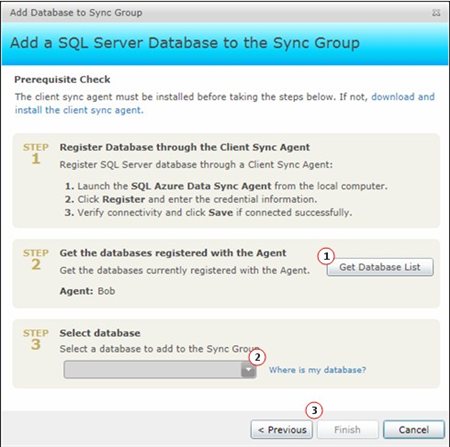
Figure 6: Add Database to the Sync Group
Step 1: Register Database through the Client Sync Agent
Open the folder where you installed the agent.
The default location is %SYSTEMDRIVE%%PROGRAMFILES%\Microsoft SQL Azure Data Sync\ on a 32-bit system, and %SYSTEMDRIVE%%PROGRAMFILES(x86)%\Microsoft SQL Azure Data Sync\ on a 64-bit system.Double-click the application SQLAzureDataSyncAgent.
Click Ping Sync Service to ensure you are connected. (Figure 7:1)
If you need to start the sync service:
Launch the Services program.
Find the SQL Azure Data Sync Preview service.
If its status is not Started right-click on the service, select Start and press Enter.
For each local SQL Server database you want to register:
Click Register. (Figure 7:2)
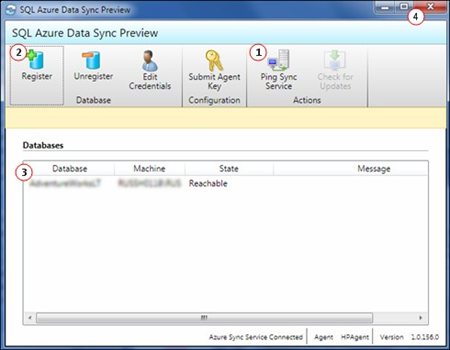
Figure 7: SQL Azure Data Sync AgentClick the appropriate Authentication tab. (Figure 8:1)
Enter the host server name and the database name. (Figure 8:2)
If needed, enter your credentials. (Figure 8:3)
If you want to use an SSL connection for this server check the Enable SSL connection with SQL Server checkbox. (Figure 8:4)
Click Test Connection. (Figure 8:5)
If the connection succeeds click Save. (Figure 8:6)
If the connection failed ensure the above information is correct then reclick Test Connection.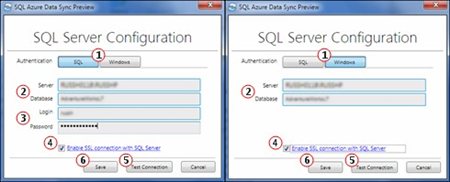
Figure 8: Register a SQL Server database
As the databases are registered they are listed in the Status pane. (Figure 7:3)
Close the Agent when you finish registering databases. (Figure 7:4)
Step 2: Get a list of databases registered with the Agent
- Click Get Database List and wait until the list is filled. (Figure 6:1)
Step 3: Select the database
Select the database from the dropdown. (Figure 6:2)
Click Finish. (Figure 6:3)
Install an Agent
You need to install an agent for each Data Sync server. A local agent can connect to multiple SQL Server instances. For specific limitations see the topic SQL Azure Data Sync FAQ.
You can add a SQL Server database that is on a different machine than the local Agent. However, the local Agent must be able to connect to the SQL Server instance.
| Warning: You must provide Administrator privileges to install an agent and execute the agent UI. You must also provide an account with Administrator privileges for the agent windows service during installation. |
If you are running SQL Server 2008 then before you install the agent make sure the following are installed.
.NET Framework 4.0
You can download the .NET Framework 4.0 at http://msdn.microsoft.com/en-us/netframework/aa569263.Microsoft SQL Server 2008 SP1 Shared Management Objects (x86) and the Microsoft SQL Server 2008 SP1 System CLR Types (x86)
You can download these at http://www.microsoft.com/download/en/details.aspx?id=26728.
Click Download. (Figure 12:1)
Click Run when asked whether to run or save the file.
At the Welcome to the Microsoft SQL Azure Data Sync Preview Setup Wizard click Next.
Carefully read the License Agreement and click the I agree radio button if you agree with it. (Figure 9:1)
Click Next. (Figure 9:2)
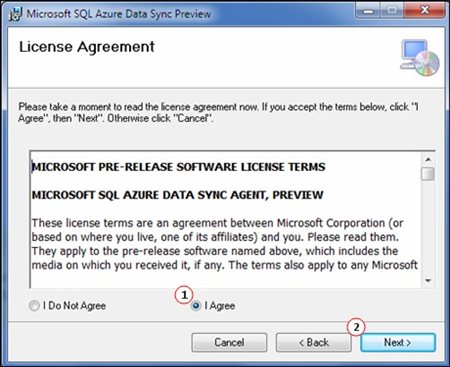
Figure 9: License AgreementEnter your user name (domain\username) (Figure 10:1) then your password. (Figure 10:2)

Critical:
- Be sure that this Windows Service account has permissions to connect to all the on-premise databases you want to register with the agent.
- If you have a network proxy ensure that you can connect to SQL Azure Data Sync service through the proxy.
Click Next. (Figure 10:3)
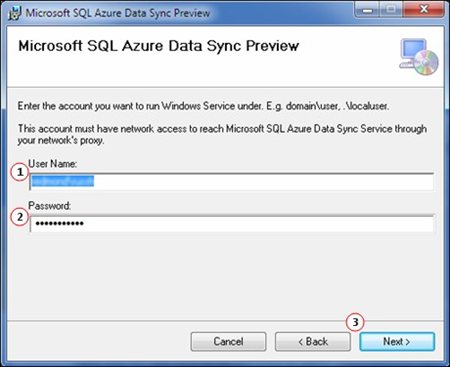
Figure 10: Enter credentials
Warning:
If you specify the run-as account as .\[accountName] the installation fails.
If you specify the run-as account as [computerName]\[accountName] the installation succeeds.
Confirm or set the path where you want the agent installed.
The default is %SYSTEMDRIVE%%PROGRAMFILES%\Microsoft SQL Azure Data Sync\ on 32-bit machines and %SYSTEMDRIVE%%PROGRAMFILES(X86)%\Microsoft SQL Azure Data Sync\ on 64-bit machines. (Figure 11:1)If you prefer you can Browse your local drives to set a path different from the default. (Figure 11:2)

Security Alert:
To provide the best security for your SQL Server credentials, install the SQL Azure Data Sync Client Agent under ‘Program Files’ on an x86 computer or ‘Program Files (x86)’ on an x64 computer.
If you have any question as to whether a drive has sufficient room click Disk cost. (Figure 11:3)Write down the installation path for later use.
Click Next. (Figure 11:4)
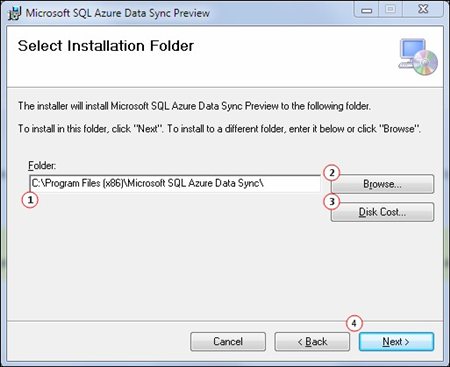
Figure 11 - Agent installation pathWhen the installation is complete click Close.
Return to the web portal.
Give the agent a unique and meaningful name. (Figure 12:2)
The agent name must be unique across all your subscriptions.Click Generate agent key. (Figure 12:3)
This creates a new agent key and reveals the Copy button. (Figure 12:4)Click Copy. (Figure 12:4)
Keep the agent key value for later use.Click Next. (Figure 12:5)
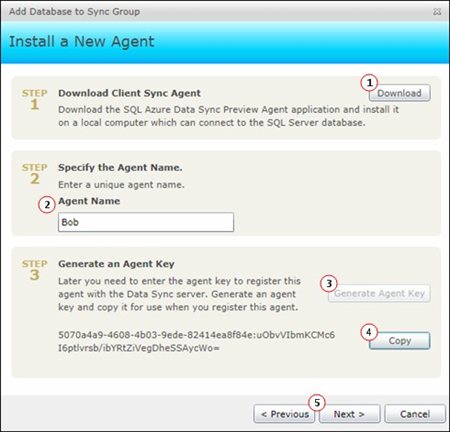
Figure 12: Install a new Agent
Register a SQL Server Database with the Agent
In order for you to include a SQL Server database in your sync group it must be registered as an endpoint with the local agent. The following steps register a single SQL Server database with an installed local agent.
| Critical: Be sure that service account under which the Agent Host is running has permissions to connect to the on-premise database you want to register. |
| Critical: Be sure that you do not attempt to register a SQL Azure database with an agent. Be sure that you do not register the same database with multiple agents as this can lead to a synchronization loop. |
Navigate to where you installed the agent. (Figure 11:1)
The default is %SYSTEMDRIVE%%PROGRAMFILES%\Microsoft SQL Azure Data Sync\ on 32-bit machines and %SYSTEMDRIVE%%PROGRAMFILES(x86)%\Microsoft SQL Azure Data Sync\ on 64-bit machines.Launch the program SqlAzureDataSyncAgent.exe.
Click Edit Agent Key. (Figure 13:1)
Paste the agent key (Figure 12:4) into the text box (Figure 14) and click OK.
Click Ping Sync Service to ensure that the Data Sync is running and reachable. (Figure 13:2)
If you need to start the service
Launch the Services program.
Find the SQL Azure Data Sync Preview service.
If its status is not Started right-click on the service, select Start and press Enter.
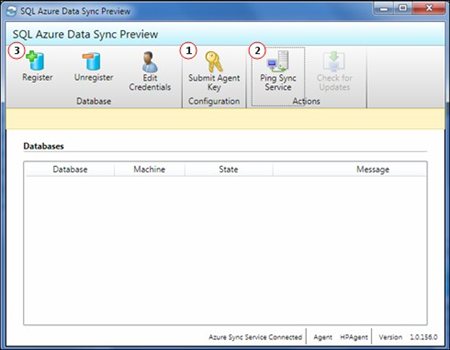
Figure 13: Agent UI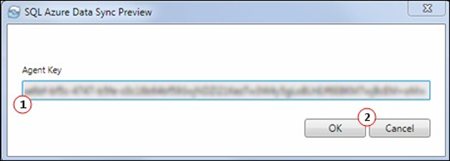
Figure 14: Enter agent keyRegister a local SQL Server database with the agent.
For each local SQL Server database you want to register:
Click Register. (Figure 13:3)
Click the appropriate Authentication tab. (Figure 15:1)
Enter the host server name and the database name. (Figure 15:2)
If needed, enter your credentials. (Figure 15:3)
Use the format domain\username for your Login.Click Test Connection. (Figure 15:4)
If the connection failed ensure the above information is correct then reclick Test Connection.After the connection succeeds click Save. (Figure 15:5)
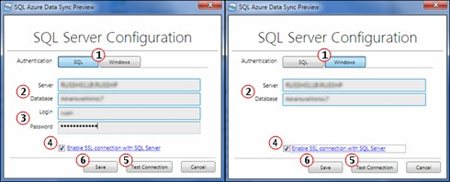
Figure 15: Register a SQL Server database
Feedback
This release was provided in order to gather feedback from our customers. Now that you have previewed what the SQL Azure Data Sync team is doing, please let us know what you think of our direction, and tell us about your experiences.
You can send us your thoughts in any of the following ways:
- Send us a note on http://twitter.com/syncfx.
- Post a comment to our blog at http://blogs.msdn.com/sync.
- Post a thread to our forum at http://social.msdn.microsoft.com/forums/en-US/ssdsgetstarted/threads/
See Also
- [[SQL Azure Data Sync Overview]]
- [[SQL Azure Overview]]